- Age Calculator Using Javascript
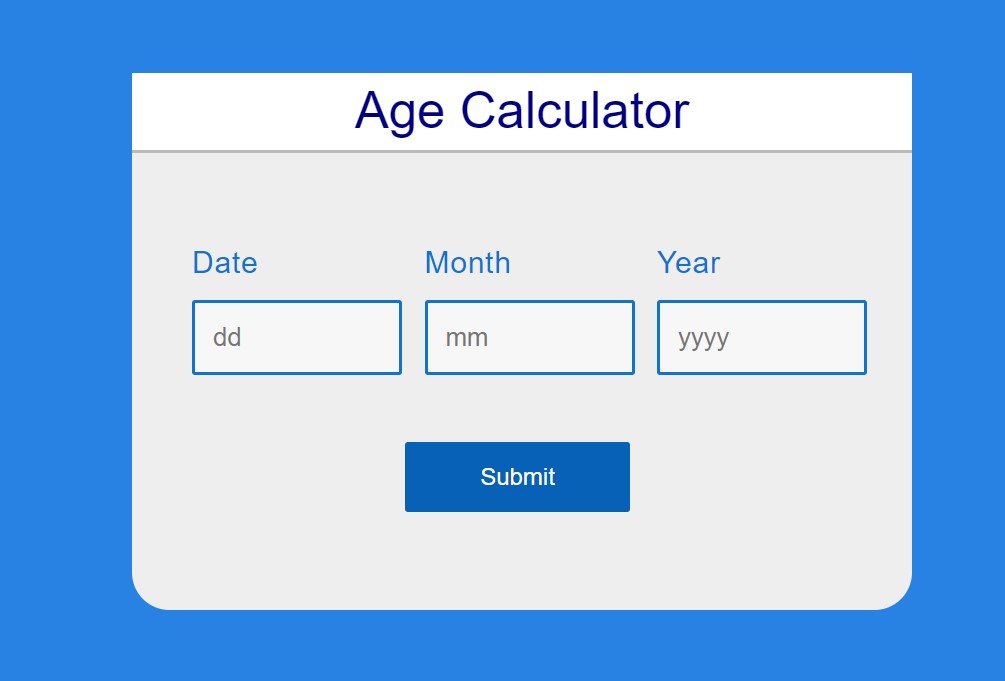
- Age Calculator Html Code:-
- Age Calculator JavaScript Code:-
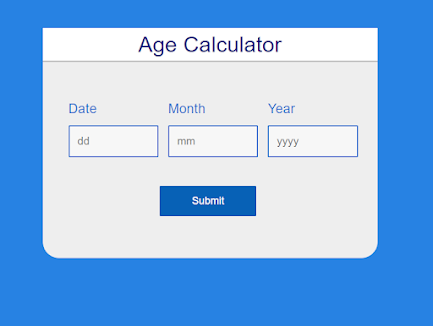
- Final Output Age Calculator Using JavaScript:-
- Latest Updates
- Category
- CodeWithRandom
- Create Calendar Using HTML and CSS
- Html Code For Calendar:-
- Html Output:
- CSS Code For Calendar:-
- Final Output Calendar Project Using HTML and CSS:-
- Live Preview Of Calendar Project Using HTML and CSS:-
- Video Output Of Calendar:
- What are the purpose of Calendar?
- What is the level of the project?
Age Calculator Using Javascript
Hello, coders! Welcome to the Codewithrandom blog. In this article, we’ll look at how to create an Age Calculator in JavaScript. In Age Calculator your date of birth and other features display the number of days till your next birthday.
JavaScript was employed to build this Age Calculator project. You should utilize a more practical project while learning something new, thus we decided to help you understand the notion by using a straightforward age calculator.

Do you want to learn HTML to JavaScript? 🔥
If yes, then here is our Master Frontend: Zero to Hero eBook! 📚 In this eBook, you’ll learn complete HTML, CSS, Bootstrap, and JavaScript from beginner to advance level. 💪 It includes 450 Projects with source code.
Hope you enjoy our blog so let’s start with a basic html structure for Age Calculator.
Age Calculator Html Code:-
body < font-family: Arial, Helvetica, sans-serif; background-color: #2782e3; font-size: 15px; line-height: 1.5; padding: 0; margin: 0; >* < box-sizing: border-box; >.container < width: 520px; height: auto; margin: 100px auto; background-color: #eee; border-radius: 25px; >.base < width: 100%; margin: 0; overflow: hidden; display: block; float: none; >.block < width: 135px; padding: 5px 20px; margin-left: 20px; display: inline-block; float: left; >.base h4 < font-size: 26px; text-align: center; font-family: sans-serif; font-weight: normal; margin-top: 0px; box-shadow: 0px 2px #bababa; background: white; font-size: 34px; color: navy; >.title < font-size: 20px; text-align: left; font-family: sans-serif; font-weight: normal; line-height: 0.5; letter-spacing: 0.5px; word-spacing: 2.7px; color: #1073d0; >input[type=»text»] < width: 140px; margin: auto; outline: none; min-height: 50px; border: 2px solid #1073d0; padding: 12px; background-color: #f7f7f7; border-radius: 2px; color: #1073d0; font-size: 17px; >input[type=»text»]:focus < background-color: #ffffff; border: 2px solid orange; outline: none; >input[type=»button»] < width: 150px; margin-left: 35%; margin-top: 40px; outline: none; border: none; border-radius: 2px; background-color: #0761b6; color: #ffffff; padding: 14px 16px; text-align: center; font-size: 16px; >input[type=»button»]:hover < background-color: #003669; >#age
Now that we’ve included our CSS code in our article, let’s go over it step by step.
Step1: We will set the font family to “Arial” using the body tag selector, and we will set the background color to “blue” using the background property. Our body is configured with “zero” padding and margin.
Step2:Now we will add a width and height of 520px for the width and auto for the height using the class selector (.container), and we will add a margin of 100px around the container using the margin property. We have added a 25-px border-radius to our calculator container using the border-radius parameter.
Step3:We will now style the parts of the age calculator using the class selector. We will give our h4 tag a font size of 26px, and we will center the content using the text-align property. The font is displayed in “navy blue.”
.block < width: 135px; padding: 5px 20px; margin-left: 20px; display: inline-block; float: left; >.base h4 < font-size: 26px; text-align: center; font-family: sans-serif; font-weight: normal; margin-top: 0px; box-shadow: 0px 2px #bababa; background: white; font-size: 34px; color: navy; >.title < font-size: 20px; text-align: left; font-family: sans-serif; font-weight: normal; line-height: 0.5; letter-spacing: 0.5px; word-spacing: 2.7px; color: #1073d0; >input[type=»text»] < width: 140px; margin: auto; outline: none; min-height: 50px; border: 2px solid #1073d0; padding: 12px; background-color: #f7f7f7; border-radius: 2px; color: #1073d0; font-size: 17px; >input[type=»text»]:focus < background-color: #ffffff; border: 2px solid orange; outline: none; >input[type=»button»] < width: 150px; margin-left: 35%; margin-top: 40px; outline: none; border: none; border-radius: 2px; background-color: #0761b6; color: #ffffff; padding: 14px 16px; text-align: center; font-size: 16px; >input[type=»button»]:hover < background-color: #003669; >#age
Now add javascript for the age calculator. We create function age and get all html elements in javascript so we get what the user enters in input. After that, we define a new code that gets today’s date, month, and year so that when a user enters an age javascript can do calculations of 2 values and show output in the age calculator.
Age Calculator JavaScript Code:-
function age() < var d1 = document.getElementById("date").value; var m1 = document.getElementById("month").value; var y1 = document.getElementById("year").value; var date = new Date(); var d2 = date.getDate(); var m2 = 1 + date.getMonth(); var y2 = date.getFullYear(); var month = [31, 28, 31, 30, 31, 30, 31, 31, 30, 31, 30, 31]; if (d1 >d2) < d2 = d2 + month[m2 - 1]; m2 = m2 - 1; >if (m1 > m2) < m2 = m2 + 12; y2 = y2 - 1; >var d = d2 - d1; var m = m2 - m1; var y = y2 - y1; document.getElementById("age").innerHTML = "Your Age is " + y + " Years " + m + " Months " + d + " Days"; > First of all, we will create an array of the number of days of every month and will store their value under the month variable.Using the document.getELementById selector to select the html and store their value in the new variables.
We were able to acquire the device’s time and date by using the new Date () function. The JavaScript method “New Date” can be used to get the most recent dates from your device. The current year, current date, and current month are what determine these three variables, which essentially represent the current time.
Now we’ll write a conditional statement that states to add the value of the current month to the current date if the value of our current month is less than 10.
To determine the age difference between the birthdate and the current date, we will now create a method named ageCalculate() and use the if-else conditional expression. After that, we merely add those values to our HTML element.
We now have the functionality of our age calculator. Let’s watch a quick video to see how it works.
Final Output Age Calculator Using JavaScript:-

Latest Updates
Category
- 3d card
- 3d cube slider
- 3D Image Gallery
- 50 project
- add background video
- animation
- api
- automatic image slider
- automatic image slider using html css and javascript
- Autoplay Carousel
- back-end
- bank management system
- Bootstrap
- Bootstrap Card
- Box Shadow
- button
- C++
- C++ Game
- C++ Programming
- C++ Project
- Calculator
- card
- chat box
- Claymorphism Design
- clone project
- code with random
- Codewithrandom
- coding with random
- codinggyan
- Color Game
- Complete CSS Guide
- Countdown Timer
- Counter
- Create Form using html css only
- create verticle timeline using html css js
- CSS
- CSS & JavaScript
- CSS Backgrounds and Borders
- CSS Box Models
- css card
- CSS Colors
- css course
- Css Effect
- css float
- Css floating button
- CSS Fonts
- css grid
- CSS Icons
- CSS Introduction
- CSS Links
- CSS Lists
- css loding animation
- CSS Margins and CSS Padding
- CSS Paper Effect
- css project
- css projectTask Management Ui
- CSS Syntax and Selectors
- CSS Text
- css tooltip
- CSS Width and Height
- cursor
- Custom Button
- dark mode
- diwali
- dropdown menu
- Dropmorphism
- Ecommerce Website
- em vs rem
- flexbox
- footer
- Front-end
- Front-end vs Back-end
- Game
- game project
- grid
- hamburger menu
- header
- heart icon css
- Hover effect
- HOW TO ADD PRODUCT IMAGE ZOOM ON HOVER
- How to Create 3D Image Gallery using HTML
- how to create Automatic Image slider
- How to create HORIZONTAL TIMELINE
- How to create verticle timeline
- HTML
- HTML & CSS
- Html & CSS Project
- HTML & CSSr
- html tag
- Image Css
- Input html tags
- Java
- javascript
- JavaScript Framework
- JavaScript Game
- JavaScript Keywords
- JavaScript Libraries
- javascript project
- jquery
- json
- JSON Basics
- Keyboard
- Learn Coding
- learn how to create form
- Learn JavaScript
- Learn Web Development
- loading animation
- login form
- Main
- Media query
- menu
- Modal Popup
- navbar
- new year project
- nodejs
- Number validation
- Paraphrasing Tool
- password
- portfolios
- Product Quick View animation
- Programming
- progress bar css
- Project
- Project Ideas
- Project Management Dashboard UI
- pure hamburger menu
- Python
- range slider
- Responsive Menu
- Ribbon
- sass
- Scroll Down Button
- search bar
- Shopping cart
- Sidebar Menu
- social media icons
- svg
- tab bar
- Tailwind
- tailwind css
- Theme Swith
- tic tac toe C++
- Tic tac toe game
- Toggle Button
- Ul tag
- Uncategorized
- web design
- web developer
- Web Development
- Web Development project
- xml
- Youtube Channel
CodeWithRandom
Thanks for visiting CodeWithRandom! Join Telegram (Click the Telegram Icon below) for source code files, pdf, etc.
For ANY Promotion queries, you can contact us at this email — [email protected]
Create Calendar Using HTML and CSS
Hey Guys, Welcome To Our Codewithrandom Blog, In Today’s Blog We Are Going To See How To Create An Calendar Using HTML and CSS. A calendar is nothing but the representation of dates with days with the year and month on top.

| Code By- | David Tappenden |
| Demo & Code | Scroll for copde |
| Language Used | HTML / CSS |
| External Links\ Dependencies | – |
| Responsive | Yes |
So Now Let’s create this project by adding source codes. For that first, we added the HTML Code.
First of all, we have to know a little bit about HTML. If you don’t know about HTML and CSS, you will be not able to make a better calendar. This article mostly used HTML and CSS.
Html Code For Calendar:-
First We create a div class with the name calendar-wrapper then with a header tag, we are adding month and year.
Secondly, we opened the order list tag for days to be added and those days were added with separate class names.
Third, We added a separate class name for one list class that contains the first number of the month’s date. and next by next we add the dates until the end of the number per month. and lastly, we closed the div and ol tag.
Do you want to learn HTML to JavaScript? 🔥
If yes, then here is our Master Frontend: Zero to Hero eBook! 📚 In this eBook, you’ll learn complete HTML, CSS, Bootstrap, and JavaScript from beginner to advance level. 💪 It includes 450 Projects with source code.
So, We have successfully completed our HTML code. Now We move on to CSS code.
Html Output:
CSS Code For Calendar:-
.calendar-wrapper < max-width: 280px; font: 100% system-ui; >.calendar < display: grid; grid-template-columns: repeat(7, 1fr); >.first-day < grid-column-start: 3; >.day-name < background: #eee; >h1 < text-align: center; >ol < list-style: none; margin: 0; padding: 0; text-align: center; >li
Step1: In the first step of CSS , We calling out the first div class name and adding max-width and font size for aligning the whole content to required number.
Step2: Second Step Involves Making the dates and days to look as like a real calendar and for that we using the grid properties like display; grid and the column alignment and space for each number with grid-template-column.
Step3: Third Step is about making the header to center of content (days and dates) with text align property and then we adding simple margin and padding , list style etc…
Now we have completed the CSS code successfully. So We can move to the Output of the project given below.
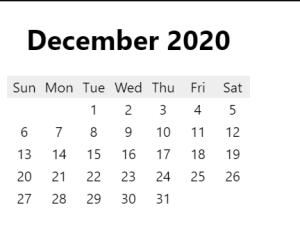
Final Output Calendar Project Using HTML and CSS:-
Live Preview Of Calendar Project Using HTML and CSS:-
Video Output Of Calendar:
Now We have Successfully created our Calendar Project Using HTML and CSS. You can use this project for your personnel needs and the respective lines of code are given with the code pen section above.
This is basic CSS calendar, you can add your own features and options. This calendar is made for functionality.
If you find out this Blog helpful, then make sure to search code with random on google for Front End Projects with Source codes and make sure to Follow the Code with Random Instagram page.
REFER CODE – Chris Coyier
WRITTEN BY – Ragunathan S
What are the purpose of Calendar?
A calendar is a very useful tool in everyday life. It enables us to keep track of the days, weeks, months, and years.
What is the level of the project?
A developer should be familiar with advanced CSS concepts because this is an intermediate-level job.