- HTML: Радиокнопка
- Задание
- Radio Button In HTML: Complete Guide
- HTML Radio Button
- HTML Radio Button Group
- Radio Button Value
- Checked Radio Button
- Radio Button Attributes
- Radio Button Label
- Radio button onclick
- Radio Button Style
- Data Representation Of Radio Group
- Conclusion
- HTML Radio Button
- Basic Radio Button
- Groups of Radio Buttons
- Important points to note about radio buttons:
- Understanding Radio Buttons
HTML: Радиокнопка
Представьте, что вы предлагаете пользователю выбор: доставить товар курьером или почтой. Использовать чекбоксы в этом случае не получится, ведь выбор строго один.
Для создания переключателей, которые умеют обрабатывать только один из множества вариантов, существуют радиокнопки. Название они получили от старых автомобильных радиоприёмников, в которых выбор радио осуществлялся нажатием на одну из множества кнопок для выбора частоты.
Для создания радиокнопки, так же, как и чекбокса, используются два тега:
- с указанием type=»radio» . Обязательным атрибутом является name , значением которого является имя. Данное имя должно быть одинаковым у всей группы радиокнопок. Без этого атрибута будет возможно выбрать все значения сразу, так как браузер не будет видеть связи между ними
- , в котором будет текст, связанный с нужной нам радиокнопкой
Связь с происходит уже по одному из двух знакомых нам сценариев:
- Связь по id . Для этого необходимо задать уникальный id для , и связать с радиокнопкой с помощью атрибута for
Для того чтобы после отправки формы на сервер возможно было узнать, какой именно пункт был выбран, используется атрибут value , внутри которого находится значение, позволяющее определить радиокнопку.
Задание
Создайте форму, у которой файл с обработчиком данных лежит по адресу /people . Внутри формы создайте 2 радиокнопки. Свяжите их вложив внутри . Уникальное имя для радиокнопок delivery . Не забудьте добавить атрибут value
Если вы зашли в тупик, то самое время задать вопрос в «Обсуждениях». Как правильно задать вопрос:
- Обязательно приложите вывод тестов, без него практически невозможно понять что не так, даже если вы покажете свой код. Программисты плохо исполняют код в голове, но по полученной ошибке почти всегда понятно, куда смотреть.
Тесты устроены таким образом, что они проверяют решение разными способами и на разных данных. Часто решение работает с одними входными данными, но не работает с другими. Чтобы разобраться с этим моментом, изучите вкладку «Тесты» и внимательно посмотрите на вывод ошибок, в котором есть подсказки.
Это нормально 🙆, в программировании одну задачу можно выполнить множеством способов. Если ваш код прошел проверку, то он соответствует условиям задачи.
В редких случаях бывает, что решение подогнано под тесты, но это видно сразу.
Создавать обучающие материалы, понятные для всех без исключения, довольно сложно. Мы очень стараемся, но всегда есть что улучшать. Если вы встретили материал, который вам непонятен, опишите проблему в «Обсуждениях». Идеально, если вы сформулируете непонятные моменты в виде вопросов. Обычно нам нужно несколько дней для внесения правок.
Кстати, вы тоже можете участвовать в улучшении курсов: внизу есть ссылка на исходный код уроков, который можно править прямо из браузера.
Radio Button In HTML: Complete Guide
In this article, you will learn everything about the HTML radio button. Its use, how to group it, how to style it using CSS, adding triggering events on it using JavaScript, etc.
You must have filled some online form before and would have interacted with options in a form where you have multiple choices to select but only one can be selected. Example gender selection , blood group selection , etc.
These are called radio buttons . Ideally, only one radio button can be selected for a single choice. For example, you can either select male , female , or transgender for gender selection.
HTML Radio Button
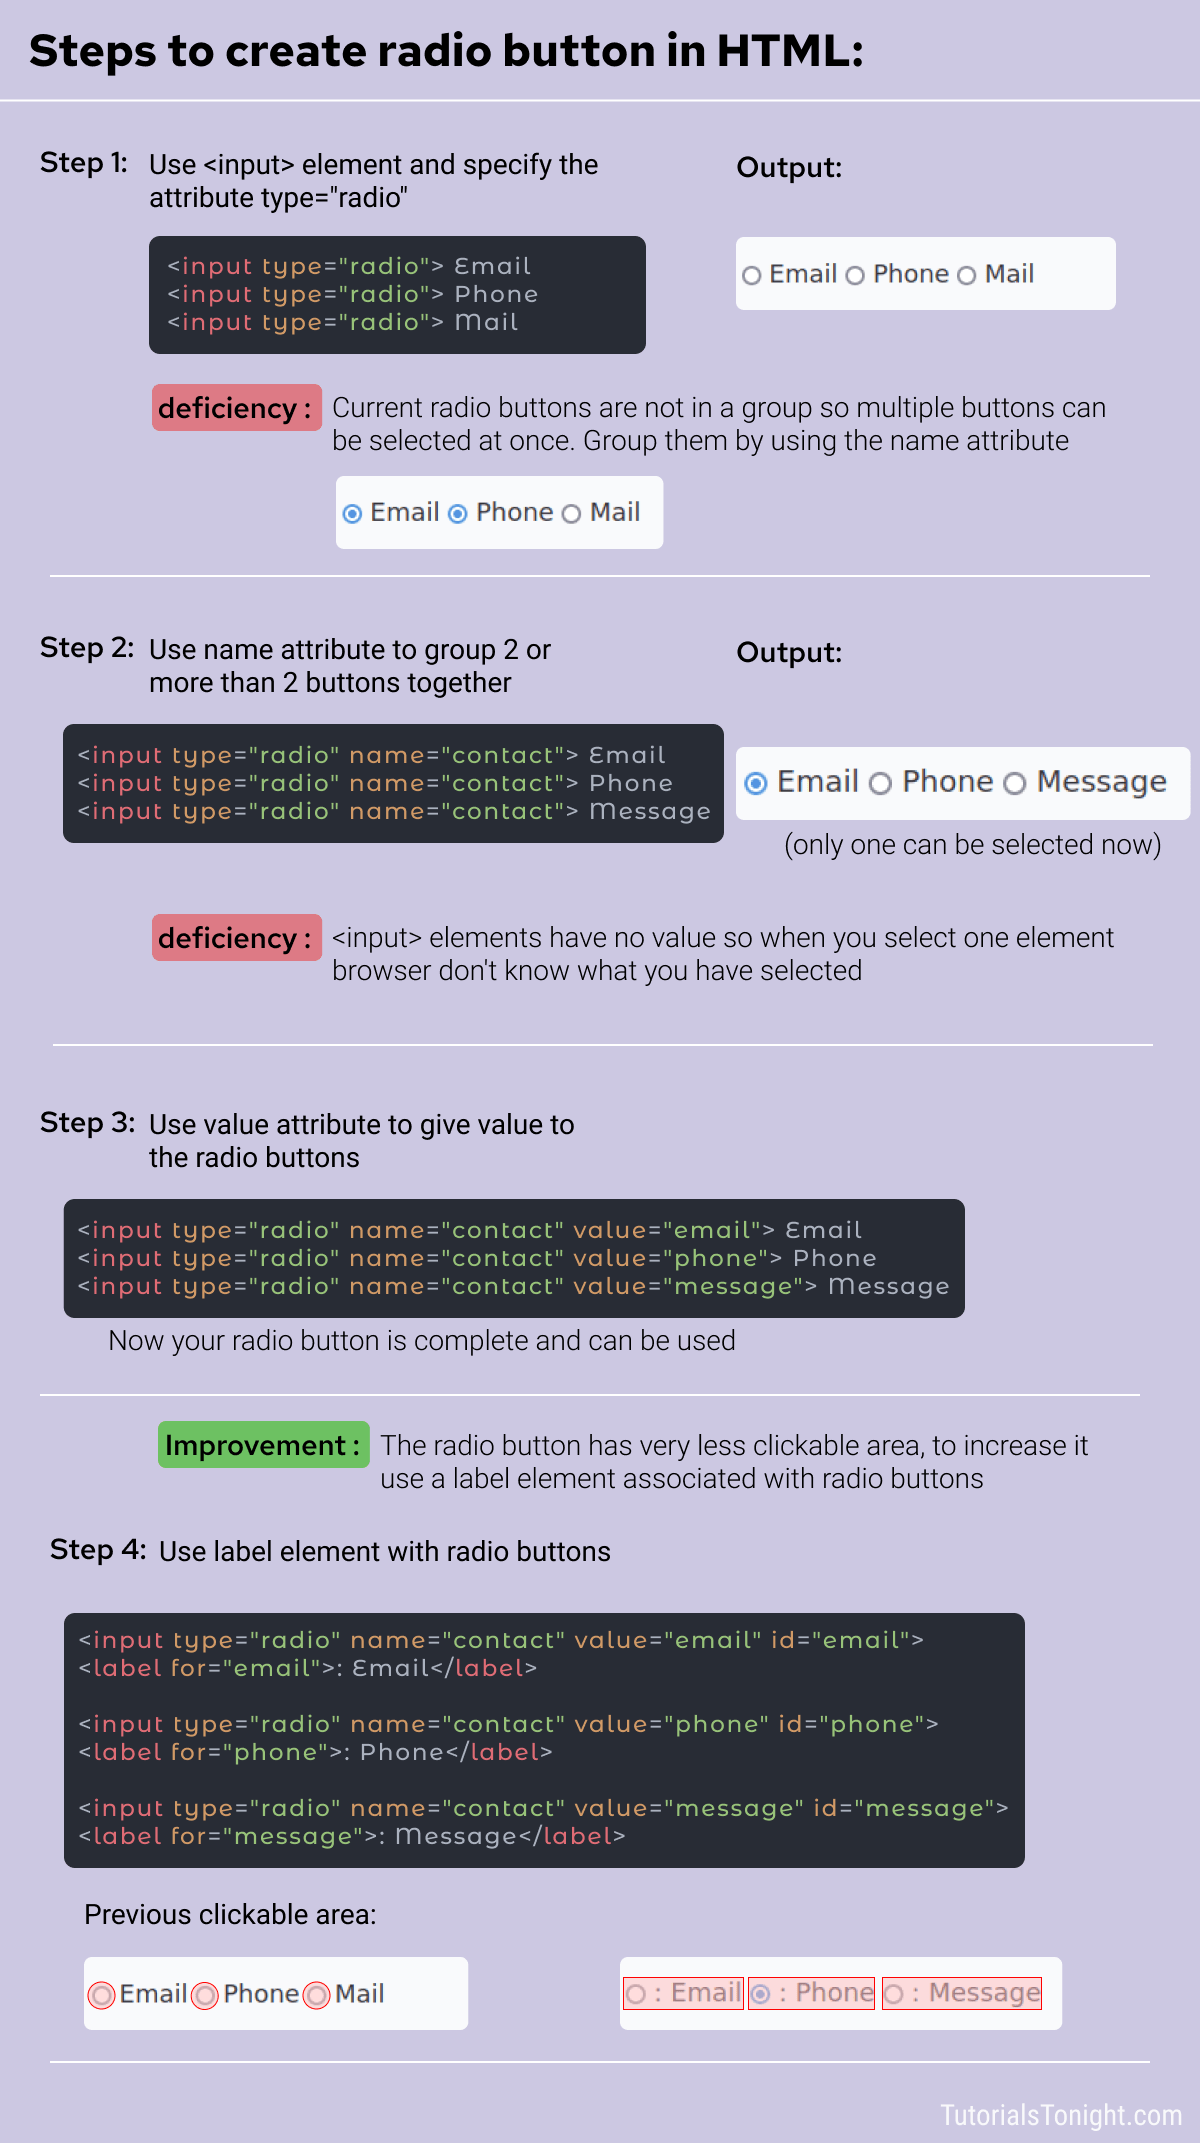
A radio button is an element of type=»radio» which is used to select only one choice among multiple choices.
It is generally used within a form but can be used alone.
To create a radio button give element a type of radio . Example
Here is an example of an HTML radio button:
HTML radio button example
You can check the above output by clicking on the button and you will observe that not only one choice but multiple choices can be selected above. Thinking why? 💭🤔
This is because none of the radio buttons are connected to each other with a common purpose. They are all independent and can be used for different purposes that are multiple of them are selected at a time.
To connect them together give them a common purpose by specifying name attribute.
HTML Radio Button Group
Practically radio buttons are used in group . So that when one button is selected then the other already get unselected if it was previously selected.
In a group of radio buttons, all the radio elements are connected. Only one button can be selected at a time.
Here is an example where radio buttons are not part of a group .
Radio buttons in the above example are not part of any group.
A radio group is defined by the name attribute. When 2 or more radio buttons are in a group they have the same name attribute.
When multiple radio buttons are given the same name then it becomes part of a group and when you select any radio button of that group it automatically deselects any other selected button in that group.
In the above example, all three radio buttons are part of a single group with name=»contact» which put them in a single group.
Radio Button Value
All radio buttons shown above have no value. This means if you select one then they don’t know for what value you want to select it.
Just an option written in front of it doesn’t mean it will take it as input.
To specify value for radio button give it a value attribute. Example
Now if you select any radio button then it will take the value of that radio button as input.
You have done a lot😊 let’s relax for a minute🍸🍹

What we have covered till now:
- Radio button is created using element having type=»radio»
- Radio button must have name attribute to be part of a group.
- Radio button should have value attribute to specify value for that radio button.
Checked Radio Button
It is better to select the most probable radio button by default because if no option is selected while submitting the form then the radio group is not included in the submitted data at all.
You can do it by using the checked attribute.
checked attribute is a boolean attribute. It is either true or false .
Just using checked is same as checked=»true» .
Example: HTML radio button default selected
Radio Button Attributes
Here is a brief description of some frequently used attributes in radio buttons.
| Attribute | description |
|---|---|
| type | It specifies input type, it must be added to create the type of button you want, i.e. radio |
| name | It creates a radio group, 1 or more than one radio buttons with the same name comes under same group |
| value | It delivers the selected button to the server if the radio button is checked |
| checked | It selects a radio button by default |
Radio Button Label
Radio buttons has a very small clickable area, you have to pin-point the small box to click it. But you can increase the clickable area by using a label with a radio button.
Radio button label is created using element.
Radio button label must have a for attribute that targets the radio button.
And the radio button must have an id attribute that with the same value is used in for attribute.
Example: HTML radio button label
Now the clickable area of the radio button is increased. You can select any radio button either by clicking on the label or by clicking on the radio button.
Radio button onclick
You can trigger an event to know which radio button is checked. For this select all radio buttons and add an onclick event to all button.
When the button is checked the event will be triggered and you can alert a message with it.
// selecting radio button const buttons = document.querySelectorAll("input[type='radio']"); // adding event to all radio buttons buttons.forEach(button => < button.onclick = () => < if (button.checked) < alert(button.value + " selected as contact option!"); >> >)Radio Button Style
Create your own custom radio button and style it using CSS since the browser’s radio button is styled by the browser itself.
Let the HTML code for the form with radio button be as follows:
Here is complete CSS code to create a custom styled radio button.
label < display: block; position: relative; padding-left: 50px; margin: 10px 0; cursor: pointer; font-size: 20px; >/* Hide the default radio button */ label input < position: absolute; opacity: 0; cursor: pointer; >/* Creating own radio button to style */ .custom-radio-button < position: absolute; top: 0; left: 0; height: 24px; width: 24px; background-color: #eee; border-radius: 50%; >/* hover effect on unchecked buttons */ label:hover input+.custom-radio-button < background: #fdd; >/* button checked */ label input:checked+.custom-radio-button < background-color: #bd1c10; >/* White dot on checked radio button (hidden) */ label .custom-radio-button::after < content: ""; display: none; position: absolute; width: 10px; height: 10px; border-radius: 50%; background: white; top: 50%; left: 50%; transform: translate(-50%, -50%); >/* Show the dot on checked button */ label input:checked+.custom-radio-button::after < display: block; >input[type="submit"]
Data Representation Of Radio Group
When a form is submitted with a radio button then the form’s data include an entry in the form name=value , here in the above case, one option could be contact=email .
If there is no value attribute in a radio button then data related to the radio button is not reported to the server.
Conclusion
You learned about radio buttons. Creating a group of radio buttons. Different types of attributes in it. Triggering an event when the button is checked and learned to style radio buttons.
You can also style the radio buttons using CSS.
HTML Radio Button
This page contains code for creating an HTML radio button. It also provides an explanation of radio buttons. Feel free to copy and paste the code into your own website or blog.
Anyway, here is the code and some information on creating a radio button.
Basic Radio Button
You will notice that, although all radio buttons had different values (i.e. within the value attribute) all radio buttons shared the same name (within the name attribute). I’ll explain how this works shortly. In the meantime, let’s look at multiple groups of radio buttons.
Groups of Radio Buttons
Here are two groups of radio buttons. Notice once again that the radio buttons in each group shares the name. The first group has a name of «preferred_color» and the second group has a name of «preferred_item».
Important points to note about radio buttons:
- All radio buttons within a group must share the same name. That is, the value of the name attribute should be the same. For example, all three radio buttons in the «Preferred Color» group have name=»preferred_color» .
- All radio buttons within a group should have a different value for the value attribute. For example, if one radio button has value=»red» , none of the others in that group should have a value of red, as this would defeat the purpose of having the extra radio button.
- The «label» for each radio button is determined by the text next to the radio button (not the value attribute). The value attribute is used by the form handler.
Understanding Radio Buttons
When you first learn how to create a radio button, you may find it a little difficult to understand how the name and value attributes work. This is probably because radio buttons are a little different to most form elements. I’ll explain.
The whole purpose of a radio button is to enable the user to make one selection — and one only — from a list. If you wanted the user to make multiple selections, you wouldn’t use a radio button — you’d use a checkbox.
Anyway, because the user can only make one selection from our group of radio buttons, all radio buttons in that group need to share the same name. This is how we group the list together — they all share the same name. This tells the form handler the name of the group, and the value of the selected radio button.
For example, if you want users to choose between a group of colors, you would create a radio button for each color. You would give all radio buttons the same name (for example, «preferred_color»), but you would give each radio button a different value (for example, «red»).
So, let’s say a user submits a form that sends an email to the webmaster. The user selects their preferred color from a radio button and clicks the submit button. The webmaster might receive an email that looks like this:
A user has selected a preferred color from your web form. Here is the result:
I’m sure you could think of better things to do than to simply ask for your users’ favorite color, but hopefully you get the idea! In this case, the form handler (i.e. a server-side script), has processed the form and emailed the name of the group (Preferred_color), and the value that was selected (Red).