- SharePoint Blog
- Displaying Charts using data in Excel and Chart.js library
- Get started with some background
- Actual Coding Starts from here
- Joining the Dots
- Comments
- Post a Comment
- Popular posts from this blog
- Installation and Configuration of Office Online Server with SharePoint 2019
- Workflow Manager 1.0- Installation, Configuration and Issues
- Work with charts using the Excel JavaScript API
- Create a chart
- New line chart
- Add a data series to a chart
- Chart before the 2016 data series is added
- Chart after the 2016 data series is added
- Set chart title
- Chart after title is set
- Set properties of an axis in a chart
- Set axis title
- Chart after title of category axis is set
- Set axis display unit
- Chart after display unit of value axis is set
- Set visibility of gridlines in a chart
- Chart with gridlines hidden
- Chart trendlines
- Add a trendline
- Chart with moving average trendline
- Update a trendline
- Chart with linear trendline
- Add and format a chart data table
- Export a chart as an image
- See also
- Feedback
SharePoint Blog
Displaying Charts using data in Excel and Chart.js library
This document explains the requirements to create and display Charts on SharePoint Page by fetching data from Excel Sheets and displaying it in beautiful Charts generated using Chart.js library.
You might think why we need to do this much coding as we can directly display Excel webparts on page and display charts generated from Excel. But Excel Web parts depends on Excel Service Application to be running in Farm and this Service is not available in Standard version of SharePoint 2013. Also Excel webpart are very heavy webparts as it tries to load Excel functionality in browser.
Get started with some background
I had a requirement to display multiple charts from Excel on SharePoint page as our Excel was very heavy approx. 5MB size so it was slowing the performance of page. So I come up with angular based project to display chart using Chart.js library.
- JQuery.min.js (basic library)
- Angular.min.js (for AngularJs application)
- Chart.js (for generating Charts)
- XLSX.min.js (for reading data from Excel)
- Chartjs-stacked100.js (ChartJS plugin to create Stacked 100% charts)
Actual Coding Starts from here
So let’s start with creating HTML template for displaying charts. In the HTML template I’ve referenced all the JavaScript libraries and created a div for rendering our AngularJS application (myChartApp). This is the main HTML that we are going to use in Content Editor Web Part to display charts on SharePoint Page.
< div ng-app color: purple; font-family: Consolas; font-size: 9.5pt; mso-bidi-font-family: Consolas;">myChartApp » ng-controller color: purple; font-family: Consolas; font-size: 9.5pt; mso-bidi-font-family: Consolas;»>myChartAppController «>
< div class ="row" style color: red; font-family: Consolas; font-size: 9.5pt; mso-bidi-font-family: Consolas;">border : 1px solid #ccc ; margin : 30px 0″ ng-repeat color: purple; font-family: Consolas; font-size: 9.5pt; mso-bidi-font-family: Consolas;»>series in TransformedData «>
As you can see in the HTML first div has properties the ng-app and ng-controller for associating myChartApp. You can use AngularJS bootstrapper to load your application but for simplicity I’ve used this method.
Now it’s time start coding myChartApp, but first I’ll some constants and configurable variable. You can skip this and apply the setting in the application itself. But I prefer to do this way as it provide more flexibility to change the setting at any time and will apply everywhere.
First setting, ChartConfig, as in this page I’m going to generate 3 different charts (stacked bar, line, stacked 100% bar):
Next I’ll define configuration settings (I use this configuration settings to change the urls any time):
angular.module( ‘myChartApp’ ).service( ‘spRestService’ , [ ‘$http’ , ‘$q’ , ‘$timeout’ , function ($http, $q, $timeout)
angular.module( ‘myChartApp’ ).controller( ‘myChartAppController’ , [ ‘$scope’ , ‘spRestService’ , function myChartAppController($scope, spRestService)
$scope.colors = [ ‘#4472c4’ , ‘#ed7d31’ , ‘#a5a5a5’ , ‘#ffc000’ , ‘#5b9bd5’ , ‘#70ad47’ , ‘#264478’ , ‘#9e480e’ , ‘#636363’ , ‘#997300’ , ‘#255e91’ , ‘#43682b’ ,
‘#698ed0’ , ‘#f1975a’ , ‘#b7b7b7’ , ‘#ffcd33’ , ‘#7cafdd’ , ‘#8cc168’ , ‘#548235’ , ‘#ffff00’ , ‘#ff0000’ ];
I’ve defined properties for storing data returned from service ( dataSeries) and then storing the transformed data ( TransformedData ). I’ve also declared XLSXRange for defining the starting row and column to read from Excel Sheet and Colors array to be used while creating chart.
As the service returns the response in arraybuffer which is a binary format, so we cannot use it as it is. We need to transform the data from binary to array. Here comes XLSX library which reads the binary data and convert it into JavaScript based Excel Workbook object. From that Excel workbook object I’ve extracted the data from different sheets using sheet_to_json method and stored it in dataSeries object. Then used TransformData method to convert dataSeries to chart dataset.
After transforming data the TransformedData object will contain all the data related to chart including Chart Type, Coloe, Label Text, Header Text, data, data format etc.
You might have noticed that chartConfiguration variable is declared as an empty object. Well this is the main object that will contain all the configuration for creating chart and displaying it on page, user interaction etc.
As you can see in above code ChartType, Data Labels and DataSet is configured. With this much configuration we can display the chart. Options provide additional functionality to the chart i.e. axis, responsive, title, legend, tooltip etc. So in the next row I’ll show only recommended options others are nice to have.
- Scales: defines the X and Y axis
- Responsive: responsive nature of chart
- Title: displays Chart title, size.
- Legend: display legend and their position
- Element/Line/Tension: 0 to disable the curves while creating line chart
- Tooltip: callback function to display custom tooltip text.
- Plugins: added stacked100 plugin to display Stacked 100% charts.
Joining the Dots
If you are not familiar with the Angular then you might be wondering how it’s going to take data and render the chart, where chartDir is called etc.
· You can see there is a div with ng-repeat directive that create a loop on TransformedData array and object in series . This directive is responsible for creating multiple div based on items in array.
· Inside div, there is Canvas with chart-dir directive initialised with series object. As series object contains data that is used in generating chart. Go back to chartDir directive and look for $scope.$watch(attrs.chartDir, function (data) < the data passed in function comes from the HTML markup chart-dir ="series".


Last thing we have to do is to add a content editor webpart in our SharePoint page and provide link to this HTML file, save and refresh. Change the data in excel file and see the chart will display the updated data.
- Get link
- Other Apps
Comments
Post a Comment
Popular posts from this blog
Installation and Configuration of Office Online Server with SharePoint 2019

Installation and Configuration of Office Online Server In this blog post I’m going to show you how to install and configure Office Online Server(OOS) farm and then configure OOS Farm with SharePoint to display Word, Excel etc in web browser. Install prerequisite software for Office Online Server https://docs.microsoft.com/en-us/officeonlineserver/deploy-office-online-server Open the Microsoft PowerShell prompt as an administrator and run this command to install the required roles and services Add-WindowsFeature Web-Server,Web-Mgmt-Tools,Web-Mgmt-Console,Web-WebServer,Web-Common-Http,Web-Default-Doc,Web-Static-Content,Web-Performance,Web-Stat-Compression,Web-Dyn-Compression,Web-Security,Web-Filtering,Web-Windows-Auth,Web-App-Dev,Web-Net-Ext45,Web-Asp-Net45,Web-ISAPI-Ext,Web-ISAPI-Filter,Web-Includes,NET-Framework-Features,NET-Framework-45-Features,NET-Framework-Core,NET-Framework-45-Core,NET-HTTP-Activation,NET-Non-HTTP-Activ,NET-WCF-HTTP-Activation45,Windows-Identi
Workflow Manager 1.0- Installation, Configuration and Issues

Install Workflow Manager Install workflow manager binaries from Microsoft Web Platform Installer 5.0 1) Workflow Manager 1.0 Refresh(CU2) 2) Workflow Manager 1.0 CU5 Workflow Manager 1.0 Refresh (CU2) Open Microsoft Web Platform Installer 5.0 and search for Workflow Manager. Select Workflow Manager 1.0 Refresh (CU2) and click on Add. Click on I Accept Select Use Microsoft Update and click Continue. It’ll install service bus and workflow manager on the server. Click on continue. Run configuration wizard if you are configuring it for fresh installation. And don’t run configuration wizard if you have to restore the Workflow Manager from database backups. Workflow Manager 1.0 CU5 Select Workflow manager 1.0 CU5 and click Add. Click Install to begin installation. Click I accept. It’ll download and install CU5. Click Finish to complete the installation. Workflow Manager DR Configuration Restore the 4 SQL databases Rest
Work with charts using the Excel JavaScript API
This article provides code samples that show how to perform common tasks with charts using the Excel JavaScript API. For the complete list of properties and methods that the Chart and ChartCollection objects support, see Chart Object (JavaScript API for Excel) and Chart Collection Object (JavaScript API for Excel).
Create a chart
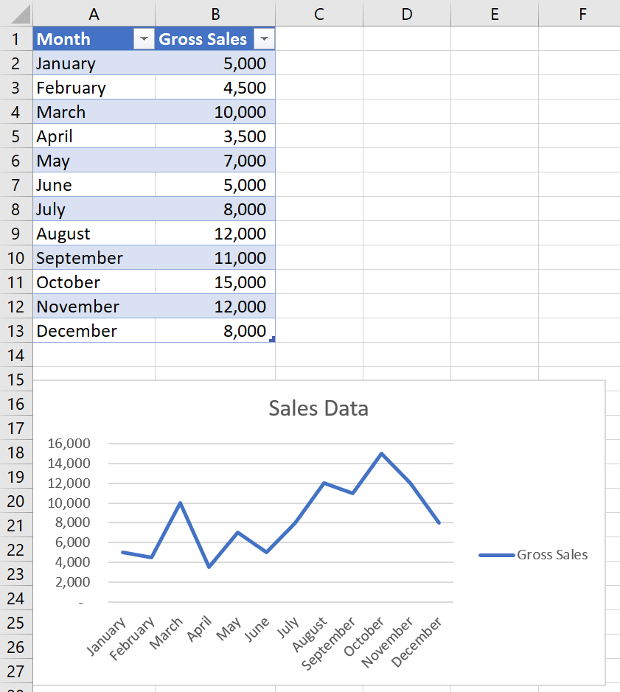
The following code sample creates a chart in the worksheet named Sample. The chart is a Line chart that is based upon data in the range A1:B13.
await Excel.run(async (context) => < let sheet = context.workbook.worksheets.getItem("Sample"); let dataRange = sheet.getRange("A1:B13"); let chart = sheet.charts.add( Excel.ChartType.line, dataRange, Excel.ChartSeriesBy.auto); chart.title.text = "Sales Data"; chart.legend.position = Excel.ChartLegendPosition.right; chart.legend.format.fill.setSolidColor("white"); chart.dataLabels.format.font.size = 15; chart.dataLabels.format.font.color = "black"; await context.sync(); >); New line chart
Add a data series to a chart
The following code sample adds a data series to the first chart in the worksheet. The new data series corresponds to the column named 2016 and is based upon data in the range D2:D5.
await Excel.run(async (context) => < let sheet = context.workbook.worksheets.getItem("Sample"); let chart = sheet.charts.getItemAt(0); let dataRange = sheet.getRange("D2:D5"); let newSeries = chart.series.add("2016"); newSeries.setValues(dataRange); await context.sync(); >); Chart before the 2016 data series is added
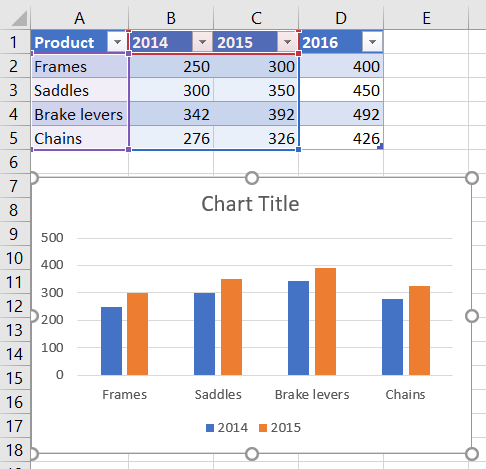
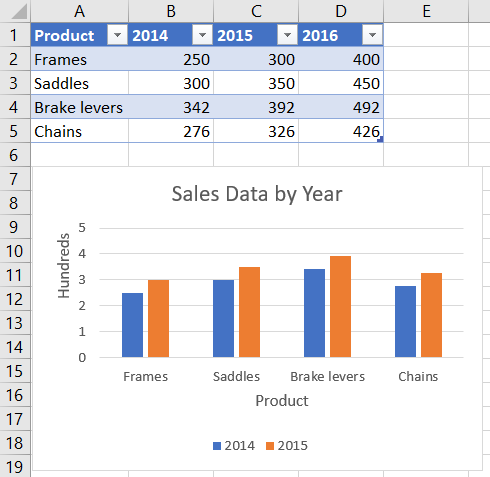
Chart after the 2016 data series is added

Set chart title
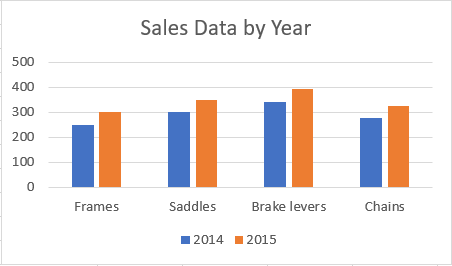
The following code sample sets the title of the first chart in the worksheet to Sales Data by Year.
await Excel.run(async (context) => < let sheet = context.workbook.worksheets.getItem("Sample"); let chart = sheet.charts.getItemAt(0); chart.title.text = "Sales Data by Year"; await context.sync(); >); Chart after title is set
Set properties of an axis in a chart
Charts that use the Cartesian coordinate system such as column charts, bar charts, and scatter charts contain a category axis and a value axis. These examples show how to set the title and display unit of an axis in a chart.
Set axis title
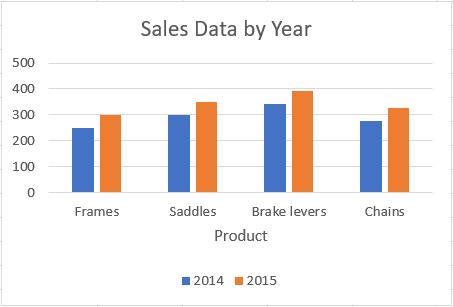
The following code sample sets the title of the category axis for the first chart in the worksheet to Product.
await Excel.run(async (context) => < let sheet = context.workbook.worksheets.getItem("Sample"); let chart = sheet.charts.getItemAt(0); chart.axes.categoryAxis.title.text = "Product"; await context.sync(); >); Chart after title of category axis is set
Set axis display unit
The following code sample sets the display unit of the value axis for the first chart in the worksheet to Hundreds.
await Excel.run(async (context) => < let sheet = context.workbook.worksheets.getItem("Sample"); let chart = sheet.charts.getItemAt(0); chart.axes.valueAxis.displayUnit = "Hundreds"; await context.sync(); >); Chart after display unit of value axis is set
Set visibility of gridlines in a chart
The following code sample hides the major gridlines for the value axis of the first chart in the worksheet. You can show the major gridlines for the value axis of the chart, by setting chart.axes.valueAxis.majorGridlines.visible to true .
await Excel.run(async (context) => < let sheet = context.workbook.worksheets.getItem("Sample"); let chart = sheet.charts.getItemAt(0); chart.axes.valueAxis.majorGridlines.visible = false; await context.sync(); >); Chart with gridlines hidden
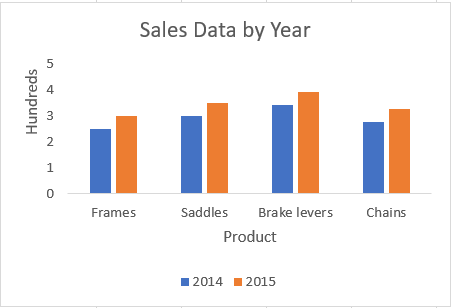
Chart trendlines
Add a trendline
The following code sample adds a moving average trendline to the first series in the first chart in the worksheet named Sample. The trendline shows a moving average over 5 periods.
await Excel.run(async (context) => < let sheet = context.workbook.worksheets.getItem("Sample"); let chart = sheet.charts.getItemAt(0); let seriesCollection = chart.series; seriesCollection.getItemAt(0).trendlines.add("MovingAverage").movingAveragePeriod = 5; await context.sync(); >); Chart with moving average trendline

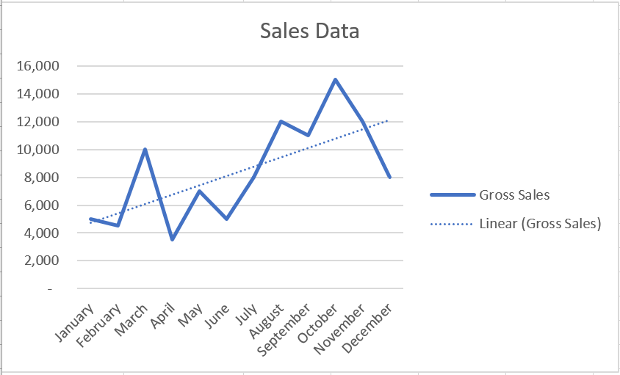
Update a trendline
The following code sample sets the trendline to type Linear for the first series in the first chart in the worksheet named Sample.
await Excel.run(async (context) => < let sheet = context.workbook.worksheets.getItem("Sample"); let chart = sheet.charts.getItemAt(0); let seriesCollection = chart.series; let series = seriesCollection.getItemAt(0); series.trendlines.getItem(0).type = "Linear"; await context.sync(); >); Chart with linear trendline
Add and format a chart data table
You can access the data table element of a chart with the Chart.getDataTableOrNullObject method. This method returns the ChartDataTable object. The ChartDataTable object has boolean formatting properties such as visible , showLegendKey , and showHorizontalBorder .
The ChartDataTable.format property returns the ChartDataTableFormat object, which allows you to further format and style the data table. The ChartDataTableFormat object offers border , fill , and font properties.
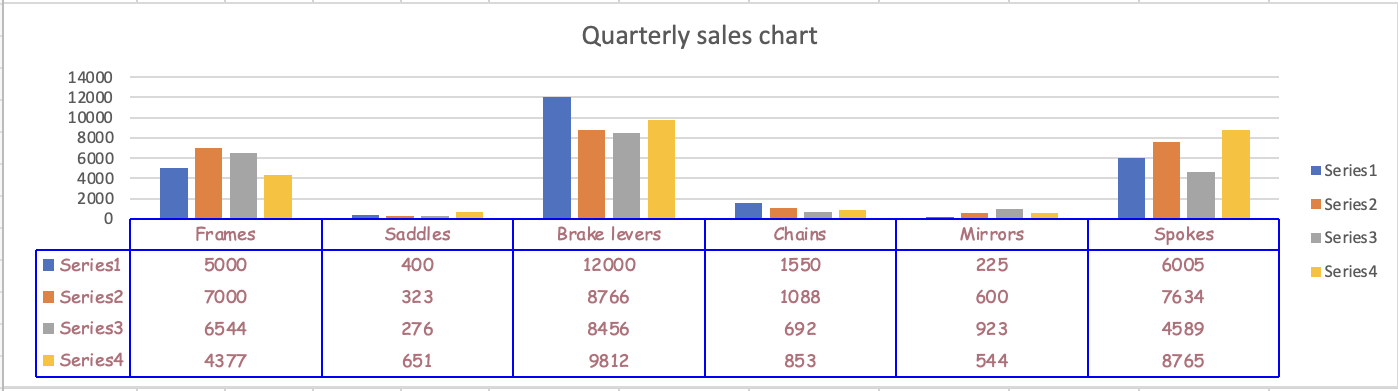
The following code sample shows how to add a data table to a chart and then format that data table using the ChartDataTable and ChartDataTableFormat objects.
// This code sample adds a data table to a chart that already exists on the worksheet, // and then adjusts the display and format of that data table. await Excel.run(async (context) => < // Retrieve the chart on the "Sample" worksheet. let chart = context.workbook.worksheets.getItem("Sample").charts.getItemAt(0); // Get the chart data table object and load its properties. let chartDataTable = chart.getDataTableOrNullObject(); chartDataTable.load(); // Set the display properties of the chart data table. chartDataTable.visible = true; chartDataTable.showLegendKey = true; chartDataTable.showHorizontalBorder = false; chartDataTable.showVerticalBorder = true; chartDataTable.showOutlineBorder = true; // Retrieve the chart data table format object and set font and border properties. let chartDataTableFormat = chartDataTable.format; chartDataTableFormat.font.color = "#B76E79"; chartDataTableFormat.font.name = "Comic Sans"; chartDataTableFormat.border.color = "blue"; await context.sync(); >); The following screenshot shows the data table that the preceding code sample creates.
Export a chart as an image
Charts can be rendered as images outside of Excel. Chart.getImage returns the chart as a base64-encoded string representing the chart as a JPEG image. The following code shows how to get the image string and log it to the console.
await Excel.run(async (context) => < let chart = context.workbook.worksheets.getItem("Sheet1").charts.getItem("Chart1"); let imageAsString = chart.getImage(); await context.sync(); console.log(imageAsString.value); // Instead of logging, your add-in may use the base64-encoded string to save the image as a file or insert it in HTML. >); Chart.getImage takes three optional parameters: width, height, and the fitting mode.
getImage(width?: number, height?: number, fittingMode?: Excel.ImageFittingMode): OfficeExtension.ClientResult; These parameters determine the size of the image. Images are always proportionally scaled. The width and height parameters put upper or lower bounds on the scaled image. ImageFittingMode has three values with the following behaviors.
- Fill : The image’s minimum height or width is the specified height or width (whichever is reached first when scaling the image). This is the default behavior when no fitting mode is specified.
- Fit : The image’s maximum height or width is the specified height or width (whichever is reached first when scaling the image).
- FitAndCenter : The image’s maximum height or width is the specified height or width (whichever is reached first when scaling the image). The resulting image is centered relative to the other dimension.
See also
Feedback
Submit and view feedback for