- Html button try it
- Button without a value
- Using buttons
- A simple button
- Adding keyboard shortcuts to buttons
- Disabling and enabling a button
- Setting the disabled attribute
- Inheriting the disabled state
- Validation
- Examples
- Technical summary
- Specifications
- HTML Tag
- Syntax
- Example of the HTML tag:
- Using CSS styles
- Example of the tag with CSS styles:
- Result
- Attributes
- Attributes
- How to style tag?
- Common properties to alter the visual weight/emphasis/size of text in tag:
- Coloring text in tag:
- Text layout styles for tag:
- Other properties worth looking at for tag:
- How to add alt text to a button with an image?
- How to add a link to a button?
Html button try it
An elements’ value attribute contains a string that is used as the button’s label.
input type="button" value="Click Me" /> Button without a value
If you don’t specify a value , you get an empty button:
Using buttons
A simple button
We’ll begin by creating a simple button with a click event handler that starts our machine (well, it toggles the value of the button and the text content of the following paragraph):
form> input type="button" value="Start machine" /> form> p>The machine is stopped.p>
const button = document.querySelector("input"); const paragraph = document.querySelector("p"); button.addEventListener("click", updateButton); function updateButton() if (button.value === "Start machine") button.value = "Stop machine"; paragraph.textContent = "The machine has started!"; > else button.value = "Start machine"; paragraph.textContent = "The machine is stopped."; > >
The script gets a reference to the HTMLInputElement object representing the in the DOM, saving this reference in the variable button . addEventListener() is then used to establish a function that will be run when click events occur on the button.
Adding keyboard shortcuts to buttons
Keyboard shortcuts, also known as access keys and keyboard equivalents, let the user trigger a button using a key or combination of keys on the keyboard. To add a keyboard shortcut to a button — just as you would with any for which it makes sense — you use the accesskey global attribute.
In this example, s is specified as the access key (you’ll need to press s plus the particular modifier keys for your browser/OS combination; see accesskey for a useful list of those).
form> input type="button" value="Start machine" accesskey="s" /> form> p>The machine is stopped.p>
const button = document.querySelector("input"); const paragraph = document.querySelector("p"); button.addEventListener("click", updateButton); function updateButton() if (button.value === "Start machine") button.value = "Stop machine"; paragraph.textContent = "The machine has started!"; > else button.value = "Start machine"; paragraph.textContent = "The machine is stopped."; > >
Note: The problem with the above example of course is that the user will not know what the access key is! In a real site, you’d have to provide this information in a way that doesn’t interfere with the site design (for example by providing an easily accessible link that points to information on what the site accesskeys are).
Disabling and enabling a button
To disable a button, specify the disabled global attribute on it, like so:
input type="button" value="Disable me" disabled /> Setting the disabled attribute
You can enable and disable buttons at run time by setting disabled to true or false . In this example our button starts off enabled, but if you press it, it is disabled using button.disabled = true . A setTimeout() function is then used to reset the button back to its enabled state after two seconds.
input type="button" value="Enabled" /> const button = document.querySelector("input"); button.addEventListener("click", disableButton); function disableButton() button.disabled = true; button.value = "Disabled"; setTimeout(() => button.disabled = false; button.value = "Enabled"; >, 2000); >
Inheriting the disabled state
If the disabled attribute isn’t specified, the button inherits its disabled state from its parent element. This makes it possible to enable and disable groups of elements all at once by enclosing them in a container such as a element, and then setting disabled on the container.
The example below shows this in action. This is very similar to the previous example, except that the disabled attribute is set on the when the first button is pressed — this causes all three buttons to be disabled until the two second timeout has passed.
fieldset> legend>Button grouplegend> input type="button" value="Button 1" /> input type="button" value="Button 2" /> input type="button" value="Button 3" /> fieldset>
const button = document.querySelector("input"); const fieldset = document.querySelector("fieldset"); button.addEventListener("click", disableButton); function disableButton() fieldset.disabled = true; setTimeout(() => fieldset.disabled = false; >, 2000); >
Note: Firefox will, unlike other browsers, by default, persist the dynamic disabled state of a across page loads. Use the autocomplete attribute to control this feature.
Validation
Buttons don’t participate in constraint validation; they have no real value to be constrained.
Examples
div class="toolbar"> input type="color" aria-label="select pen color" /> input type="range" min="2" max="50" value="30" aria-label="select pen size" />span class="output">30span> input type="button" value="Clear canvas" /> div> canvas class="myCanvas"> p>Add suitable fallback here.p> canvas>
body background: #ccc; margin: 0; overflow: hidden; > .toolbar background: #ccc; width: 150px; height: 75px; padding: 5px; > input[type="color"], input[type="button"] width: 90%; margin: 0 auto; display: block; > input[type="range"] width: 70%; > span position: relative; bottom: 5px; > const canvas = document.querySelector(".myCanvas"); const width = (canvas.width = window.innerWidth); const height = (canvas.height = window.innerHeight - 85); const ctx = canvas.getContext("2d"); ctx.fillStyle = "rgb(0,0,0)"; ctx.fillRect(0, 0, width, height); const colorPicker = document.querySelector('input[type="color"]'); const sizePicker = document.querySelector('input[type="range"]'); const output = document.querySelector(".output"); const clearBtn = document.querySelector('input[type="button"]'); // covert degrees to radians function degToRad(degrees) return (degrees * Math.PI) / 180; > // update sizepicker output value sizePicker.oninput = () => output.textContent = sizePicker.value; >; // store mouse pointer coordinates, and whether the button is pressed let curX; let curY; let pressed = false; // update mouse pointer coordinates document.onmousemove = (e) => curX = e.pageX; curY = e.pageY; >; canvas.onmousedown = () => pressed = true; >; canvas.onmouseup = () => pressed = false; >; clearBtn.onclick = () => ctx.fillStyle = "rgb(0,0,0)"; ctx.fillRect(0, 0, width, height); >; function draw() if (pressed) ctx.fillStyle = colorPicker.value; ctx.beginPath(); ctx.arc( curX, curY - 85, sizePicker.value, degToRad(0), degToRad(360), false, ); ctx.fill(); > requestAnimationFrame(draw); > draw();
Technical summary
Specifications
HTML Tag
The tag is used to create clickable buttons on the web page. The difference between these elements and buttons created with the tag is that you can place the content (images or text) inside the .
Use the element to define a button within HTML form, as browsers display the content of the tag differently.
Syntax
The
Example of the HTML tag:
html> html> head> title>Title of the document title> head> body> h1>Here will be our button h1> button type="button">Click button> body> html>Using CSS styles
You can apply CSS styles to the tag to change the appearance of the button, its size, color, text font, and so on.
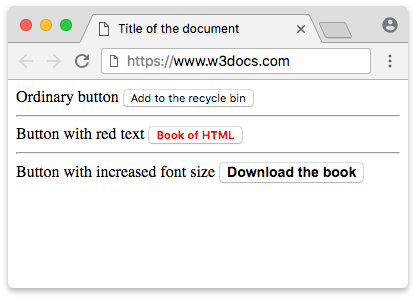
Example of the tag with CSS styles:
html> html> head> title>Title of the document title> head> body> Ordinary button button type="button">Add to the recycle bin button> hr /> Button with red text button type="button" style="color: red;">b>HTML Book b> button> hr /> Button with increased font size button type="button" style="font: bold 14px Arial;">Download the book button>br /> body> html>Result
Attributes
The
Attributes
| Attributes | Value | Description |
|---|---|---|
| autofocus | autofocus | Specifies that the button should receive focus after loading the page. |
| disabled | disabled | Deactivates the button. (Used when the button should become active after performing some action.) |
| form | form_id | Specifies one or more forms the button belongs to. If the button has multiple forms, then their identifiers (form_id) must be separated by spaces. |
| formaction | URL | Defines the address, where the form data will be sent after clicking on the button. (Used only for the buttons with the type=»submit» attribute). |
| formenctype | Defines how the form-data should be encoded when a form is submitted. (Used only for type=»submit»). | |
| application/x-www-form- | All symbols are encoded before a form is submitted (default value). | |
| urlencoded | Symbols are not encoded. | |
| multipart/form-data | Spaces are being replaced by the sign «+», but symbols aren’t encoded. | |
| text/plain | ||
| formmethod | Defines the method of the HTTP request, which will be used when a form is submitted (only for type=»submit»). | |
| get | Passes the form data in the address bar («name = value»), which are added to the URL of the page after the question mark and are separated by an ampersand (&). (http://example.ru/doc/?name=Ivan&password=vanya) | |
| post | The browser communicates with the server and sends the data for processing. | |
| formnovalidate | formnovalidate | Specifies that the form-data should not be validated on submission (only for type=»submit»). |
| formtarget | Specifies, where the response will be shown after the form is submitted (only for type=»submit»). | |
| blank | Opens the response in a new window. | |
| self | Opens the response in the current window. | |
| parent | Opens the response in the parent frame. | |
| top | Opens the response in the full width window. | |
| name | name | Defines the button name. |
| type | Defines the button type. | |
| button | ordinary button | |
| reset | button, that clears the form from the input data | |
| submit | button for sending form data. | |
| value | text | Defines the button value. |
How to style tag?
Common properties to alter the visual weight/emphasis/size of text in tag:
- CSS font-style property sets the style of the font. normal | italic | oblique | initial | inherit.
- CSS font-family property specifies a prioritized list of one or more font family names and/or generic family names for the selected element.
- CSS font-size property sets the size of the font.
- CSS font-weight property defines whether the font should be bold or thick.
- CSS text-transform property controls text case and capitalization.
- CSS text-decoration property specifies the decoration added to text, and is a shorthand property for text-decoration-line, text-decoration-color, text-decoration-style.
Coloring text in tag:
- CSS color property describes the color of the text content and text decorations.
- CSS background-color property sets the background color of an element.
Text layout styles for tag:
- CSS text-indent property specifies the indentation of the first line in a text block.
- CSS text-overflow property specifies how overflowed content that is not displayed should be signalled to the user.
- CSS white-space property specifies how white-space inside an element is handled.
- CSS word-break property specifies where the lines should be broken.
Other properties worth looking at for tag:
- CSS text-shadow property adds shadow to text.
- CSS text-align-last property sets the alignment of the last line of the text.
- CSS line-height property specifies the height of a line.
- CSS letter-spacing property defines the spaces between letters/characters in a text.
- CSS word-spacing property sets the spacing between words.
How to add alt text to a button with an image?
To add alt text to a button with an image, you can use the alt attribute. Here is an example:
button type="button"> img src="button-image.png" alt="Button Label"> button>In this example, the alt attribute has been added to the img element inside the button element. The value of the alt attribute should be a short description of the image, which will be read by screen readers in place of the image itself.
How to add a link to a button?
To add a link to a button, you can wrap the button element in an a element with the href attribute set to the URL you want to link to. Here is an example:
"https://example.com"> "button"> Button Label In this example, the a element has been added around the button element, and the href attribute has been set to the URL you want to link to. When the user clicks on the button, they will be taken to the linked URL.