- HTML Tag
- Syntax
- Example of the HTML tag:
- Using CSS styles
- Example of the tag with CSS styles:
- Result
- Attributes
- Attributes
- How to style tag?
- Common properties to alter the visual weight/emphasis/size of text in tag:
- Coloring text in tag:
- Text layout styles for tag:
- Other properties worth looking at for tag:
- How to add alt text to a button with an image?
- How to add a link to a button?
- CSS Tooltip
- Basic Tooltip
- Example
- Example Explained
- Positioning Tooltips
HTML Tag
The tag is used to create clickable buttons on the web page. The difference between these elements and buttons created with the tag is that you can place the content (images or text) inside the .
Use the element to define a button within HTML form, as browsers display the content of the tag differently.
Syntax
The
Example of the HTML tag:
html> html> head> title>Title of the document title> head> body> h1>Here will be our button h1> button type="button">Click button> body> html>Using CSS styles
You can apply CSS styles to the tag to change the appearance of the button, its size, color, text font, and so on.
Example of the tag with CSS styles:
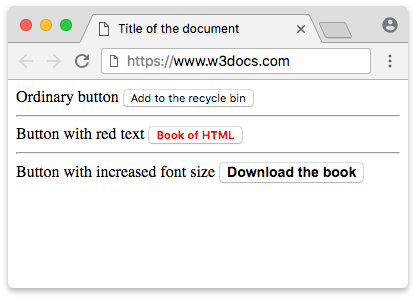
html> html> head> title>Title of the document title> head> body> Ordinary button button type="button">Add to the recycle bin button> hr /> Button with red text button type="button" style="color: red;">b>HTML Book b> button> hr /> Button with increased font size button type="button" style="font: bold 14px Arial;">Download the book button>br /> body> html>Result
Attributes
The
Attributes
| Attributes | Value | Description |
|---|---|---|
| autofocus | autofocus | Specifies that the button should receive focus after loading the page. |
| disabled | disabled | Deactivates the button. (Used when the button should become active after performing some action.) |
| form | form_id | Specifies one or more forms the button belongs to. If the button has multiple forms, then their identifiers (form_id) must be separated by spaces. |
| formaction | URL | Defines the address, where the form data will be sent after clicking on the button. (Used only for the buttons with the type=»submit» attribute). |
| formenctype | Defines how the form-data should be encoded when a form is submitted. (Used only for type=»submit»). | |
| application/x-www-form- | All symbols are encoded before a form is submitted (default value). | |
| urlencoded | Symbols are not encoded. | |
| multipart/form-data | Spaces are being replaced by the sign «+», but symbols aren’t encoded. | |
| text/plain | ||
| formmethod | Defines the method of the HTTP request, which will be used when a form is submitted (only for type=»submit»). | |
| get | Passes the form data in the address bar («name = value»), which are added to the URL of the page after the question mark and are separated by an ampersand (&). (http://example.ru/doc/?name=Ivan&password=vanya) | |
| post | The browser communicates with the server and sends the data for processing. | |
| formnovalidate | formnovalidate | Specifies that the form-data should not be validated on submission (only for type=»submit»). |
| formtarget | Specifies, where the response will be shown after the form is submitted (only for type=»submit»). | |
| blank | Opens the response in a new window. | |
| self | Opens the response in the current window. | |
| parent | Opens the response in the parent frame. | |
| top | Opens the response in the full width window. | |
| name | name | Defines the button name. |
| type | Defines the button type. | |
| button | ordinary button | |
| reset | button, that clears the form from the input data | |
| submit | button for sending form data. | |
| value | text | Defines the button value. |
How to style tag?
Common properties to alter the visual weight/emphasis/size of text in tag:
- CSS font-style property sets the style of the font. normal | italic | oblique | initial | inherit.
- CSS font-family property specifies a prioritized list of one or more font family names and/or generic family names for the selected element.
- CSS font-size property sets the size of the font.
- CSS font-weight property defines whether the font should be bold or thick.
- CSS text-transform property controls text case and capitalization.
- CSS text-decoration property specifies the decoration added to text, and is a shorthand property for text-decoration-line, text-decoration-color, text-decoration-style.
Coloring text in tag:
- CSS color property describes the color of the text content and text decorations.
- CSS background-color property sets the background color of an element.
Text layout styles for tag:
- CSS text-indent property specifies the indentation of the first line in a text block.
- CSS text-overflow property specifies how overflowed content that is not displayed should be signalled to the user.
- CSS white-space property specifies how white-space inside an element is handled.
- CSS word-break property specifies where the lines should be broken.
Other properties worth looking at for tag:
- CSS text-shadow property adds shadow to text.
- CSS text-align-last property sets the alignment of the last line of the text.
- CSS line-height property specifies the height of a line.
- CSS letter-spacing property defines the spaces between letters/characters in a text.
- CSS word-spacing property sets the spacing between words.
How to add alt text to a button with an image?
To add alt text to a button with an image, you can use the alt attribute. Here is an example:
button type="button"> img src="button-image.png" alt="Button Label"> button>In this example, the alt attribute has been added to the img element inside the button element. The value of the alt attribute should be a short description of the image, which will be read by screen readers in place of the image itself.
How to add a link to a button?
To add a link to a button, you can wrap the button element in an a element with the href attribute set to the URL you want to link to. Here is an example:
"https://example.com"> "button"> Button Label In this example, the a element has been added around the button element, and the href attribute has been set to the URL you want to link to. When the user clicks on the button, they will be taken to the linked URL.
CSS Tooltip
A tooltip is often used to specify extra information about something when the user moves the mouse pointer over an element:
Basic Tooltip
Create a tooltip that appears when the user moves the mouse over an element:
Example
/* Tooltip text */
.tooltip .tooltiptext visibility: hidden;
width: 120px;
background-color: black;
color: #fff;
text-align: center;
padding: 5px 0;
border-radius: 6px;
/* Position the tooltip text — see examples below! */
position: absolute;
z-index: 1;
>
/* Show the tooltip text when you mouse over the tooltip container */
.tooltip:hover .tooltiptext visibility: visible;
>
Example Explained
HTML: Use a container element (like ) and add the «tooltip» class to it. When the user mouse over this , it will show the tooltip text.
The tooltip text is placed inside an inline element (like ) with class=»tooltiptext» .
CSS: The tooltip class use position:relative , which is needed to position the tooltip text ( position:absolute ). Note: See examples below on how to position the tooltip.
The tooltiptext class holds the actual tooltip text. It is hidden by default, and will be visible on hover (see below). We have also added some basic styles to it: 120px width, black background color, white text color, centered text, and 5px top and bottom padding.
The CSS border-radius property is used to add rounded corners to the tooltip text.
The :hover selector is used to show the tooltip text when the user moves the mouse over the with class=»tooltip» .
Positioning Tooltips
In this example, the tooltip is placed to the right ( left:105% ) of the «hoverable» text (). Also note that top:-5px is used to place it in the middle of its container element. We use the number 5 because the tooltip text has a top and bottom padding of 5px. If you increase its padding, also increase the value of the top property to ensure that it stays in the middle (if this is something you want). The same applies if you want the tooltip placed to the left.