- Оформление кнопок
- Ширина и высота кнопки
- Параметры текста
- Рамка
- Скругление углов
- Фон
- Градиентный фон
- Добавление тени
- Итоги
- CSS Button Size
- Example 01:
- Example 02: Using Inline CSS to Alter the Size of a Button in an HTML File
- Example 03: Increasing the Size of a Button When It Hovers With Our Cursor in an HTML File
- Example 04: Using the Font Size to Enhance the Size of a Button Using CSS
- Conclusion
- About the author
- Aqsa Yasin
Оформление кнопок
Через CSS к любой кнопке применяются следующие параметры оформления: ширина и высота, фон, рамку, цвет и размер текста и др. Также к самим кнопкам и к тексту на них можно добавить тень.
Ширина и высота кнопки
Размеры кнопки явно устанавливать обычно необходимости нет, потому что кнопки автоматически подстраивают свой размер под имеющийся текст или изображение. Тем не менее, иногда в угоду дизайну приходится указывать ширину и высоту кнопки через соответствующие свойства width и height (пример 1).
Также на размер кнопки можно косвенно влиять через свойство padding. Оно добавляет пространство вокруг текста, расширяя кнопку по вертикали и горизонтали (пример 2).
Пример 2. Использование padding
Здесь у свойства padding два значения: первое устанавливает пространство вокруг текста по вертикали, второе по горизонтали.
Параметры текста
К тексту на кнопке применимы те же свойства, что и для обычного текста. В частности, допустимо менять шрифт, размер текста, его насыщенность, цвет и др. В примере 3 для текста кнопки устанавливается зелёный цвет и моноширинный шрифт с заглавными буквами.
Рамка
Для управления параметрами рамки применяется свойство border и его производные: border-width, border-style и border-color. В примере 4 класс .btn устанавливает основные параметры кнопки, в том числе толщину, стиль и цвет рамки. Для расширения набора кнопок в пример включены дополнительные классы, меняющие цвет рамки и текста. Таким образом, к достаточно добавить класс .btn и класс с нужным цветом, например, .info .
Пример 4. Цветные рамки у кнопки
Здесь используется набор кнопок с цветными рамками для различных ситуаций.
Скругление углов
За скругление уголков у рамок отвечает свойство border-radius, в качестве его значения указываются любые единицы размера из CSS, например, em, rem, пиксели, проценты и др. В примере 5 у кнопок радиус установлен как 0.4em .
Пример 5. Скруглённые уголки у кнопок
Разные значения border-radius дают и различную форму кнопок. В табл. 1 приведён вид кнопок, получаемый в зависимости от радиуса скругления.
| Значение border-radius | Описание | Вид кнопки |
|---|---|---|
| 0.5em | Такое значение устанавливает одинаковый радиус скругления у всех уголков кнопки. | Кнопка |
| 5em | Любое большое значения радиуса, превышающее половину высоты кнопки, превращает кнопку в подобие пилюли. | Кнопка |
| 50% | Процентная запись устанавливает разные значения радиуса по горизонтали и вертикали, поскольку проценты берутся отдельно от ширины и высоты кнопки. В итоге получается овальная кнопка. | Кнопка |
| 0.8em 0 0.8em 0 | Четыре значения позволяют установить радиус каждого уголка кнопки независимо. Отсчёт начинается от левого верхнего угла и идёт по часовой стрелке. | Кнопка |
Фон
В примерах выше цвет фона делался прозрачным через свойство background-color со значением transparent . Аналогично устанавливается и произвольный цвет фона. Учтите, что у цветных кнопок сохраняется рамка по умолчанию, которая при желании убирается через свойство border-width или через свойство border-style со значением none . В примере 6 вводится несколько стилевых классов для кнопок, меняющих их цвет. К элементу достаточно добавить класс .btn и одновременно класс с желаемым цветом фона, например, .success .
Пример 6. Использование background-color
Здесь используется набор цветных кнопок для различных ситуаций.
Цветной фон допустимо комбинировать с цветной рамкой, получая разные вариации кнопок. В примере 7 рамка у кнопки сперва убирается, а затем к кнопке добавляется цветная линия снизу через свойство border-bottom.
Пример 7. Сочетание фона и линии
Градиентный фон
Вместо однотонного цветного фона для кнопок можно установить градиент через свойство background-image и функцию linear-gradient(). Например, для вертикального градиента от красного к синему цвету пишем следующее:
Для горизонтального градиента слева направо добавится ещё один параметр to right:
Вместо названия цветов или шестнадцатеричных значений цвет удобно задавать в формате rgba() . Тогда оставляя цвет исходным мы только меняем значение прозрачности. Здесь вместо оранжевого цвета #f79103 используется его аналог rgb(247, 145, 3), для начального и конечного цветов задана прозрачность 0.2.
linear-gradient( rgba(247, 145, 3, 0.2), rgb(247, 145, 3), rgba(247, 145, 3, 0.2) );В примере 8 представлены градиентные кнопки для разных ситуаций, цвет которых задан через rgba() . Для контрастного выделения кнопок к ним, также, добавлена рамка соответствующего цвета.
Пример 8. Градиентные кнопки
Добавление тени
Как и к любому блоку, к легко добавляется тень через свойство box-shadow. У него четыре основных параметра: первые два отвечают за смещение тени, третий устанавливает её размытие, а четвёртый цвет тени. Так, для создания равномерной полупрозрачной тени вокруг кнопки используем следующую запись.
Для тени не вокруг кнопки, а внутри неё, добавляется параметр inset .
В примере 9 приведены несколько кнопок с разными параметрами box-shadow , дающими непохожие друг на друга тени.
Итоги
- Ширина и высота кнопки устанавливаются непосредственно через свойства width и height. Также на размер влияет свойство padding, оно задаёт расстояние от текста до края кнопки.
- Параметры рамки меняются с помощью свойства border, которое определяет толщину, стиль и цвет линии. Для скругления уголков рамки добавляется свойство border-radius.
- Цвет фона кнопки задаётся через свойство background-color, для градиентного фона применяется свойство background-image с функцией linear-gradient().
- Тень к кнопке добавляется через свойство box-shadow.
CSS Button Size
![]()
This article will go over the concept of the button size in the CSS style approach. As we know, the default button is small in size and is not visible. So, we will use the CSS in two separate ways to increase the button size and alter it on an effect like the hover effect. All these examples will be performed in the Notepad++ environment.
Example 01:
In this example, we will use the width and height property for the button element to increase its size. We will use the CSS Style Tag approach in this example to add several properties. First, we will look at the default size of the button element present in an HTML file.
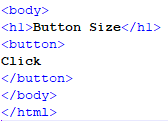
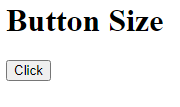
As we can see in the given script, we have not altered the size of the button. In the following output, we can see that the button size is very small and is not feasible for a web page.
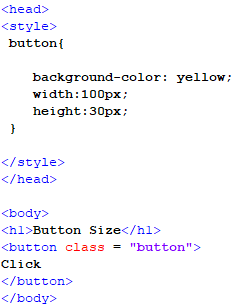
So, now we add the styling to the button. First, we open the head tag for the file. In this tag, the style tag for CSS is called. In this tag, we add all the properties for the button element. We write all the properties for the button element inside the button class parenthesis. First, we set the background color to “yellow”. Then, we set the width in pixel format to “100px”. Finally, we set the height in pixel format to “30px”. We close the style and head tags after all of the formatting are complete. Then, we go to the body tag. We write the page’s headline using the h1 tag in the body tag and then open the button tag. The class from the style tag is called in the button tag. Following that, we close the button tag with the text that displays on the button in between, as well as the body tag.
As explained earlier, we added the code in the previous script. Now, we open this new script on our browser after saving it in the correct format.
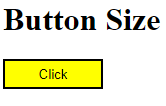
In the given output, we can see that the button has all the formatting including the size that we specified in the style class in the file header.
Example 02: Using Inline CSS to Alter the Size of a Button in an HTML File
In this example, we will use the inline CSS to change the size of an HTML file’s default button element. All the style properties will be assigned inside the button tag. This is an unconventional method to add CSS to any element and will only be associated with the current element.

As we can see in the previous snippet, we directly moved to the body of the file as all the content would be in the body tag. First, we open the h1 tag to write a heading for the page and then close it. Then, we open the button tag. In this tag, we call the style attribute by its keyword. After this, we write all the properties for the button element in the inverted commas and separate them by using the semicolon character. First, we assign the background color, “yellow”. Then, we assign the width in the pixel format. In the end, we assign the height, also in the pixel format. After this, we close the button tag with the text in between, which will appear on the button. And close the body tag along with it. Now, we save this file in the “.html” format and open it on our browser to get the following result:
As we can see in the output of our script, the heading and button from the body tag are visible. The button has all of the values defined in the tag, including the height and width.
Example 03: Increasing the Size of a Button When It Hovers With Our Cursor in an HTML File
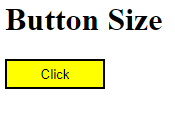
In this example, we will use the width and height properties of the button element to make it bigger, only when the pointer is over it. In this example, we will use the CSS style tags to add numerous attributes and effects to the button element.
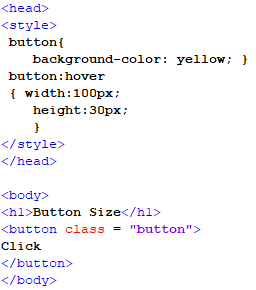
In this example, we customize the button using the CSS style tags. First, we open the file’s head tag. And then, we call the CSS style tag from there. We add all of the button element’s attributes in this tag. Inside the button class parenthesis, we enter all of the properties for the button element; in this example, we set the background color to “yellow.” Then, we open a button class that inherits a method called “hover”. In this function, we do the following: we set the width in pixel format to “100px” and set the height in pixel format to “30px”. After we finish formatting, we close the style and head tags. Then, we go to the body tag. We use the h1 tag to create the page’s title in the body tag, then open the button tag. The button tag uses the class from the style tag and have the text that appears on the button in between. Following that, we close the button tag and the body tag.

As we can see in the previous output, the size and the background color have changed as we hovered on the button with our cursor. This is because the hover function has all these properties defined in the style tag of the header’s file.
Example 04: Using the Font Size to Enhance the Size of a Button Using CSS
In this example, we will opt to a different method to change the size of a button. The font size property will be used to increase the size of a button using the style tag CSS.
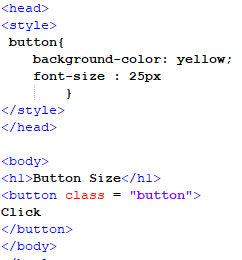
First, we open the style tag in the file header and create a styling class for the button. In this class, we assign a background color to the button. After that, we assign the font size as well. In this case, it is set to “25px”. Then, we close the class and the style and head tags, respectively. Then the body tag has a heading and a button tag which have the style tag class inherited in it. After this, we close the tags and save the file to open it on our browser.
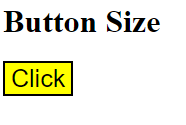
In the output screen, we can see that the button has an increased size from the default button that the HTML provides due to the change in the font size property.
Conclusion
In this article, we discussed the size of the button element present in the Hypertext Markup Language. The default button has a very small size which makes it difficult to navigate on a web page. So, we used the different approaches in CSS like the style tag and inline CSS approach. The most common property used to alter the size are the width and height property of a button. We discussed this concept and implemented this on the Notepad++. We also implemented the font size approach to increase the size of a button.
About the author
Aqsa Yasin
I am a self-motivated information technology professional with a passion for writing. I am a technical writer and love to write for all Linux flavors and Windows.