- Sets the front-to-back ordering of elements
- Example
- Example 2
- Html back to front
- # How to bring an element to the Front using CSS
- # In some cases, you might have to use a very high z-index value
- # You can also set the z-index property on flex items
- # Additional Resources
- jQuery display list from back to front
- Javascript Source Code
- Related
Sets the front-to-back ordering of elements
The z-index property sets the front-to-back for elements.
The value for the z-index value is a number, and negative values are allowed. The smaller the value, the further to the back the element will be drawn.
This property is useful only when elements overlap.
Example
The following code demonstrates the z-index Property.
!DOCTYPE HTML> html> head> style> img !-- w w w.ja v a 2s. c o m--> border: medium double black;; background-color: lightgreay; position: fixed; > #myID < z-index: 1; top: 15px; left: 150px; > #mySecond < z-index: 2; top: 25px; left: 120px; > body> p>This is a test. p>This is a test. img >"myID" src="http://www.java2s.com/style/download.png" /> img >"mySecond" src="http://www.java2s.com/style/download.png" /> p>This is a test. Example 2
The following code shows how to use z-index to create layer.
html> head> style rel="stylesheet" type="text/css"> div#layer1 !-- w ww .j av a2 s . c om--> z-index: 3; position: absolute; top: 10px; left: 10px; width: 200px; height: 100px; background-color: red; border: 1px solid #000000; padding: 5px; > div#layer2 < z-index: 2; position: absolute; top: 20px; left: 20px; width: 200px; height: 100px; background-color: pink; border: 1px solid #000000; padding: 5px; > div#layer3 < z-index: 1; position: absolute; top: 30px; left: 30px; width: 200px; height: 100px; background-color: yellow; border: 1px solid #000000; padding: 5px; > body> div >"layer1"> h1>Layer One div >"layer2"> h1>Layer Two div >"layer3"> h1>Layer Three Html back to front
Last updated: Apr 29, 2023
Reading time · 6 min

# How to bring an element to the Front using CSS
To bring an element to the front using CSS:
- Set the element’s z-index CSS property to 1 .
- Set the element’s position CSS property to relative .
- The z-index property only applies to positioned elements.
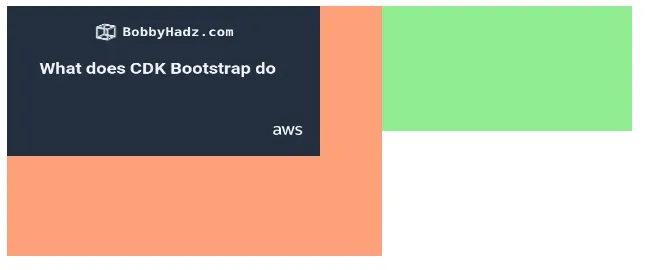
Copied!DOCTYPE html> html lang="en"> head> meta charset="UTF-8" /> head> style> .box-1 height: 200px; width: 300px; background-color: lightsalmon; position: absolute; z-index: 3; > .box-2 height: 100px; width: 500px; background-color: lightgreen; position: absolute; z-index: 2; > .banner-img height: 120px; width: 250px; position: relative; z-index: 1; > style> body> div class="box-1">BOX 1div> div class="box-2">BOX 2div> img src="https://bobbyhadz.com/images/blog/what-aws-cdk-bootstrap-do/thumbnail.webp" alt="banner" class="banner-img" /> body> html>
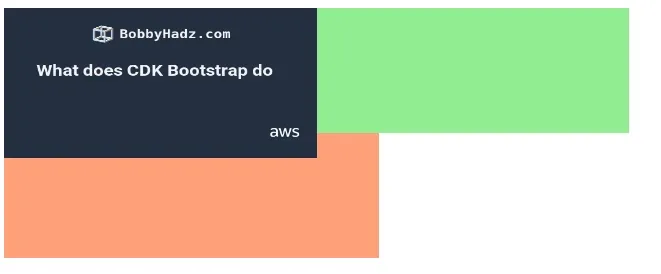
Notice that the image is positioned in front of the 2 div elements.
Copied!.banner-img height: 120px; width: 250px; position: relative; z-index: 1; >
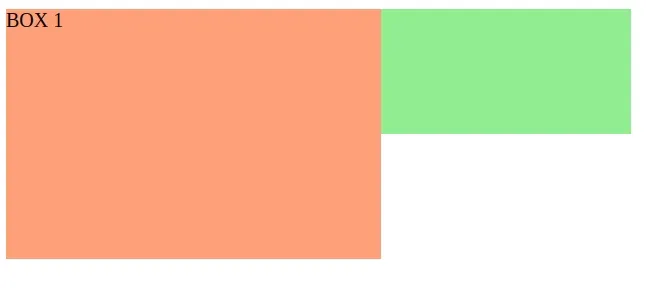
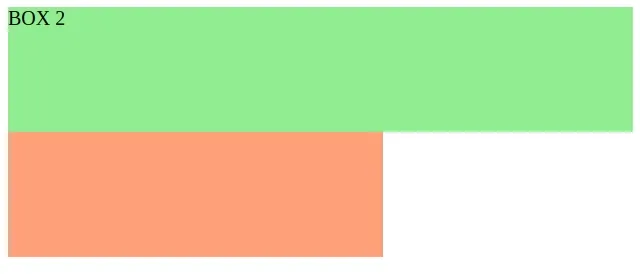
The z-index CSS property sets the z-order of a positioned element and its descendants or flex items.
Overlapping elements with a higher z-index cover those with a smaller one.
So if the div elements have a z-index of 1 , the img element has to have a z-index of at least two to be shown in front of the divs.
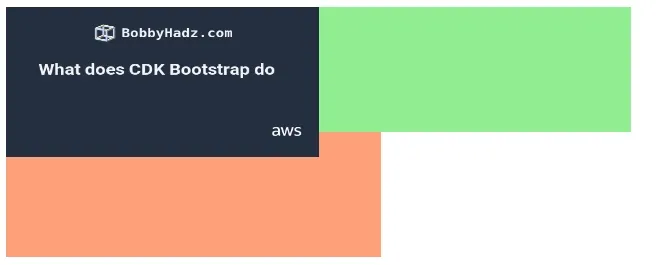
Copied!.box-1 height: 200px; width: 300px; background-color: lightsalmon; position: absolute; /* has a z-index of 1 */ z-index: 1; > .box-2 height: 100px; width: 300px; background-color: lightgreen; position: absolute; /* has a z-index of 1 */ z-index: 1; > .banner-img height: 120px; width: 250px; position: relative; /* z-index set to 2 */ z-index: 2; >
Setting the position CSS property on the img element to relative is important because the element has to be positioned for the z-index CSS property to take effect.
The relative position means that the element is positioned according to the normal flow of the document.
Other values for the position CSS property include: absolute , relative , fixed and sticky .
There is also a static value which is the default and should not be used when setting the z-index CSS property.
The z-index CSS property only affects elements that have a position value other than static or are flex items.
Some things to note about the z-index CSS property:
- A z-index can be set to a negative integer value, e.g. -1 .
- The default z-index value for an element is set to 0 .
- Overlapping elements with a higher z-index cover those with a smaller one.
- An element with a negative z-index value appears behind elements without a set z-index value because the default is 0 .
If I set the z-index of one of the boxes to a higher value than the z-index of the image, the corresponding div appears in front of the image.
Copied!.box-1 height: 200px; width: 300px; background-color: lightsalmon; position: absolute; /* display box-1 in front of the image */ z-index: 3; > .box-2 height: 100px; width: 500px; background-color: lightgreen; position: absolute; > .banner-img height: 120px; width: 250px; position: relative; z-index: 2; >
I can also move the image behind the boxes by setting its z-index to a negative value, e.g. -1 .
Copied!.box-1 height: 200px; width: 300px; background-color: lightsalmon; position: absolute; > .box-2 height: 100px; width: 500px; background-color: lightgreen; position: absolute; > .banner-img height: 120px; width: 250px; position: relative; /* hide image behind div elements */ z-index: -1; >
This approach can also be used to bring an element to the front.
You can set a z-index of -1 on the overlapping elements and they will be moved to the back.
# In some cases, you might have to use a very high z-index value
In some cases, you might have to use a very high z-index value to bring an element to the front.
For example, if you use a third-party CSS library that has set a high z-index on an element, you have to use a higher value to move an element to the front.
To view the z-index of an element:

- Make sure the Elements tab is selected and click on Computed.
- View the z-index of the element.
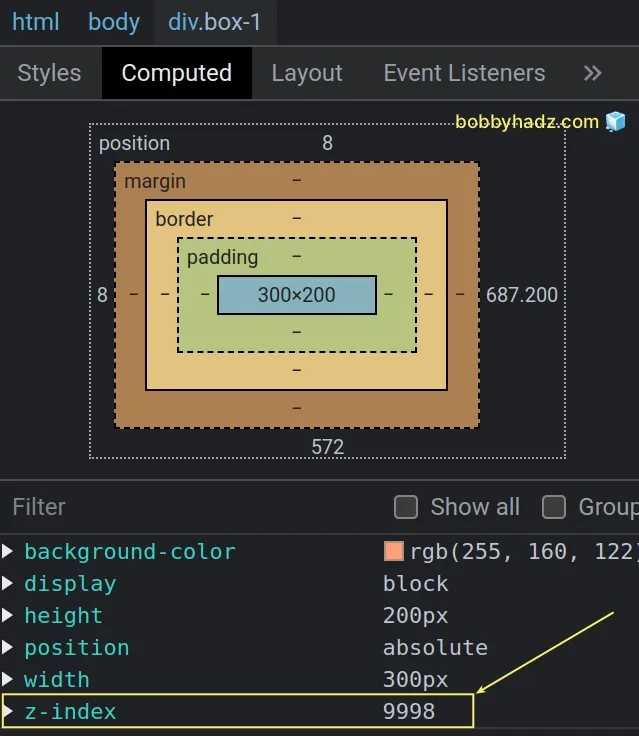
The z-index of the element in the example is 9998 , so I have to use a z-index of at least 9999 to move another element in front of it.
Copied!DOCTYPE html> html lang="en"> head> meta charset="UTF-8" /> head> style> .box-1 height: 200px; width: 300px; background-color: lightsalmon; position: absolute; z-index: 9998; > .box-2 height: 100px; width: 500px; background-color: lightgreen; position: absolute; > .banner-img height: 120px; width: 250px; position: relative; z-index: 9999; > style> body> div class="box-1">BOX 1div> div class="box-2">BOX 2div> img src="https://bobbyhadz.com/images/blog/what-aws-cdk-bootstrap-do/thumbnail.webp" alt="banner" class="banner-img" /> body> html>
The img element in the example has a higher z-index value than the div , so it is positioned in front of it.
In some cases, you might have to overwrite the z-index of an element that has its z-index property set inline.
If you don’t have access to the inline style, you have to use the !important flag.
Copied!DOCTYPE html> html lang="en"> head> meta charset="UTF-8" /> head> style> .box-1 height: 200px; width: 300px; background-color: lightsalmon; position: absolute; > .box-2 height: 100px; width: 500px; background-color: lightgreen; position: absolute; > .banner-img height: 120px; width: 250px; position: relative; z-index: 9999 !important; > style> body> div class="box-1">BOX 1div> div class="box-2">BOX 2div> img src="https://bobbyhadz.com/images/blog/what-aws-cdk-bootstrap-do/thumbnail.webp" alt="banner" class="banner-img" style="z-index: -100" /> body> html>
Notice that the img element has its z-index CSS property set to -100 inline.
Copied!img src="https://bobbyhadz.com/images/blog/what-aws-cdk-bootstrap-do/thumbnail.webp" alt="banner" class="banner-img" style="z-index: -100" />
Inline styles have higher precedence than global styles, so in order to overwrite the element’s z-index , I used the !important flag.
Copied!.banner-img height: 120px; width: 250px; position: relative; z-index: 9999 !important; >
# You can also set the z-index property on flex items
As previously noted, the z-index CSS property only affects elements that have a position value other than static or are flex items.
Flex items are the direct children of an element that has display set to flex or inline-flex .
Here is an example of how you can move the img element to the front without setting its position CSS property.
Copied!DOCTYPE html> html lang="en"> head> meta charset="UTF-8" /> head> style> .container display: flex; > .box-1 height: 200px; width: 300px; background-color: lightsalmon; position: absolute; > .box-2 height: 100px; width: 500px; background-color: lightgreen; position: absolute; > .banner-img height: 120px; width: 250px; z-index: 1; > style> body> div class="container"> div class="box-1">BOX 1div> div class="box-2">BOX 2div> img src="https://bobbyhadz.com/images/blog/what-aws-cdk-bootstrap-do/thumbnail.webp" alt="banner" class="banner-img" /> div> body> html>
We directly set the z-index CSS property on the img element and it moved the image to the front.
Copied!.banner-img height: 120px; width: 250px; z-index: 1; >
Notice that we didn’t set the position property on the element.
This worked because the direct parent of the image has its display property set to flex .
Copied!.container display: flex; >
# Additional Resources
You can learn more about the related topics by checking out the following tutorials:
- How to adjust a Button’s width to fit the Text in CSS
- Hide element when clicked outside using JavaScript
- Set min-margin, max-margin, min-padding & max-padding in CSS
- How to Apply a CSS Hover effect to multiple Elements
- How to set a Max Character length in CSS
- Changing Bold Text into Normal (Unbold Text) in HTML
- Force the text in a Div to stay in one Line in HTML & CSS
- CSS text-align: center; not working issue [Solved]
- focus() not working in JavaScript issue [Solved]
- Remove the Header, Footer & URL when Printing in JavaScript
- How to change the Style of the title Attribute using CSS
- Tailwind CSS classes not working in Vanilla or React project
- Remove whitespace between inline-block elements using CSS
I wrote a book in which I share everything I know about how to become a better, more efficient programmer.
jQuery display list from back to front
The following tutorial shows you how to do «jQuery display list from back to front».
The result is illustrated in the iframe.
You can check the full source code and open it in another tab using the links.
Javascript Source Code
The Javascript source code to do «jQuery display list from back to front» is
html> head> meta name="viewport" content="width=device-width, initial-scale=1"> script type="text/javascript" src="https://code.jquery.com/jquery-1.9.1.js" > !-- w w w . d e m o 2 s . c o m --> body> div >'list'> ul> li>a href="/home/fresa/Desktop/task/page.html">2011 li>a href="/home/fresa/Desktop/task/page.html#?topic=2013">2012 li>a href="/home/fresa/Desktop/task/page.html#?topic=2012">2013 li>a href="/home/fresa/Desktop/task/page.html#?topic=2012">2014 script type='text/javascript'> $('.list ul li').each(function()< $(this).prependTo($(this).parent()) >); Related
- jQuery Difference between click listener with jQuery and Javascript (Demo 3)
- jQuery display grid as default in list/grid view switcher
- jQuery display last comment at the top of the list
- jQuery display list from back to front
- jQuery Display paragraph content in list
- jQuery Display records by list view / grid view
- jQuery Displaying only last array in list
demo2s.com | Email: | Demo Source and Support. All rights reserved.