- Change Header Color when Scroll your page.
- HTML: 📖
- CSS: 💅
- jQuery: 🕺
- How to style a header using CSS?
- CSS properties to style header
- Example: Style header using CSS
- Output
- Example: Style header using CSS
- Conclusion
- Как изменить шапку сайта (часть 1)
- Что бы я изменил в дизайне?
- Первый ряд – панель с контактами (top header).
- HTML разметка
- CSS стили
- Второй ряд – шапка (header)
- HTML код
- CSS код
- Комментарии ( 0 ):
- How to Change Header Background Color in WordPress
- How to Change Header Background Color in WordPress
- Changing Header Background for Classic Themes
- How To Change The Header Menu Items Background Color In WordPress
- Conclusion
Change Header Color when Scroll your page.
Hi Dev friends!
🙋 I want to write a small tutorial trick for change color of your fixed header when scroll your HTML page: it’s simple and it’s a nice view!
HTML: 📖
id="container-header"> THIS IS MY HEADER id="container-main"> THIS IS MY BODY CSS: 💅
Create your style, and add a class (in this case «.change-color», and i added a border bottom) for change color of your header when will scroll the page.
* margin: 0; padding: 0; box-sizing: border-box; > /* Header */ #container-header height: 70px; width: 100vw; position: fixed; display: flex; justify-content: center; align-items: center; color: #FFFFFF; > /* Add this class when scroll page */ .change-color border-bottom: 0.5px solid #EDEDED; > /* Main */ #container-main width: 100vw; height: 1100px; background-color: #000000; display: flex; justify-content: center; align-items: center; color: #FFFFFF; > jQuery: 🕺
$(document).on('scroll', function() if ( $(window).scrollTop() > 30) $('#container-header').addClass('change-color'); > else $('#container-header').removeClass('change-color'); > >); How to style a header using CSS?
The headers are the first thing that the viewers see when visiting a website. So, styling the header is very important in web designing. We can style the header using CSS properties.
CSS properties to style header
To customize the header elements using the CSS properties, we can change the font size of header text using font-size property, change the background color of the header container using background-color property, set the width and height of the header container, add padding between the header components and so on.
Example: Style header using CSS
In this program, we have used various CSS properties to style the header.
.header < width: 100%; height: 200px; background-color: teal; text-align: center; >h1 Styling the header
Here we have used list of properties to style header
Output
Here is the output of the above program.

Example: Style header using CSS
We can customize the header in various ways using CSS properties. In the example given below, we are going to add background-image to the header element. We have also added the opacity to the header text.
Conclusion
In this tutorial, we have learned to style the headers using CSS properties. The most common properties used to style headers are back-ground color , font-size , text-align , padding , margin , etc. You can practice your own to make the header more customize using CSS.
Как изменить шапку сайта (часть 1)

На фриланс-биржах, заказчики часто просят, изменить дизайн какого-нибудь фрагмента сайта, например шапки. Самый простой способ изменить шапку сайта, так это создать её с нуля. Почему я так считаю? Пожалуйста, будут и аргументы.
Когда я открываю исходный код чужого сайта, то за редким исключением, вижу неструктурированный HTML код, непоследовательно написанный CSS и почти нет комментариев. Ориентироваться в таком хаосе, очень сложно и я понимаю, что мне быстрее сделать все заново.
Такой бардак происходит на сайтах, сделанных непрофессионально, поэтому и обращается заказчик с такими шедеврами к фрилансерам. Грамотно сделанные сайты, редко переделывают, потому вероятность наткнуться на плохо сделанный сайт, очень высока.
Специально для этой статьи, я сделал скриншот одной чудесной шапки, случайно найденной в интернете, у какого-то сайта и буду её улучшать, подробно описывая весь процесс.

У данного творения просматривается явная нехватка места для всех элементов. От такого плотного соседства элементов и отсутствия пустого пространства, глаза собираются в кучу. Надо разрядить пространство, за счёт создания нового ряда для контактной информации.
Что бы я изменил в дизайне?
- Шрифт и цвет у логотипа
- Размер и цвет остального шрифта
- Убрать зеленую полосу
- Блок с контактами разместить на верхней панели

Между тегами head в HTML файле:
Делать верстку мы будем на flexbox.
Первый ряд – панель с контактами (top header).
HTML разметка
В блок-контейнер с классом top-header, поместим три флекс-элемента – абзацы с текстом.
Массажный салон для вашего здоровья и красоты
Tel. (+372) 5514704, 58079045
Инфо и запись: ежедневно с 9:00 до 21:00
CSS стили
/* Общие стили для шапки */
body font-family: ‘Forum’, cursive;
color: #777;
background-color: #fff;
>
Инфоблоки встанут в ряд благодаря display: flex. Свойство space-around равномерно распределяет пустое пространство между инфоблоками. Однопиксельная серая рамка, визуально разграничит верхнюю панель от самой шапки.
/* Флекс контейнер для верхних инфо-блоков */
.top-header display: flex;
justify-content: space-around;
padding: 5px;
font-size: 100%;
border-bottom: 1px solid #efd0d0;
position: relative;
>
Выделим некоторые слова зеленым цветом.
/* Зеленый цвет у текста инфо-блоков */
.top-header .green color: #b2db41;
font-weight: bold;
>
Временно подсветим красной и черной рамками, чтобы было ясно, где флекс-контейнер, а где флекс-элементы.

Второй ряд – шапка (header)
Слева направо, первым идет логотип, а затем навигационное меню.
HTML код
Начинается с открывающего тега header, внутри которого блок с логотипом. Логотип вставляется, как ссылка, ведущая на главную страницу.
CSS код
/* Флекс контейнер для шапки */
header display: flex;
justify-content: space-around;
padding: 5px;
border-bottom: 5px solid #b2db41;
>
/* Стили для всех ссылок внутри флекс контейнера */
header a display: block;
color: #212121;
padding: 12px;
text-decoration: none; /* убирает подчеркивание */
font-size: 100%;
text-shadow: 0 1px 0 #fff;
border-radius: 4px;
>
Здесь мы указываем относительную ширину блока под логотип, значит остальные 70%, будет занимать навигация. Задавая проценты, можно точнее распределять детей-элементов в контейнере-родителе.
/* Ширина дочернего блока под логотип */
.wrap-logo width: 30%;
>
Задавая размеры шрифта в %, мы заботимся о супер больших экранах, ведь пиксели жестко задают размер.
/* Стилизация логотипа */
.wrap-logo #logo font-family: ‘Roboto Slab’, serif;
font-size: 200%;
font-weight: bold;
>
Логотип смотрится свежее, если его сделать двухцветным.
/* Зеленый цвет у части логотипа */
.wrap-logo span color: #b2db41;
>

![]()
Создано 08.04.2019 10:20:30
Копирование материалов разрешается только с указанием автора (Михаил Русаков) и индексируемой прямой ссылкой на сайт (http://myrusakov.ru)!
Добавляйтесь ко мне в друзья ВКонтакте: http://vk.com/myrusakov.
Если Вы хотите дать оценку мне и моей работе, то напишите её в моей группе: http://vk.com/rusakovmy.
Если Вы не хотите пропустить новые материалы на сайте,
то Вы можете подписаться на обновления: Подписаться на обновления
Если у Вас остались какие-либо вопросы, либо у Вас есть желание высказаться по поводу этой статьи, то Вы можете оставить свой комментарий внизу страницы.
Порекомендуйте эту статью друзьям:
Если Вам понравился сайт, то разместите ссылку на него (у себя на сайте, на форуме, в контакте):
- Кнопка:
Она выглядит вот так: - Текстовая ссылка:
Она выглядит вот так: Как создать свой сайт - BB-код ссылки для форумов (например, можете поставить её в подписи):
Комментарии ( 0 ):
Для добавления комментариев надо войти в систему.
Если Вы ещё не зарегистрированы на сайте, то сначала зарегистрируйтесь.
Copyright © 2010-2023 Русаков Михаил Юрьевич. Все права защищены.
How to Change Header Background Color in WordPress
WordPress lets you customize your website’s look and appearance in any way you want. With so many themes out there, you can not only choose a design that matches your needs but also customize it according to your brand’s style guide.
Just like the various elements you customize on your website, the header menu is also a highly customized aspect of any WordPress site.
There are many WordPress themes that let you build custom and advanced menus on your website.
But what if you simply want to change the header background in WordPress?
That’s exactly what I’m going to show in this short tutorial.
How to Change Header Background Color in WordPress
The process of changing the header background color in WordPress varies theme by theme. It’s comparatively easy when you use a block theme. In this post, we will cover both block and classic themes.
Changing Header Background for Classic Themes
When the theme doesn’t provide any option to change the header background color, you’ll have to do it manually by adding custom CSS.
Don’t worry though. It’s very simple to add custom CSS to change your menu header background.
Here are the steps you need to follow:
Step 1. Visit your website on your browser and right-click on your mouse and click on Inspect.
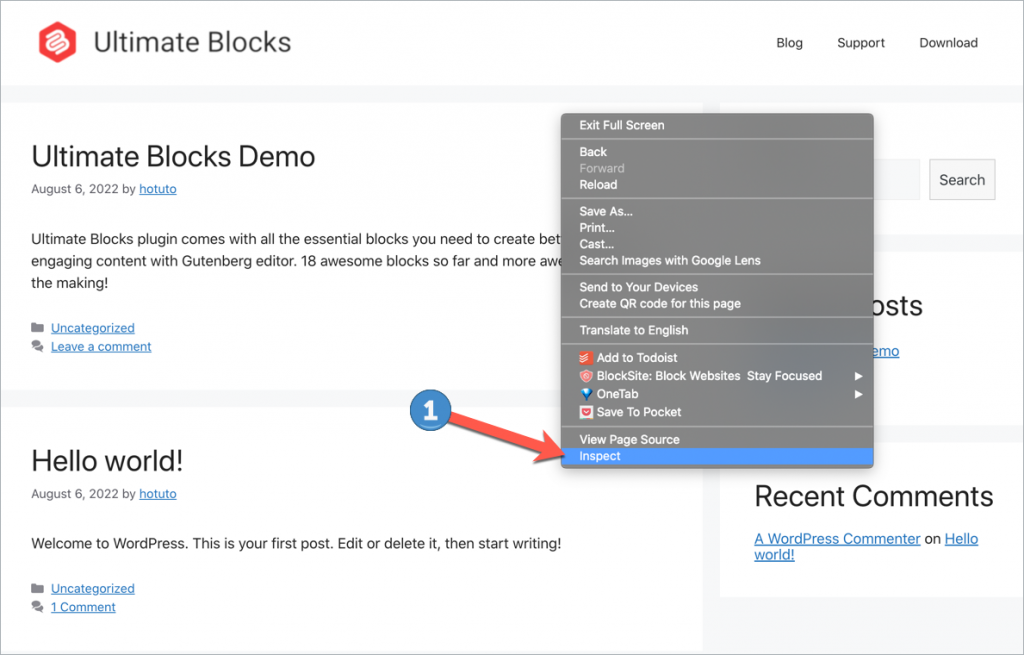
This opens a new window inside your browser that displays the HTML elements on the page.
Step 2. Find the CSS class of your header by expanding the lines of code in the Elements window. The CSS class for the header will most probably be like “site-header” or “menu-header”.
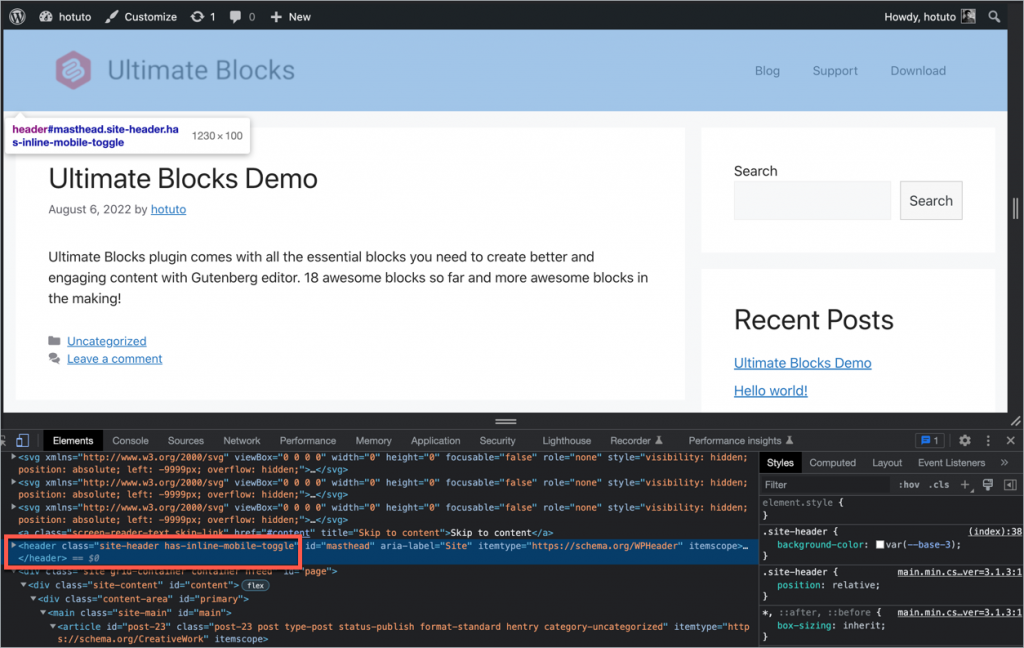
In my example, I’m using the GeneratePress WordPress theme which has the header CSS class as “site-header”.
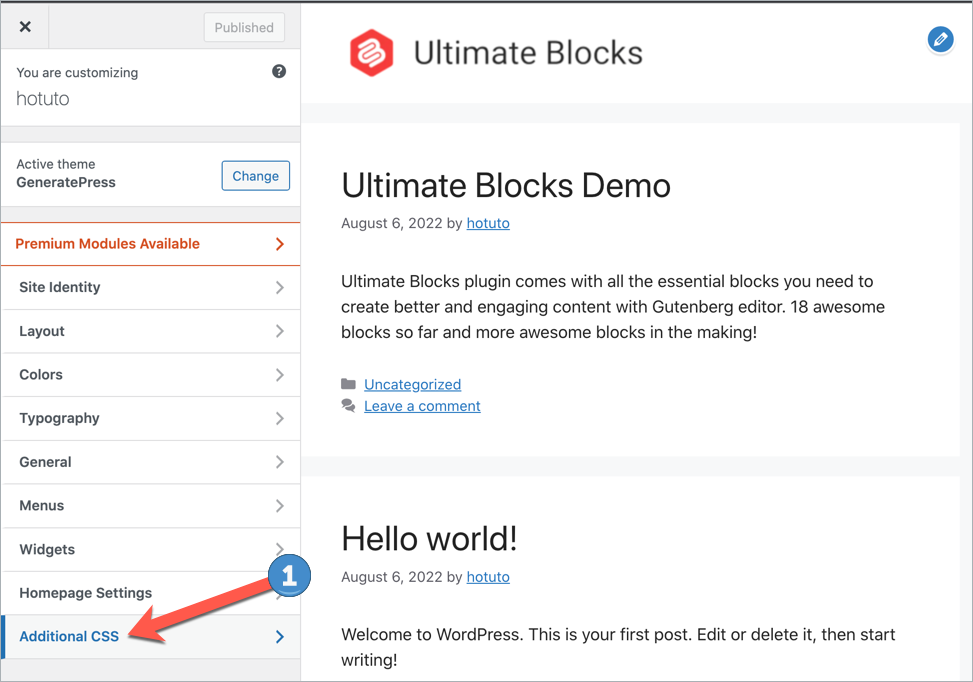
Step 3. Go to your WordPress dashboard > Appearance > Customize. This will take you to the theme customizer.

Step 4. Go to the Additional CSS settings in the theme customizer. This is where you can add custom CSS to your website.
Step 5. In the CSS editor, paste the following code:
Replace “#F0F1F8” with your desired background color’s hex code. Also, if your theme has a different site header class, replace it with “site-header”.
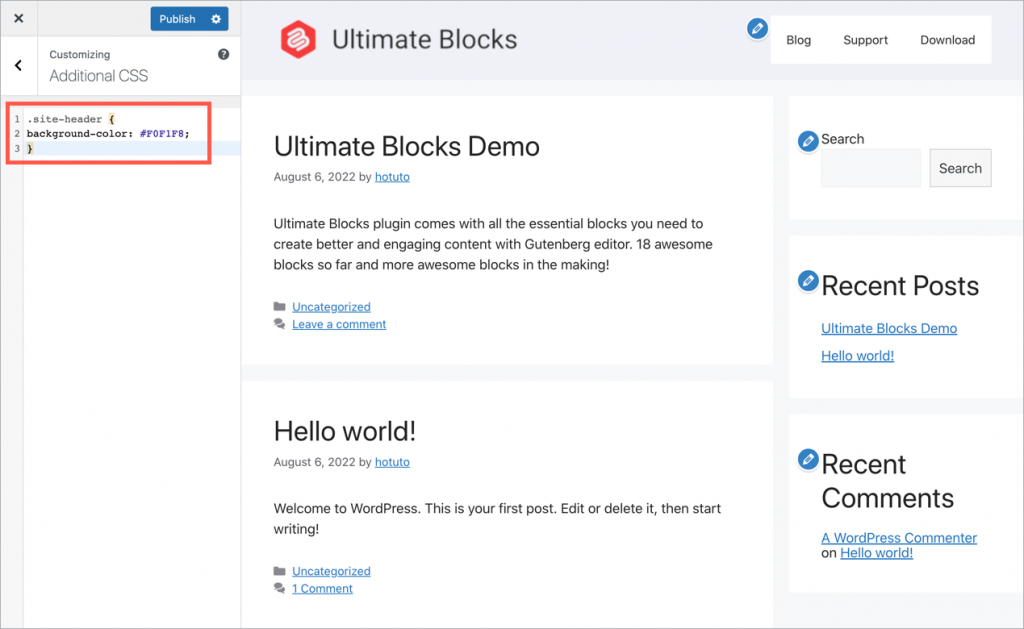
Now click on ‘Publish’ button to save your changes.
As you can see, the header background color of the website has been changed.
But there’s one problem. The menu items still have a white background color which doesn’t look very good.
How To Change The Header Menu Items Background Color In WordPress
The process of changing the background color of menu items is the same. Here are the steps you should follow:
Step 1. Visit your website and find the CSS class of the menu items.
As you can see, the CSS class for the menu navigation is titled “main-navigation”. Copy the name of this class.
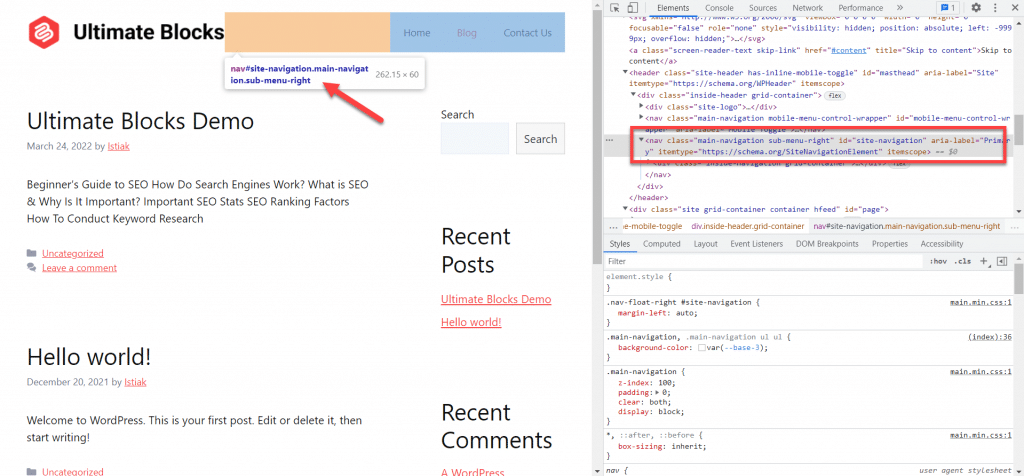
In many themes, you can also use the “menu” CSS class to change its background color. You can use either of the above two classes for this purpose.
Step 2. In the Additional CSS page, paste the following CSS line:
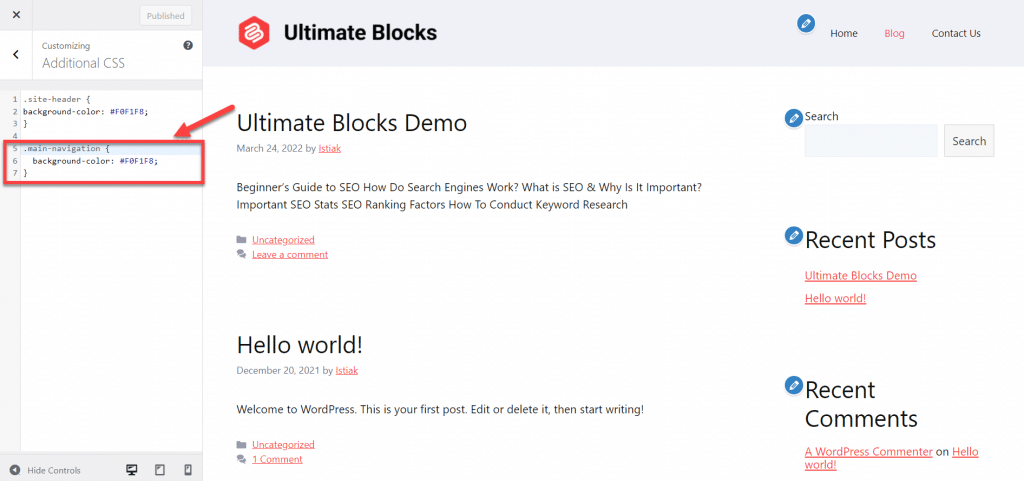
This will make the background color of the menu items the same as the header background color.
Conclusion
So, that’s how you can change the header background color in WordPress. I hope you found this tutorial helpful and can change your site’s header background colors with ease.
If you have any questions regarding this tutorial, feel free to ask your questions in the comments below. Also, don’t forget to browse more WordPress tutorials and guides on our blog.