- How To Install GDAL for Python with Anaconda
- Open the Anaconda Prompt
- Create a Conda Environment
- Install GDAL with conda install
- Verify the Installation
- Want to learn more about GDAL?
- Still Not Working?
- QGIS for Beginners
- Remote Sensing with QGIS
- QGIS Python Scripting with PyQGIS
- Latest Tutorials
- About Us
- Saved searches
- Use saved searches to filter your results more quickly
- How to install GDAL
How To Install GDAL for Python with Anaconda
The Geospatial Data Abstraction Library (GDAL) is a fundamental package for spatial analysis with Python. GDAL is a powerful package with a lot of functionality. However, it is notoriously difficult to install. There are two reliable ways to install the GDAL python package: from the conda-forge channel using the conda installer or using pip to install a precompiled wheel. This guide will demonstrate how to successfully install GDAL from the conda-forge channel to an Anaconda ( conda ) environment. You can check out the video at the end of this article for a demonstration. Once you get GDAL installed, check out our tutorial to get started using GDAL with Python.
Open the Anaconda Prompt
Start by opening your Anaconda Prompt. If you’re using Mac or Linux this will probably be your regular terminal window. If using Windows, you’ll need to have the Anaconda distribution directories added to your path variable or open the Anaconda Prompt (recommended).
Create a Conda Environment
Now, make sure you’re installing GDAL to an environment. I’ve run into trouble installing GDAL to the base environment, but haven’t had issues when I’ve created a new conda environment. To create an anaconda environment, enter the following code.
Here, pygdal is the name of the environment that was created. Now activate the environment using conda activate env-name . Like so.
Install GDAL with conda install
Next comes the GDAL install. Make sure your pygdal environment has been activated. You should see (pygdal) , or your environment’s name, to the left of the current working directory in the command prompt. At this point you’re ready to perform the GDAL installation. GDAL can be installed using the conda install command. At the time of writing, GDAL is not available from the main install channel, so we’ll specify the conda-forge channel which contains a GDAL distribution. Type the following code to perform the install.
conda install -c conda-forge gdal
You should be given a prompt asking if you want to install/upgrade/downgrade the listed packages. Select the ‘yes’ option and GDAL will be installed in your environment. It is important to note that depending on the other modules you are using there could be discrepancies with GDAL’s requirements that prevent a successful install. Make sure you specify the conda-forge channel using the -c flag. If you do not specify the channel and just use conda install gdal you will probably get something like the following.
Collecting package metadata (current_repodata.json): done Solving environment: failed with initial frozen solve. Retrying with flexible solve. Solving environment: failed with repodata from current_repodata.json, will retry with next repodata source. Collecting package metadata (repodata.json): done Solving environment: failed with initial frozen solve. Retrying with flexible solve. Solving environment: | Found conflicts! Looking for incompatible packages.
In my experience, it’s not worth trying to resolve these errors or resolve conflicts with any incompatible packages. If I ever get messages like this I either create a new environment to install GDAL or, if that doesn’t work, reinstall Anaconda.
Verify the Installation
Make sure you can import GDAL into an interactive session to confirm it has been appropriately installed. From the command prompt type python (or python3 if you also have a version of Python 2 on your machine). You will now see this symbol >>> , which indicates you have started the interactive session. Your first instinct will be to type import gdal this will produce the following error.
>>>import gdal Traceback (most recent call last): File "", line 1, in ModuleNotFoundError: No module named 'gdal'
Not to worry. The GDAL distribution from conda-forge installs GDAL as part of the OSGEO library, which includes GDAL, OGR, and OSR. Just use from osgeo import gdal .
No error message is given. GDAL has been successfully imported. Check out our guide to getting started with GDAL to make the most of your new installation.
Want to learn more about GDAL?
I have a full-length course on using GDAL for raster analysis with Python. The course contains six hours of video instruction and is complete with code and example datasets so you can easily follow along and replicate the concepts that are taught. Check it out at geospatialschool.com!
Still Not Working?
- You have other modules installed that conflict with GDAL
- You are using a python version that doesn’t support the current GDAL release
- There is a problem with your conda environment
- There is a problem with your Anaconda installation
The first thing I would try is to create a new conda environment and specify a python version. For example, the following code would create a conda environment with python version 3.8.
conda create -n pygdal38 python=3.8
If that doesn’t work there are few more things you can try to reconcile these problems. First, create a new environment and install GDAL before any other packages. Second, remove and reinstall Anaconda. Third, try to reconcile any dependency issues. Fourth, download a GDAL wheel file and install it with pip .
I’ve spent a lot of hours troubleshooting GDAL installation with Python and one of these solutions usually works for me. I hope this workflow helps pass on some of my hard-earned knowledge so that you spend more time writing code and less time pulling out your hair.
Whether you’re looking to take your GIS skills to the next level, or just getting started with GIS, we have a course for you! We’re constantly creating and curating more courses to help you improve your geospatial skills.
QGIS for Beginners
Remote Sensing with QGIS
QGIS Python Scripting with PyQGIS
All of our courses are taught by industry professionals and include step-by-step video instruction so you don’t get lost in YouTube videos and blog posts, downloadable data so you can reproduce everything the instructor does, and code you can copy so you can avoid repetitive typing
My Recommended Equipment
This article contains affiliate links. When you click on links in this article Open Source Options may make a commission on any sales. This does not have any impact on the price you pay for products.
Konrad has a Master’s Degree in Ecology and a Doctorate Degree in Water Resources and has been performing geospatial analysis and writing code (in multiple programming languages) for over a decade. He writes code to develop models and analysis workflows to predict and evaluate changes to landscapes and water resources. He has published multiple articles in prominent peer-reviewed, scientific journals. Konrad’s code and workflow contribute to operational products that inform water and ecosystem management.
Latest Tutorials
With QGIS reprojections can be calculated with the export data tool, the reproject layer tool, and GDAL Warp. Reprojecting layers (i.e., converting them to a different coordinate reference system, or.
In cartography and GIS, it is to display two different products side by side to make comparisons. This is a powerful and often necessary feature of any serious GIS software. QGIS makes it possible to.
About Us
We believe data processing and analytics routines should be repeatable without purchasing expensive software licenses. This is possible with open-source programs and programming languages. Our goal is to help you learn open-source software and programming languages for GIS and data science. We do this with free tutorials and paid courses.
Saved searches
Use saved searches to filter your results more quickly
You signed in with another tab or window. Reload to refresh your session. You signed out in another tab or window. Reload to refresh your session. You switched accounts on another tab or window. Reload to refresh your session.
How to install GDAL
- Preamble
- Installation instructions
- Georeferencing management
- About 3D view size and clip distances
- Basemaps
- Get OSM
- Get SRTM
- Shapefile
- Georaster
- Georaster relief
- Open Street Map
- Shapefile
- Georender
- Geophotos
- Delaunay triangulation
- Voronoi diagram
- lonlat to sphere
- Earth curvature correction
- Drop to terrain
- Terrain analysis
- Using the addon with GDAL
- QGIS tips
Clone this wiki locally
GDAL is a popular and powerful geospatial data processing library. GDAL is available as a set of commandline utilities (ready to use binaries files). The developer oriented library is available as a C/C++ API. Bindings in other languages, including Python, are also available.
GDAL is an optional dependency, most of the functionalities of BlenderGIS are available without it. If the addon does not works as expected, installing GDAL will not solve the issue. GDAL can be useful for advanced users who need more support for GIS specific fomats and reprojection tasks directly in Blender. However, if you want to deal with heterogeneous data formats, projections or extents, the most straightforward strategy is to preprocess your data with QGIS before trying the import into Blender. QGIS is a powerful open source desktop GIS software, this is an essential tool for working with BlenderGIS because it will help prepare the data for a smooth import. Futhermore, installing GDAL with Blender can be really tricky because Blender bundle it’s how Python installation.
GDAL binary and Python binding are available through ubuntugis repository
sudo add-apt-repository ppa:ubuntugis/ubuntugis-unstable
sudo apt-get install gdal-bin
sudo apt-get install python3-gdal
sudo apt-get install python3-numpy
Install Blender from a repository instead of ready to use tarballs from blender.org.
sudo add-apt-repository ppa:thomas-schiex/blender
Installing through this way, Blender will use the version of Python existing on the system instead of it’s own bundle version.
Warning : Currently, Numpy will fails if your distribution does not support Python 3.6. It can be solved by reinstalling Numpy with pip :
sudo apt-get install python-pip python3-pip
sudo pip3 install -U numpy
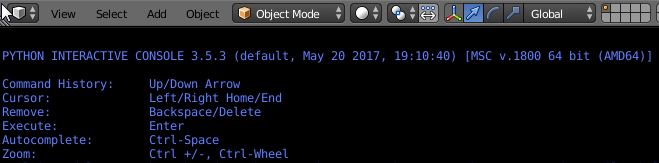
On Windows, the most easiest way to install GDAL Python Binding is to use the packages build by Christoph Gohlke and available here. Choose the package that match the version of Python bundle with Blender, you can determine it by opening the Python console in Blender. In the following screenshoot this is Python 3.5.3, the corresponding package is named GDAL-2.2.4-cp35-cp35m-win_amd64.whl.

The *.whl package file contains a stand alone GDAL installation including all needed files (binaries, libraries, Python binding. ), so you don’t need to install any other file.
Blender bundle it’s own Python executable at blender_install_folder\2.7x\python\bin\python.exe , after downloading the whl file, put it in this directory and then open a new Windows terminal from this folder. To do this, in the file explorer right click while maintaining shift key and choose open command window here.
You need pip utility to install *.whl package files. Since Blender 2.81 pip is already available in Blender install. With previous version you need to install pip yourself with the following command :
Then you can install the wheel file:
python.exe -m pip install GDAL-2.2.4-cp35-cp35m-win_amd64.whl
GDAL will be installed into blender_install_folder\2.7x\python\lib\site-packages\osgeo
GDAL Python binding needs Numpy to correctly working. Numpy is already included with Blender Python installation, but most of time this version does not match the one used to compile GDAL module. So, to ensure the best compatibility it’s more careful to also install Christoph Gohlke’s Numpy wheel package.
After dowloading the file, install it in the same way as previously :
python.exe -m pip install numpy-1.14.5+mkl-cp35-cp35m-win_amd64.whl
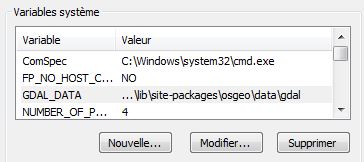
To finalize the installation, it’s necessary to define a new Windows environment variable named GDAL_DATA and pointing the following directory : blender_install_folder\2.7x\python\lib\site-packages\osgeo\data\gdal
To test the install open Blender Python console and type:
from osgeo import gdalnumeric
These statements should not return error.
For testing if GDAL_DATA environment variable is correctly setup type :
The second statement must return zero, a value >0 refers to an error code.
Tested on Yosemite 10.10 and Blender 2.74
- Install Xcode and Macports from this link : https://www.macports.org/install.php
- Install gdal and gdal python bindings Open a terminal from spotlight or from Applications => Utilities => Terminal Then type with administratives rights :
sudo port install gdal py34-gdal
cp -rf /opt/local/Library/Frameworks/Python.framework/Versions/3.4/lib/python3.4/site-packages/osgeo /**where_you_put_blender_on_your_mac**/Blender/blender.app/Contents/Resources/2.74/scripts/modules/
Replace where_you_put_blender_on_your_mac with the path where you run or install Blender
Test it in Blender Python console like windows installation.