- How to install Java JDK on MacOS
- Pre-Requisites
- How to Install Java on MacOS
- Setup JAVA_HOME and Switching Version
- How to Install Java on Mac via Terminal
- Install Homebrew
- Install Java
- Step 1: Run the brew install command
- Step 2: You will see output from Homebrew scroll by in Terminal.
- Step 3: Verify the Installation
- Step 4: Create a symbolic link
- Step 5: Verify your version
- What are JRE and JDK?
- JRE
- JDK
- FAQs
- Can I Install Java without Homebrew?
- What does keg-only mean?
- Why should I use Java?
- Conclusion
- Leave a Reply Cancel Reply
How to install Java JDK on MacOS
Java is a general-purpose, secure, robust, object-oriented language developed by Sun Microsystems in 1990. Java is portable which means it follows to write once run anywhere paradigm. Many of the useful applications are built on Java and required a Java runtime environment. If you are preparing your system for developing new Java applications, you need to install JDK on your machine.
In this blog post, you will learn to install different-2 Java versions on macOS using Homebrew.
Pre-Requisites
Before starting the installation of Java using this tutorial you must have the following prerequisites
- Terminal: You must have Mac Terminal access and little knowledge about working with the terminal application. Ao login to your Mac system and open terminal
- Homebrew: This tutorial relies on Homebrew, So you must have homebrew installed. Homebrew can be installed with a single command. You can follow these instructions to install Homebrew
How to Install Java on MacOS
The Homebrew contains the latest stable java version along with the LTS release Java 8, 11 LTS, and Java 17. Follow the below steps to install the specific version of Java or all the available Java versions on your macOS system.
brew search openjdk ==> Formulae openjdk ✔ [email protected] [email protected] [email protected] jd mdk cdkAs you know that Brew’s “openjdk” formulae always refer to the latest version. You can install it with the following command.
Brew installation of OpenJDK doesn’t set reference than Celler directory. For the system, Java wrappers to find this JDK, symlink it with:
sudo ln -sfn /usr/local/opt/openjdk/libexec/openjdk.jdk /Library/Java/JavaVirtualMachines/openjdk.jdk Generally, the applications required some old or stable Java versions. So instead of installing default (latest) Java, install specific Java by its version number. Here Java 8, and 11 are the LTS versions. Use one of the below options to install the required Java version. If required, You can also install all the versions on a single system:
sudo ln -sfn /usr/local/opt/[email protected]/libexec/openjdk.jdk /Library/Java/JavaVirtualMachines/openjdk-1.8.jdk sudo ln -sfn /usr/local/opt/[email protected]/libexec/openjdk.jdk /Library/Java/JavaVirtualMachines/openjdk-11.jdk sudo ln -sfn /usr/local/opt/[email protected]/libexec/openjdk.jdk /Library/Java/JavaVirtualMachines/openjdk-17.jdk java -version openjdk version "11.0.16.1" 2022-08-12 OpenJDK Runtime Environment Homebrew (build 11.0.16.1+0) OpenJDK 64-Bit Server VM Homebrew (build 11.0.16.1+0, mixed mode)Setup JAVA_HOME and Switching Version
The /usr/libexec/java_home command returns a path suitable for setting the JAVA_HOME environment variable. It determines this path from the preferred JVMs in the Java Preferences application. Use the below steps to configure JAVA_HOME environment variable. Also, know about switching to the default Java version.
- Use java_home command with -V option to list all the JVM configured on your macOS.
/usr/libexec/java_home -V Matching Java Virtual Machines (4): 18.0.2.1 (x86_64) "Homebrew" - "OpenJDK 18.0.2.1" /usr/local/Cellar/openjdk/18.0.2.1/libexec/openjdk.jdk/Contents/Home 17.0.4.1 (x86_64) "Homebrew" - "OpenJDK 17.0.4.1" /usr/local/Cellar/[email protected]/17.0.4.1/libexec/openjdk.jdk/Contents/Home 11.0.16.1 (x86_64) "Homebrew" - "OpenJDK 11.0.16.1" /usr/local/Cellar/[email protected]/11.0.16.1/libexec/openjdk.jdk/Contents/Home 1.8.0_345 (x86_64) "Homebrew" - "OpenJDK 8" /usr/local/Cellar/[email protected]/1.8.0+345/libexec/openjdk.jdk/Contents/Home /usr/local/Cellar/openjdk/18.0.2.1/libexec/openjdk.jdk/Contents/HomeHow to Install Java on Mac via Terminal
Many applications we frequently use require Java, and if you are a developer who creates Java applications, then you definitely need to be able to download and install Java on your Mac.
While it is possible to download and install it from your desktop, installing Java on your Mac via Terminal is often the preferred method of many who use a command-line interface like Terminal. One of the best methods to install Java on your Mac through Terminal is with Homebrew.
My name is Eric, and as a software engineer and software configuration manager. I have installed many applications, a large portion of them through a command-line interface like Terminal. I have done many Java installs, and I can show you how.
Keep reading below if you want to see the detailed steps of installing Java on Mac via Terminal.
- Install Homebrew
- Install Java
- Step 1: Run the brew install command
- Step 2: You will see output from Homebrew scroll by in Terminal.
- Step 3: Verify the Installation
- Step 4: Create a symbolic link
- Step 5: Verify your version
- JRE
- JDK
- Can I Install Java without Homebrew?
- What does keg-only mean?
- Why should I use Java?
Install Homebrew
Homebrew is a tool that makes it easy to install applications like Java. By typing the following command, you can check if your system already has it installed.
brew –version

It will give you a response showing the version if you already have it installed. If it says something like command not found, you do not have it installed and will need to install it. You can install it using the following command.
/bin/bash -c “$(curl -fsSL https://raw.githubusercontent.com/Homebrew/install/HEAD/install.sh)”
Once it starts, it will walk you through the installation, and you will only need to answer a few simple questions. You can take a look here for more information on installing Homebrew.
Install Java
Once you install Homebrew, you are now ready to install Java. Before starting the installation, I first recommend checking to see if you already have a version of Java on your Mac. There’s a chance it could have already been installed by another application.
If there is another version, you may want to take note of the version. You could proceed with the new install if there is a more recent version and you wish to upgrade. You can check if you currently have Java installed with the following command.
java -version
If you already have it installed, it will come back with the current version on your machine. You will see a command not found message or something similar if it is not installed.
If Java has already been installed, you can use Homebrew to check the latest available version. If you already have the newest version, you do not need to install/upgrade. Use the command below to see what the latest version available is.
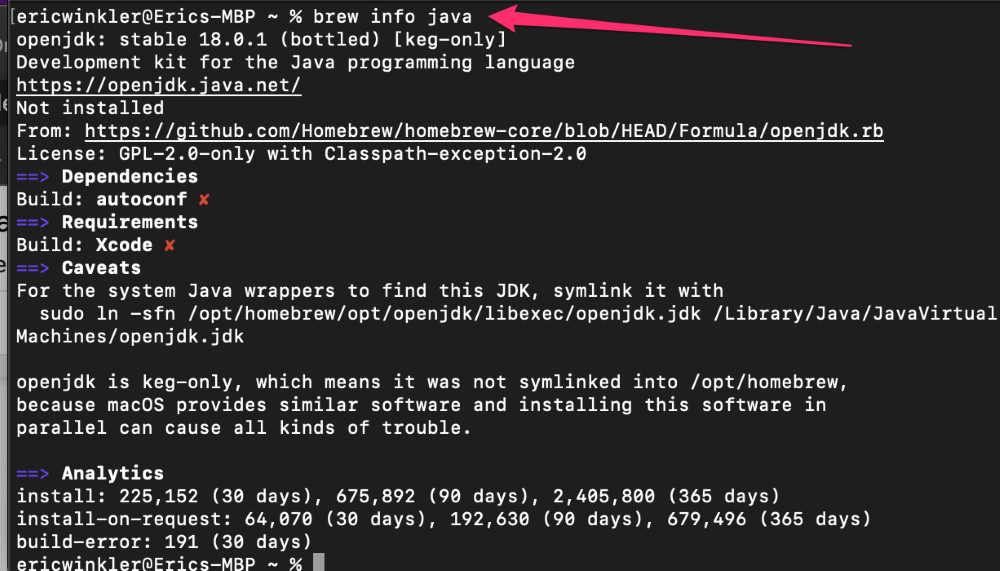
brew info java
This will provide you with details of the latest version available. If, when running the -version command above, you have the same version, then there is no need to do the install. If there is a more current version or you do not have java at all, you can proceed with the steps below.
Step 1: Run the brew install command
Type the command below into Terminal and hit return / enter .
brew install java
Step 2: You will see output from Homebrew scroll by in Terminal.
Step 3: Verify the Installation
You will want to verify the java installation by looking in the directory in which Hombrew was supposed to install it. Use the ls command below to see if it is there.
ls -la /opt/homebrew/Cellar/openjdk
In the output, you should see a folder with the latest version of java. Our example above shows the 18.0.1.1 version, which is the version Homebrew indicated it was going to install.
Step 4: Create a symbolic link
The Homebrew installation of Java is keg-only, meaning that it installs it in Homebrew’s own directory. It does not create any links and does not add java to your path, so at this point, if you type in a java command, your system will not be able to find it.
To fix this problem, we can create a symbolic link in a directory that is already in your system’s path and is linked to the new java installation. If you look at the output of the java installation, you will see the command you need to run to do this.
So, type in the following command and then hit return / enter .
sudo ln -sfn /opt/homebrew/opt/openjdk/libexec/openjdk.jdk /Library/Java/JavaVirtualMachines/openjdk.jdk
You will need to enter your password after entering the above command. Use the same password you use to log into your Mac. Note that the account you log in with must be an account with admin permissions.
Step 5: Verify your version
After completing step 4, you should now be able to test the installation by typing in the java -version command. Type in the command below followed by return / enter .
java -version
You should get a response showing the same version as the java version you just installed. In the example above, it would be 18.0.1.1.
What are JRE and JDK?
When working with and installing Java, you may see references to JRE and JDK and wonder what these are. You may understand that they are part of Java but may also wonder what the difference is between them. Here is a really quick explanation.
JRE
JRE stands for Java Runtime Environment. This is the part of Java that actually runs Java applications and applets. It is used to run any java apps you write and java applications you might download.
JDK
JDK stands for Java Development Kit. This is a set of tools that you need to develop applications in Java. It contains the javac compiler, libraries, and other components you need to create a java application that will run on JRE.
FAQs
Below are a few questions I often see when talking about Java installations.
Can I Install Java without Homebrew?
Yes, there are other ways to install Java without Homebrew. You can even install it by downloading it with your web browser and installing it from your desktop, but in my opinion, Homebrew is the easiest way to install it and ensure you get the latest version.
What does keg-only mean?
When Homebrew installs it as keg-only, this means that it installs it into its own Homebrew directory and does not automatically set up the path, create links or set up compiler settings in your shell profile. As with the link we created above, you need to do this on your own.
Why should I use Java?
One of the greatest advantages of Java is that it is platform-independent. This means you can develop apps on your Mac that will run in any environment, such as macOS, Windows, Linux, etc. It is also one of the most popular programming languages and is very easy to learn.
Conclusion
The easiest way to install Java on your Mac via Terminal is to use Homebrew. If you don’t have Homebrew installed, it is straightforward to install. Once you have Homebrew, it takes only a few simple commands to get Java installed and working.
As usual, let me know if you have any questions or comments. I would love to hear from you.
Leave a Reply Cancel Reply
Vishesh
Little correction:
Please use master instead of HEAD in URL for Homebrew
/bin/bash -c “$(curl -fsSL https://raw.githubusercontent.com/Homebrew/install/master/install.sh)”
I am getting error with HEAD:
[email protected] ~ % /bin/bash -c “$(curl -fsSL https://raw.githubusercontent.com/Homebrew/install/HEAD/install.sh)”
#: “#!/bin/bash: No such file or directory
Date: 21 Dec 2022 ReplyEric
Hi Vishesh,
Thank you for providing this information and those who see the error that you are seeing can use master instead of HEAD. HEAD should point to the latest version of the install.sh file, so this one should still be ok, but I’m not sure what happened when you were trying to run it. I took a look at the file versions of both HEAD and master and they are identical, but it could be that at the time you were running some update was made. In any case, I think the original command using HEAD will still work for most users but if anyone has a problem, they can certainly try running it from master. In most cases, they should still point to the same version but thank you for providing this workaround for those who do get the same error as you. Reply