- Python Turtle Circle
- Python turtle circle
- Python turtle half circle
- Python turtle circle spiral code
- Python turtle circle spirograph
- Python turtle circle fill color
- Python turtle circle center
- Python turtle circle steps
- Python turtle circle color
- Python turtle Inverted circle
- Python turtle circle commands
- Рисуем геометрические фигуры в Python с помощью Pillow
- Создание объекта Draw в Python
- Рисуем фигуры в Pillow: ellipse, rectangle и line
- Справочник по параметрам методов рисования
- Область рисования — xy
- Параметр fill — заполняем фигуру определенным цветом
- Параметр outline — цвет границ
- Параметр width — размер границ
- Рисование эллипса и прямоугольника в Python
Python Turtle Circle
In this Python tutorial, we will learn How to create a circle in Python Turtle and we will also cover different examples related to the Python Turtle circle. And, we will cover these topics.
- Python turtle circle
- Python turtle half circle
- Python turtle circle spiral code
- Python turtle circle spirograph
- Python turtle circle fill color
- Python turtle circle center
- Python turtle circle steps
- Python turtle circle color
- Python turtle Inverted circle
- Python turtle circle commands
Python turtle circle
In this section, we will learn How to create a circle whit the help of a turtle in Python turtle.
The circle is a round shape like a ring. In Python turtle, we can draw a circle with the help of a turtle. Turtle is working as a pen and they draw the exact shape of a circle.
In the following code, we draw a circle with the help of a turtle and the turtle gives the exact shape of a circle-like ring.
tur.circle(90) It is used for drawing a circle with the help of a turtle.
from turtle import * import turtle as tur tur.circle(90)After running the above code we get the following output in which we see a circle is drawn with the help of a turtle.
Python turtle half circle
In section, we will learn how to draw a half-circle with the help of a turtle in Python turtle.
The half-circle is also known as a semicircle. It is formed by cutting the whole circle along with its diameter.
In the following code, we import some modules from turtle import *, import turtle as tur, and draw a half-circle with the help of the turtle.
Turtle-It is a pre-installed library that is used for creating shapes and pictures.
tur.speed(1) is used to manage the speed of the circle.
tur.circle(90,extent = 150) It is used for drawing half circle.
from turtle import * import turtle as tur tur.speed(1) tur.circle(90, extent = 150)After running the above code we get the following output in which we see a half-circle is created with the help of turtle.
Python turtle circle spiral code
In this section, we will learn how to create a circle spiral code in Python turtle.
A Spiral is a cylindrical coil-like structure or we can say that wind around a point while moving further from a point.
In the following code, we draw a spiral circle with a radius =8 this spiral circle is drawn with the help of a turtle.
import turtle tur = turtle.Turtle() r = 8 for i in range(100): tur.circle(r + i, 35)After running the above code we get the following output in which we see a spiral circle is drawn
Python turtle circle spirograph
In this section, we will learn how to draw circle spirographs in Python turtle.
A spirograph is a device used for drawing different types of curves and also draw beautiful patterns which attract the user’s eye.
In the following code, we import the turtle library for drawing the required curve and set the background color as “black”.Choose the color combination for color in (‘green’, ‘yellow’, ‘red’,’pink’, ‘blue’, ‘orange’,’cyan’): inside this and the beautiful coloured spirograph shown on the screen.
We also draw a circle of the chosen size.
import turtle as tur tur.bgcolor('black') tur.pensize(4) tur.speed(10) for i in range(5): for color in ('green', 'yellow', 'red', 'pink', 'blue', 'orange', 'cyan'): tur.color(color) tur.circle(100) tur.left(10) tur.hideturtle() After running the above code we get the following output as we showed a beautiful colored circle spirograph is drawn.
Python turtle circle fill color
In the following code, we will learn how to fill color in a circle in Python turtle.
We Can fill the color with the help of tur.fillcolor() and add any color we want in the argument to give the style to the shape.
In the following code, we draw a color-filled circle with the help of a pen and also manage the speed. speed(1) is a slow speed that helps the user to easily identify the shape.
- tur.fillcolor(“red”) is used for set the fill color as red.
- tur.begin_fill() is used to start the filling color.
- tur.circle(100) is used for drawing the circle with radius.
- tur.end_fill()is used for ending the filling of the color.
import turtle tur = turtle.Turtle() tur.speed(1) tur.fillcolor("red") tur.begin_fill() tur.circle(100) tur.end_fill()After running the above code we see the following output in which we see a circle is drawn with a beautiful “red” color is filled inside.
Python turtle circle center
In this section, we will learn about the circle center in Python turtle.
The center of a circle is the point that divides the circle into equals parts from the points on the edge.
In the following code, we import the turtle package from turtle import *, import turtle as tur also draw the circle of radius 60. Radius is the distance from the center point to any endpoint.
from turtle import * import turtle as tur tur.speed(1) tur.pensize(4) tur.circle(60) In the following output, we see a circle is drawn with the help of a turtle inside the circle there is a center point.
Python turtle circle steps
In this section, we will learn about how to draw a circle with steps in Python turtle.
We use turtle.circle(radius,extend=None,steps=None) for creating circle.
- radius: Radius shows the radius of the given circle.
- extent: It is part of a circle in degree as an arc.
- steps: It divides the shape of the circle in an equal number of the given step.
In the following code, we import turtle library from turtle import *, import turtle as tur we draw a circle of radius 150 pixels with the help of a pen.
tur.circle(150) It is used to draw a circle of radius 150 pixels with the help of a pen.
from turtle import * import turtle as tur tur.pensize(2) tur.circle(150)After running the above code we get the following output in which we see a circle is drawn.
Python turtle circle color
In this section, we will learn how to change the circle color in python turtle.
Color is used to give the attractive look to shape. Basically, the default color of the turtle is black if we want to change the turtle color then we used tur.color().
In the following code, we set the background color as black with pensize(2) and the speed of drawing a circle is speed(1). We give two-color to circle and also give a size for drawing circle tur.circle(100).
import turtle as tur tur.bgcolor('black') tur.pensize(4) tur.speed(1) for i in range(1): for color in ('orange', 'yellow', ): tur.color(color) tur.circle(100) tur.left(2)After running the above code we get the following output as we see a beautiful colored circle is shown in this picture.
Python turtle Inverted circle
In this section, we will learn how to draw an inverted circle in Python turtle.
Inverted means to put something in an opposite position. The inverted circle is drawn in a clockwise direction rather than in an anticlockwise direction.
In the following code, we import the turtle library for drawing an inverted circle. Turtle is a pre-installed library used to draw different shapes and pictures.
- t.right(90) is used to move the turtle in right.
- t.forward(100)is used to move the turtle in the forwarding direction after moving the right.
- t.circle(-100)is used for drawing the circle of radius.
from turtle import * import turtle t = turtle.Turtle() t.right(90) t.forward(100) t.left(90) t.circle(-100) After running the above code we get the following output in which we see an inverted circle is drawn.
Python turtle circle commands
In this section, we will learn how circle commands work in python turtle.
The different commands are used to draw different shapes and they also help to move the turtle in any direction. We will discuss the turtle circle command below.
- circle()-circle() command is used to draw a circle shape with the help of a turtle.
- forward()– The forward() command is used to move the turtle in a forwarding direction.
- right()– A right() command is used to move the turtle in a clockwise direction.
- penup()– Penup() command is used for picking up the turtle pen.
- pendown()-Pendown() command is used for puts down the turtle pen.
- color()– color() command is used for changing the color of the turtle pen.
- shape()-Shape() command is used to give the shape to the turtle.
In the following code, we used some commands that help to make a circle. And the circle we make looks attractive.
import turtle tur = turtle.Turtle() tur.color("blue") radius = 10 n = 10 for i in range(2, n + 1, 2): tur.circle(radius * i)After running the above code we get the following output in which we see inside an output the circle is made and loop is working.
So, in this tutorial, we discuss Python Turtle circle and we have also covered different examples related to its implementation. Here is the list of examples that we have covered.
- Python turtle circle
- Python turtle half circle
- Python turtle circle spiral code
- Python turtle circle spirograph
- Python turtle circle fill color
- Python turtle circle center
- Python turtle circle steps
- Python circle color
- Python turtle Inverted circle
- Python turtle circle commands
I am Bijay Kumar, a Microsoft MVP in SharePoint. Apart from SharePoint, I started working on Python, Machine learning, and artificial intelligence for the last 5 years. During this time I got expertise in various Python libraries also like Tkinter, Pandas, NumPy, Turtle, Django, Matplotlib, Tensorflow, Scipy, Scikit-Learn, etc… for various clients in the United States, Canada, the United Kingdom, Australia, New Zealand, etc. Check out my profile.
Рисуем геометрические фигуры в Python с помощью Pillow

Модуль ImageDraw из библиотеки обработки изображений Pillow (PIL) предоставляет методы для рисования круга, квадрата и прямой линии в Python.
Создание объекта Draw в Python
Используя объекта Image мы создадим фоновое изображение на которой мы будем рисовать наши фигуры при помощи объекта Draw . Не забудьте импортировать модуль Image и ImageDraw в начале кода.
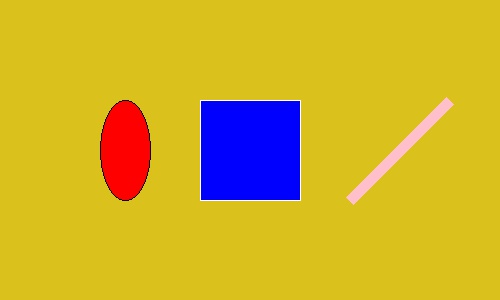
Здесь создается пустое изображение с размером 500 на 300 пикселей и с тёмно желтым фоном.

Рисуем фигуры в Pillow: ellipse, rectangle и line
Вызываем методы рисования из объекта Draw для рисования фигур на нашем желтом фоне.
Рисуем эллипс, прямоугольник и прямую линию в качестве примера.
Справочник по параметрам методов рисования
Даже если, способы рисования отличаются в зависимости от используемого метода, следующие параметры являются общими для всех.
Область рисования — xy
Параметр xy указывает прямоугольную область для рисования новой фигуры.
Уточняется один из следующих форматов:
- (((Верхняя левая x координата, Верхняя левая y координата), (нижняя правая x координата, нижняя правая y координата)) ;
- (Верхняя левая x координата, Верхняя левая y координата, нижняя правая x координата, нижняя правая y координата) .
В методах line() , polygon() и point() используются многочисленные координаты вместо двух точек, представляющих прямоугольную область.
Метод line() рисует прямую линию, которая связывает каждую точку, polygon() рисует многоугольник, а метод point() рисует точку в 1 пиксель для каждой указанной точки.
Параметр fill — заполняем фигуру определенным цветом
Параметр fill указывает какой цвет будет использован для заполнения нашей геометрической формы.
Спецификация формата цвета отличается в зависимости от указанного режима изображения (объект Image ):
- RGB : Указывает значение цвета в форме (R, G, B) ;
- L (Черно-белое): Указывает значение (0-255) как целое число).
Значение по умолчанию None (не заполнено).
Есть три способа указать цвет, возьмем красный цвет, его можно записать так:
- текстовый формат: red;
- CSS формат (Шестнадцатеричный): #FF0000
- RGB: (255, 0, 0)
Стоит учесть тот факт, что текстовый формат не имеет все цвета, кол-во доступных цветов ограничено в коде самой библиотеки. Вот весь список: https://github.com/python-pillow/Pillow/blob/8.1.0/src/PIL/ImageColor.py#L148
Лучше всего использовать шестнадцатеричный формат #FFFFFF (белый).
Параметр outline — цвет границ
Параметр outline указывает на цвет границы фигуры.
Спецификация формата цвета такая же, как и у параметра fill которого мы обсуждали выше. Значение по умолчанию равно None (без границ).
Параметр width — размер границ
Вне зависимости от рисуемой фигуры, вы можете указать размер в пикселях для границы фигуры.
Рисование эллипса и прямоугольника в Python
Метод ellipse() рисует эллипс, область рисования указывается в параметр xy . Если мы зададим четыре координата которые будут соответствовать квадрату, то у нас получится ровный круг.
Нарисуем небольшой смайл используя круги.