- Python скрипт для изменения значений сущностей Home Assistant
- Python Scripts
- Writing your first script
- Calling Services
- Python Scripts
- Writing your first script, reading input and logging the activity
- Triggering events
- Calling Services
- Documenting your Python scripts
- Services
- Service python_script.reload
- Help us to improve our documentation
- Categories
- On this page
- Умный дом в котором я живу. Использование скриптов Python в автоматизациях Home Assitant
Python скрипт для изменения значений сущностей Home Assistant
Простой способ изменить любые значения любых датчиков в Home Assistant через автоматизации.
Странно, что штатными средствами автоматизации нет возможности изменить значение датчика, например, на «недоступен» или дать ему любое другое значение. Немного поискав, нашел python скрипт для этой цели.
Скрипт должен находиться по пути /config/python_scripts с именем set_state.py. Сам скрипт:
inputEntity = data.get('entity_id') if inputEntity is None: logger.warning("===== entity_id is required if you want to set something.") else: inputStateObject = hass.states.get(inputEntity) if inputStateObject is None and not data.get('allow_create'): logger.warning("===== unknown entity_id: %s", inputEntity) else: if not inputStateObject is None: inputState = inputStateObject.state inputAttributesObject = inputStateObject.attributes.copy() else: inputAttributesObject = <> for item in data: newAttribute = data.get(item) logger.debug("===== item = ; value = ".format(item,newAttribute)) if item == 'entity_id': continue # already handled elif item == 'allow_create': continue # already handled elif item == 'state': inputState = newAttribute else: inputAttributesObject[item] = newAttribute hass.states.set(inputEntity, inputState, inputAttributesObject) При этом в configuration.yaml нужно разрешить использование python скриптов. Добавляем:
И перезагружаем Home Assistant.
Чтобы использовать скрипт в автоматизациях, нужно в action прописать service: python_script.set_state и указать в data_template нужную сущность и нужные значения.
Установить значение сущности, в данном случае switch.switch_123, в статус Недоступно:
action: service: python_script.set_state data_template: entity_id: switch.switch_123 state: 'unavailable'
action: service: python_script.set_state data_template: entity_id: switch.switch_123 icon: mdi:door-open
Изменить значение на Включен
action: service: python_script.set_state data_template: entity_id: switch.switch_123 state: 'on'
Добавить attribution:

action: service: python_script.set_state data_template: entity_id: switch.switch_123 attribution: 'Data provided by Synology'
Просто смотрим в Панели разработчика нужный параметр сущности и добавляем его в автоматизацию.
Python Scripts
This component allows you to write Python scripts that are exposed as services in Home Assistant. Each Python file created in the /python_scripts/ folder will be exposed as a service. The content is not cached so you can easily develop: edit file, save changes, call service. The scripts are run in a sandboxed environment. The following variables are available in the sandbox:
| Name | Description |
|---|---|
| hass | The Home Assistant object. Access is only allowed to call services, set/remove states and fire events. API reference |
| data | The data passed to the Python Script service call. |
| logger | A logger to allow you to log messages: logger.info() , logger.warning() , logger.error() . API reference |
Writing your first script
- Add to configuration.yaml : python_script:
- Create folder /python_scripts
- Create a file hello_world.py in the folder and give it this content:
name = data.get('name', 'world') logger.info("Hello <>".format(name)) hass.bus.fire(name, "wow": "from a Python script!" >) Calling Services
The following example shows how to call a service from python_script . This script takes two parameters: entity_id (required), rgb_color (optional) and calls light.turn_on service by setting the brightness value to 255 .
entity_id = data.get('entity_id') rgb_color = data.get('rgb_color', [255, 255, 255]) if entity_id is not None: service_data = 'entity_id': entity_id, 'rgb_color': rgb_color, 'brightness': 255 > hass.services.call('light', 'turn_on', service_data, False) The above python_script can be called using the following JSON as an input.
"entity_id": "light.bedroom", "rgb_color": [255, 0, 0] > For more examples, visit the Scripts section in our forum.
Python Scripts
This integration allows you to write Python scripts that are exposed as services in Home Assistant. Each Python file created in the /python_scripts/ folder will be exposed as a service. The content is not cached so you can easily develop: edit file, save changes, call service. The scripts are run in a sandboxed environment. The following variables are available in the sandbox:
| Name | Description |
|---|---|
| hass | The Home Assistant object. Access is only allowed to call services, set/remove states and fire events. API reference |
| data | The data passed to the Python Script service call. |
| logger | A logger to allow you to log messages: logger.info() , logger.warning() , logger.error() . API reference |
| time | The stdlib time available as limited access. |
| datetime | The stdlib datetime available as limited access. |
| dt_util | The homeassistant.util.dt module. |
Other imports like min , max are available as builtins. See the python_script source code for up-to-date information on the available objects inside the script.
It is not possible to use Python imports with this integration. If you want to do more advanced scripts, you can take a look at AppDaemon or pyscript
Writing your first script, reading input and logging the activity
This is a simplified example that does no real work. It is created as a first step, to help with:
- Demonstrating how to setup the script
- How to process the input data
- How to log the script activity
- How to troubleshoot / manually call the script.
Start by enabling the Python Scripts integration and create the first script.
- Add to configuration.yaml : python_script:
- Create the folder /python_scripts
- Create a file /python_scripts/hello_world.py in the folder and give it this content:
# `data` is available as builtin and is a dictionary with the input data. name = data.get("name", "world") # `logger` and `time` are available as builtin without the need of explicit import. logger.info("Hello <> at <>".format(name, time.time())) - Start Home Assistant to reload the script configuration.
- Call your new python_script.hello_world service (with parameters) from the Services, using the YAML mode.
service: python_script.hello_world data: name: "Input-Text" Running this script show absolutely no output on the screen, but it logs with level info . You must have the Logger enabled at least for level info .
Your configuration.yaml should include something like this.
Triggering events
The following example shows how to trigger a custom event over the hass.bus .
This example uses the hello_world.py from the previous example. Edit the file adding the code listed below to the end of the file. There is no need to reload the configuration or restart Home Assistant.
hass.bus.fire("hello_world_event", "wow": "from a Python script!">) This script doesn’t output anything. However, you can view the events being fired in the Developer tools.
From a separate browser window or tab, go to Developer Tools -> Events and at Listen to events type hello_world_event and then press Start listening . You should see something like this:
event_type: hello_world_event data: wow: from a Python script! origin: LOCAL time_fired: "2022-09-19T16:15:39.613378+00:00" context: id: 01GDB8H9JXJ1N23Q62SHX6PTBK parent_id: null user_id: null Calling Services
The following example shows how to call a service from python_script . This script takes two parameters: entity_id (required), rgb_color (optional) and calls light.turn_on service by setting the brightness value to 255 .
# turn_on_light.py entity_id = data.get("entity_id") rgb_color = data.get("rgb_color", [255, 255, 255]) if entity_id is not None: service_data = "entity_id": entity_id, "rgb_color": rgb_color, "brightness": 255> hass.services.call("light", "turn_on", service_data, False) The above python_script can be called using the following YAML as an input.
- service: python_script.turn_on_light target: entity_id: light.bedroom data: rgb_color: [255, 0, 0] Documenting your Python scripts
You can add names and descriptions for your Python scripts that will be shown in the frontend. To do so, simply create a services.yaml file in your /python_scripts folder. Using the above Python script as an example, the services.yaml file would look like:
# services.yaml turn_on_light: name: Turn on light description: Turn on a specific light and set its color. fields: entity_id: description: The light that will be turned on. example: light.bedroom rgb_color: description: The color to which the light will be set. example: [255, 0, 0] For more examples, visit the Scripts section in our forum.
Services
Available services: reload .
Service python_script.reload
Reload all available python_scripts from the /python_scripts folder, as a quicker alternative to restarting Home Assistant.
Use this when creating a new Python script, or after updating the /python_scripts/services.yaml file.
You don’t have to call this service when you change an existing Python script.
This service takes no service data attributes.
Help us to improve our documentation
The Python Scripts integration was introduced in Home Assistant 0.47, and it’s used by 3% of the active installations. It scores internal on our quality scale.
Categories
On this page
Умный дом в котором я живу. Использование скриптов Python в автоматизациях Home Assitant
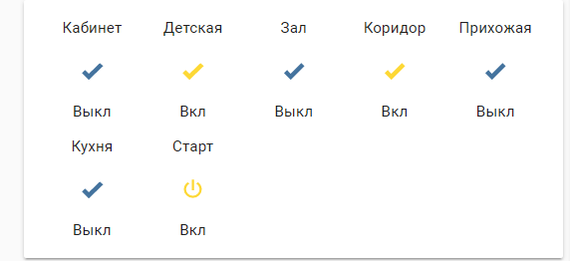
Писать полный перебор всех вариантов комбинация комнат — так себе идея. Их будет свыше 60 и выпадающий список будет огромный. Поэтому возникла идея заменить на пачку селекторов, где я выбираю комнаты в произвольной комбинации.
Но встал вопрос как передавать параметры уборки роботу.
Т.е. из отдельных блоков комнат [х1,у1,х2,y2,count] мы должны собрать строку
Пока я искал как это написать, нашел статью https://sprut.ai/client/article/2555 , где решается практически моя задача.
При переделке кода под себя, вылезли некоторые косяки, которые и побудили меня написать целый пост.
Итак, собственных возможностей HA не хватает, чтобы написать перебор всех возможных вариантов уборки. Поэтому, можно задействовать скрипты на Питоне, что существенно расширяет возможности автоматизации. В configuration.yaml прописываем
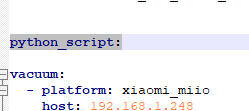
и в каталоге config создаем директорию python_scripts
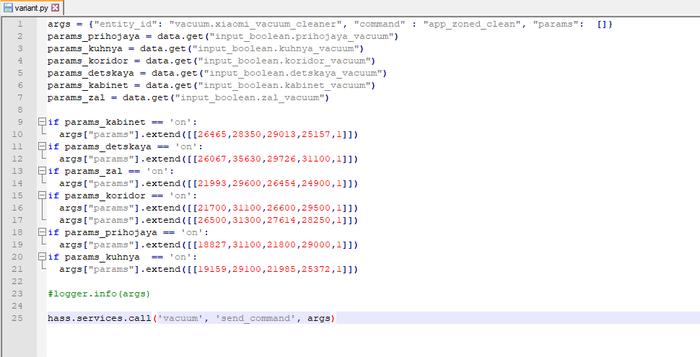
Как это работает. Мы должны передать пылесосу массив состоящий из параметров комнат, которые мы будем убирать.
Скрипт принимает на вход состояния выключателей input_boolean и рассовывает их по переменным. затем он на основе значений переменных или добавляет параметры комнаты или нет.
Закомментированная строчка выплевывает передаваемый роботу массив в лог HA, что удобно для отладки.
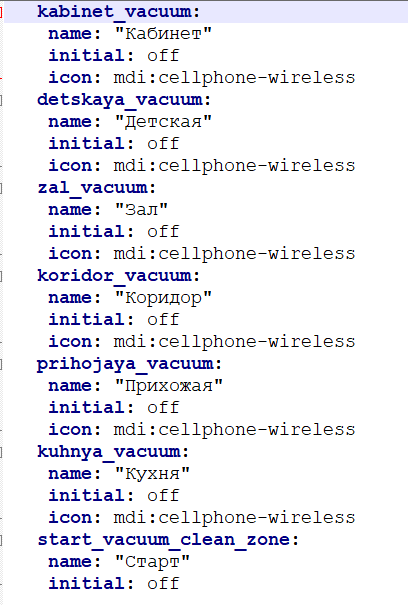
В input_boolean: !include input_boolean.yaml


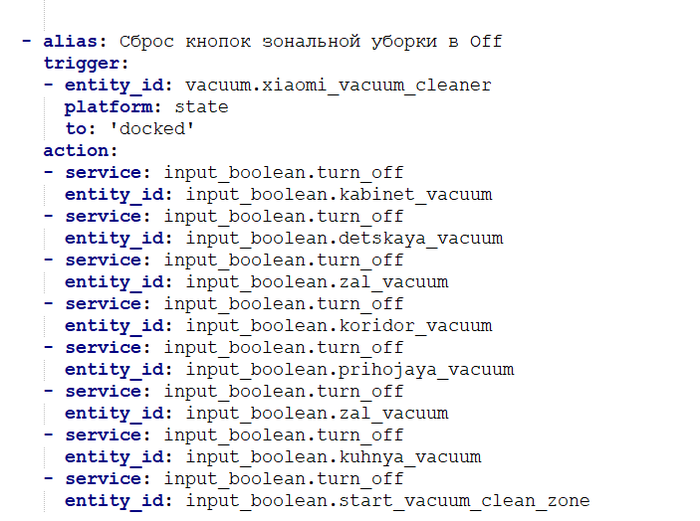
И сброс кнопок при возврате на базу
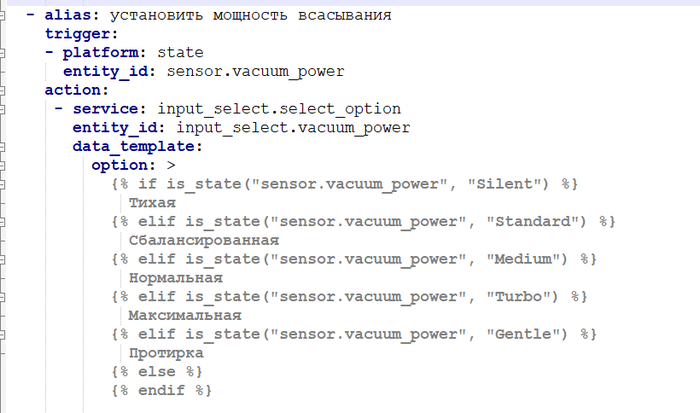
Ну и на случай внешней установки мощности всасывания (скажем из веб морды) в HA надо установить селекбокс.

И автоматизацию, устанавливающую в правильное положение селект бокс
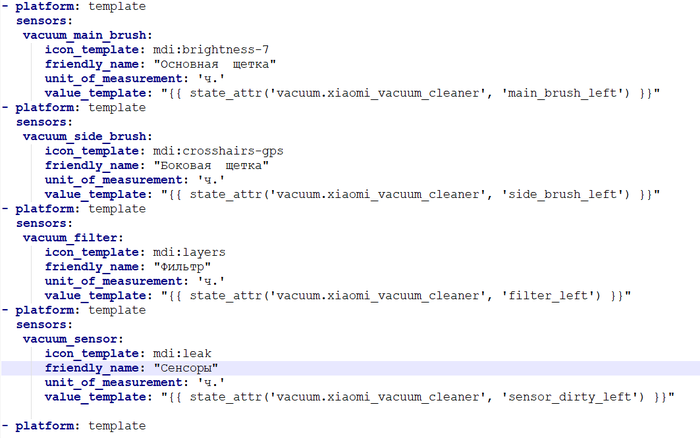
Лепим сенсоры замены расходников:
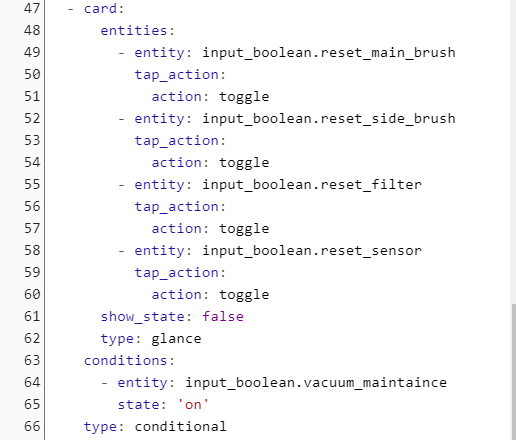
И кнопки для сброса и кнопку скрытия их
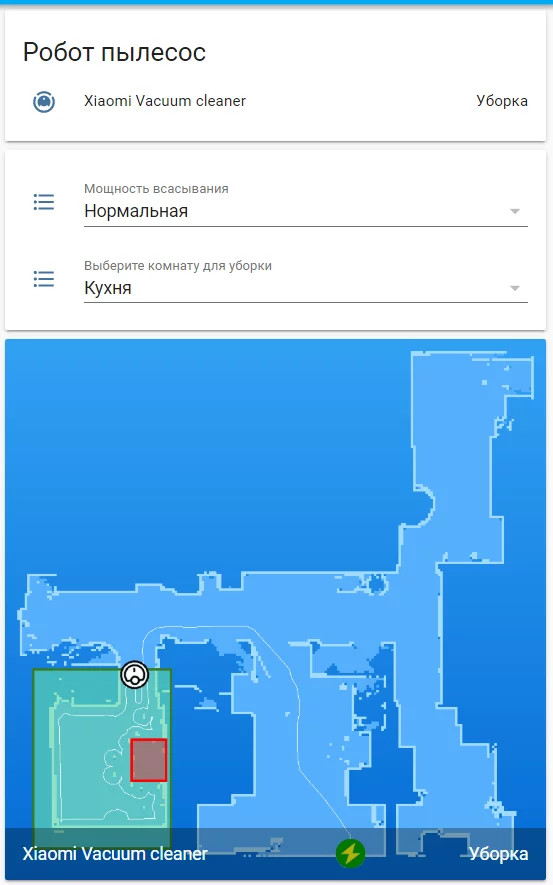
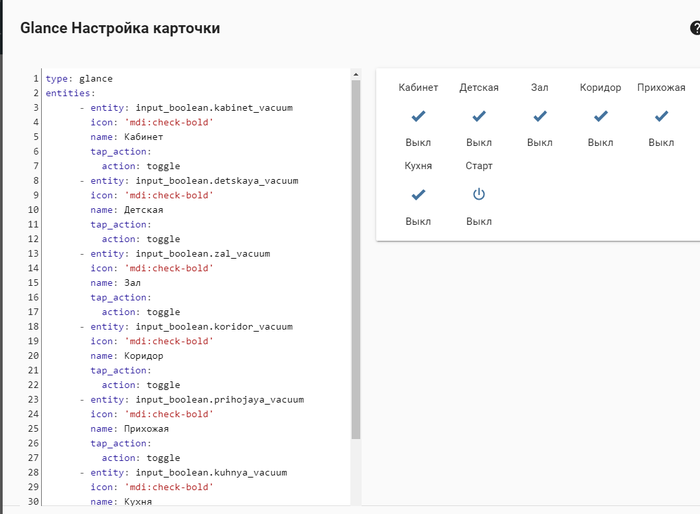
В итоге карточка робота выглядит вот так