- HMAC SHA256 signatures in Python and Flask.
- Python SHA256: Implementation and Explanation
- What is Python SHA256?
- Different functions associated with Python sha256:
- Implementation of Python sha256:
- Output:
- Module Functions
- Hashlib:
- string.encode()
- Syntax:
- Parameter Values:
- hashlib.sha256():
- Hexidiest():
- Python hmac sha256:
- Syntax:
- Parameters:
- Return Value:
- Python sha256 Encoding on a file:
- Advantages of Python sha256:
- Application:
- Conclusion:
HMAC SHA256 signatures in Python and Flask.
I’m playing around a bit with the Slack API, which I’ll have a longer post on in a bit. One part of the integration requires generating an HMAC SHA256 signature to verify requests are from Slack. There weren’t too many helpful search results, and some of them like the hmac module docs don’t include examples. Here are some quick notes for folks in future attempting the same thing.
h/t to Joe Kampschmidt’s post which covers signing well.
First step is to instrument your test application is capturing the full headers and raw body from a response so you can verify you implementation.
If you’re using Flask for your server, getting at the raw request body turns out to be slightly complicated, as it’ll helpfully attempt to convert data with content-type of application/x-www-form-urlencoded into a dictionary instead of raw string. This conversion into a dictionary masks most obvious ways to access to the raw string.
Fortunately you can use Request.get_data to get the raw body as long as you do it before calling Request.form . It does work fine to call Request.get_data and then later Request.form , so be careful to sequence them correctly.
def recall_post(request): # must not call request.form here headers = request.headers() data = request.get_data() print(headers) print(data) # calling request.form is fine now request.form return "%s %s" % (headers, data)
Once you have thoes headers and data, you’ll be able to do a test run of generating the signature and comparing it against the sent signature. The values you need to extract from the inbound request are:
timestamp = request.headers['X-Slack-Request-Timestamp'] expected_sig = request.headers['X-Slack-Signature']
You’ll also need to go to your Application page within the Slack dashboard to get your Signing Secret. Once you have these pieces along with the raw POST body retrieved via Request.get_data , then you can use those components to test generating your own signature.
import hmac, hashlib body = b'token=etc&team_id=etc&. ' timestamp = b'100000000000' base = 'v0:%s:%s' % (timestamp.decode('utf-8'), body.decode('utf-8')) secret = b'1234' computed = hmac.new(secret, base.encode('utf-8'), digestmod=hashlib.sha256).hexdigest() sig = 'v0=%s' % (computed,) print(sig) If you use real values, this should match exactly the signature from Slack signature in the X-Slack-Signature header.
Pulling this all together, the server function will look like:
def verify(request,secret): body = request.get_data() timestamp = request.headers['X-Slack-Request-Timestamp'] sig_basestring = 'v0:%s:%s' % (timestamp, body.decode('utf-8')) computed_sha = hmac.new(secret, sig_basestring.encode('utf-8'), digestmod=hashlib.sha256).hexdigest() my_sig = 'v0=%s' % (computed_sha,) slack_sig = request.headers['X-Slack-Signature'] if my_sig != slack_sig: err_str = "my_sig %s does not equal slack_sig %s" % \ (my_sig, slack_sig)) raise Exception(err_str) def recall_post(request): signing_secret = b'your secret from some config tool' verify(request, signing_secret) return "Signatures match, yay." Now as long as you call verify in your handlers, you can be confident that the incoming requests are indeed from Slack. Hopefully this will save someone a few minutes!
Hi folks. I’m Will aka @lethain.
If you’re looking to reach out to me, here are ways I help. If you’d like to get a email from me, subscribe to my weekly newsletter.
Python SHA256: Implementation and Explanation

Hello coders!! In this article, we will be learning about python sha256. We will understand its meaning, its purpose and will also learn its implementation. So let us dig into the topic.
What is Python SHA256?
SHA stands for Secure Hash Algorithms. These are set of cryptographic hash functions. These functions can be used for various applications like passwords etc. The hashlib module of Python is used to implement a common interface to many different secure hash and message digest algorithms. The hash algorithms included in this module are:
- SHA1: a 160-bit hash function that resembles MD5 hash
- SHA224: internal block size of 32 bits (truncated version)
- SHA256: internal block size of 32 bits
- SHA384: internal block size of 32 bits (truncated version)
- SHA512: internal block size of 64 bits
- MD5 algorithm
Different functions associated with Python sha256:
- encode(): used to convert the string into bytes
- hexdigest(): used to return the encoded data in hexadecimal format
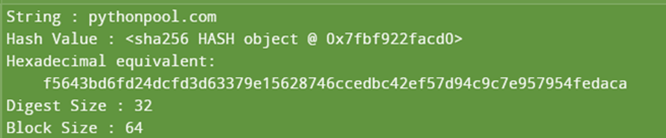
Implementation of Python sha256:
import hashlib string="pythonpool.com" encoded=string.encode() result = hashlib.sha256(encoded) print("String : ", end ="") print(string) print("Hash Value : ", end ="") print(result) print("Hexadecimal equivalent: ",result.hexdigest()) print("Digest Size : ", end ="") print(result.digest_size) print("Block Size : ", end ="") print(result.block_size) Output:
Module Functions
Let us understand the various methods used in the above code:
Hashlib:
A Python module is used to implement a common interface to many different secure hash and message digest algorithms.
string.encode()
This function converts the string into bytes
Syntax:
string.encode(encoding=encoding, errors=errors)
Parameter Values:
- encoding: type of encoding that will be used
- Default value: UTF – 8
hashlib.sha256():
This function is used to create a SHA-256 hash object.
Hexidiest():
This function is used to return the encoded data in hexadecimal format.
Python hmac sha256:
HMAC stands for keyed-hash message authentication code.
It is a type of message authentication code, that includes a cryptographic hash function along with a secret cryptographic key.
Syntax:
hmac.new(key, msg=None, digestmod='')
Parameters:
- key: secret key
- msg: If this is present, the update(msg) method is called.
- digestmod: digest name
Return Value:
import hmac import hashlib import binascii def signature(key, msg): key = binascii.unhexlify(key) msg = msg.encode() return hmac.new(key, msg, hashlib.sha256).hexdigest().upper() print(signature("E49756B4C8FAB4E48222A3E7F3B97CC3", "Python Pool"))519F46535F78F67235F27BC2C1155571C4A76F21A8FCD05B1918E1738F0F54CC
In this example, we have passed the secret key and the message to the signature() method. We converted the key into binary data using the binascii() method. Then lastly using the hmac.new() method, we generated the hmac object.
Python sha256 Encoding on a file:
In order to hash a given file in Python, we start reading it bit-by-bit. We keep the instances of the current hashing functions updated. Once the hashing function gets all bytes in order, we can then get the hex digest.
import hashlib filename = "sample.py" with open(filename,"rb") as f: bytes = f.read() hash = hashlib.sha256(bytes).hexdigest(); print(hash)
5f12568f6f0af1ec7a7ae7c69711215bcf312e1cfaf7b11b05af109b620ef21a
In this example, we have iterated through the file using a loop. We read every byte of the file and convert it into hash using the hexidigest() method.
Advantages of Python sha256:
- 64-byte block size indicator
- 33 byte of maximum message length
- 4-byte standard word size.
- 32-byte internal position length
- 64 iterations in one cycle
- Approx 140 Mib/s speed achieved by the[is Protocol
Application:
Python Sha256 is used in some of the most popular encryption and authentication protocols like:
Sha256 is also used in unix and linux for password securing using hash.
Conclusion:
With this, we come to an end with this article. We learned about Python sha256, its meaning, and its implementation. We also saw the advantages and application of hsa256 in various security authentication protocols.
However, if you have any doubts or questions, do let me know in the comment section below. I will try to help you as soon as possible.
Happy Pythoning!