- Introduction
- “So how does it help me?”
- How does it work?
- Quickstart
- Features
- «Looks great! How do I get it?»
- Ending note
- Create A Grid In Javascript (Simple Examples)
- TLDR – QUICK SLIDES
- TABLE OF CONTENTS
- CREATE A GRID WITH JAVASCRIPT
- 1) BASIC GRID
- 1A) THE HTML
- 1B) THE CSS
- 2) JAVASCRIPT ARRAY TO GRID
- 2A) THE HTML
- 2B) THE JAVASCRIPT
- 3) JAVASCRIPT OBJECT TO GRID
- 3A) THE HTML
- 3B) THE JAVASCRIPT
- DOWNLOAD & NOTES
- SUPPORT
- EXAMPLE CODE DOWNLOAD
- EXTRA BITS & LINKS
- RESPONSIVE GRID
- LINKS & REFERENCES
- INFOGRAPHIC CHEAT SHEET
- THE END
- 10 Best Grid Layout Systems In JavaScript And CSS (2023 Update)
- The Best Grid Layout System
- Table of contents:
- jQuery Grid Layout Plugins:
- Isotope — Magical Dynamic Layout Plugin For jQuery
- Responsive jQuery Dynamic Grid Layouts Plugin — Freewall
- Responsive & Fluid Drag-and-Drop Grid Layout with jQuery — gridstack.js
- Create A Sortable and Filterable Grid of Items — Shuffle
- Responsive & Filterable jQuery Portfolio Gallery Plugin — Elastic Grid
- Vanilla JS Grid Layout Libraries:
- Responsive, Draggable, Filterable Grid Layout – muuri
- Creating A Flickr-style Justified Layout With JavaScript
- Responsive Grid Layout Builder In Vanilla JavaScript – EasyGrid
- Pure CSS Grid Layout System:
- Responsive 12-column Grid Layout – SpaceGrid
- flexbin.css
- More Resources:
- See Also:
Introduction
Well, yes! I had been learning React since a few months now, and it was while working on a personal project, which needed a grid layout that could auto-adjust its grids, that I saw that although there are packages that help with these, they are too complicated.
So, I thought up a way, and created my first npm package for React — react-waterfall-grid !
“So how does it help me?”
1WaterfallGrid childWidth=300> styleGridContainer= width: "100%", position: "relative", justifyContent: "center", zIndex: 1 >>> 2 imagesList> 3 WaterfallGrid>See that one liner code? That’s a fully responsive, auto-adjusting waterfall grid!
How does it work?
React-Waterfall-Grid is a library of fully responsive and customizable waterfall grids (vertical and horizontal). All it needs is an array of your elements, and it handles the rest out-of-the-box.
At its core, react-waterfall-grid uses flexbox to place items correctly. So, all the possible props that you can pass to the Grid components (see ‘All Grids’) are the same as what you would pass to flexbox. The below example will show you how it’s done.
Quickstart
Here’s a small example to get you started. Take note of how the array of (one-dimensional) elements is passed to the grid through a prop. Yes, you pass all your stuff only once, and all subsequent layout changes are handled automatically!
1import styled from 'styled-components' 2 import WaterfallGrid> from 'react-waterfall-grid' 3 import useMediaQuery > from 'react-responsive' 4 // You are free to add as many grid contents as you want. Here, you see only 4 pictures. 5 import Image1 from './static/images/1.jpg' 6 import Image2 from './static/images/2.jpg' 7 import Image3 from './static/images/3.jpg' 8 import Image4 from './static/images/4.jpg' 9 const ParentContainer = styled.div` 10 width: 100%; 11 background-color: #121212; 12 ` 13 const Image = styled.img` 14 object-fit: cover; 15 ` 16 export default function App() 17 // Boolean - True if phone 18 const isPhone = useMediaQuery( query: 'max-width: 480px' >) 19 // List of images 20 const imagesList = [Image1, Image2, Image3, Image4].map((imagePath) => ( 21 Image key=imagePath> style= width: (isPhone ? "200px" : "300px") >> src=imagePath> alt=imagePath> 22 variants=imageVariants> whileHover= scale: 1.05, transition: ease: ease, duration: 0.8 > >> /> 23 )) 24 return ( 25 ParentContainer id="parent-container"> 26 WaterfallGrid childItems=imagesList> childWidth=isPhone ? 200 : 300> 27 styleGridContainer= width: "100%", position: "relative", justifyContent: "center", zIndex: 1 >>/> 28 ParentContainer> 29 ); 30 >Features
With react-waterfall-grid , you get access to two different grid containers —
As you might have guessed, WaterfallGrid is named so because the child contents fall vertically, while in WaterfallHorizontalGrid the child contents ‘fall’ horizontally.
The vertical grid will only accept child elements with a fixed width but any height. (to keep the elements’ layout changes constrained), whereas the horizontal grid will only accept child elements with a fixed height but any width.
Based on this, there are different props, some common to both Grids, and the rest are specific to a particular type of Grid.
Lastly, react-waterfall-grid uses flexbox at its core, so to customize styles for the grid container as a whole or the grid columns (or rows, for horizontal grids), pass in the style with the appropriate prop just like you would for a native flexbox container.
«Looks great! How do I get it?»
As with all npm packages, you download the package like so:
npm install —save react-waterfall-grid
Ending note
react-waterfall-grid is built keeping the need of simplicity in mind. It helps you quickly create beautiful grids that can manage themselves!
Give it a try, and tell me how you use it in your projects!
Hey there! I am Sohail, and I am a Frontend web developer, specializing in the React.js ecosystem. I love learning, and creating content to help the community.
Have something interesting to say? Hit me up!
Create A Grid In Javascript (Simple Examples)
Welcome to a quick tutorial on how to create a grid in Javascript. Need to display some data in a nice grid? Gone are the days when we have to use crazy tables and CSS hacks.
- Define a grid container and specify the number of columns in HTML CSS first.
- #grid
- Use Javascript to add cells to the grid container.
- var grid = document.getElementById(«grid»);
- var cell = document.createElement(«div»);
- cell.innerHTML = «TEXT»;
- grid.appendChild(cell);
- Create cell as many cells as required and append them to the grid.
Yep, it’s that simple. Let us walk through a few more examples in this guide – Read on!
TLDR – QUICK SLIDES

TABLE OF CONTENTS
CREATE A GRID WITH JAVASCRIPT
All right, let us now get started with creating grids with HTML, CSS, and Javascript.
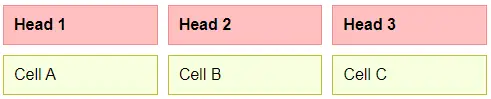
1) BASIC GRID
1A) THE HTML
- (B) All we need in the HTML is a container, add as many inside as required.
- (A) The “grid magic” happens in the CSS.
1B) THE CSS
/* (A) GRID LAYOUT */ .grid < display: grid; grid-gap: 10px; >/* (B) OPTIONAL - CELLS */ .head, .cell < padding: 10px; >.head < font-weight: 700; border: 1px solid #f18e8e; background: #ffbfbf; >.cell
- display: grid Is all it takes to turn an HTML container into a grid layout.
- grid-template-columns: repeat(3, minmax(0, 1fr)) Specifies “3 columns per row”.
- Lastly, grid-gap: 10px is optional – The spacing between the cells.
That’s all. The rest is pretty much cosmetics.
P.S. repeat(3, minmax(0, 1fr)) will create 3 equal columns, while repeat(3, auto) allows the browser to resize as required. You can also specify exact widths like 20% 50% 30% .
2) JAVASCRIPT ARRAY TO GRID
2A) THE HTML
That’s right. All we need is an empty and CSS “grid preset” layout – Take note, this only sets the container to grid layout, not define the number of columns grid-template-columns .
2B) THE JAVASCRIPT
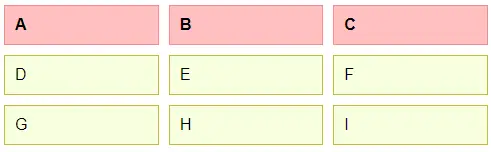
- (C1) There are endless ways to nest an array. For this example, we will just assume it is in this exact order, with the first row being the header.
- (C2) Remember that the number of columns is set yet? Yep, we count the number of columns the array has, and set it here.
- (C3) Loop through the first row of the array, and append header cells.
- (C4) Loop through the following rows of the array, and append “normal cells”.
3) JAVASCRIPT OBJECT TO GRID
3A) THE HTML
Once again, an empty HTML that is preset to display:grid .
3B) THE JAVASCRIPT
// (C1) DATA OBJECT var data = < "Name" : ["Joe", "Jon", "Joy"], "Gender" : ["M", "M", "F"] >; // (C2) SET NUMBER OF COLUMNS var grid = document.getElementById("demoC"), keys = Object.keys(data); grid.style.cssText = `grid-template-columns:repeat($, minmax(0, 1fr))`; // (C3) FIRST ROW - HEADER for (let i of keys) < let cell = document.createElement("div"); cell.innerHTML = i; cell.className = "head"; grid.appendChild(cell); >// (C4) FOLLOWING ROWS - CELLS for (let i=0; i >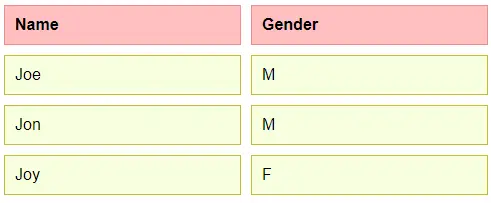
- (C1) Yet again, there are endless ways an object can be structured. Let’s just assume it is in the order of KEY : [DATA], KEY : [DATA], etc.
- (C2) Extract all the keys (headers), calculate and set the number of columns.
- (C3) Loop through the keys. Create the first row, the headers.
- (C4) Loop through all the data entries, and append them to the grid.
DOWNLOAD & NOTES
Firstly, here is the download link to the example code as promised.
SUPPORT
600+ free tutorials & projects on Code Boxx and still growing. I insist on not turning Code Boxx into a «paid scripts and courses» business, so every little bit of support helps.
EXAMPLE CODE DOWNLOAD
Click here for the source code on GitHub gist, just click on “download zip” or do a git clone. I have released it under the MIT license, so feel free to build on top of it or use it in your own project.
EXTRA BITS & LINKS
That’s all for the tutorial, and here is a small section on some extras and links that may be useful to you.
RESPONSIVE GRID
@media screen AND (max-width: 768px) < .grid < grid-template-columns: 100% >>If you don’t have a “fixed header” and “it must be N columns” to deal with, you can consider reducing the number of columns on small screens. The above snippet will collapse into a single column on small screens.
LINKS & REFERENCES
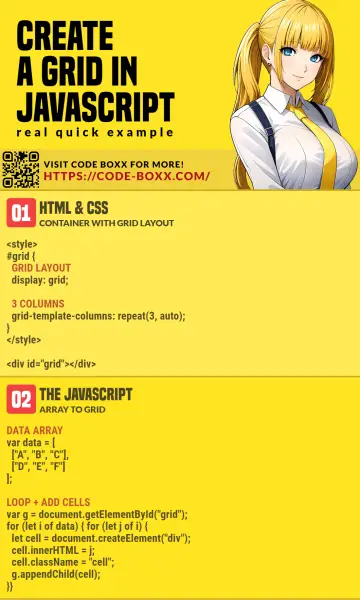
INFOGRAPHIC CHEAT SHEET
THE END
Thank you for reading, and we have come to the end. I hope that it has helped you to better understand, and if you want to share anything with this guide, please feel free to comment below. Good luck and happy coding!
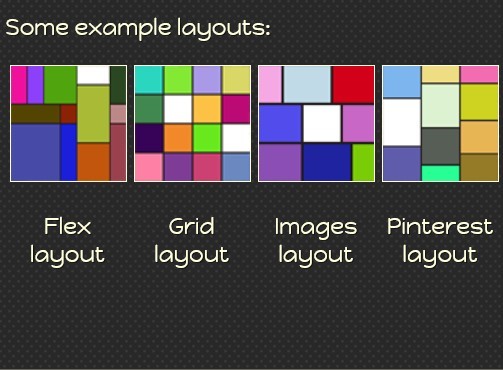
10 Best Grid Layout Systems In JavaScript And CSS (2023 Update)
Grid layout is one of the most popular cross-platform layout design concepts in modern web & mobile design.
The grid layout dynamically resizes and arranges grid items in a responsive, multi-column, card-style UI depending on the screen size.
The Best Grid Layout System
In this blog post you will find the 10 best responsive grid layout systems implemented in jQuery, Vanilla JavaScript, or even Pure CSS/CSS3. I hope you like it.
Originally Published Nov 22 2017, updated Jan 04 2022
Table of contents:
jQuery Grid Layout Plugins:
Isotope — Magical Dynamic Layout Plugin For jQuery
A Magical Dynamic Layout Plugin features Layout modes(Intelligent, dynamic layouts that can’t be achieved with CSS alone.), Filtering (Hide and reveal item elements easily with jQuery selectors) and Sorting (Re-order item elements with sorting.

Responsive jQuery Dynamic Grid Layouts Plugin — Freewall
Freewall is a responsive and cross-browser jQuery plugin for creating dynamic grid layouts for desktop, mobile and tablet.
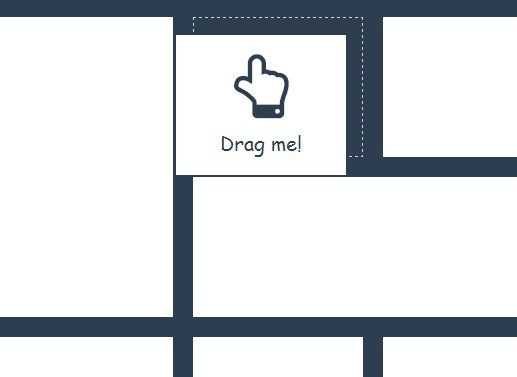
Responsive & Fluid Drag-and-Drop Grid Layout with jQuery — gridstack.js
Gridstack.js is a vanilla JavaScript widget/grid layout plugin inspired by Gridster that allows you to dynamically and responsively rearrange grid items through drag and drop.
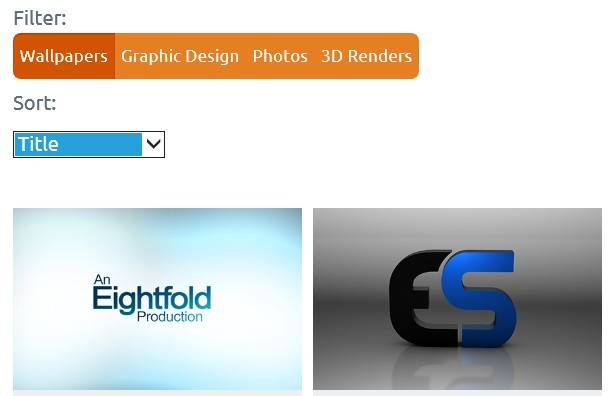
Create A Sortable and Filterable Grid of Items — Shuffle
Shuffle is a responsive jQuery plugin for categorizing your grid of items to make them sortable, searchable and filterable.
Responsive & Filterable jQuery Portfolio Gallery Plugin — Elastic Grid
Elastic Grid is a powerful, responsive, interactive, filterable jQuery & CSS3 image gallery plugin designed for portfolio websites.

Vanilla JS Grid Layout Libraries:
Responsive, Draggable, Filterable Grid Layout – muuri
A versatile JavaScript library that helps you create responsive, draggable, filterable, searchable grid layout with smooth animations based on Velocity.js.

Creating A Flickr-style Justified Layout With JavaScript
A versatile JavaScript library that helps you create responsive, draggable, filterable, searchable grid layout with smooth animations based on Velocity.js.

Responsive Grid Layout Builder In Vanilla JavaScript – EasyGrid
An easy, framework-agnostic JavaScript grid library helps developers quickly build a responsive, customizable, and animated grid layout on their sites or web apps.

Pure CSS Grid Layout System:
Responsive 12-column Grid Layout – SpaceGrid
A lightweight CSS library used to render a responsive, 12-column grid layout for your modern web design.

flexbin.css
a lightweight, flexible CSS library which lets you create responsive, neat, justified grid layout for showcasing your photos as you seen on Google Image Search and Flickr. Heavily based on CSS3 flexbox and fully customizable via SCSS.

More Resources:
Looking for more jQuery plugins or JavaScript libraries to create awesome Grid Layouts on the web & mobile? See jQuery Grid Layout and JavaScript/CSS Grid Layout sections for more details.