- Create Admin Login and Logout Page
- Registration and Login form in PHP and MySQL
- Create MySQL Connection Using PHP
- Create Connection Using PHP and MySQL
- Create Partial header.php
- Create Partial sidebar.php
- Created Admin and User Registration
- User and Admin Signup HTML
- Added Method to save User Form Data
- Created Login/Sign-In Using MySQL
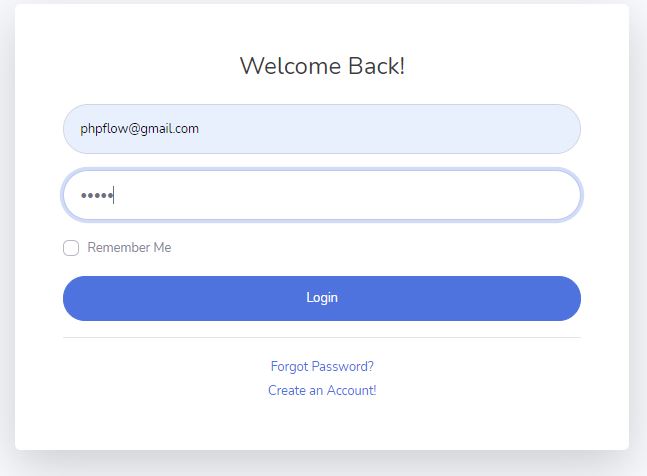
- User and Admin Login HTML
- Added Method to Login User
- Logout Using PHP
- How To Check Logged-in User is Admin
- Conclusion
- 2 thoughts on “ Create Admin Login and Logout Page ”
- How to Use the HTML Admin template in PHP?
- What is PHP? And why admin template uses?
- How to Use the HTML Admin template in PHP?
Create Admin Login and Logout Page
In this post, I am going to let you know how to create a Normal/Admin register and login using PHP and MySQL. I also provide features to logout from admin dashboard. I will use PHP session to maintain user visibility.
The Login system of the user helps to restrict the access of sensitive information or pages from unauthorized user.
The admin pages in the application are not accessible to normal users. To log in, all users (administrators and normal users) utilise the same form. Normal users are redirected to the index page after checking in, whereas admin users are redirected to the admin pages.
I am using SB Admin 2 theme.It’s a open source bootstrap based theme.
Registration and Login form in PHP and MySQL
Let’s build a user management system with two types of users: admins and regular users. I’ll save everything to a MySQL database.
Create the following files and directories in the xampp/htdocs(www if you’re using wamp) folder for a user-management application:
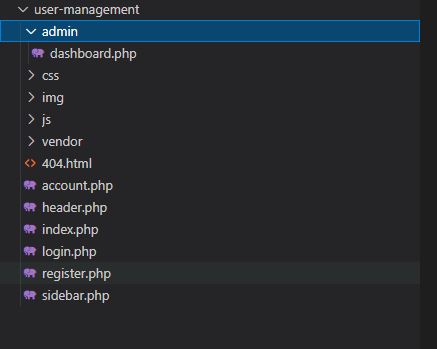
- index.php: This is the normal user’s home page.
- account.php: This file will contain user registration and login methods.
- admin/dashboard.php: This file will be used to display the admin user’s welcome dashboard page..
- header.php: This file contains information about the header theme.
- sidebar.php: This is a partial file that will display an html view of the ace admin sidebar.
- login.php: It will have a user sign-in view.
- register.php: This file provides user registration information; I use the same registration form for admins and regular users.
Create MySQL Connection Using PHP
We’ll start by creating a database called test. Also, using the SQL script below, create a login name table in this database:
CREATE TABLE `login` ( `id` int(11) NOT NULL, `first_name` varchar(50) NOT NULL, `last_name` varchar(50) NOT NULL, `email` varchar(50) NOT NULL, `password` varchar(50) NOT NULL, `user_type` enum('normal','admin','') NOT NULL DEFAULT 'normal', `status` enum('active','pending','deleted','') NOT NULL DEFAULT 'pending', `authtoken` varchar(250) NOT NULL ) ENGINE=InnoDB DEFAULT CHARSET=latin1; Create Connection Using PHP and MySQL
Let’s use PHP to make a connection with MySQL data. The following code was added to the top of the account.php file.
// connect to database $db = mysqli_connect('localhost', 'root', '', 'test'); Create Partial header.php
We’ll make a header.php file and paste the code below into it. This file will contain all of the CSS and JS include paths. I also used the session start method at the top of the file to start a PHP session.
Add a link to the css/js files directly under the file’s head section.
Create Partial sidebar.php
We’ll make a sidebar.php file and paste the code below into it. This file has a sidebar menu option, which you can customize for both admins and regular users.
Created Admin and User Registration
Using SB admin2 Theme Theme, we’ll first setup user and admin registration. Now, open register.php in your preferred text editor and begin writing some code.
User and Admin Signup HTML
Create an HTML form that receives user input and saves it to the mysql login table. I’ve added the following code to this file:
Create an Account!