- Python Client for Cloud Speech API
- Quick Start
- Installation
- Code samples and snippets
- Supported Python Versions
- Unsupported Python Versions
- Mac/Linux
- Windows
- Next Steps
- Saved searches
- Use saved searches to filter your results more quickly
- License
- googleapis/python-texttospeech
- Name already in use
- Sign In Required
- Launching GitHub Desktop
- Launching GitHub Desktop
- Launching Xcode
- Launching Visual Studio Code
- Latest commit
- Git stats
- Files
- README.rst
- Speech AI с Python & Google API
- Распознавание речи
- SpeechRecognition
- Обработка речи
- ChatterBot
- Синтезирование и воспроизведение речи
- Google Text to Speech
- Speech Recognition in Python using Google Speech API
- Required Installations
- Speech Input Using a Microphone and Translation of Speech to Text
- Troubleshooting
Python Client for Cloud Speech API
Cloud Speech API: enables easy integration of Google speech recognition technologies into developer applications. Send audio and receive a text transcription from the Speech-to-Text API service.
Quick Start
In order to use this library, you first need to go through the following steps:
Installation
Install this library in a virtualenv using pip. virtualenv is a tool to create isolated Python environments. The basic problem it addresses is one of dependencies and versions, and indirectly permissions.
With virtualenv, it’s possible to install this library without needing system install permissions, and without clashing with the installed system dependencies.
Code samples and snippets
Code samples and snippets live in the samples/ folder.
Supported Python Versions
Our client libraries are compatible with all current active and maintenance versions of Python.
Unsupported Python Versions
If you are using an end-of-life version of Python, we recommend that you update as soon as possible to an actively supported version.
Mac/Linux
pip install virtualenv virtualenv source /bin/activate /bin/pip install google-cloud-speech Windows
pip install virtualenv virtualenv \Scripts\activate \Scripts\pip.exe install google-cloud-speech Next Steps
- Read the Client Library Documentation for Cloud Speech API to see other available methods on the client.
- Read the Cloud Speech API Product documentation to learn more about the product and see How-to Guides.
- View this README to see the full list of Cloud APIs that we cover.
Except as otherwise noted, the content of this page is licensed under the Creative Commons Attribution 4.0 License, and code samples are licensed under the Apache 2.0 License. For details, see the Google Developers Site Policies. Java is a registered trademark of Oracle and/or its affiliates.
Last updated 2023-07-06 UTC.
Saved searches
Use saved searches to filter your results more quickly
You signed in with another tab or window. Reload to refresh your session. You signed out in another tab or window. Reload to refresh your session. You switched accounts on another tab or window. Reload to refresh your session.
License
googleapis/python-texttospeech
This commit does not belong to any branch on this repository, and may belong to a fork outside of the repository.
Name already in use
A tag already exists with the provided branch name. Many Git commands accept both tag and branch names, so creating this branch may cause unexpected behavior. Are you sure you want to create this branch?
Sign In Required
Please sign in to use Codespaces.
Launching GitHub Desktop
If nothing happens, download GitHub Desktop and try again.
Launching GitHub Desktop
If nothing happens, download GitHub Desktop and try again.
Launching Xcode
If nothing happens, download Xcode and try again.
Launching Visual Studio Code
Your codespace will open once ready.
There was a problem preparing your codespace, please try again.
Latest commit
Git stats
Files
Failed to load latest commit information.
README.rst
Python Client for Google Cloud Text-to-Speech API
Google Cloud Text-to-Speech API: enables easy integration of Google text recognition technologies into developer applications. Send text and receive synthesized audio output from the Cloud Text-to-Speech API service.
In order to use this library, you first need to go through the following steps:
Install this library in a virtual environment using venv. venv is a tool that creates isolated Python environments. These isolated environments can have separate versions of Python packages, which allows you to isolate one project’s dependencies from the dependencies of other projects.
With venv, it’s possible to install this library without needing system install permissions, and without clashing with the installed system dependencies.
Code samples and snippets
Code samples and snippets live in the samples/ folder.
Supported Python Versions
Our client libraries are compatible with all current active and maintenance versions of Python.
Unsupported Python Versions
If you are using an end-of-life version of Python, we recommend that you update as soon as possible to an actively supported version.
python3 -m venv source /bin/activate pip install google-cloud-texttospeech py -m venv .\\Scripts\activate pip install google-cloud-texttospeech - Read the Client Library Documentation for Google Cloud Text-to-Speech API to see other available methods on the client.
- Read the Google Cloud Text-to-Speech API Product documentation to learn more about the product and see How-to Guides.
- View this README to see the full list of Cloud APIs that we cover.
Speech AI с Python & Google API
Совсем недавно пришла в голову идея сделать «говорилку» на русском языке. В голове была простенькая схема наподобие:
1) Распознать речь с микрофона
2) Придумать более — менее разумный ответ.
В этом пункте можно сделать много интересного.
Например реализовать управление чем — нибудь физическим и не очень.
3) Преобразовать этот самый ответ в речь и воспроизвести.
Самое интересное, что для всех этих пунктов нашлись библиотеки под Python, чем я и воспользовался.
В итоге получилась связка, практически не зависящая от выбранного в качестве разговорного языка.
Распознавание речи
SpeechRecognition
Эта библиотека представляет из себя обвертку над многими популярными сервисами / библиотеками распознавания речи.
Т.к. из всех представленных в списке библиотеки сервисов первым заработал Google Speech Recognition, им я и воспользовался в дальнейшем.
Обработка речи
ChatterBot
Библиотека использует методы машинного обучения. Обучение происходит на наборах данных в формате диалогов.
Процесс обучения в библиотеке chatterbot
В качестве источников данных для обучения могут выступать файлы такого простого формата
По сути они представляют из себя набор диалогов в виде:
Для английского языка там есть хороший набор обучающих классов, один из которых берет диалоги из Ubuntu Dialog Corpus, а другой из Twitter’a.
К сожалению, для русского языка я не нашел альтернатив Ubuntu Dialog Corpus (такого же объема). Хотя тот же TwitterTrainer должен работать.
В порядке эксперимента я попробовал использовать при обучении диалоги из первого тома Воины и Мира.
Получилось забавно, но малоправдоподобно, т.к. диалоги там зачастую направленные на определенных персонажей романа.
Так как без большого количества данных сложно получить из бота интересного собеседника, в данный момент поиск хорошей базы для диалогов продолжается.
Еще библиотека chatterbot предоставляет набор «Логических модулей» (LogicAdapter). При помощи которых можно например фильтровать ответ, научить бота считать или говорить текущее время.
Библиотека довольно гибкая, позволяет писать свои классы для обучения и логические модули.
Синтезирование и воспроизведение речи
Google Text to Speech
Эта библиотека умеет преобразовывать строку в mp3 файл с речью. Т.к. за этой библиотекой стоит Google, то на выбор имеется много языков, включая русский.
Speech Recognition in Python using Google Speech API
Speech Recognition is an important feature in several applications used such as home automation, artificial intelligence, etc. This article aims to provide an introduction to how to make use of the SpeechRecognition library of Python. This is useful as it can be used on microcontrollers such as Raspberry Pi with the help of an external microphone.
Required Installations
The following must be installed:
Python Speech Recognition module:
sudo pip install SpeechRecognition
PyAudio: Use the following command for Linux users
sudo apt-get install python-pyaudio python3-pyaudio
If the versions in the repositories are too old, install pyaudio using the following command
sudo apt-get install portaudio19-dev python-all-dev python3-all-dev && sudo pip install pyaudio
Use pip3 instead of pip for python3. Windows users can install pyaudio by executing the following command in a terminal
Speech Input Using a Microphone and Translation of Speech to Text
- Configure Microphone (For external microphones): It is advisable to specify the microphone during the program to avoid any glitches. Type lsusb in the terminal for LInux and you can use the PowerShell’s Get-PnpDevice -PresentOnly | Where-Object command to list the connected USB devices. A list of connected devices will show up. The microphone name would look like this
USB Device 0x46d:0x825: Audio (hw:1, 0)
- Make a note of this as it will be used in the program.
- Set Chunk Size: This basically involved specifying how many bytes of data we want to read at once. Typically, this value is specified in powers of 2 such as 1024 or 2048
- Set Sampling Rate: Sampling rate defines how often values are recorded for processing
- Set Device ID to the selected microphone: In this step, we specify the device ID of the microphone that we wish to use in order to avoid ambiguity in case there are multiple microphones. This also helps debug, in the sense that, while running the program, we will know whether the specified microphone is being recognized. During the program, we specify a parameter device_id. The program will say that device_id could not be found if the microphone is not recognized.
- Allow Adjusting for Ambient Noise: Since the surrounding noise varies, we must allow the program a second or two to adjust the energy threshold of recording so it is adjusted according to the external noise level.
- Speech to text translation: This is done with the help of Google Speech Recognition. This requires an active internet connection to work. However, there are certain offline Recognition systems such as PocketSphinx, that have a very rigorous installation process that requires several dependencies. Google Speech Recognition is one of the easiest to use.
Troubleshooting
The following problems are commonly encountered
Muted Microphone: This leads to input not being received. To check for this, you can use alsamixer. It can be installed using
sudo apt-get install libasound2 alsa-utils alsa-oss
Type amixer. The output will look somewhat like this
Simple mixer control 'Master', 0 Capabilities: pvolume pswitch pswitch-joined Playback channels: Front Left - Front Right Limits: Playback 0 - 65536 Mono: Front Left: Playback 41855 [64%] [on] Front Right: Playback 65536 [100%] [on] Simple mixer control 'Capture', 0 Capabilities: cvolume cswitch cswitch-joined Capture channels: Front Left - Front Right Limits: Capture 0 - 65536 Front Left: Capture 0 [0%] [off] #switched off Front Right: Capture 0 [0%] [off]
As you can see, the capture device is currently switched off. To switch it on, type alsamixer As you can see in the first picture, it is displaying our playback devices. Press F4 to toggle to Capture devices.
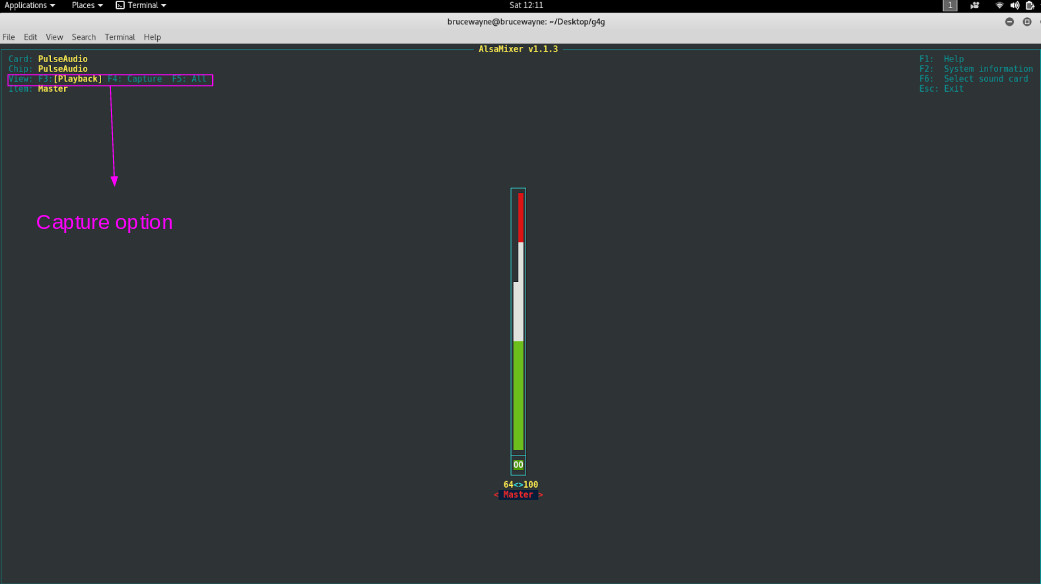
In the second picture, the highlighted portion shows that the capture device is muted. To unmute it, press the space bar .  As you can see in the last picture, the highlighted part confirms that the capture device is not muted.

Current microphone not selected as a capture device: In this case, the microphone can be set by typing alsamixer and selecting sound cards. Here, you can select the default microphone device. As shown in the picture, the highlighted portion is where you have to select the sound card. The second picture shows the screen selection for the sound card.
No Internet Connection: The speech-to-text conversion requires an active internet connection.
This article is contributed by Deepak Srivatsav. If you like GeeksforGeeks and would like to contribute, you can also write an article using write.geeksforgeeks.org or mail your article to review-team@geeksforgeeks.org. See your article appearing on the GeeksforGeeks main page and help other Geeks.
Please write comments if you find anything incorrect, or if you want to share more information about the topic discussed above.