- Tutorial on Using Gitlab CI/CD Pipelines to Deploy Your Python Flask Restful API With Postgres on Heroku
- Heroku
- Heroku API Key
- Heroku Postgres Add-on
- Our Application Code
- Testing the API:
- Troubleshooting
- Resources:
- Thank You
- Setting Up GitLab CI for a Python Application
- What is CI?
- Getting Started with GitLab CI
- Creating a Single Job in GitLab CI
- Running Tests with pytest on GitLab CI
- Final GitLab CI Configuration
- Related Posts:
Tutorial on Using Gitlab CI/CD Pipelines to Deploy Your Python Flask Restful API With Postgres on Heroku
Today we will build a Restful API using Python Flask, SQLAlchemy using Postgres as our Database, testing using Python Unittest, a CI/CD Pipeline on Gitlab, and Deployment to Heroku.
From our previous post, we demonstrated setting up a Custom Gitlab Runner on Your Own Server for Gitlab CI.
Heroku
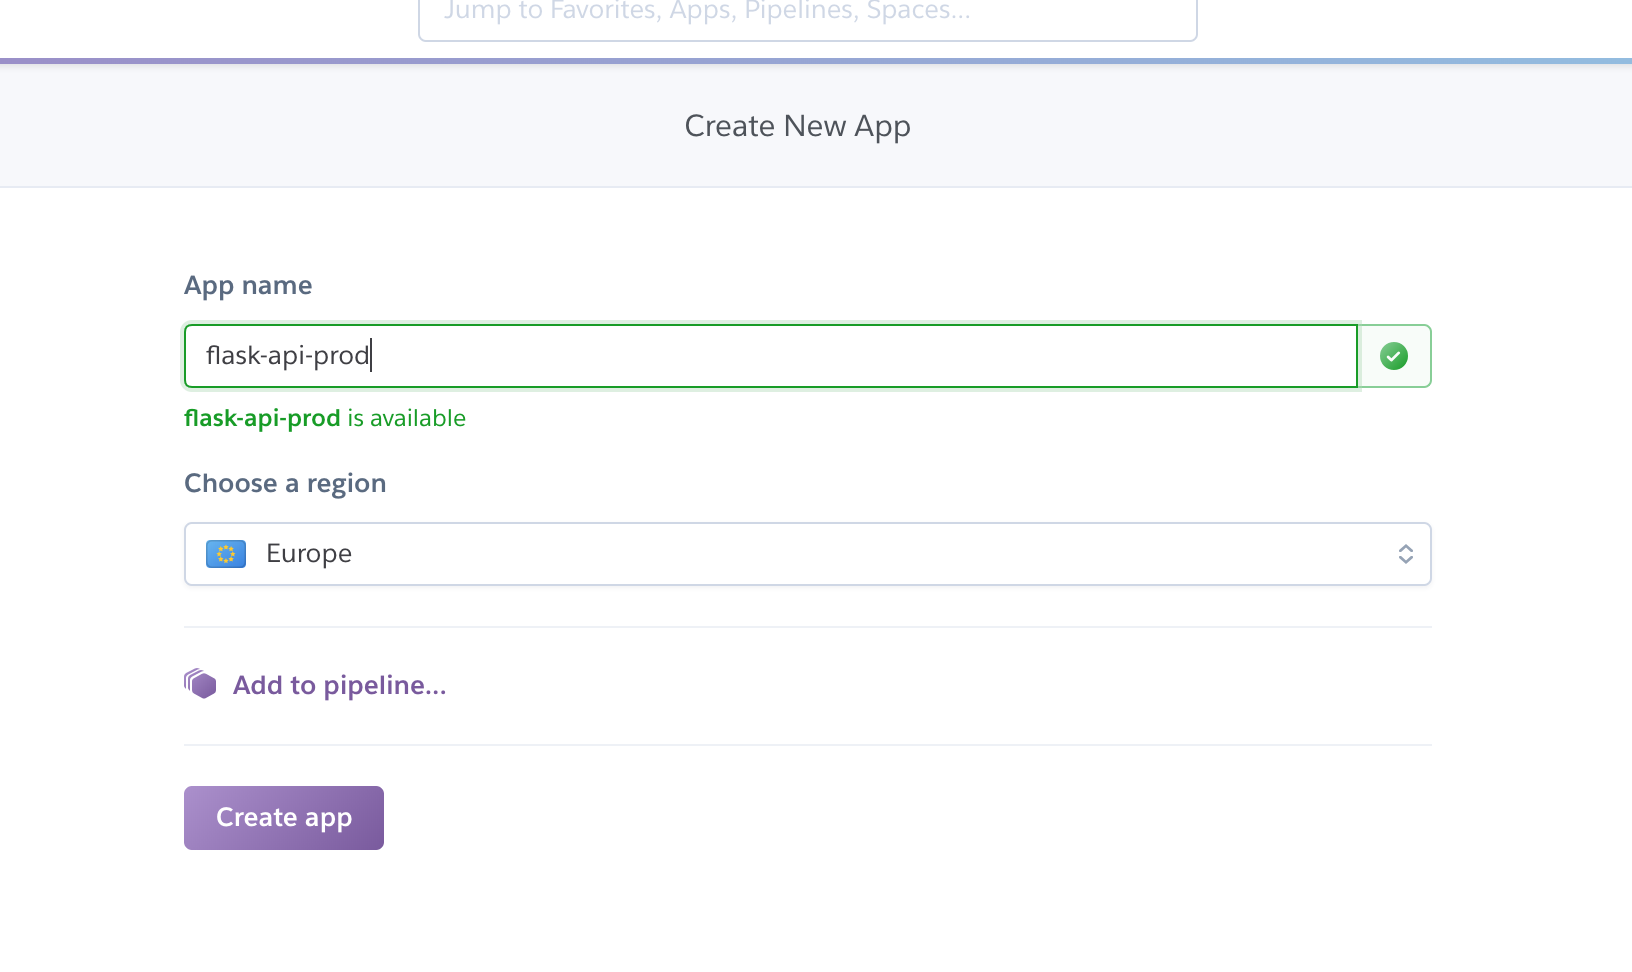
If you don’t have an account already, Heroku offer’s 5 free applications in their free tier account. Once you have created your account, create 2 applications. I named mine flask-api-staging and flask-api-prod.
You can create the applications via cli or the ui, from the ui it will look more or less like this:

Select an app name and check if the name is available then select create. Note down the name and config as we will use it in our .gitlab-ci.yml config:
Heroku API Key
To allow the deployment of applications to Heroku from Gitlab, we need to generate a API Key on Heroku and save the config in Gitlab.
Head over to your Heroku Dashboard, select Account Settings, scroll to the API Key section and generate a API Key.
Head over to your Gitlab Repository, select Settings, CI/CD, then select Variables enter the Key: HEROKU_API_KEY and the Secret of the API Key into the Value and select Save Variable.
We will reference this variable from our deploy steps.
Heroku Postgres Add-on
Heroku offers a free Postgres Add-On, to activate: Select your application, select Resources, search for the Add-on Heroku Postgres , select and select the Hobby Dev Free version and select provision.
Our Application Code
Clone your repository then let’s start by creating our Flask API. Note this is more on Gitlab CI/CD than going into detail into the Flask Application.
Create the files that we will need:

Testing the API:
Now that everything is up and running, its time to test our API.
$ curl https://flask-api-staging.herokuapp.com/api/user [] $ curl -H 'Content-Type: application/json' -XPOST https://flask-api-staging.herokuapp.com/api/user -d '' "member": "id": 1, "username": "ruanb" > > $ curl -H 'Content-Type: application/json' -XGET https://flask-api-staging.herokuapp.com/api/user [ "email": "ruan@r.com", "id": 1, "username": "ruanb" > ] Update a User’s email address:
$ curl -H 'Content-Type: application/json' -XPUT https://flask-api-staging.herokuapp.com/api/user/1 -d '' "id": 1, "username": "ruanb" > $ curl -H 'Content-Type: application/json' -XGET https://flask-api-staging.herokuapp.com/api/user/1 "email": "ruan@r.com", "id": 1, "username": "ruanb" > $ curl -H 'Content-Type: application/json' -XDELETE https://flask-api-staging.herokuapp.com/api/user/1 "message": "ruanb has been deleted" > Troubleshooting
I had some issues with Heroku, where one was after I deployed, I received this error in Heroku’s logs:
code=H14 desc="No web processes running" method=GET path="/" I just had to scale my web dyno to 1:
$ heroku ps:scale web=1 -a flask-api-staging Scaling dynos. done, now running web at 1:Free Have a look at their documentation if you need help with the heroku cli.
And to troubleshoot within the dyno, you can exec into it by running this:
heroku ps:exec -a flask-api-staging I seriously dig Gitlab-CI and with this demonstration you can see how easy it is to setup a CI/CD Pipeline on Gitlab and Deploy them to Heroku.
Resources:
For more blog posts on Gitlab, have a look at my gitlab category on blog.ruanbekker.com
Thank You
Please feel free to show support by, sharing this post, making a donation, subscribing or reach out to me if you want me to demo and write up on any specific tech topic.

My name is Ruan, I’m a DevOps Engineer from South Africa. I’m passionate about AWS, OpenSource, Observability, Containers, Linux, Automation and sharing my findings with the world. More info about me on my website, ruan.dev.
Follow @ruanbekker
Setting Up GitLab CI for a Python Application
This article describes how to configure a Continuous Integration (CI) process on GitLab for a python application. This article utilizes one of my python applications to show how to setup the CI process.
In this article, I’ll show how I setup a GitLab CI process to run the following jobs on a python application:
- Unit and functional testing using pytest
- Linting using flake8
- Static analysis using pylint
- Type checking using mypy
What is CI?
To me, Continuous Integration (CI) means frequently testing your application in an integrated state. However, the term ‘testing’ should be interpreted loosely as this can mean:
- Integration testing
- Unit testing
- Functional testing
- Static analysis
- Style checking (linting)
- Dynamic analysis
To facilitate running these tests, it’s best to have these tests run automatically as part of your configuration management (git) process. This is where GitLab CI is awesome!
Getting Started with GitLab CI
Before jumping into GitLab CI, here are a few definitions:
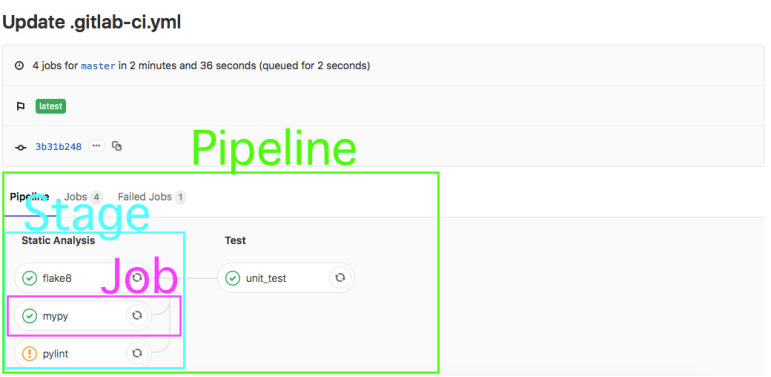
- pipeline: a set of tests to run against a single git commit.
- runner: GitLab uses runners on different servers to actually execute the tests in a pipeline; GitLab provides runners to use, but you can also spin up your own servers as runners.
- job: a single test being run in a pipeline.
- stage: a group of related tests being run in a pipeline.
GitLab utilizes the ‘.gitlab-ci.yml’ file to run the CI pipeline for each project. The ‘.gitlab-ci.yml’ file should be found in the top-level directory of your project.
While there are different methods of running a test in GitLab CI, I prefer to utilize a Docker container to run each test. I’ve found the overhead in spinning up a Docker container to be trivial (in terms of execution time) when doing CI testing.
Creating a Single Job in GitLab CI
The first job that I want to add to GitLab CI for my project is to run a linter (flake8). In my local development environment, I would run this command:
flake8 --ignore=E501 project You can find an accessible description of how to configure flake8 in the official documentation at Configuring Flake8
This command can be transformed into a job on GitLab CI in the ‘.gitlab-ci.yml’ file:
image: "python:3.9-slim" cache: paths: - deps_cache - venv/ before_script: - python --version - python -m venv venv - source venv/bin/activate - pip install -r test-requirements.txt --cache-dir deps_cache stages: - Static Analysis flake8: stage: Static Analysis only: - master - merge_requests script: - flake8 --ignore=E501 project This YAML file tells GitLab CI what to run on merge request and commits pushed up to master. Let’s break down each section…
The first part (image: “python: 3.9-slim”) instructs GitLab CI to utilize Docker for performing ALL of the tests for this project, specifically to use the ‘python:3.9-slim‘ image that is found on DockerHub.
The second part (cache) ised to specify a list of files and directories to cache between jobs. You can only use paths that are in the local working copy. Caching is shared between pipelines and jobs. Caches are restored before artifacts.
The third section (before_script) is the set of commands to run in the Docker container before starting each job. This is really beneficial for getting the Docker container in the correct state by installing all the python packages needed by the application.
The fourth section (stages) defines the different stages in the pipeline. There is only a single stage (Static Analysis) at this point, but later a second stage (Test) will be added. I like to think of stages as a way to group together related jobs.
The fourth section (flake8) defines the job; it specifies the stage (Static Analysis) that the job should be part of and the commands to run in the Docker container for this job. For this job, the flake8 linter is run against the project directory.
Running Tests with pytest on GitLab CI
When I run my unit and functional tests with pytest in my development environment, I run the following command in my top-level directory:
This command transformed into a job on GitLab CI in the ‘.gitlab-ci.yml’ file like this:
pytest: stage: Test only: - master - merge_requests script: - py.test -v tests --doctest-modules --cov project --cov-report term --cov-report xml artifacts: paths: - coverage.xml reports: cobertura: - coverage.xml In this part of the script we also create coverage report and store it in coverage.xml file
Final GitLab CI Configuration
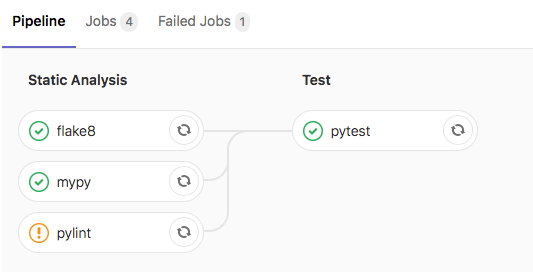
Final script which run pylint, mypy, flake8, pytest, coverage and allow failure of Static Analysis stages looks like this:
image: python:3.9-slim cache: paths: - deps_cache - venv/ before_script: - python --version - python -m venv venv - source venv/bin/activate - pip install -r test-requirements.txt --cache-dir deps_cache stages: - Static Analysis - Test flake8: stage: Static Analysis only: - master - merge_requests allow_failure: true script: - flake8 --ignore=E501 project pylint: stage: Static Analysis only: - master - merge_requests allow_failure: true script: - pylint --fail-under=8 project mypy: stage: Static Analysis only: - master - merge_requests allow_failure: true script: - mypy --ignore-missing-imports project pytest: stage: Test only: - master - merge_requests script: - py.test -v tests --doctest-modules --cov project --cov-report term --cov-report xml artifacts: paths: - coverage.xml reports: cobertura: - coverage.xml To configure pylint we will use next .pylintrc file:
[MASTER] init-hook="from pylint.config import find_pylintrc; import os, sys; sys.path.append(os.path.dirname(find_pylintrc()))" [MESSAGES CONTROL] # Disable the message, report, category or checker with the given id(s). You # can either give multiple identifier separated by comma (,) or put this option # multiple time (only on the command line, not in the configuration file where # it should appear only once). disable=C0103 [DESIGN] # Maximum number of arguments for function / method max-args=5 # Maximum number of attributes for a class (see R0902). max-attributes=10 # Maximum number of boolean expressions in a if statement max-bool-expr=5 # Maximum number of branch for function / method body max-branches=12 # Maximum number of locals for function / method body max-locals=15 # Maximum number of parents for a class (see R0901). max-parents=7 # Maximum number of public methods for a class (see R0904). max-public-methods=10 # Maximum number of return / yield for function / method body max-returns=10 # Maximum number of statements in function / method body max-statements=50 # Minimum number of public methods for a class (see R0903). min-public-methods=0 Check this resource to find more about pylint messages and they meaning: PyLint Messages
In this article we didnot cover some intersting techincs like testing against different python version with tox, configuring static analysis tools from 1 source of thuth pyproject.toml file and some other cool features, i will try to cover this in next articles.