Receiving Email with PHP and Laravel
It’s possible to receive email in PHP by running a mail server and executing a PHP script with the email passed to STDIN. With CloudMailin you don’t need to do any of that, your email is delivered to your application over HTTP(S).
Additional information about the format of the HTTP POST sent by CloudMailin can be found in the Receiving Email via HTTP API (POST) — Formats documentation. There are also some Postman Examples.
Receiving Email via HTTP POST
When receiving mail in PHP we recommend using our Normalized Multipart format. In this format your email will be delivered by HTTP POST as multipart/form-data content. This means that most of the content will be accessible from the $_POST variable. However, attachments will be in the $_FILES variable as an upload.
Response Type
Firstly we’re going to set a content type as text/plain . With the content type set to plain text CloudMailin will record any error messages returned when the HTTP status is not 2xx (HTTP Status Codes — Accepting, Rejecting and Retrying Emails).
// Setting content-type: text/plain will allow CloudMailin to store this response if it's an error header("Content-type: text/plain"); ?> Plain PHP
The Envelope (SMTP Transaction)
The SMTP transaction itself receives a recipient ( to ) and a mail ( from ) command. This allows the server to route the email. We also retain some other information such as the remote server IP and encryption (TLS) status.
Often you don’t want the to/from address in the envelope (SMTP) if your email is being forwarded. The intended information is normally available in the headers and is often different and preferable. Feel free to contact us if you need help deciding which to use.
// We recommend you use the normalized multipart format with PHP echo("Envelope:\n"); print_r($_POST['envelope']); ?> We can implement a simple check to accept or reject the email based on the SMTP transaction’s RCPT TO like the following:
$to = $_POST['envelope']['to']; if ($to == 'allowed@example.com') http_response_code(201); echo("success\n"); >else http_response_code(403); echo("user not allowed here\n"); > ?> Note that the CloudMailin server will respond to the SMTP sending server as if the mailbox does not exist if we return 403 (HTTP Status Codes — Accepting, Rejecting and Retrying Emails).
The Headers
All of the headers can be found in the headers parameter.
echo("Headers:\n"); print_r($_POST['headers']); ?> Array ( [received] => by mail-qv1-f65.google.com with SMTP id p7so20148692qvl.4 for ; Wed, 08 Jul 2020 02:45:03 -0700 [date] => Wed, 08 Jul 2020 10:44:51 +0100 [from] => Test User [to] => postman@example.net [message_id] => [subject] => Test Email . ) Note that if there are multiple values for the same header then this can be an array of strings not just a string.
Plain Content
The plain part of the email is in the plain parameter. Note that not all emails will have a plain part, we recommend falling back to the html parameter just in case here.
echo("Plain:\n"); echo($_POST['plain']."\n"); ?> HTML Content
The HTML part of the email is in the html parameter. Note that not all emails will have an HTML part, we recommend falling back to the plain parameter just in case here, as above.
Attachments
In the multipart format, attachments are sent over as $_FILES[‘attachments’] . This is an array of attachments so the output will be in the form $_FILES[‘attachments’][‘name’][0] for example. More details about attachment formats can be found in the Multipart Form/Data (Normalised) Hash Format section:
echo("Attachments:\n"); print_r($_FILES["attachments"]); ?> Attachments: Array ( [name] => Array ( [0] => Logo.png ) [type] => Array ( [0] => image/png ) [tmp_name] => Array ( [0] => /tmp/phprXSsmp ) [error] => Array ( [0] => 0 ) [size] => Array ( [0] => 68731 ) ) If the attachments are being sent to an Attachment Store instead of your server directly then the attachments’ field will be an array of attachments in the $_POST[‘attachments’] variable.
More details can be found in the Multipart Form/Data (Normalised) Hash Format documentation.
Now that we’re done creating our code, you can take a look at the full example or head over to the summary.
The Full Example
The full example we’ve been working on can be found below:
// Setting content-type: text/plain will allow CloudMailin // to store this response if it's an error header("Content-type: text/plain"); $to = $_POST['envelope']['to']; if ($to == 'allowed@example.com') http_response_code(201); echo("success\n"); >else http_response_code(403); echo("user not allowed here\n"); > echo("Envelope:\n"); print_r($_POST['envelope']); echo("Headers:\n"); print_r($_POST['headers']); echo("Plain:\n"); echo($_POST['plain']."\n"); echo("HTML:\n"); echo($_POST['html']."\n"); echo("Attachments:\n"); print_r($_FILES["attachments"]); ?> We that we’re done creating our code, you can now head over to the summary.
Receiving Email in Laravel
Receiving mail in Laravel is also straight forward. Again we recommend using the Normalized Multipart format for Laravel to receive email.
We’re going to start by creating a single action controller, but you’re free to use one of your regular controllers if it makes more sense:
php artisan make:controller IncomingMail --invokable That creates the controller so we’ll register the route:
use App\Http\Controllers\IncomingMail; Route::post('/incoming_mail', IncomingMail::class); CloudMailin will send a HTTP POST with the email content so we’ll register the controller as a POST.
The controller
Now that we’ve setup our route it’s time to add some code to the controller. In this example we’re going to access the envelope TO address (the email from the SMTP transaction) and get hold of the first attachment:
namespace App\Http\Controllers; use Illuminate\Http\Request; use Illuminate\Support\Facades\Log; class IncomingMail extends Controller /** * Handle the incoming request. * * @param \Illuminate\Http\Request $request * @return \Illuminate\Http\Response */ public function __invoke(Request $request) $to = $request->input('envelope.to'); Log::info($to); if ($to != "to@example.net") return response("To address not expected", 422) ->header('content-type', 'text/plain'); > $file = $request->file('attachments')[0]; Log::info($file); return "Thanks!"; > > If the envelope.to email doesn’t match then we’ll return a 422 error with a plain content type. As we mentioned in the Response Type section, if we return a plain response for a 4xx status code then CloudMailin will store the response to help you debug.
In this controller we only took a few parameters. All of the available parameters can be found in the Multipart Form/Data (Normalised) Hash Format documentation.
Preventing CSRF errors
Because CloudMailin’s post will be stateless, and we recommend you use Basic Auth and HTTPS to protect your endpoint, we can disable CSRF for this route. This allows us to prevent the 419 Page Expired status code occuring when the HTTP POST is sent.
To solve this we’ll disable CSRF Verification just for this action in App\Http\Middleware\VerifyCsrfToken :
namespace App\Http\Middleware; use Illuminate\Foundation\Http\Middleware\VerifyCsrfToken as Middleware; class VerifyCsrfToken extends Middleware /** * The URIs that should be excluded from CSRF verification. * * @var array */ protected $except = [ '/incoming_mail' ]; > Summary
That’s the code complete. All we now have to do is log into CloudMailin and make sure we set your address to deliver to http://example.com/incoming_mail (replace example.com with your App URL) and send our first message.
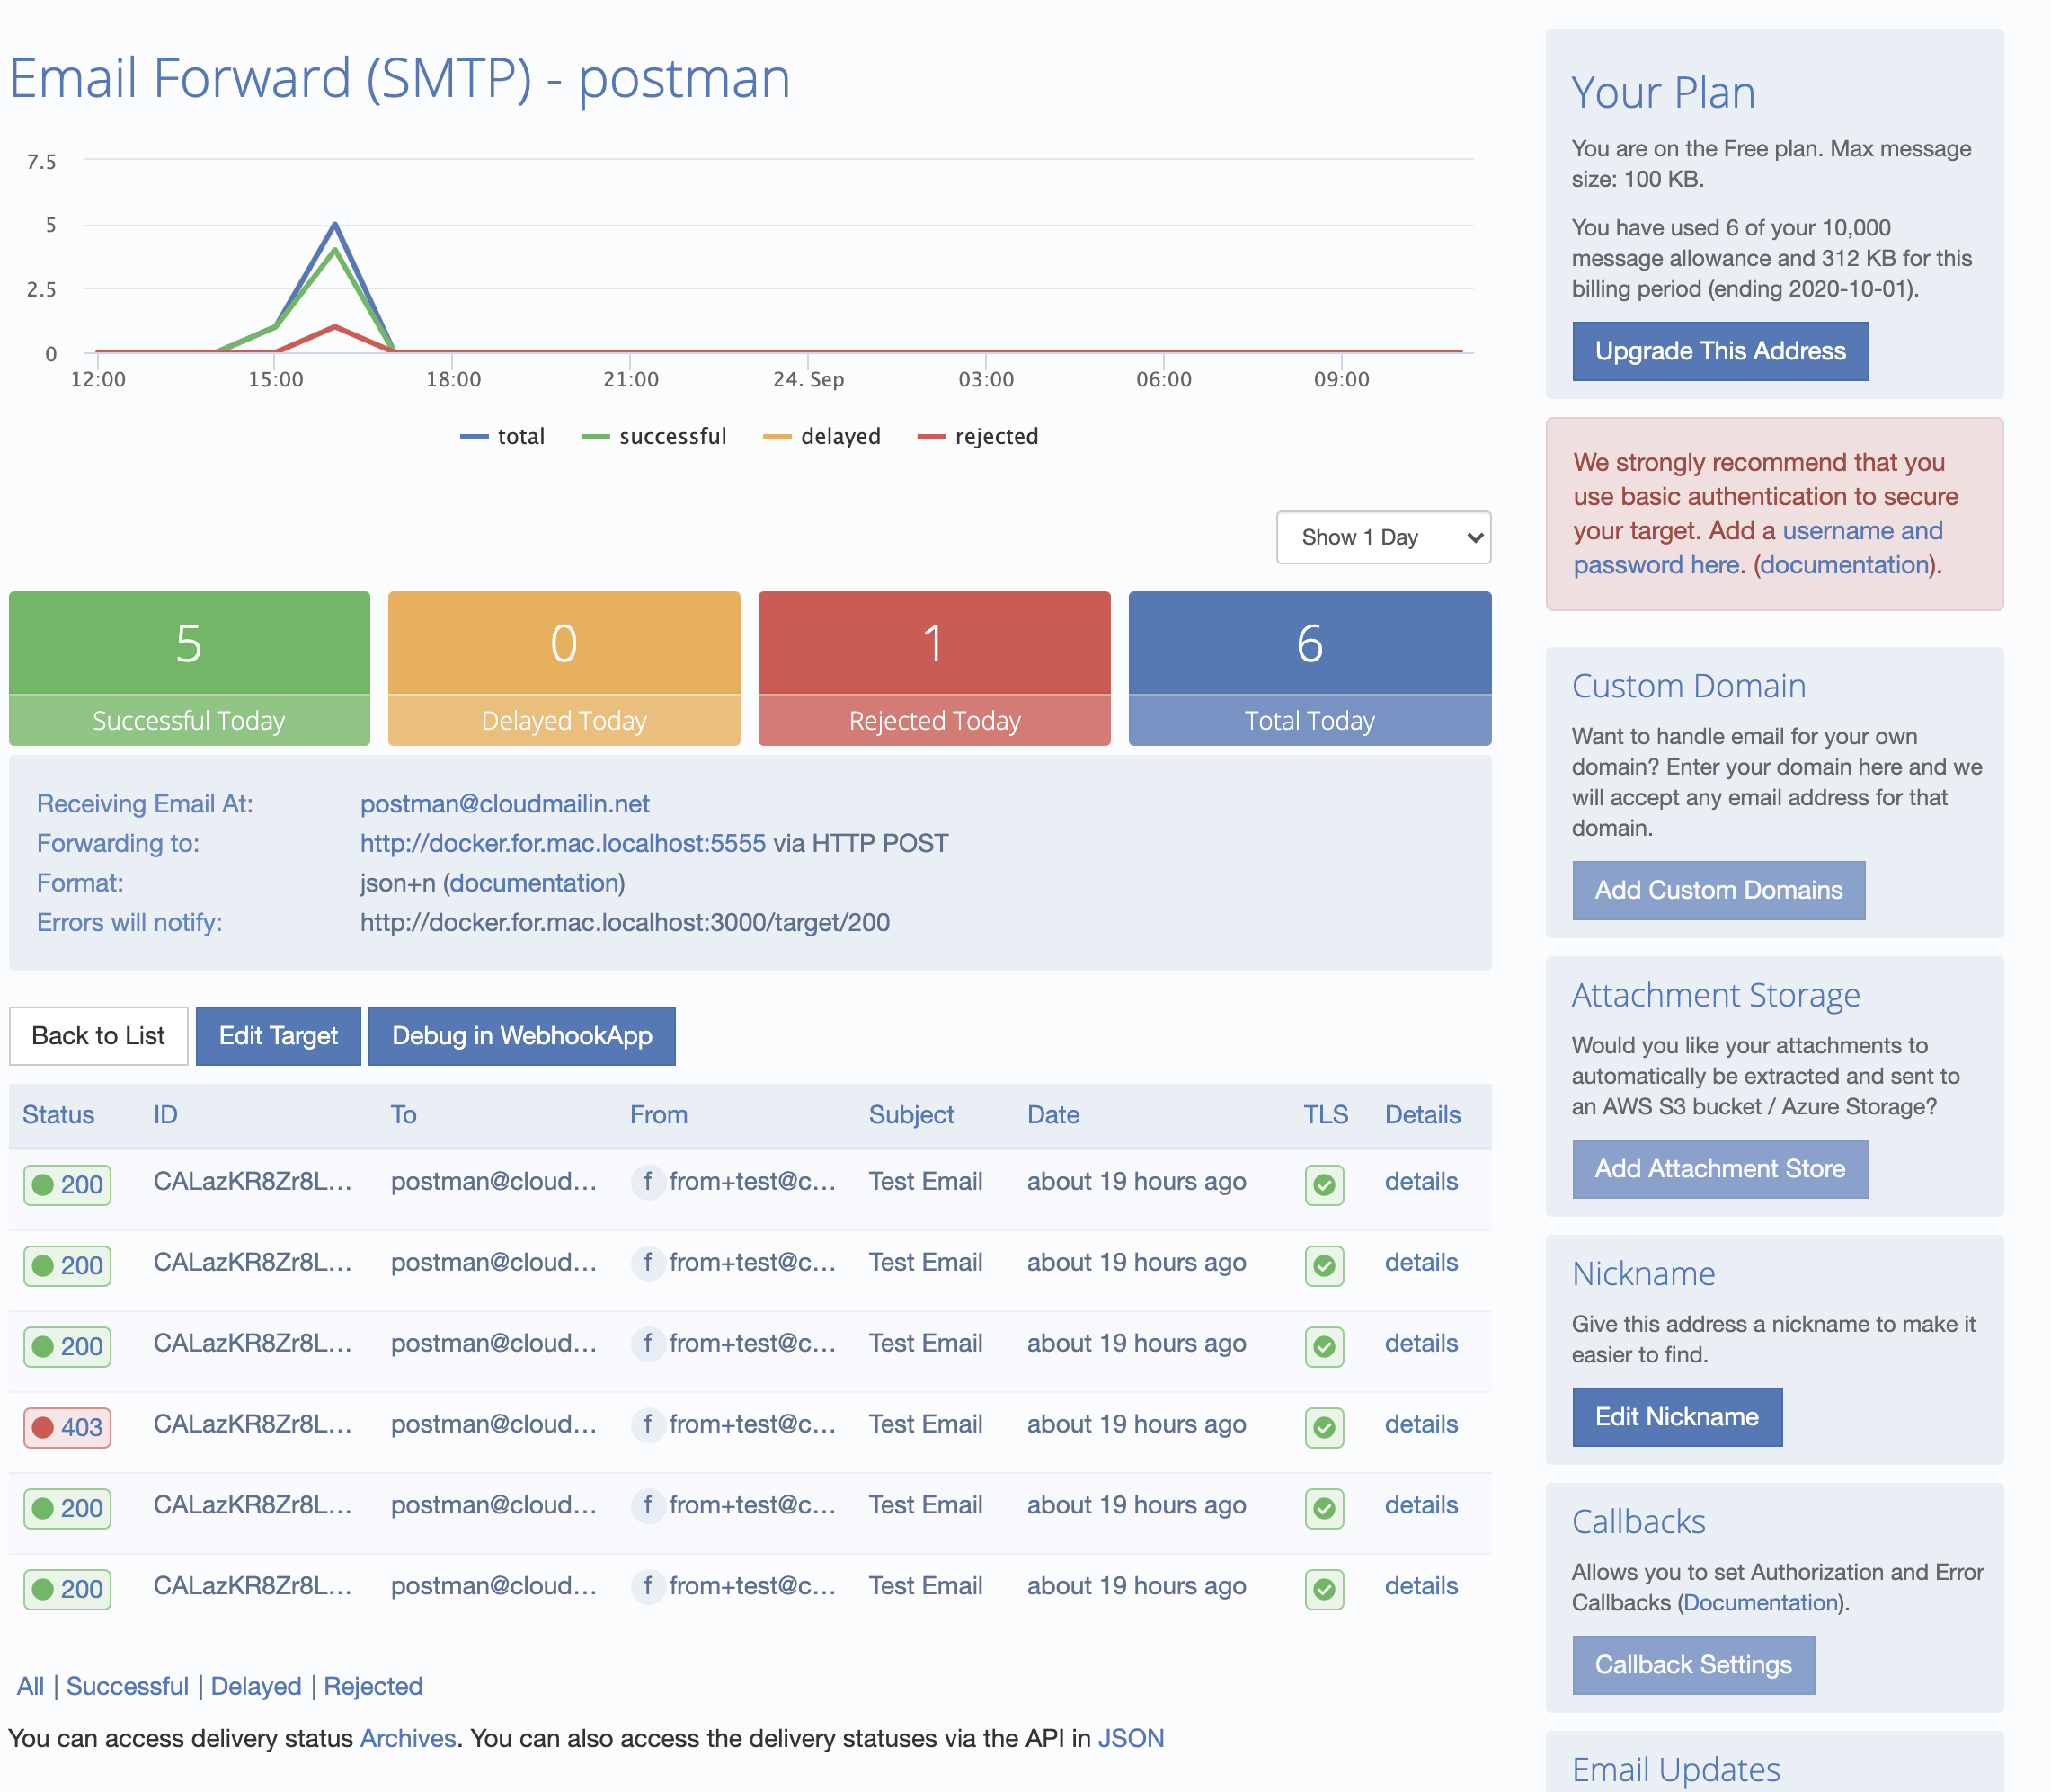
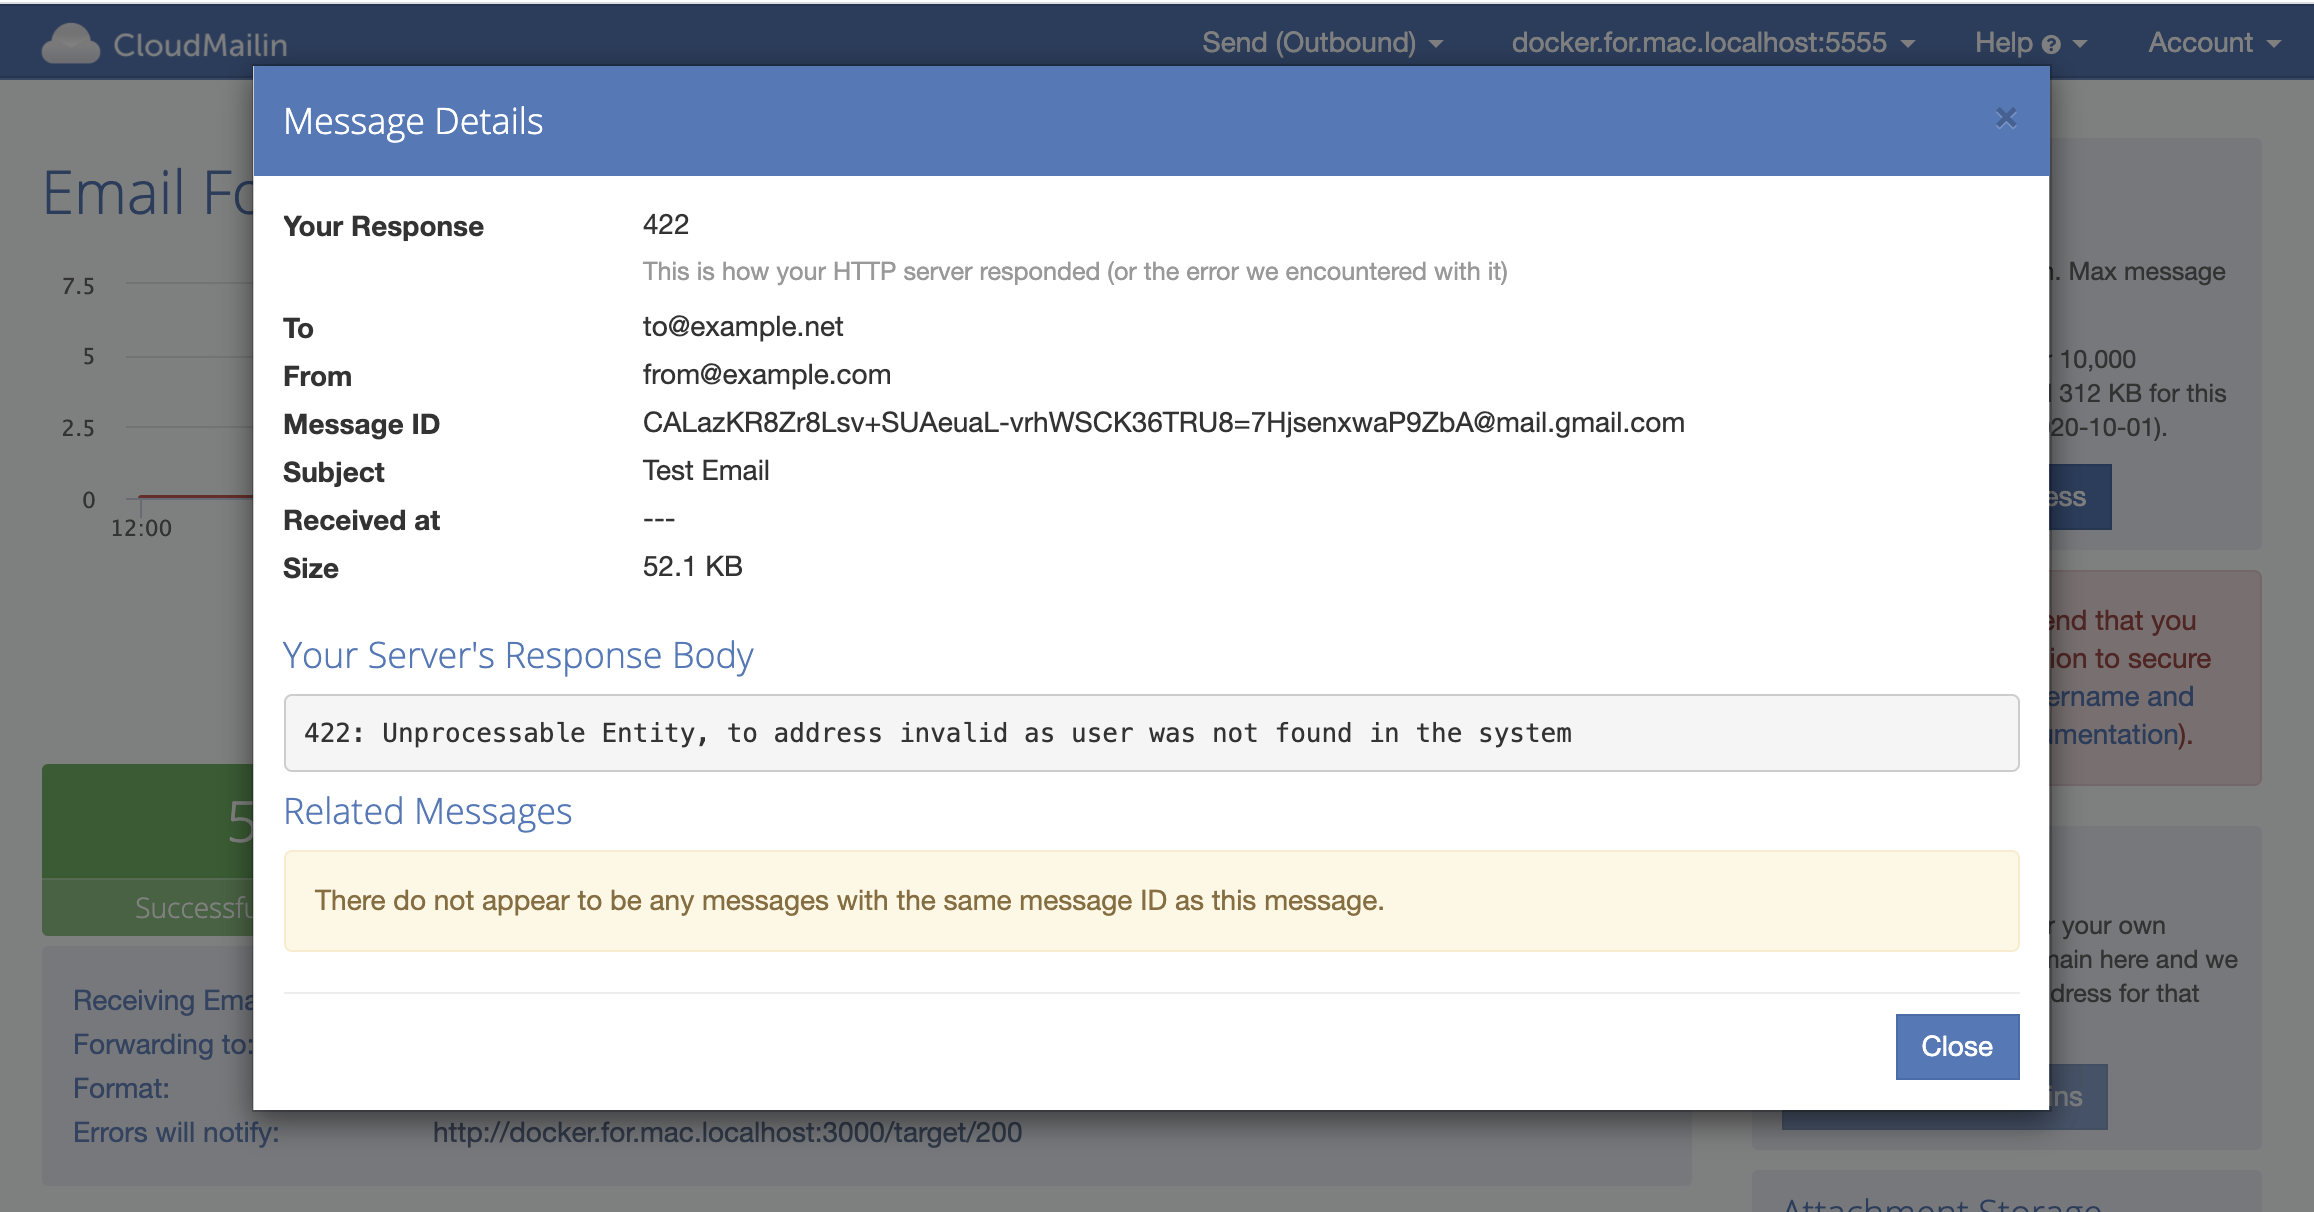
All of the details are listed in the dashboard. Here we can dig in and see the details. If the HTTP response of your server does not return a 2xx status code then the response will be recorded (see Status Codes):
Navigation
- Home
- Getting Started (Receiving)
- Introduction
- Receiving Email on AWS
- Receiving Email on Azure
- Receiving Email on Google Cloud
- Receiving Email on Heroku
- FAQs
- Getting Started Sending Email
- Introduction to POST Formats
- JSON (Normalized)
- Multipart (Normalized)
- Raw Message Format
- JSON Format
- Multipart Format
- Original Format
- HTTP Status Codes
- Using your own Domain
- Store Attachments in Cloud Storage
- Store Full Email in Cloud Storage
- Reply Parsing
- Callbacks
- Authorization Callbacks
- Error Callbacks
- Receiving Email with .Net 5 & 6
- Receiving Email with Go (Golang)
- Receiving Email with Java
- Receiving Email with Node JS and Typescript
- Receiving Email with PHP and Laravel
- Receiving Email with Python
- Receiving Email with Ruby and Rails
- Local Development / Debugger
- Test Driven Development
- Introduction
- Getting Started
- Priorities and Tagging
- Sending Email via API
- Sending Email with SMTP
- Examples