- Create a Button with a Loading Spinner in HTML & CSS 🔥
- Source Code & Preview
- Video Tutorial
- HTML
- CSS
- Styling The Button
- Creating The Spinner
- Animation
- Making The Button Work
- Conclusion
- File Upload with Progress Bar HTML CSS & JavaScript
- Video Tutorial of File Upload JavaScript with Progress Bar
- You might like this:
- File Upload JavaScript with Progress Bar [Source Codes]
Create a Button with a Loading Spinner in HTML & CSS 🔥
In today’s post I’ll be showing you how to use HTML and CSS to create an awesome looking button that features a loading spinner when clicked on.
Source Code & Preview
Video Tutorial
If you prefer this tutorial in the form of a video, you can watch it on my YouTube channel, dcode. Also, consider subscribing to my channel if you’re interested in web development 😁
HTML
Let’s begin by writing the HTML for the button. This is going to be fairly straightforward. We create a
type="button" class="button"> class="button__text">Save Changes CSS
Styling The Button
.button position: relative; padding: 8px 16px; background: #009579; border: none; outline: none; border-radius: 2px; cursor: pointer; > .button:active background: #007a63; > .button__text font: bold 20px 'Quicksand', san-serif; color: #ffffff; transition: all 0.2s; > As you may have noticed, a lot of these properties are for look and feel — but the main one to focus on here is position: relative . By using position: relative , it means we can center the loading spinner, which we’ll see shortly.
Creating The Spinner
We’ll be using the ::after pseudo-element to create the spinning animation. A pseudo-element is an element (like HTML) that you can style in CSS — in our case, ::after will create a «fake element» that sits inside our .button .
Important!
We’re going to be applying CSS to a class called .button—loading . Basically, this is a modifier class on the .button which can be added dynamically through JavaScript whenever you want the spinning animation to appear. For example, this may be done at the time of submitting a form.
.button--loading::after content: ""; position: absolute; width: 16px; height: 16px; top: 0; left: 0; right: 0; bottom: 0; margin: auto; border: 4px solid transparent; border-top-color: #ffffff; border-radius: 50%; animation: button-loading-spinner 1s ease infinite; > - content: «»; — this is a requirement to get the spinner to display
- position: absolute; — used in combination with position: relative; above, and the top , left , right and bottom properties will allow us to center the spinner
- border: 4px solid transparent — with this, we are setting a 4px wide solid border that is transparent. Combining it with border-top-color will only show a border at the top of the 16×16 square. This is key to creating a circle spinner.
- border-radius: 50% — this creates the circle
I recommend you toggle some of these properties on and off, to get a full understanding of how they work to produce a circle.
As you may have noticed, we’re also specifying an animation here, with a value of button-loading-spinner 1s ease infinite . This means, as long as the spinner is showing, make it spin infinitely with an ease timing duration, and an animation time of 1 second.
The button-loading-spinner animation doesn’t actually exist yet, so we must create it.
Animation
To make the animation specified in the previous block of code above work, we need to create keyframes for it. This is simple.
@keyframes button-loading-spinner from transform: rotate(0turn); > to transform: rotate(1turn); > > Here, we’re just saying the animation must turn our quarter-circle spinner from no turn to a full turn. With this code, the animation property above will now work.
Making The Button Work
Now that we’ve got all the CSS done, we need to make the spinner appear using JavaScript. Typically, you’ll want to activate the spinner as soon as the button is clicked on.
To do this, you simply add the class of .button—loading , for example:
const theButton = document.querySelector(".button"); theButton.addEventListener("click", () => theButton.classList.add("button--loading"); >); Every application is going to be different, so it’s up to you to decide when to toggle the loading spinner. To remove it, you can use classList.remove(«button—loading»); .
Conclusion
And that is how to create a button with a loading spinner using HTML and CSS. If you have any questions or comments please leave them below and I’ll try my best to respond 🙂 cheers!
File Upload with Progress Bar HTML CSS & JavaScript
Hey friends, today in this blog you’ll how to Upload File with Progress in HTML CSS & JavaScript. Earlier, I have shared a blog on how to create Drag & Drop or Browse File Upload Feature using JavaScript. So I’ll not add this feature to this File Uploader.
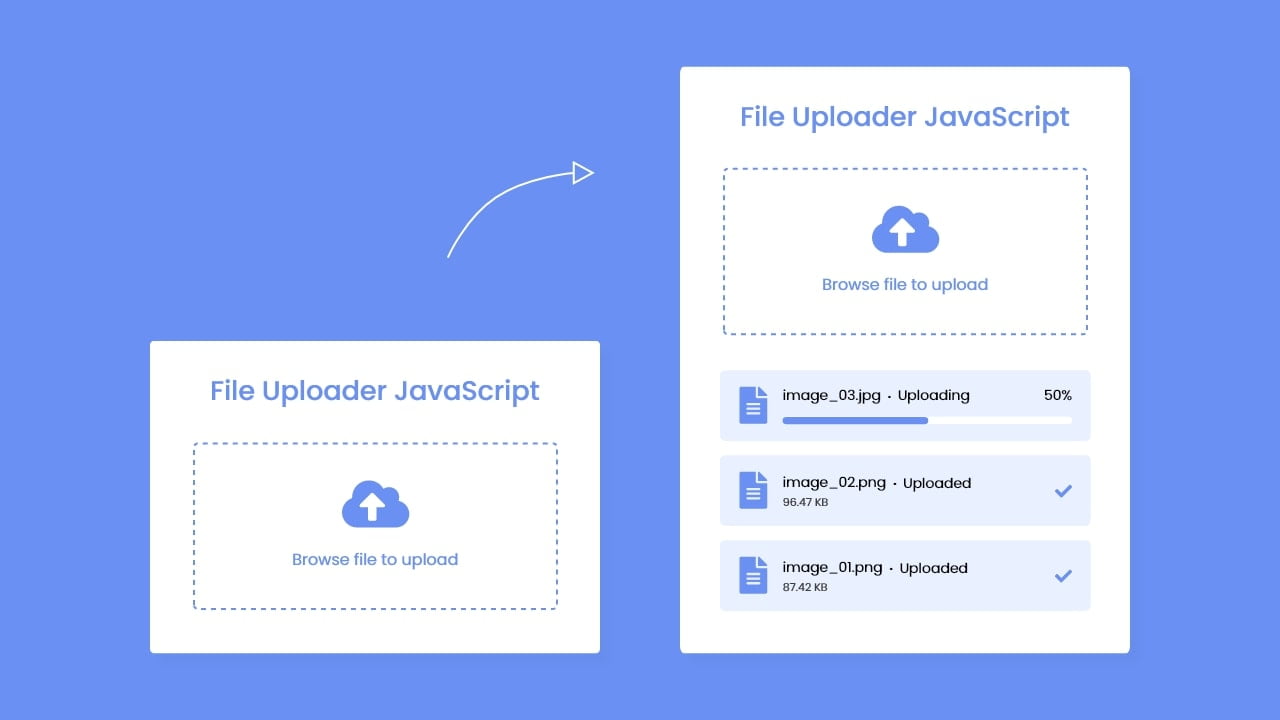
In this project (File Upload JavaScript with Progress Bar), as you can see in the preview image, there are two pictures of the file uploader. In the first one, there is a dashed border container with an icon and text to browse the file to upload.
When you click on this container an open file window will open and you can select any file to upload. Once you select the file then you can see in the second picture, there is shown your file uploading status with filename, uploaded percent, progress bar, etc. and there is the history of the uploaded files with filename, size, etc.
Video Tutorial of File Upload JavaScript with Progress Bar
In the video, you have seen the demo of the File Upload with Progress Bar and how I created it using HTML CSS, JavaScript & PHP. I’ve used PHP as a backend language to receive the user file and save or upload it. You can also use any other server-side language for it such as NodeJS.
I hope you liked this File Uploader and want to get source codes or files of this project but don’t worry I have given codes and source files download link to the bottom of the page. But before copy-paste the codes or download files, let’s talk about the important codes and concepts behind creating this file uploader.
In the JavaScript file, I used the change event to get the user selected filename and then called the uploadFile(filename) function with passing the filename as an argument. Inside uploadFile() function, using Ajax I sent the selected file to the PHP. As you can have seen on the codes, I used upload property and progress event to get file loaded value and file total size.
In the PHP file, I received the file and added the current time before the filename to make the filename dynamic and moved this file to the files folder using PHP inbuilt function move_uploaded_file .
You might like this:
File Upload JavaScript with Progress Bar [Source Codes]
To create this project (File Upload JavaScript). First, you need to create four Files: HTML, CSS, JavaScript & PHP files. After creating these files just paste the following codes into your file. Remember, you’ve to create a folder with php name and inside this folder, you’ve to create php file a name of upload.php and a files folder to saved all uploaded files.
If you didn’t understand then you can download the source code files of this File Upload JavaScript with Progress Bar from the given download button.
First, create an HTML file with the name of index.html and paste the given codes into your HTML file. Remember, you’ve to create a file with .html extension.
File Uploader JavaScript
Second, create a CSS file with the name of style.css and paste the given codes in your CSS file. Remember, you’ve to create a file with .css extension.
/* Import Google font — Poppins */ @import url(‘https://fonts.googleapis.com/css2?family=Poppins:wght@400;500;600&display=swap’); * < margin: 0; padding: 0; box-sizing: border-box; font-family: "Poppins", sans-serif; >body < display: flex; align-items: center; justify-content: center; min-height: 100vh; background: #6990F2; >::selection < color: #fff; background: #6990F2; >.wrapper < width: 430px; background: #fff; border-radius: 5px; padding: 30px; box-shadow: 7px 7px 12px rgba(0,0,0,0.05); >.wrapper header < color: #6990F2; font-size: 27px; font-weight: 600; text-align: center; >.wrapper form < height: 167px; display: flex; cursor: pointer; margin: 30px 0; align-items: center; justify-content: center; flex-direction: column; border-radius: 5px; border: 2px dashed #6990F2; >form :where(i, p) < color: #6990F2; >form i < font-size: 50px; >form p < margin-top: 15px; font-size: 16px; >section .row < margin-bottom: 10px; background: #E9F0FF; list-style: none; padding: 15px 20px; border-radius: 5px; display: flex; align-items: center; justify-content: space-between; >section .row i < color: #6990F2; font-size: 30px; >section .details span < font-size: 14px; >.progress-area .row .content < width: 100%; margin-left: 15px; >.progress-area .details < display: flex; align-items: center; margin-bottom: 7px; justify-content: space-between; >.progress-area .content .progress-bar < height: 6px; width: 100%; margin-bottom: 4px; background: #fff; border-radius: 30px; >.content .progress-bar .progress < height: 100%; width: 0%; background: #6990F2; border-radius: inherit; >.uploaded-area < max-height: 232px; overflow-y: scroll; >.uploaded-area.onprogress < max-height: 150px; >.uploaded-area::-webkit-scrollbar < width: 0px; >.uploaded-area .row .content < display: flex; align-items: center; >.uploaded-area .row .details < display: flex; margin-left: 15px; flex-direction: column; >.uploaded-area .row .details .size < color: #404040; font-size: 11px; >.uploaded-area i.fa-check
Third, create a JavaScript file with the name of script.js and paste the given codes into your JavaScript file. Remember, you’ve to create a file with .js extension.
Last, create a PHP file with the name of message.php and paste the given codes into your PHP file. Remember, you’ve to create a file with .php extension.
That’s all, now you’ve successfully created a File Upload JavaScript with Progress Bar. If your code doesn’t work or you’ve faced any error/problem, please download the source code files from the given download button. It’s free and a .zip file will be downloaded then you’ve to extract it. Once you extracted it, move this project folder inside htdocs or www folder of your XAMPP or WAMP installation directory then start the apache server and run this file on your browser.
Note: In the video, I have manually slowed the Internet connection to upload files slowly and to show you the progress of uploading. So the small size file like images also taken time to upload but when you download this project and upload the image file then you might not see the progress bar because your file will be uploaded too fast.