- Saved searches
- Use saved searches to filter your results more quickly
- videowhisper/PHP-RTSP-IP-Camera-Streaming
- Name already in use
- Sign In Required
- Launching GitHub Desktop
- Launching GitHub Desktop
- Launching Xcode
- Launching Visual Studio Code
- Latest commit
- Git stats
- Files
- README.md
- About
- «Нет времени объяснять!» или Как реализовать трансляцию с IP камеры на сайт?
- Подготовка.
- Сборка Nginx с поддержкой rtmp
- Установка FFmpeg и проверка его работы
- Настройка Nginx и проверка его работы
- Подключение нашего потока к JWPlayer
Saved searches
Use saved searches to filter your results more quickly
You signed in with another tab or window. Reload to refresh your session. You signed out in another tab or window. Reload to refresh your session. You switched accounts on another tab or window. Reload to refresh your session.
Publish a RTSP IP cam live stream on websites as HLS, MPEG DASH or RTMP (Flash).
videowhisper/PHP-RTSP-IP-Camera-Streaming
This commit does not belong to any branch on this repository, and may belong to a fork outside of the repository.
Name already in use
A tag already exists with the provided branch name. Many Git commands accept both tag and branch names, so creating this branch may cause unexpected behavior. Are you sure you want to create this branch?
Sign In Required
Please sign in to use Codespaces.
Launching GitHub Desktop
If nothing happens, download GitHub Desktop and try again.
Launching GitHub Desktop
If nothing happens, download GitHub Desktop and try again.
Launching Xcode
If nothing happens, download Xcode and try again.
Launching Visual Studio Code
Your codespace will open once ready.
There was a problem preparing your codespace, please try again.
Latest commit
Git stats
Files
Failed to load latest commit information.
README.md
- Re-Stream Live Video in Browser
- Input Existing Streams (RTSP, UDP, RTMP)
- Output RTMP & HTML5: HLS, MPEG-DASH
- Serve hundreds/thousands of users with a streaming server
- Share Channels Link
- Limit Stream Life (Automated Deletion)
- Limit Watch Time by Channel, User
- Simple Setup
- Easy to Install, Configure
- Full PHP Source Code
- Easy to Integrate
- Transcoding for iOS HLS / Android MPEG DASH playback
PHP RTSP IP Camera Streaming Demo — For custom ports you need to contact VideoWhisper support to configure firewall for allowing access to the RTSP streams.
Installation Instructions for PHP Live Video Streaming Software
- Before installing, make sure your hosting environment meets all requirements .
- This edition requires Wowza Streaming Engine 4.2+ to monitor and publish the streams folder.
- For enabling transcoding for HTML5 HLS / MPEG DASH playback required for iOS/Android delivery, special requirements apply: latest Wowza and FFMPEG with Flash and HTML5 specific codecs. MPEG DASH requires HTTPS.
- If you’re not hosting RTMP with VideoWhisper (see requirements and turnkey hosting options) go to RTMP Application Setup for installation details
- Deploy files to your web installation location. (Example: yoursite.domain/php-rtsp-ip-camera-streaming/)
- Fill your RTMP path into settings.php
- If you don’t have SuPHP, enable write permissions (0777) for folders: snapshots, uploads
- To enable transcoding for HTML5 playback, configure HLS / MPEG DASH as per Wowza specs and fill httpstreamer & httpdash setting in settings.php . If you have Wowza hosting with VideoWhisper.com, staff can assist with setting this up (plans come with a rtmp address preconfigured for such usage).
This is a simple setup for easy deployment and integration with other PHP scripts.
For assistance and clarifications, Contact VideoWhisper.
For a more advanced setup, see this turnkey live video broadcasting site solution based on WP, that also includes WebRTC and automated transcoding between all formats and protocols: Broadcast Live Video . Live functionality can be tested on Video Now Live website.
About
Publish a RTSP IP cam live stream on websites as HLS, MPEG DASH or RTMP (Flash).
«Нет времени объяснять!» или Как реализовать трансляцию с IP камеры на сайт?
Пожалуй мне везет на идиотские задачи в самый неподходящий момент. Это что, карма такая?! Ну да ладно..
В данном «отпускном» посте речь пойдет о том, как при наличии 3g модема и ноутбука реализовать трансляцию с IP камеры на сайт.
Сам пост я бы не написал, если бы не задал вопрос на тостере, на котором мне подсказали что гуглить.
- Недешевая IP камера AXIS Q1755, которую я даже в руках не держал.. Сама камера находится в городе «А» и подключена через тормозной 3g модем.
- Сервер на Debian 7, который крутится на почти дохлом Core2Duo. Хотя не такой уж он и дохлый, но для данных задач подходит не очень. Ах, да, сам сервер живет в городе Б.
- Сайт, на который необходимо повесить плеер. Сайт находится на другом, более производительном сервере, в том же городе Б.
- Я, который находится в городе В, с ноутбуком, 3g модемом и ограниченным трафиком в 4gb..
При помощи чего мы все это реализуем? Сама камера будет передавать поток по RTSP, FFmpeg будет принимать его и конвертировать его в RTMP, а при помощи JW Player этот поток можно «повесить на сайт».
Для тех, кто любит наглядно — получайте:
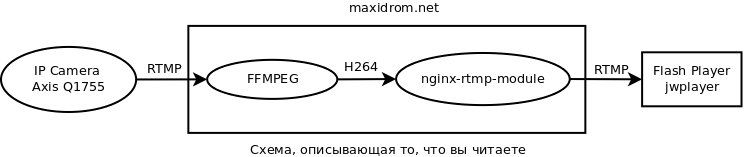
Ну а теперь главное, что же нужно сделать, чтобы заиметь у себя такую штуку?
Подготовка.
Для начала нам необходимо все подготовить и установить необходимые пакеты. Например для сборки Nginx понадобится Perl библиотека регулярных выражений и заголовки OpenSSL:
apt-get install libpcre3 libpcre3-dev libssl-dev
Так же поставим утилиту rtmpdump, которая позволит нам понять, работает ли у нас rtmp или нет:
Далее скачаем сами исходники Nginx, стабильной версии 1.6.0 и распакуем их:
wget http://nginx.org/download/nginx-1.6.0.tar.gz tar -xzvf nginx-1.6.0.tar.gz
Тоже самое сделаем и с модулем, с которым нам нужно будет скомпилировать Nginx:
wget https://github.com/arut/nginx-rtmp-module/zipball/master -O nginx-rtmp-module-master.zip unzip nginx-rtmp-module-master.zip -d nginx-rtmp-module-master
Сборка Nginx с поддержкой rtmp
Теперь приступим к сборке. Для начала нужно сконфигурировать Nginx:
cd nginx-1.6.0 ./configure --prefix=/usr --add-module=../nginx-rtmp-module-master/arut-nginx-rtmp-module-0bb2323/ --pid-path=/var/run/nginx.pid --conf-path=/etc/nginx/nginx.conf --error-log-path=/var/log/nginx/error.log --http-log-path=/var/log/nginx/access.log --with-http_ssl_module
На выходи мы должны получить что-то подобное:
.configuring additional modules adding module in ../nginx-rtmp-module-master/arut-nginx-rtmp-module-0bb2323/ + ngx_rtmp_module was configured checking for PCRE library . found checking for PCRE JIT support . found checking for OpenSSL library . found checking for zlib library . found creating objs/MakefileConfiguration summary + using system PCRE library + using system OpenSSL library + md5: using OpenSSL library + sha1: using OpenSSL library + using system zlib librarynginx path prefix: "/usr" nginx binary file: "/usr/sbin/nginx" nginx configuration prefix: "/etc/nginx" nginx configuration file: "/etc/nginx/nginx.conf" nginx pid file: "/var/run/nginx.pid" nginx error log file: "/var/log/nginx/error.log" nginx http access log file: "/var/log/nginx/access.log" nginx http client request body temporary files: "client_body_temp" nginx http proxy temporary files: "proxy_temp" nginx http fastcgi temporary files: "fastcgi_temp" nginx http uwsgi temporary files: "uwsgi_temp" nginx http scgi temporary files: "scgi_temp"Важно, чтобы сам rtmp модуль подключился и пути к логам, конфигам и бинарнику были верными. Выше я выделил то, что нужно проверить. Если все хорошо, то компилируем и устанавливаем:
Теперь скопируем файл stat.xsl из папки с исходниками в папку nginx:
cp nginx-rtmp-module-master/arut-nginx-rtmp-module-0bb2323/stat.xsl /etc/nginx/И проверим работу самого nginx.
Заходим на http://ip_servera. Видим приветствие Nginx? Тогда все хорошо.
Установка FFmpeg и проверка его работы
Для того, чтобы мы смогли конвертировать поток rtsp в fvl, нам понадобится ffmpeg.
Да, кстати, если вы проделывайте все эти действия на Ubuntu, то имейте в виду, что в этом Ubuntu FFmpeg считается устаревшим, и в замен предлагает использовать avconv. Не пугайтесь, замена «шила на мыло» ничего не сломает, все будет работать.
Ладно, подключаем репозитории FFmpeg и ставим его:
apt-add-repository ppa:jon-severinsson/ffmpeg apt-get update apt-get install ffmpegТеперь проверим, на сколько удачно подключается ffmpeg к камерам. Я например забыл открыть доступ на маршрутизаторе к 554 порту.
На выходе мы должны будем получить что-то подобное:
ffmpeg version 1.0.10 Copyright (c) 2000-2014 the FFmpeg developers built on Jul 25 2014 07:50:40 with gcc 4.7 (Debian 4.7.2-5) configuration: --prefix=/usr --extra-cflags='-g -O2 -fstack-protector --param=ssp-buffer-size=4 -Wformat -Werror=format-security ' --extra-ldflags='-Wl,-z,relro' --cc='ccache cc' --enable-shared --enable-libmp3lame --enable-gpl --enable-nonfree --enable-libvorbis --enable-pthreads --enable-libfaac --enable-libxvid --enable-postproc --enable-x11grab --enable-libgsm --enable-libtheora --enable-libopencore-amrnb --enable-libopencore-amrwb --enable-libx264 --enable-libspeex --enable-nonfree --disable-stripping --enable-libvpx --enable-libschroedinger --disable-encoder=libschroedinger --enable-version3 --enable-libopenjpeg --enable-librtmp --enable-avfilter --enable-libfreetype --enable-libvo-aacenc --disable-decoder=amrnb --enable-libvo-amrwbenc --enable-libaacplus --libdir=/usr/lib/x86_64-linux-gnu --disable-vda --enable-libbluray --enable-libcdio --enable-gnutls --enable-frei0r --enable-openssl --enable-libass --enable-libopus --enable-fontconfig --enable-libfdk-aac --enable-libdc1394 --disable-altivec --dis libavutil 51. 73.101 / 51. 73.101 libavcodec 54. 59.100 / 54. 59.100 libavformat 54. 29.104 / 54. 29.104 libavdevice 54. 2.101 / 54. 2.101 libavfilter 3. 17.100 / 3. 17.100 libswscale 2. 1.101 / 2. 1.101 libswresample 0. 15.100 / 0. 15.100 libpostproc 52. 0.100 / 52. 0.100 [rtsp @ 0x19d6cc0] Estimating duration from bitrate, this may be inaccurate Input #0, rtsp, from 'rtsp://admin:[email protected]/axis-media/media.amp': Metadata: title : Media Presentation Duration: N/A, start: 0.570122, bitrate: N/A Stream #0:0: Video: h264 (Baseline), yuvj420p, 1280x720 [SAR 1:1 DAR 16:9], 25 tbr, 90k tbn, 180k tbc At least one output file must be specifiedЭто доказывает что камера работает, вещает rtsp поток и ffmpeg работает.
Настройка Nginx и проверка его работы
Теперь открываем файл коyфигурации nginx своим любимым редактором (у меня это vim)
и приводим его к следующему состоянию:
user nginx; # Узнать сколько ядер в системе можно при помощи команды nproc worker_processes 2; error_log /var/log/nginx/error.log warn; pid /var/run/nginx.pid; events < worker_connections 1024; >http < include /etc/nginx/mime.types; default_type application/octet-stream; log_format main '$remote_addr - $remote_user [$time_local] "$request" ' '$status $body_bytes_sent "$http_referer" ' '"$http_user_agent" "$http_x_forwarded_for"'; access_log /var/log/nginx/access.log main; sendfile on; #tcp_nopush on; keepalive_timeout 65; #gzip on; server < listen 80; # rtmp stat location /stat < rtmp_stat all; rtmp_stat_stylesheet stat.xsl; >location /stat.xsl < # you can move stat.xsl to a different location root /etc/nginx/; >location / < rtmp_control all; >error_page 500 502 503 504 /50x.html; location = /50x.html < root html; >#Добавим locations для просмотра статических изображений с камеры location /image/cam1/ < proxy_pass "http://10.10.10.11/axis-cgi/jpg/image.cgi"; >> include /etc/nginx/conf.d/*.conf; > rtmp < access_log /var/log/nginx/rtmp_access.log; server < listen 1935; ping 30s; notify_method get; application cam1 < live on; exec_pull ffmpeg -i rtsp://admin:[email protected]/axis-media/media.amp -threads 2 -f flv -r 25 -s 1280x720 -an rtmp://localhost:1935/cam1/stream 2>>/var/log/nginx/ffmpeg.log; > > >Сохраняем, закрываем, проверяем:
nginx -t nginx: the configuration file /etc/nginx/nginx.conf syntax is ok nginx: configuration file /etc/nginx/nginx.conf test is successful service nginx restartПроверить корректность работы RTMP сервера на базе NGINX можно следующей командой:
rtmpdump -r "rtmp://127.0.0.1:1935/cam1/stream" -vВывод видео вы получите пряма в консоль.
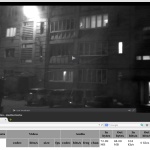
Подключение нашего потока к JWPlayer
Ну и последнее, что вам нужно будет сделать, так это зарегистрироваться на сайте www.jwplayer.com, получить код плеера и привести его к следующему виду:
Все, задача выполнена, наслаждайтесь!
Источники и прочие вспомогательные ресурсы:
- https://www.sinyawskiy.ru/nginxrtmpmodule.html
- https://help.ubuntu.com/community/FFmpeg
- https://github.com/arut/nginx-rtmp-module
- http://osdrive.ru/blog.php?page=entry&action=read&id=22
- http://habrahabr.ru/post/117735/
- https://toster.ru/q/128005
- jwplayer.com
- http://support.jwplayer.com/customer/portal/articles/1430358-using-rtmp-streaming
- http://rugraphics.ru/forvideo/pleer-dlya-sayta-jw-player-oblachnoe-podklyuchenie
- http://habrahabr.ru/post/162237/
- https://obsproject.com/forum/resources/how-to-set-up-your-own-private-rtmp-server-using-nginx.50/
- http://habrahabr.ru/post/145867/
- http://habrahabr.ru/post/233237/
- http://flance.onego.ru/2012/09/07/387
- http://habrahabr.ru/post/188380/