- How to Create a Personal Online PHP Editor
- Converting HTML Textarea into Code Editor
- Executing Code with Online Editor using jQuery AJAX
- PHP Script to Write Editor Code to a File Dynamically
- Saved searches
- Use saved searches to filter your results more quickly
- License
- adeleyeayodeji/WYSIWYG-Rich-Text-Editor-with-Ajax-Gallery-PHP-MYSQL
- Name already in use
- Sign In Required
- Launching GitHub Desktop
- Launching GitHub Desktop
- Launching Xcode
- Launching Visual Studio Code
- Latest commit
- Git stats
- Files
- README.md
- About
- Save TinyMCE Editor Content with PHP & MySQL
- Step1: Create MySQL Database Table
- Step2: Include Bootstrap, jQuery and TinyMCE Editor Files
- Step3: Create Form with TinyMCE Editor
- Step4: Initialize TinyMCE Editor
- Step5: Handle Form Submit and Save Content
- Step6: Display Saved Records
How to Create a Personal Online PHP Editor
Online editors has cool advantages like, providing live preview of the code and ease of use. Writing the code online in the web browser and executing it on the go provides an amazing experience. It greatly reduces the effort of downloading and installing the software for setting up the local environment to run the codes. It will also be useful to troubleshoot code snippets intuitively.
This article is to create an online code editor for executing PHP scripts. I have used the CodeMirror API for the UI to type and edit the code online. CodeMirror is a JavaScript-based library. It is one of the popular and widely used code editor. I have written a custom logic to get the code and run (interpret) it in the server-side and provide results in the browser.
Note: This example is designed in such a way that, you can deploy in your local environment for your personal use only. This needs to be enhanced to a large extent to put it into public use.
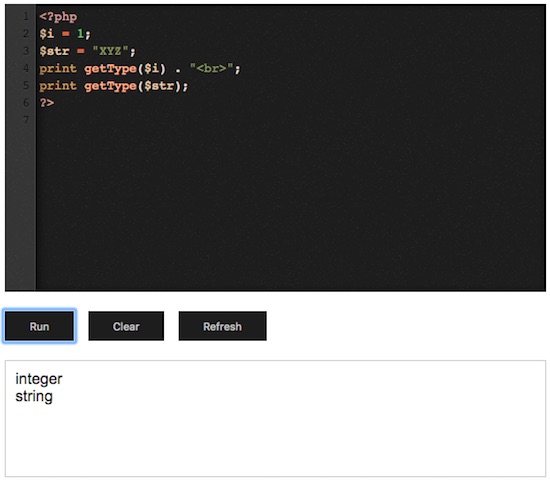
In this online PHP editor example, an editor will be shown on the landing page. Initially, it is loaded with the PHP hello world program. The code in the editor window is editable and the Run action will take the current code from the editor. Also, we can clear and reload the editor window by clicking the Clear and Refresh button controls respectively. These Run, Refresh and Clear actions are performed using jQuery AJAX.
Converting HTML Textarea into Code Editor
This is the HTML code for showing the landing page with an online text editor. Download CodeMirror and integrate it by including the library files that are required to show the editor. By integrating this library, a HTML form text area element can be converted as an editor window.
The code typed in the editor window can be seen in a various mode based on the programming language. For each mode, the library includes separate JavaScript to classify the mode. In this example, the JavaScript files are used for differentiating the mode of languages like PHP, CSS, XML and more.
This editor window is populated with a sample code. By clicking the Run button, the code in the editor will be validated with jQuery script and executed in the server-side and the result will be displayed below the editor. The action controls Run, Clear and Refresh buttons will make this application interactive.
This is the JavaScript code to initialize CodeMirror properties to turn the HTML textarea element into the code editor. In this script, the textarea class reference is used for the library initialization.
Executing Code with Online Editor using jQuery AJAX
First, the editor instance is created by setting the initial properties by using the library function. With the reference of this editor instance, the editor code content will be read and executed. By clicking the Run button, the code typed in the editor window is read by using the getValue() function. The code can be passed to the PHP via an AJAX request and written in a server file.
After writing the editor code in a PHP file code-editable.php, the another AJAX request will be sent in the complete() callback. In the second AJAX request, the code-editable.php file is accessed. As this file is with the code typed on the editor, it will return the expected output as the AJAX response in a HTML format. This output will be shown in the result container element.
On clicking the Clear button, the editor window will be wiped out by removing the code via jQuery. The Refresh button click event will trigger the reload action to load the editor with the initial Hello Word PHP program.
PHP Script to Write Editor Code to a File Dynamically
In this PHP script, the editor code input from an AJAX request is received. Then the code content will be written to a target file. The PHP file functions are used to create the target file pointer to write the code into it. After writing the code to the file, the file pointer will be closed. When you set up this example in your local environment, make sure the code-editable.php target has the write permission.
Saved searches
Use saved searches to filter your results more quickly
You signed in with another tab or window. Reload to refresh your session. You signed out in another tab or window. Reload to refresh your session. You switched accounts on another tab or window. Reload to refresh your session.
WYSIWYG Rich Text Editor with Ajax Gallery PHP MYSQL
License
adeleyeayodeji/WYSIWYG-Rich-Text-Editor-with-Ajax-Gallery-PHP-MYSQL
This commit does not belong to any branch on this repository, and may belong to a fork outside of the repository.
Name already in use
A tag already exists with the provided branch name. Many Git commands accept both tag and branch names, so creating this branch may cause unexpected behavior. Are you sure you want to create this branch?
Sign In Required
Please sign in to use Codespaces.
Launching GitHub Desktop
If nothing happens, download GitHub Desktop and try again.
Launching GitHub Desktop
If nothing happens, download GitHub Desktop and try again.
Launching Xcode
If nothing happens, download Xcode and try again.
Launching Visual Studio Code
Your codespace will open once ready.
There was a problem preparing your codespace, please try again.
Latest commit
Git stats
Files
Failed to load latest commit information.
README.md
WYSIWYG Rich Text Editor with Ajax Gallery PHP MYSQL is developed to enhanced post publishing for personal blog post or content publishing
Features included: *Ajax Gallery *Ajax Image Uploader
Writting In: JavaScript PHP MySql
About
WYSIWYG Rich Text Editor with Ajax Gallery PHP MYSQL
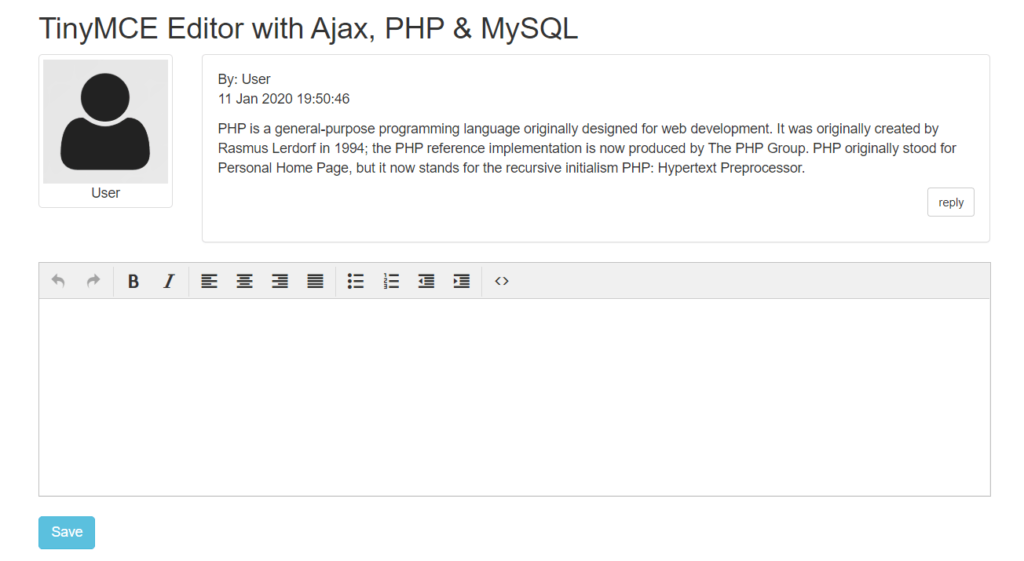
Save TinyMCE Editor Content with PHP & MySQL
In our previous tutorial, we have explained how to develop Student Attendance System with PHP & MySQL. In this tutorial, we will explain how to use TinyMCE editor to replace textarea to save content with ajax, PHP and MySQL.
TinyMCE is the most advance JavaScript WYSIWYG HTML editor to create contents for websites. The editor can easily be integrated into any website to convert textarea to HTML editor to create HTML contents.
If you’re working on website and wants to replace normal textarea with advanced WYSIWYG HTML editor, then you’re here at the right place.
We will cover the tutorial in easy steps to integrate TinyMCE editor and save contents to MySQL database with ajax and PHP.
So let’s implement TinyMCE Editor with Ajax, PHP and MySQL. The major files are:
- index.php: PHP file to load TinyMCE editor to save content.
- tinymce_editor.js: A JavaScript to initiliaze TinyMCE editor.
- action.php: Action file to handle ajax request.
- Post.php: A class to hold methods.
Step1: Create MySQL Database Table
First we will create MySQL database table posts to store contents from TinyMCE editor.
CREATE TABLE `posts` ( `id` int(11) NOT NULL, `message` text NOT NULL, `user` varchar(255) NOT NULL, `edited` int(11) NOT NULL DEFAULT 0, `created` datetime NOT NULL DEFAULT current_timestamp() ) ENGINE=InnoDB DEFAULT CHARSET=latin1;
Step2: Include Bootstrap, jQuery and TinyMCE Editor Files
As we will design pages with Bootstrap, so we will include Bootstrap files. We will also include jQuery and TinyMCE files in index.php file.
Step3: Create Form with TinyMCE Editor
In index.php file, we will create HTML form with textarea and submit button to save form data.
Step4: Initialize TinyMCE Editor
In tinymce_editor.js file, we will initialize TinyMCE editor. We will user textarea to convert into advance TinyMCE editor.
Step5: Handle Form Submit and Save Content
We will handle form submit with jQuery and make ajax request to action.php with action save to save form values to database table and display saved content on ajax request success.
$(document).on('submit','#posts', function(event) < var formData = $(this).serialize(); $.ajax(< url: "action.php", method: "POST", data: formData, dataType:"json", success: function(data) < var html = $("#postHtml").html(); html = html.replace(/USERNAME/g, data.user); html = html.replace(/POSTDATE/g, data.post_date); html = html.replace(/POSTMESSAGE/g, data.message); $("#postLsit").append(html).fadeIn('slow'); tinymce.get('message').setContent(''); >>); return false; >); In action.php file, we will handle ajax POST request and call method insert() to insert content to the database.
include_once 'config/Database.php'; include_once 'class/Post.php'; $database = new Database(); $db = $database->getConnection(); $post = new Post($db); if(!empty($_POST['message']) && $_POST['message'] && $_POST['action'] == 'save') < $post->message = $_POST['message']; $post->user = "User"; $post->insert(); >
We will implement method insert() in class Post.php to save content into MySQL database table and return saved data as JSON response to display content record.
public function insert()< if($this->message) < $stmt = $this->conn->prepare(" INSERT INTO ".$this->postsTable."(`message`, `user`) VALUES(?, ?)"); $stmt->bind_param("ss", $this->message, $this->user); if($stmt->execute())< $lastPid = $stmt->insert_id; $sqlQuery = " SELECT id, message, user, DATE_FORMAT(created,'%d %M %Y %H:%i:%s') AS post_date FROM ".$this->postsTable." WHERE "; $stmt2 = $this->conn->prepare($sqlQuery); $stmt2->execute(); $result = $stmt2->get_result(); $record = $result->fetch_assoc(); echo json_encode($record); > > > Step6: Display Saved Records
We will display saved records in index.php file by calling getPost() method.
getPost(); while ($post = $result->fetch_assoc()) < $date = date_create($post['created']); ?>reply
We will implement method getPost() in class Post.php to get records.
public function getPost()< $sqlQuery = " SELECT * FROM ".$this->postsTable." ORDER BY id DESC"; $stmt = $this->conn->prepare($sqlQuery); $stmt->execute(); $result = $stmt->get_result(); return $result; >You may also like:
- Follow and Unfollow System with PHP & MySQL
- GST Billing System with PHP & MySQL
- Restaurant Management System with PHP & MySQL
- Visitor Management System with PHP & MySQL
- Student Attendance System with PHP & MySQL
- Like and Dislike System with Ajax, PHP & MySQL
- Build Star Rating System with jQuery, PHP & MySQL
- User Registration and Login System with PHP & MySQL
- Build Contact Form with PHP and Ajax
- To-do List Application with Ajax, PHP & MySQL
- Build Event Calendar with jQuery , PHP & MySQL
You can view the live demo from the Demo link and can download the source from the Download link below.
Demo Download