- Generating Java code from XML in Eclipse
- Solution 2
- Generate Java Class from xml Schema in Eclipse
- Tools Used :
- Tools Used :
- Steps to generate Java classes from XSD in Eclipse :
- Step 1: Create JAXB project
- Step 2: Assign name of your Project
- Step 3: JAXB Facet Setup
- Step 4: Create XSD file
- Step 5: Adding jar files to Project
- Step 6: Generating Java classes
- How to generate java class from xml schema xsd using jaxb in eclipse
- Steps:
- On Console:
- Generate Java class from XML Schema in Eclipse IDE
- Environment Used:
- Generate Java classes in Eclipse
- Creating JAXB project
- Create XSD file
- Adding JAR files
- Generating Java classes from Schema
Generating Java code from XML in Eclipse
This is exactly what the JET component in the Model to Text (M2T) project was made for. In fact, you can even create the project, .classpath and any other files you need with JET.
Jet templates are as follows. Note that these templates must be named exactly as shown.
--- traverse input model, performing calculations and storing --- the results as model annotations via c:set tag com.lacqui.commands com.lacqui.commands - Derive the class name from the name of the command Command false --- traverse annotated model, performing text generation actions --- such as ws:file, ws:folder and ws:project " /> /.project" /> /.classpath"/> /src//.java" replace="true"/> org.eclipse.jdt.core.javabuilder org.eclipse.jdt.core.javanature package ; public class extends Command < public ResponseCode execute() < Server srv = getServer(); if (srv.hasCapability(Capabilities.) == false) < Log.debug("Attempting non-available capability: "); > String = getArgument(""); if ( == null) < throw new InvalidArgumentException("Require "); > String command = "GROUP"; if ( != null) command += " - " + ; srv.send(command); return srv.getResponse(); > > gives a complete java project named com.lacqui.commands containing three java files:
package com.lacqui.commands; public class ArticleCommand extends Command < public ResponseCode execute() < Server srv = getServer(); if (srv.hasCapability(Capabilities.READER) == false) < Log.debug("Attempting non-available capability: READER"); >String article-id = getArgument("article-id"); if (article-id == null) < throw new InvalidArgumentException("Require article-id"); >String message-id = getArgument("message-id"); String command = "GROUP"; if (article-id != null) command += " -article-id " + article-id; if (message-id != null) command += " -message-id " + message-id; srv.send(command); return srv.getResponse(); > > package com.lacqui.commands; public class GroupCommand extends Command < public ResponseCode execute() < Server srv = getServer(); if (srv.hasCapability(Capabilities.LOGGER) == false) < Log.debug("Attempting non-available capability: LOGGER"); >if (srv.hasCapability(Capabilities.AUTHENTICATOR) == false) < Log.debug("Attempting non-available capability: AUTHENTICATOR"); >String groupname = getArgument("groupname"); if (groupname == null) < throw new InvalidArgumentException("Require groupname"); >String command = "GROUP"; if (groupname != null) command += " -groupname " + groupname; srv.send(command); return srv.getResponse(); > > Solution 2
You might want to take a look at JaxB.
Lars Vogel did a simple tutorial if you want to take a quick look at it.
JAXB Tutorial
Generate Java Class from xml Schema in Eclipse
In this article we will discuss about how to generate java classes from XSD in Eclipse IDE.We are going to use MOXy JAXB implementation which is available as part of Eclipselink project.
Tools Used :
- JDK 6 (Java SE 6) or later.
- Eclipse Indigo IDE for Java EE Developers (3.7.1).
- EclipseLink 2.3.2 .
Download EclipseLink from here and extract the zip file in your local. We need this for MOXy which is an implementation of JAXB API.
Steps to generate Java classes from XSD in Eclipse :
Follow the steps below to generate Java classes from XML Schema in Eclipse IDE.
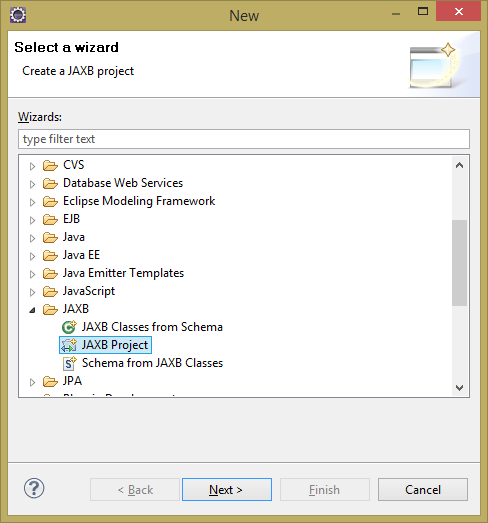
Step 1: Create JAXB project
Open Eclipse IDE and create a new JAXB project which can be done by navigating to File-> New -> Other -> JAXB -> JAXB Project. Select JAXB Project and click Next.
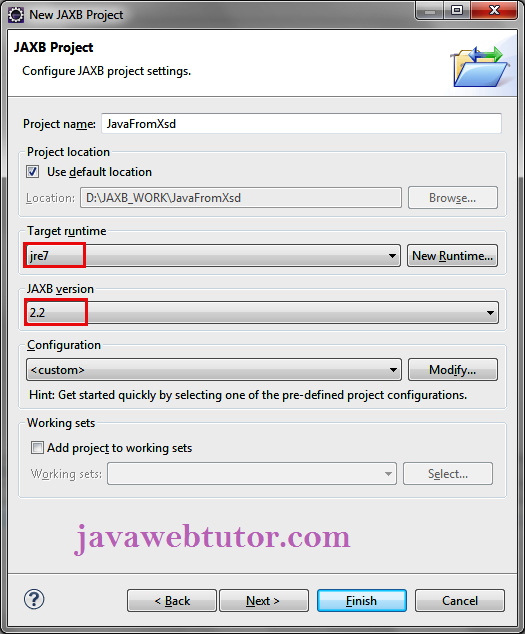
Step 2: Assign name of your Project
Enter the project name as JavaFromXsd and make sure jre7 is selected as the Target runtime and JAXB version as 2.2.If your project is using jre6 then you have to use JAXB version as 2.1. and Click Next -> Next.
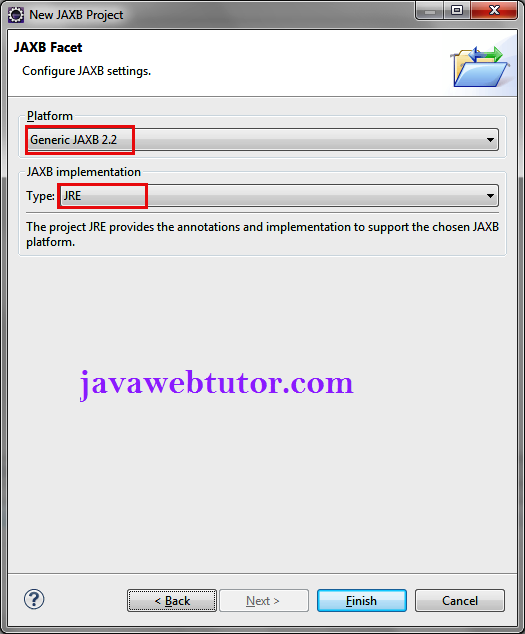
Step 3: JAXB Facet Setup
In JAXB Facet window, select «Generic JAXB 2.1» as platform with JRE as JAXB implementation as shown below and click Finish.
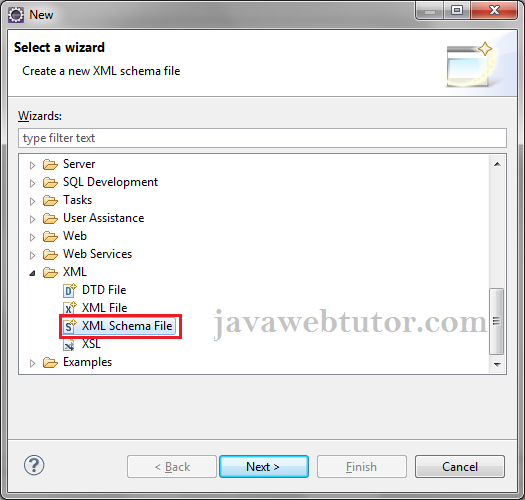
Step 4: Create XSD file
Right click on ‘src’ and create a new package «com.example.jaxb.schema». Now create a new XSD file inside this package. To create a new XSD file, Right click on package -> New -> Other.-> XML -> XML Schema File and click Next.
Select the location and enter the file name as ’employeerequest.xsd’. Copy the following code in XSD file.
Step 5: Adding jar files to Project
We need to add MOXy JAXB implementation JAR files in the project classpath.Follow the steps below to do the same.
Right Click on your Project and select New-> folder provide the name of folder as lib and click Finish.
Now copy com.sun.tools.xjc.[version number].jar,com.sun.xml.bind.[version number].jar,javax.xml.bind.[version number].jar in lib folder.
You can found these jars in extracted [DOWNLOADED_ECLIPSELINK_FOLDER]/jlib/moxy folder.
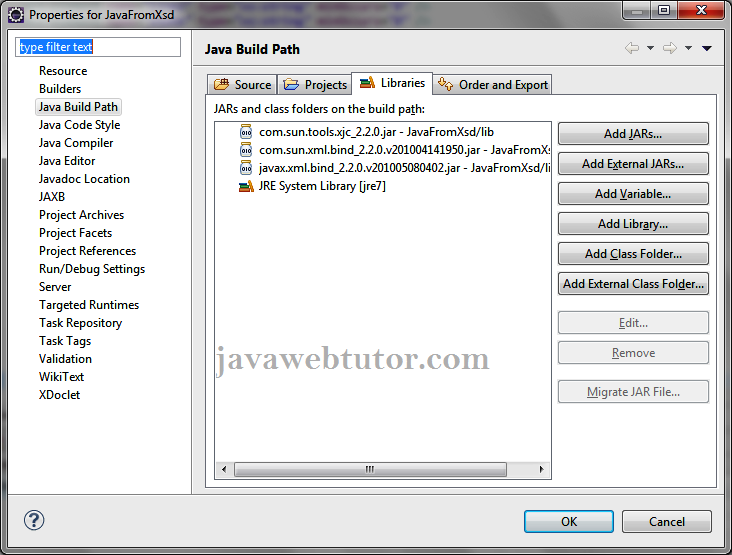
Right click on your JAXB Project-> Build Path-> Configure Build Path and select Libraries tab from right side and click on Add External JARs.Add all the jars of lib folder.
Step 6: Generating Java classes
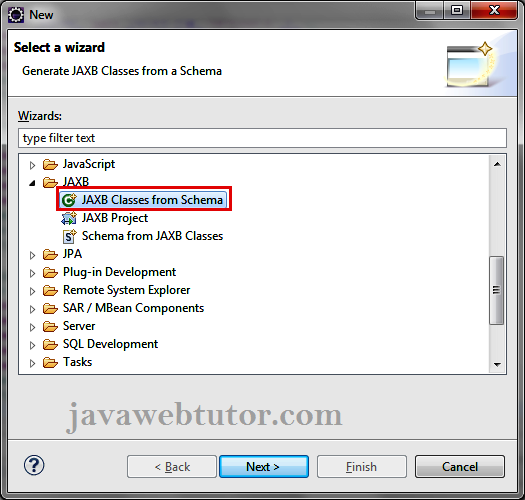
Right click on your package -> New -> Other. -> JAXB -> JAXB Classes from Schema.
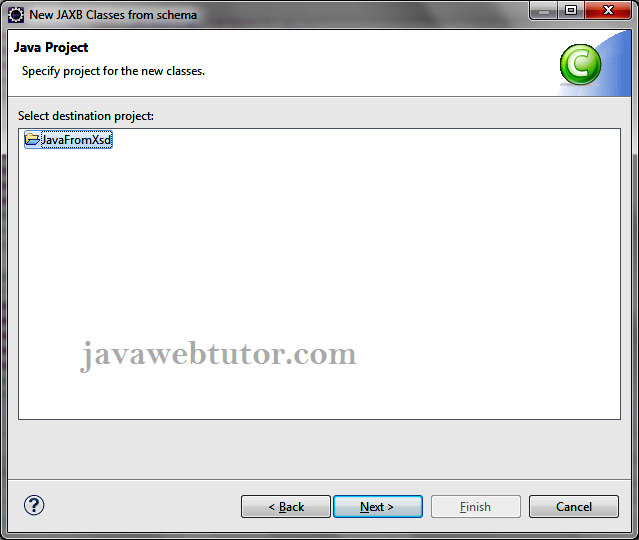
Click Next and select Project (JavaFromXsd) and click Next.
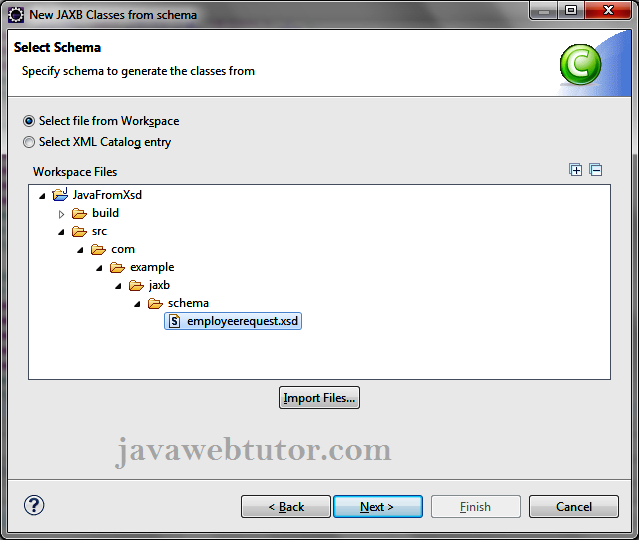
Select schema to generate classes from and click Next.
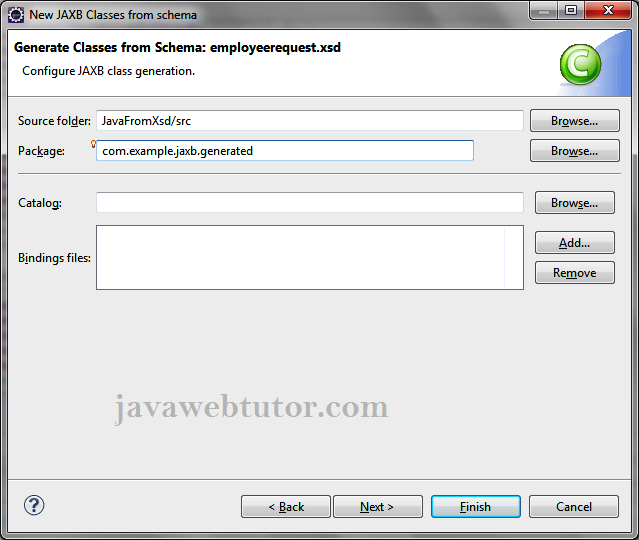
Enter the package name «com.example.jaxb.generated» for the generated Java classes and Click Next-> Next-> Finish(dont change default values while navigating).
After Finishing Click OK if you are getting any Warnings.You will see the following message displayed in the console.
parsing a schema. compiling a schema. com\example\jaxb\generated\Address.java com\example\jaxb\generated\Department.java com\example\jaxb\generated\Employee.java com\example\jaxb\generated\ObjectFactory.java
You can see the generated classes in Project explorer
How to generate java class from xml schema xsd using jaxb in eclipse
Let us discuss how to generate or create java class from xml schema xsd using jaxb in eclipse with below example.
Steps:

1. Create a new JAXB project. File -> New -> Other -> JAXB -> JAXB Project.

2. Enter the project name and click on Finish button.

3. Download JAXB Jar and JAXB-XJC jar files and include in class path.

4. Create package which will contain xsd file.

5. Create package which will contain java classes.
7. Copy the below code into xsd file.
xml version="1.0" encoding="UTF-8" standalone="yes"?> xs:schema version="1.0" xmlns:xs="http://www.w3.org/2001/XMLSchema"> xs:element name="student" type="student"/> xs:element name="address" type="address"/> xs:complexType name="address"> xs:sequence> xs:element name="addressLine1" type="xs:string" minOccurs="0"/> xs:element name="addressLine2" type="xs:string" minOccurs="0"/> xs:element name="city" type="xs:string" minOccurs="0"/> xs:element name="state" type="xs:string" minOccurs="0"/> xs:sequence> xs:complexType> xs:complexType name="student"> xs:sequence> xs:element name="firstName" type="xs:string" minOccurs="0"/> xs:element name="lastName" type="xs:string" minOccurs="0"/> xs:element name="className" type="xs:string" minOccurs="0"/> xs:element name="rollNo" type="xs:string" minOccurs="0"/> xs:element ref="address" minOccurs="0"/> xs:sequence> xs:complexType> xs:schema> 
8. Right click on your package -> New -> Other -> JAXB -> JAXB Classes from Schema.

9. Specify project for new Java classes and click on Next.

10. Select schema from which java classes have to generated and click on Next.

11. Specify package for new Java classes and click on Finish.
On Console:
parsing a schema. compiling a schema. com\w3spoint\javaclass\Address.java com\w3spoint\javaclass\ObjectFactory.java com\w3spoint\javaclass\Student.java
parsing a schema. compiling a schema. com\w3spoint\javaclass\Address.java com\w3spoint\javaclass\ObjectFactory.java com\w3spoint\javaclass\Student.java
Generate Java class from XML Schema in Eclipse IDE
In the example provided here, we saw how to generate Java classes from XML schema using JAXB binding compiler ‘xjc’ command. In this tutorial we will see how to generate the same in Eclipse IDE with the help of MOXy JAXB implementation which is available as part of Eclipselink project.
Environment Used:
- JDK 6 (Java SE 6) or later.
- Eclipse Indigo IDE for Java EE Developers (3.7.1).
- EclipseLink 2.3.2 (Download EclipseLink from here and extract the zip file). We need this for MOXy which is an implementation of JAXB API.
Generate Java classes in Eclipse
Follow the steps below to generate Java source files from XML Schema in Eclipse IDE.
Creating JAXB project
- Open Eclipse IDE and create a new JAXB project which can be done in many ways,
- File menu -> New -> Other -> JAXB -> JAXB Project
- Click on the down arrow on New icon on toolbar -> Other -> JAXB -> JAXB Project
- Right click on Project Explorer -> New -> Other -> JAXB -> JAXB Project

Select JAXB Project and click Next.
 NOTE: for JRE version 6, the JAXB version is 2.1. If you are using JRE7 then you can use JAXB 2.2.
Create XSD file
Right click on ‘src’ and create a new package and name it as “com.theopentutorials.jaxb.beans”. Now create a new XSD file in the package created above. To create a new XSD file, Right click on package -> New -> Other…-> XML -> XML Schema File and click Next.

Select the location and enter the file name as ‘employeeSchema.xsd’. Copy the following code in XSD file.
Adding JAR files
We need to add MOXy JAXB implementation JAR files in the project classpath for generating Java classes from schema. Follow the steps below to do the same.
Right click on your JAXB Project->Properties, select Java Build Path from left side pane and select Libraries tab from right side and click on Add External JARs. Add the following jars.
| JAR File | Location |
|---|---|
| com.sun.tools.xjc.[version number].jar | [DOWNLOADED_ECLIPSELINK_FOLDER]/jlib/moxy |
| com.sun.xml.bind.[version number].jar | [DOWNLOADED_ECLIPSELINK_FOLDER]/jlib/moxy |
| javax.xml.bind.[version number].jar | [DOWNLOADED_ECLIPSELINK_FOLDER]/jlib/moxy |

Generating Java classes from Schema
- Right click on your package -> New -> Other… -> JAXB -> JAXB Classes from Schema.

- Click Next.
- Specify project for Java classes and click Next.
- Select schema to generate classes from and click Next.
- Enter the package name “com.theopentutorials.jaxb.beans” for the generated Java classes and Click Next.
- In the JAXB compiler options window and vendor extensions window, keep the default options and click Next
- Click Finish.


You will see the following message displayed in the console.
parsing a schema…
compiling a schema…
com\theopentutorials\jaxb\beans\Address.java
com\theopentutorials\jaxb\beans\Employee.java
com\theopentutorials\jaxb\beans\ObjectFactory.java

The complete folder structure for this example is shown below.