How to Make Executable JAR file in Eclipse IDE — Java
If you are a Java programmer then you know what is the purpose of the JAR file, but for those who are unaware, the JAR file is deliverables of Java application. Just like C and C++ applications produce EXE files, Java produces JAR files. In other words, A JAR (Java Archive) file is a ZIP format file that bundles Java classes into a single unit, it may contain all the resources needed by Java application as well. There are mainly two types of the JAR file in Java: Library JAR (normal JAR) files: JARs which are reusable libraries like Apache commons JAR file, guava.jar itself, or even JDBC drivers like ojdbc6_g.jar . There is another type as well, Executable JAR files: JARs which can be executed as standalone Java applications.
The main difference between normal and executable JAR file is that later contains a manifest file, which specifies a main-class entry. When you run that JAR file, Java starts your application by reading that main-class entry, because you need the main method to execute Java programs.
I had earlier shared steps to create a JAR file from the command prompt, which if you have not read, go read it. You will learn about the basics of the JAR command, which comes with JDK, manifest file, and different attributes of the manifest file.
In this tutorial, we will learn how to make/create/export both library and executable JAR files in Eclipse IDE. Why it’s important to know creating executable JAR in Eclipse because it’s one of the most used tools by Java programmers.
Once you know the steps, you export your Java program as a JAR file in a second or two. After creating an executable JAR file, you can follow these steps to run the Java program from the JAR file in the command line.
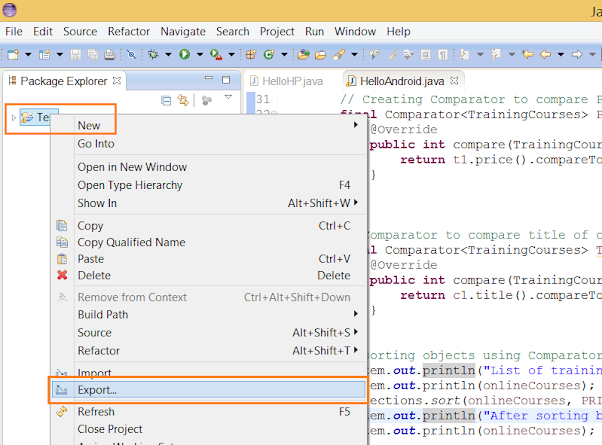
Steps to Create Executable JAR file in Eclipse
A picture is worth more than a thousand words, that’s why I have provided all steps by taking screenshots. You can quickly learn how to create executable JAR for your Java application in Eclipse, by just looking at these screenshots. They are arranged from start to end. This means the first image is for the first step and the last image is for the last step.
By the way, if your application is dependent upon some other JAR files e.g. third-party library, then don’t need to include them inside JAR. All you need to do is include them inside your Java Classpath. Java is smart enough to pick classes from those JAR.
Also remember to include the main method or entry point of your Java program, while creating executable JAR, as you can not run a Java program without the main method, as discussed here.
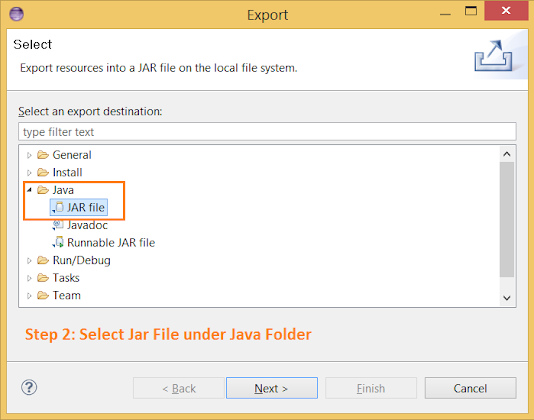
Step 2
Choose Java and select JAR file for exporting
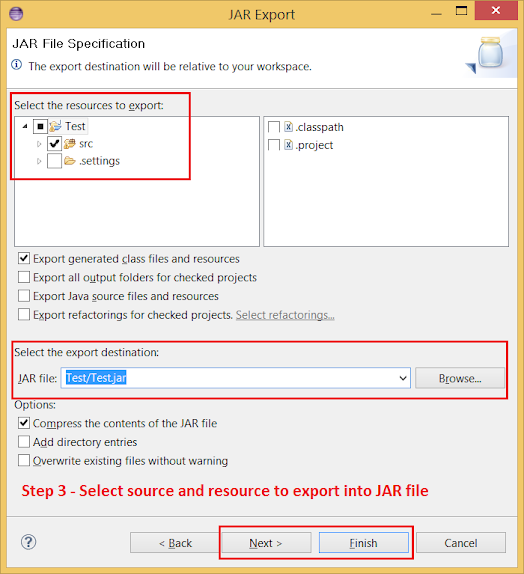
Step 3
Now select the source and resources you want to export into a JAR file. After selecting the src folder and any resource, select the destination folder, where you want your JAR file to be created. Also, don’t forget to check the option «compress the content of JAR file» . This will reduce the size of the executable JAR file. If you want you can finish the process in this step, but you can also go one step further to save these instructions of executable JAR file creation for future use.
Step 4
In this step, you can save all instructions into a «JAR description» file for future use. This will create a description file e.g. Test.jardesc in the chosen folder.

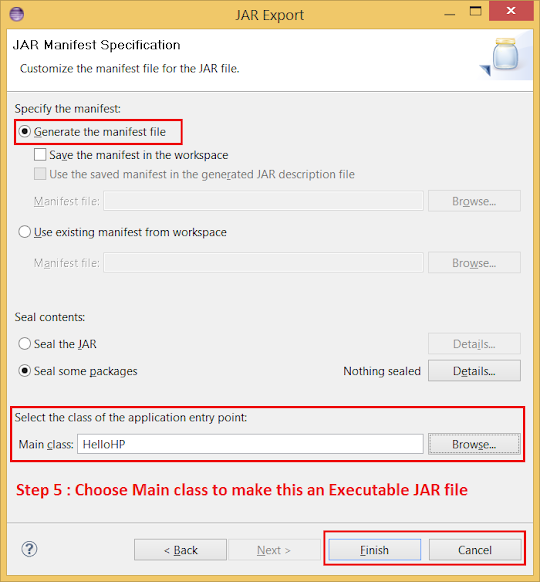
Step 5
This is an important step because you are going to generate the manifest file, don’t forget to choose the main class. This is important to make your JAR an executable JAR file. Remember the main method is the entry point of any Java application.
Step 6
You are done with creating an executable JAR file. Now you can go to the target folder, which you have chosen in previous steps to see both the JAR file as well .jardesc file to recreate the JAR file again and again. This time you don’t need to include main class as well, as those are already included.

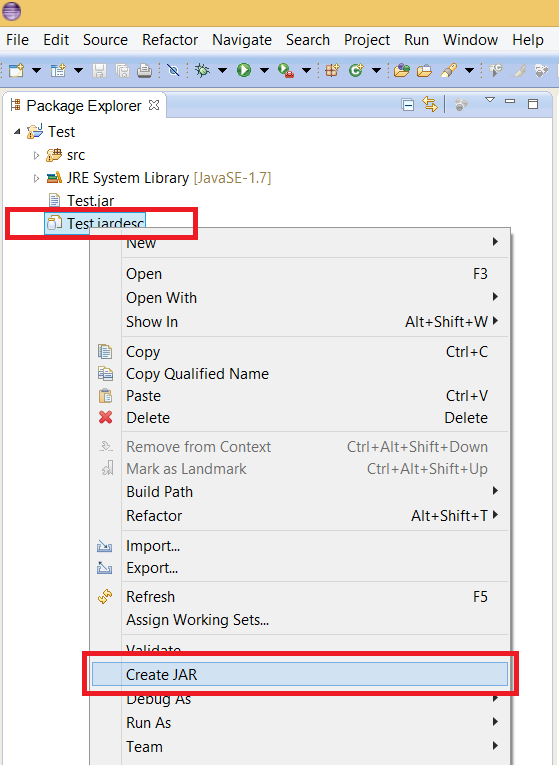
Step 7
After making code changes, if you want to create a new JAR file, you don’t need to go through all previous steps. This time, just select your JAR description file and say «create JAR» , a right click menu option in Eclipse. This will create another JAR file in same folder. You can double check timestamp of JAR file.
That’s all about How to create or make an Executable JAR file in Eclipse IDE. By following these steps you can export your Java program as executable JAR, which allows you to share your program with your user, client, and anyone who wants to take a look. I strongly suggest saving instructions to export the JAR file, so that you don’t need to run through all these steps again and again. Next time, when you update your code, just click on your jardesc file and your JAR file will be ready in a blink.
How to Create an Executable File from Eclipse
This article was co-authored by wikiHow staff writer, Travis Boylls. Travis Boylls is a Technology Writer and Editor for wikiHow. Travis has experience writing technology-related articles, providing software customer service, and in graphic design. He specializes in Windows, macOS, Android, iOS, and Linux platforms. He studied graphic design at Pikes Peak Community College.
This article has been viewed 592,482 times.
After having completed your project in Eclipse, your next goal will be to create a runnable version of your project. While Eclipse doesn’t have the ability to export a Java project as an «.exe» file, you can export it as a runnable JAR (.jar) file, which works similar to an executable (.exe) file. You can then use a program called Launch4j to convert the JAR file to an executable file. This wikiHow teaches you how to transform a typical «.jar» file to an executable file!
Exporting from Eclipse

- If Eclipse does not open the Java project you want to export, see if you can find the project folder in the Package Explorer to the left. If you can’t, click File in the menu bar and click Open file. Navigate to the «.java» file you want to open and click Open. You can also find recent project under Open recent in the «File» menu.


Right-click your project and click Export . It’s in the menu that appears when you right-click your project in the Package Explorer panel to the left.

Expand the «Java» folder and double-click the Runnable JAR file option. This option allows you to save your project as a runnable JAR file.

Select the main class. The main class is the class that contains the method with the identifier called «main». This is the class that indicates where your program begins. Use the drop-down menu under «Launch configuration» to select the main class of your project.

- Click Browse.
- Navigate to the folder you want to save the JAR file to.
- Type a name for the JAR file next to «Filename».
- Click Save.

Ensure the «Extract required libraries into generated JAR» radio button is selected. Do not worry about the rest of the menu.

Creating an Icon


Go to https://convertico.com/. This is a free site that converts common image files (.png, .jpg) to a usable ICO (.ico) file.

- Alternatively, if you have an image from the internet, you can enter the web address in the bar that says «Select file from URL».

Creating the Executable File

- Go to http://sourceforge.net/projects/launch4j/files/launch4j-3/3.1.0-beta1/
- Click Download the latest version.
- Wait 5 seconds for the download to start.
- Open the «launch-3.12-win32.exe» in your web browser or Downloads folder.
- Click Yes
- Click Next.
- Click I agree.
- Click Browse to select an install location (optional).
- Click Install.
- Click Finish.

Open Launch4j. To open Launch4j, click the Windows Start menu and type «Launch4j». Click the Lanuch4j icon. It resembles a computer screen with an IDE program open.

- Click the blue folder icon next to the «Output file» bar.
- Navigate to the location you want to save the file to.
- Type the name of the file next to «Filename» (make sure it has the «.exe» file extension at the end).
- Click Save.

- Click the blue folder next to the bar labeled «Jar».
- Navigate to the folder with your «JAR» file.
- Select the JAR file and click Open.

- Click the blue folder next to the bar that says «Ico».
- Navigate to the folder with your ICO file.
- Select the ICO file and click Open.

Click the JRE tab. It’s the fifth tab at the top. This tab allows you to select which version of Java you want to use.

Type 1.4.0 next to «Min JRE version». This ensures that the users have a sufficient version of Java to use your program. You can enter a different version if needed. Version 1.4.0 is a safe version for most users.

Click the gear button at the top. This is the gear button that says «Build Wrapper» when you hover over it.

Community Q&A
Check if you exported JAR properly, defined all the paths, and launched configuration according to your main class. The JAR export might be damaged, in which case your .exe file wouldn’t work.
Thanks! We’re glad this was helpful.
Thank you for your feedback.
As a small thank you, we’d like to offer you a $30 gift card (valid at GoNift.com). Use it to try out great new products and services nationwide without paying full price—wine, food delivery, clothing and more. Enjoy! Claim Your Gift If wikiHow has helped you, please consider a small contribution to support us in helping more readers like you. We’re committed to providing the world with free how-to resources, and even $1 helps us in our mission. Support wikiHow
Is it possible to wrap an appropriate version of JRE with the executable so that the end user doesn’t need any JRE installed to run the program?
Thanks! We’re glad this was helpful.
Thank you for your feedback.
As a small thank you, we’d like to offer you a $30 gift card (valid at GoNift.com). Use it to try out great new products and services nationwide without paying full price—wine, food delivery, clothing and more. Enjoy! Claim Your Gift If wikiHow has helped you, please consider a small contribution to support us in helping more readers like you. We’re committed to providing the world with free how-to resources, and even $1 helps us in our mission. Support wikiHow
Tips
You Might Also Like

Use Easy Windows CMD Commands to Check Your Java Version

How to Set JAVA_HOME for JDK & JRE: A Step-by-Step Guide

How to Do Division in Java (Integer and Floating Point)

How to Compile and Run Java Programs Using Notepad++


Simple Steps to Type a Bunny with Your Keyboard

About This Article
This article was co-authored by wikiHow staff writer, Travis Boylls. Travis Boylls is a Technology Writer and Editor for wikiHow. Travis has experience writing technology-related articles, providing software customer service, and in graphic design. He specializes in Windows, macOS, Android, iOS, and Linux platforms. He studied graphic design at Pikes Peak Community College. This article has been viewed 592,482 times.