- Динамическая работа с таблицами
- 1. создание таблицы
- 2. управление атрибутами
- 3. добавление/удаление столбцов и строк и 4. перемещение строк
- 5. заполнение ячеек
- дополнительно
- How to create a dynamic table in HTML using JavaScript
- Create an HTML table using JavaScript
- Add Table Header
- Add Some Style to Table
- How to add multiple rows dynamically in a table using javascript
- Remove dynamically added rows from a table
- Conclusion:
- Leave a Comment Cancel reply
- Trending Now
- Instant and dynamic HTML table creation with JavaScript
- Using the JavaScript table generator function
- Usage notes
- Output examples
- Example 1: Simple table
- Example 2: Meal plan
- The code
- Table generator function:
- CSS styling
- The JavaScript Manipulation
Динамическая работа с таблицами
Часто при использовании html таблиц с помощью JavaScript можно избежать лишних перезагрузок страницы, улучшить юзабилити и упростить работу пользователей.
Под динамической работой понимается:
- создание;
- управление атрибутами;
- добавление/удаление столбцов и строк;
- перемещение строк;
- заполнение ячеек
1. создание таблицы
Для того, чтобы создать новую таблицу на странице нужно сгенерировать элемент TABLE (createElement()) и добавить его в иерархическую структуру документа с помощью метода appendChild():
var newElem=document.createElement('table'); document.body.appendChild(newElem); 2. управление атрибутами
Есть два способа присвоения атрибутов элементу: использование метода setAttribute()
var newElem=document.createElement('table'); newElem.setAttribute('id','tl'); newElem.setAttribute('width','500'); newElem.setAttribute('border','1'); document.body.appendChild(newElem); и прямое обращение к свойствам объекта
var newElem=document.createElement('table'); newElem.id='tl'; newElem.width=500; newElem.border=1; document.body.appendChild(newElem); Есть и более простой способ добавления в документ таблицы с определенными атрибутами:
3. добавление/удаление столбцов и строк и 4. перемещение строк
Для вставки строк используется метод insertRow(), ячеек — insertCell():
var newElem=document.createElement("table"); var newRow=newElem.insertRow(0); var newCell = newRow.insertCell(0); newCell.width="200"; newCell.innerHTML ; var newCell = newRow.insertCell(1); newCell.width="400"; newCell.innerHTML ; var newRow=newElem.insertRow(1); var newCell = newRow.insertCell(0); newCell.width="200"; newCell.innerHTML ; var newCell = newRow.insertCell(1); newCell.width="400"; newCell.innerHTML ; document.body.appendChild(newElem); Для удаления строк используется метод deleteRow(), по своей конструкции аналогичный методу insertRow(), ячейки — deleteCell(). Для перемещения строк существует функция moveRow(индекс_источника, индекс_приёмника), но она пока работает только в IE (по крайней мере мне не удалось заставить ее работать в других браузерах).
Следующий пример работает только в IE:
var dt = document.getElementById(«t1»); function delete_tr(obj) < var num_tr=obj.parentNode.sectionRowIndex; dt.deleteRow(num_tr) >function up_tr(obj) < var num_tr=obj.parentNode.sectionRowIndex; if (num_tr!=0) dt.moveRow(num_tr, num_tr-1); >function down_tr(obj)
| 0 | удалить строку | поднять строку | опустить |
| 1 | удалить строку | поднять строку | опустить строку |
| 2 | удалить строку | поднять строку | опустить строку |
5. заполнение ячеек
Заполнение ячеек возможно с помощью свойств innerHTML и innerTEXT (их отличия, думаю, понятны из названия):
document.getElementById('идентификатор').innerHTML = 'something'; дополнительно
Как перебрать в цикле все таблицы на странице:
var tables = document.getElementsByTagName(«table»); for ( var t = 0; t
Как перебрать в цикле все ячейки таблицы:
var td_cells=document.getElementById("tl").cells; for (var i=0; i < td_cells.length; i++) alert(td_cells[i].innerHTML); как закрасить строки таблицы через одну:
var t = document.getElementsById('t1'); var rows = t.getElementsByTagName("tr"); for ( var i = 1; i < rows.length; i += 2 ) rows[i].className = "odd"; How to create a dynamic table in HTML using JavaScript
Creating a dynamic HTML table is one of the most common tasks for web developers. Not only are tables used to display data, but they can also be used as interfaces. In this blog post, I will walk you through how to create a dynamic table in HTML using JavaScript.
We are also going to add some rows dynamically to our newly generated table created using JavaScript. So, let’s check the code step by step.
Create an HTML table using JavaScript
In order to create a table, I am going to use a pure JavaScript function i.e. document.createElement() . Let’s check the code first.
- First, create a table var userTable = document.createElement('table');
- Give an id to our dynamically created table userTable.setAttribute('id', 'userTable');
- Add the table to element using .appenChild() method i.e. document.body.appendChild(userTable); .
Add Table Header
In our previous steps, we have successfully created a user table. Now we need to add a Table Header. To do that, follow the code below.
- By using .insertRow() method, we have to add a row to our userTable.
- Now store the all column name into an array.
- Loop through the tableHeadArray to get each element.
- Now create element by using document.createElement('th'); method.
- Store each array element value into a dynamically generated tag.
- Append each column into tableHeadRow i.e. tableHeadRow.appendChild(th);
Add Some Style to Table
We have already created a table as well as a table header. Now add some style to it. As we have set our table id i.e. userTable, we can add style using CSS for example #userTable < your style here >or we can add using .setAttribute() method.

How to add multiple rows dynamically in a table using javascript
We have created a simple dynamic table. Now we are going to add multiple rows dynamically based on user input.
In order to add a row, we need three text boxes and a button. Let’s create it first.
I have written here a simple HTML code for example purposes. You can add your own style as per your requirement. Now add the following code to add a row.
var td = tr.insertCell(-1); // add a button var button = document.createElement('button'); // set button attributes. button.setAttribute('type', 'button'); button.innerHTML = 'Remove'; // set onclick event. button.setAttribute('onclick', 'remRow(this)'); td.appendChild(button); username.value = ""; address.value = ""; age.value = ""; >); - First store all textboxes into different const i.e. username, address, age.
- Add a row using .insertRow(-1) method. Here -1 is used to append the row to the table. If you use 0, it will prepend the row into the table.
- Using insertCell(-1) the method, add the cell data.
- Create a button element at the end of the row and add a function remRow(this) to it.
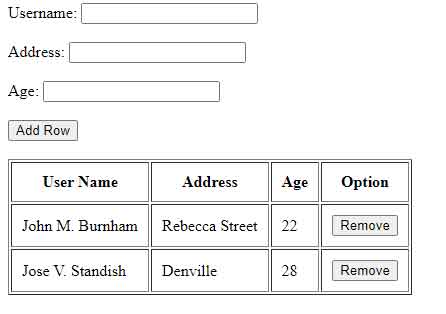
Remove dynamically added rows from a table
Sometimes, we need to remove some rows from a table. That’s why we have already set a remove button and also add a function to it. Let’s check the remRow() function.
Conclusion:
In this blog post, I have walked you through how to create a dynamic table in HTML using JavaScript. If you’ve been looking for an easy way to display data or create interfaces with tables on your website, hopefully, the tips and tricks we covered will help you out! Thank you so much for reading this article. We hope that it was helpful!
About Ashis Biswas
A web developer who has a love for creativity and enjoys experimenting with the various techniques in both web designing and web development. If you would like to be kept up to date with his post, you can follow him.
Leave a Comment Cancel reply
Enjoying the articles? I would appreciate a coffee to help me keep writing and coding!
Trending Now
Instant and dynamic HTML table creation with JavaScript
Do you find hard-coding HTML tables tedious? The good news is you can spare yourself this effort by creating tables dynamically using JavaScript.
To start using the table generator function, copy and paste the code below into your project and call the function according to the usage notes.
Build notes that may be helpful to you in creating your own table generator function or customizing the one provided here are contained in notes alongside the code.
Using the JavaScript table generator function
Usage notes
- rows : table rows (numeric)
- cols : table columns (numeric)
- thead : head title (string) or column titles (array)
- tfoot : foot title (string)
The return value of the function is the table. So it can be rendered to the DOM like this:
Output examples
Example 1: Simple table
A simple table with a heading and five rows of data:
const data = ["United States","China","India","Russia","Germany"]; tableCreate(5,1, "Five large countries", "By JavaScript");

Example 2: Meal plan
A more complex table with multiple rows and columns as well as column titles.
The cells in the first column of the table have the class attribute col-left and so can be separately styled in CSS:
// Define data input const data = ["Monday", "Cereal", "Steamed rice", "Baked Potatoes", "Tuesday", "Bagel", "Spaghetti bolognese", "Pasta salad", "Wednesday", "Oatmeal", "Pasta", "Burger", "Thursday", "Cereal", "Fish and chips", "Fried Rice", "Friday", "Fried breakfast", "Sandwiches", "Lasange" ] // Define headings const headings = ['', 'Breakfast', 'Lunch', 'Dinner'] /* Call tableCreate */ tableCreate(5,4,data,headings,'Created by JavaScript');

The code
Table generator function:
/* Defining the tableCreate function */ function tableCreate(rows, cols, data, thead, tfoot) < // 1) Create table and body elements let table = document.createElement('table') let tableBody = document.createElement('tbody') // 2) Optional header let headContent = document.createElement('thead') let tr = document.createElement('tr') // 2.1) Sets default behavior: Single cell header if (thead && Array.isArray(thead) == false) < let td = document.createElement('td') td.innerHTML = thead // Set header text to argument input td.setAttribute('colspan', cols) // Span header for as many cols as table tr.append(td) headContent.append(tr) // append head row to thead element thead = headContent // Make this final value of thead >// 2.2) If "split" is third argument: Creates a multi-cell header if (Array.isArray(thead)) < let i for (i = 0; i < cols; i++) < let td = document.createElement('td') td.id = 'thead' + i td.innerHTML = thead[i] tr.append(td) // append multiple td to head row >headContent.append(tr) // append head row to thead element thead = headContent // Make this final value of thead > // 3) Optional footer (text is user input string) if (tfoot) < footElement = document.createElement('tfoot') tr = document.createElement('tr') td = document.createElement('td') td.innerHTML = tfoot // Set text to fourth argument input td.setAttribute('colspan', cols) tr.append(td) // Append single cell to row footElement.append(tr) // Append row to tfoot element tfoot = footElement // Make this final value of tfoot >// 4) Create table body rows and cell with loops let i for (i = 0; i < rows; i++) < // Loop to create row let tr = document.createElement('tr') let * cols // Nested loop to append cells to rows (first loop second loop etc) for (j = 0; j < cols; j++) < let td = document.createElement('td') id++ // increase id by 1 (first loop is 0+1 = 1) if (id == i * cols + 1) < td.classList.add('left-col') >td.innerHTML = id // print id in col cell td.setAttribute('id', 'cell' + id) // set id of element to id tr.append(td) // append col cell to table row // Repeats until j < column numbers entered by user if (data) < td.innerHTML = data[id - 1] >> tableBody.append(tr) > // 5) Append head, body and footer if (thead) < table.append(thead) >table.append(tableBody) if (tfoot) < table.append(tfoot) >// Show table in console console.log(table) // 6) Return a value for the function return table > CSS styling
/* import custom Open Sans font */ @import url('https://fonts.googleapis.com/css2?family=Open+Sans&display=swap'); body < background: linear-gradient(#e66465, #9198e5); background-repeat: no-repeat; background-position: top left; height: 100vh; margin: 0px; >#table < display: flex; justify-content: center; margin-top: 3rem; >table < font-family: 'Open Sans', sans-serif; border-collapse: collapse; color: black; >thead < background-color: lightblue; font-weight: bold; border-bottom: 2px solid white; >th, td < padding: 0.5rem; padding-left: 3rem; padding-right: 3rem; text-align: center; >tbody tr td < padding: 0.5rem; padding-left: 0.8rem; padding-right: 0.8rem; >/* Even row styling */ tbody tr:nth-child(even) < background-color: #f2f2f2; >/* Odd row styling */ tbody tr:nth-child(odd) < background-color: white; >/* Left column styling */ .col-left < background-color: lightblue; color: black; font-weight: 400; border-top: 2px solid white; border-bottom: 2px solid white; >tfoot < background-color: rgb(206, 231, 240); font-size: 0.7rem; padding: 0.1rem; border-top: 2px solid white; >tfoot tr td
- This h2 tag is the heading of the HTML page. The value 2 specifies the degree of heading.
- There can be multiple headings in one document of different degrees (from higher to lower). Eg: ,,,, and so on.
- In line 4, first we will write the HTML code for the title of the HTML page using tag inside.
- From 5 to 14, we styled the input cell border using tag with attributes like border, outline, and font-size.
- In line 18, we have used the tag for writing the heading Create dynamic table using JavaScript.
- In tag, we have styled using the text-align:leftto place the heading on the left side of the HTML page.
- In line 21, we have used tag to submit input from the user using the id=’fetch’ attribute.
- Also, we will put a text Create to be displayed on the button on the HTML page.
- In line 22, we have used
tag
for inserting a paragraph in the body with tag to display a note to the user. - The note will be useful to inform the user that in case no values are entered, the HTML page will create a 10×10 table by default.
- In line 23, we have used the tag to integrate the JavaScript function in it to generate table.
- In tag, we have used id=’container’ attribute that will contain the entered value by the user as input.
The JavaScript Manipulation
- In line 25, we have used document.getElementById() method which returns the input element object with ID ‘fetch’. So, we can now access the input elements.
- Also, we have used onlick event handler with the getElementById() method to call the JavaScript function.
- In line 26 and 27, variables rows and cols are defined and values fetched from the user input is assigned in them respectively using getElementById().value to generate the dynamic table further.
- From line 28 to 31, we used the if statement to make sure that if no values are entered, then by default the values of both rows and cols will be equal to 10.
- In line 32, we defined a variable output and assigned a table to it.
- Also, in line 32, we styled the table using some attributes like border, cellspacing, and cellpadding.
- Now, in line 34, we will finally create a JavaScript function createTable() with parameters rows and cols.
- In line 35, inside the function, we will create a for loopforrows of the table.
- In line 36, inside the first for loop, between each iteration, the output will generate rows for row elements using .
- In line 37, inside the first for loop, we will create another for loop for columns in each row.
- In line 38, inside the column loop, between each iteration, the output will generate columns in each row and store data using , and also take data input from the user using with type attribute stating a text input data.
- After the loops are closed, the output is updated each time in line 40 and line 42.
- In line 43, we will update the ID ‘container’ using the output from the function.
- In line 45, we finally call the createTable() function.
There are many different approaches for creating a dynamic table using JavaScript. In the next example, we will create a dynamic table using ArrayList in JavaScript.