- How to Create a Custom Views Argument Plugin in Drupal 8
- Assumptions
- The solution
- Step 1: Content and field configuration
- Step 2: Create a custom module
- Step 3: Implement hook_views_data_alter()
- Step 4: Create a custom views argument plugin
- Step 5: Create Demo Content
- Step 6: Configure a View
- Next steps
- Drupal Views Arguments
- 5 Answers 5
- Related
- Hot Network Questions
- Subscribe to RSS
- Страницы с аргументом, созданные при помощи модуля Views в Drupal 7
- Создание отображения
- Задаем путь
- Добавляем связь
- Добавление и настройка контекстного фильтра
- Сохранение и проверка
- using views argument in the view tpl.php file
- 1 Answer 1
- Related
- Hot Network Questions
- Subscribe to RSS
How to Create a Custom Views Argument Plugin in Drupal 8
When you’re building a site, it’s standard to set up «pretty URLs». For example, we’d rather see /catalog/accessories than /taxonomy/term/18 and we’d rather see /about-us than /node/19 . With Drupal, we use the Pathauto module to configure these types of standard content paths. But in some cases, there’s no option to create a nice URL pattern, so we end up seeing those URLs.
This happens with Views that are filtered by a taxonomy term in the URL. The result is that you end up seeing taxonomy term IDs in the URL (e.g. catalog/19/search ) rather than a pretty URL (e.g. catalog/accessories/search ).
In this tutorial, I’ll walk you through how to create a field that is used to make generate URLs for Views pages that take taxonomy terms as contextual arguments. Using this approach, a site editor will be able to configure what the URL path will look like.
Assumptions
It has been assumed that you know:
- The basic concepts of Drupal 8.
- How to configure fields.
- How to configure a view with a contextual filter.
- How to create a custom module in Drupal 8.
- How to create a custom plugin in Drupal 8.
The solution
We’re going to use the core taxonomy argument plugin ( Drupal\taxonomy\Plugin\views\argument\Taxonomy) to help us fix this problem. The plugin takes a term ID from the URL and passes it to Views. We’ll override the plugin so that it takes a string from the URL (slug), and then looks up the associated term ID. All the rest of the functionality we’ll leave as is.
Step 1: Content and field configuration
To make the example work, we need the following configuration to be in place (most of this you get out-of-the-box with Drupal, you’ll just need to add the Slug field):
- A taxonomy vocabulary named tags.
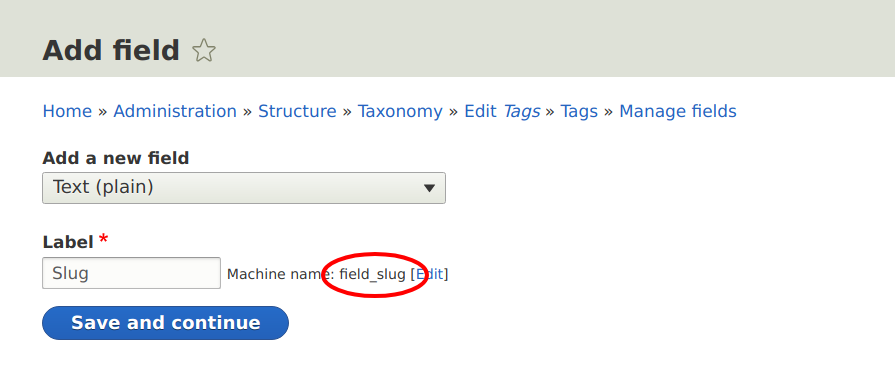
- Tags should have the following field:
- Field name: Slug
- Machine name: field_slug
- Type: Text (Plain)
- Size: 32 characters
- Field name: Tags
- Machine name: field_tags
- Type: Entity reference (to taxonomy terms from Tags)
- Number of values: At least one

Configuring field slug on taxonomy term
Step 2: Create a custom module
Create a custom module called custom_views_argument . Declare a dependency on the views module in the .info.yml file.
Step 3: Implement hook_views_data_alter()
The hook_views_data_alter() hook tells Views about the various database tables, fields and the relevant plugins associated to them. We implement this hook to tell Drupal to include our custom argument plugin which we will create in the next step.
Step 4: Create a custom views argument plugin
Next we implement the CustomTaxonomySlug class with a proper annotation @ViewsArgument(«custom_taxonomy_slug») . This tells the Views module that the class is a special class which implements a custom Views argument plugin. We extend the Drupal\taxonomy\Plugin\views\argument\Taxonomy class and override one important method CustomTaxonomySlug::setArgument() .
public function setArgument($arg) < // If we are not dealing with the exception argument, example "all". if ($this->isException($arg)) < return parent::setArgument($arg); >// Convert slug to taxonomy term ID. $tid = is_numeric($arg) ? $arg : $this->convertSlugToTid($arg); $this->argument = (int) $tid; return $this->validateArgument($tid); >All we do here is catch the argument from the URL and if it is a slug, we use a convertSlugToTid() method to retrieve the underlying taxonomy term ID. That is it! The rest of the things are handled by the taxonomy plugin.
Step 5: Create Demo Content
Now that everything is in place, we’ll put our solution to the test. Start by creating some demo content. Create 2-3 articles and assign them some tags. The tags are created, however, they don’t have a slug.
Once done, go to the Admin > Structure > Taxonomy > Tags page and edit the tags and give them nice URL slugs containing only English alphabet letters, numbers and dashes. For real projects, you might need to use a custom or contrib module to automatically generate slugs (see the machine_name module).
Step 6: Configure a View
Now we’re all set! The last step is to create and configure a View which will put everything together.
- Create a View of Content. You can name it Blog.
- Create a page display and set it’s URL to /blog/% .
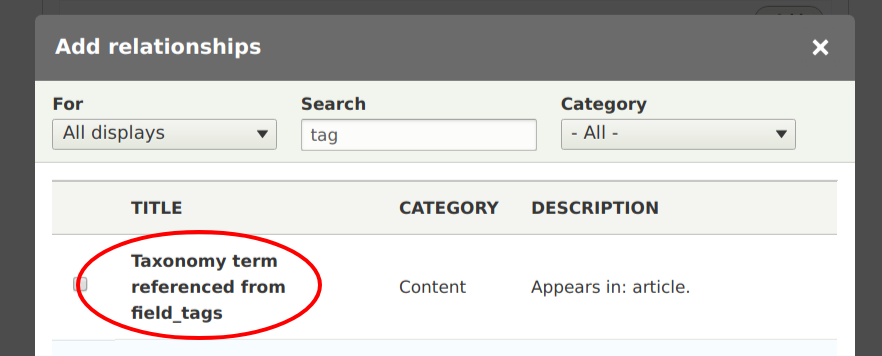
- Add a relationship to taxonomy terms referenced from field_tags.
- We do this to be able to use the Slug field in a filter.
Configure a relationship with taxonomy terms
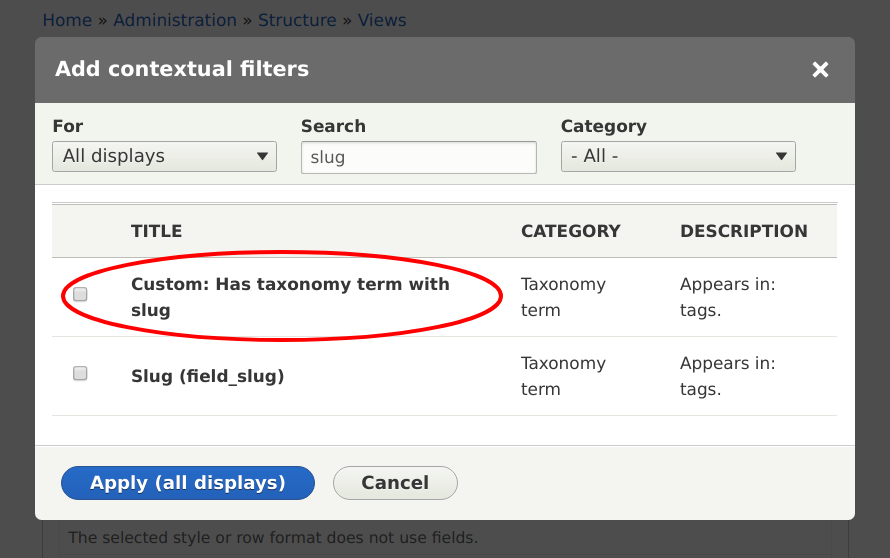
- Now, define a contextual filter for the Slug using the custom argument plugin which we created.
- Click on the Add button for Contextual filters
- Choose the Slug filter which we created. It should have the name we had defined in our plugin, i.e. Custom: Has taxonomy term with slug.
- Optionally, specify a validation criteria for Taxonomy Term and specify the Tags vocabulary.
Configuring the custom views argument plugin for contextual filters
And we’re done! If you visit the /blog/SLUG , you should see all the articles which have the taxonomy term associated to SLUG . Here, SLUG refers to the value you put in the Slug field for the tag. E.g. if you have a tag named Accessories and you wrote accessories in the Slug field, you should go the the URL /blog/accessories .
Next steps
If you’re looking for hands-on training about how to develop Drupal modules, we offer professional Drupal training online and in-person. See the full Drupal 8 Module Development training curriculum for details.
Drupal Views Arguments
I know how to successfully use arguments in drupal’s views module, but when it «filters» based on those arguments it uses «=» in the where clause of the SQL statement. However, I would like to use «like» instead of » mt24 mb12″>
Great question..facing same problem..if you got any solution..please dont forgot to post it as answer.
5 Answers 5
one possible solution would be to generate the view by code with your required query.
Do you have an example of how I might do this? If I do this can I then edit the view using the Views UI?
I am looking for the same solution. It looks like you can modify the query using the views_views_pre_execute hook. The link below has a pretty good explanation. Haven’t tried it yet but giving it a shot now.
You could export the view, which outputs the views-generated query as code, then modify the query to suit your needs, and load it programatically (http://www.chilipepperdesign.com/2010/01/15/how-to-programmatically-create-views-in-drupal-6)
In drupal 7 you can use views query alter to generate your custom querys:
There are no options for selecting which operator should be used with contextual filters (save the exclude option). All default to is equal to.
Related
Hot Network Questions
Subscribe to RSS
To subscribe to this RSS feed, copy and paste this URL into your RSS reader.
Site design / logo © 2023 Stack Exchange Inc; user contributions licensed under CC BY-SA . rev 2023.7.21.43541
By clicking “Accept all cookies”, you agree Stack Exchange can store cookies on your device and disclose information in accordance with our Cookie Policy.
Страницы с аргументом, созданные при помощи модуля Views в Drupal 7
Прошлый урок мы посвятили созданию представления, в котором мы настроили агрегацию и вывели его в виде блока с «Жанрами». Однако перейдя по любой ссылке из блока нам пишет, что страницы нет, так как их мы еще не создали.
Для того, что бы мы могли переходить по ссылкам через наш блок нам надо их создать. Этим мы и займёмся при помощи нашего модуля Views
Новое представление нам не понадобиться, а работать мы будем с существующим, которое называется «Книги» и было создано в предыдущих уроках курса, так как именно их нам и надо выводить на страницах, поэтому переходим в его настройки.
Создание отображения
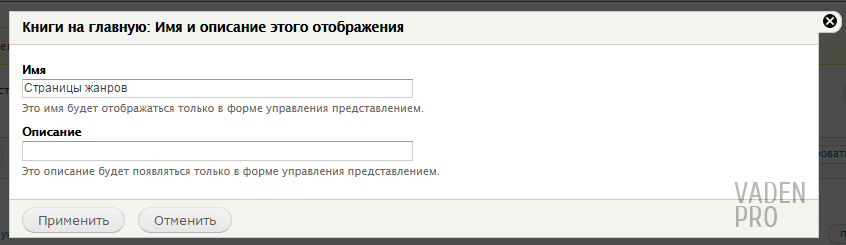
Тут у нас уже создано два отображения: «Книги на главную» и «Популярные» . Нам нужно добавить представление с такими же полями как и уже существующего представления под названием «Книги на главную». Не стоит спешить, создавая новое представление и добавлять в него поля, для облегчения нашего труда в функционале модуля views существует функция клонирования отображения. Эту кнопку можно найти, развернув опциональный блок и выбрать в нём «Клонировать».
После нажатия на ссылку у нас появится точно такое же отображение, поэтому, что бы в дальнейшем не запутаться, сменим ему имя.
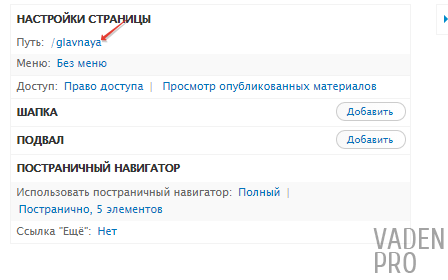
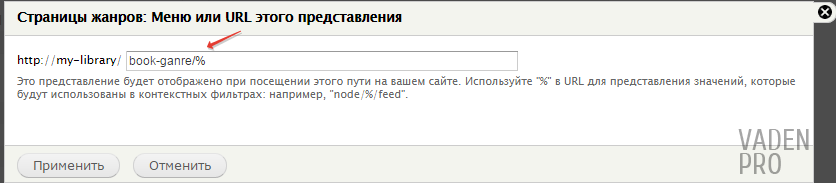
Задаем путь
Теперь нам нужно поменять путь, на который ведет страница, он меняется в блоке «Настройка страницы» графа «путь»
Когда мы создавали отображение «Жанр» мы устанавливали путь ссылки для поля Пользовательский текст. Теперь мы должны дублировать путь «book-ganre» и через слеш добавить к нему знак «%». Знак процента в дальнейшем, системой будем заменён на параметр, а в конкретном представлении это будет ID термина таксаномии. В итоге в графе путь должна быть надпись «book-ganre/%».
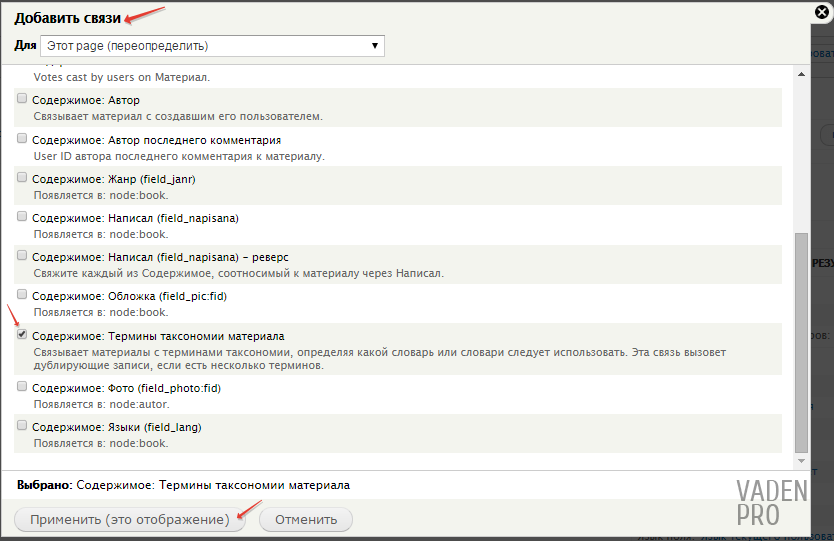
Добавляем связь
После того как мы установили путь для нашего отображения, нам надо его связать с определённым жанром, для того что бы выводились только книги одного жанра.
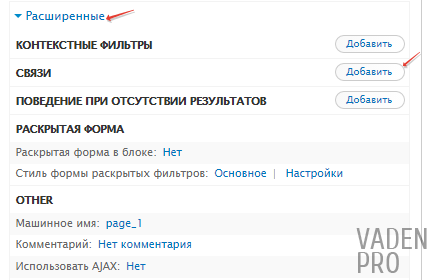
Переходим в «Расширенные настройки» и в графе связь добавляем новое поле.
В выплывающем окне, которое появится после нажатия на кнопку, находим «Содержимое: Термины таксономии материала». Не забываем в графе «Для» выбрать «Этот page», в противном случае, изменения которые мы внесем будут зайдествованы во всех отображениях, присутствующих в этом представлении, что нам само собой не нужно. После выбора графы «Для» рядом с надписью «применить» появится надпись «(это отображение)» На которую мы и клацнем, что бы сохранить настройки.
Далее мы попадаем в окно настроек поля, в котором мы должны выбрать наш словарь, в нашем случае «Жанр», также я советую переименовать идентификатор написав более понятный нам, и делаем эту связь обязательной нажатием на советующий чекбокс. После внесения всех изменений сохраняем.
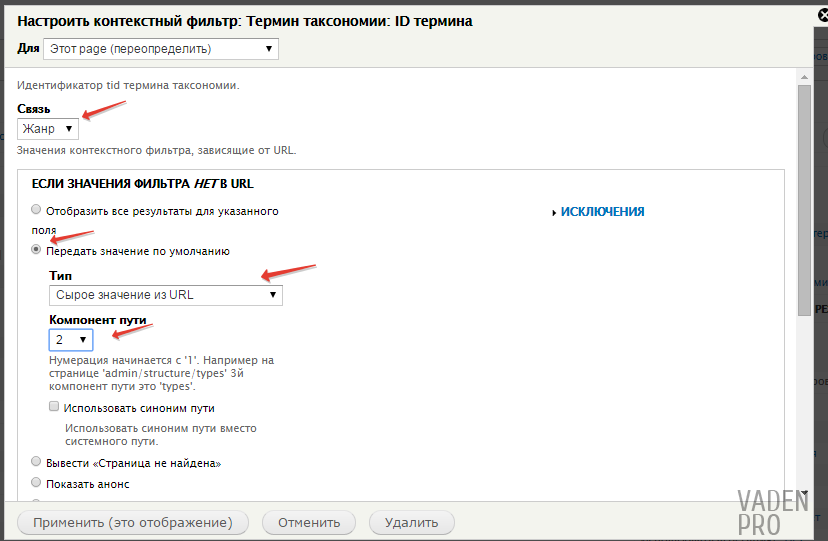
Добавление и настройка контекстного фильтра
После того, как мы связали наше отображение со словарём, нам нужно отфильтровать книги по жанрам. Это мы сделаем при помощи контекстного фильтра.
В списке фильтров находим ID термина, который относиться к терминам таксономии, не забываем отметить область применения настроек.
В настройках фильтра мы должны выбрать нашу связь, которая в моём случае называется «ЖАНР». Далее переходим в настройки «Если значения Фильтра нет в URL». В этом поле мы должны отметить «Передать значение по умолчанию» в графе «Тип» из выплывающего окна найти и выбрать «Сырое значение из Url» а в компоненте пути ставим цифру «2».
Почему именно «2»? совсем недавно мы задавали путь для нашей страницы «book-ganre/%». Вот как раз наш выбор и основан на этой надписи. В ней book-ganre выступает первым компонентом пути, а в роли второго «%», который выступает в качестве ID термина.
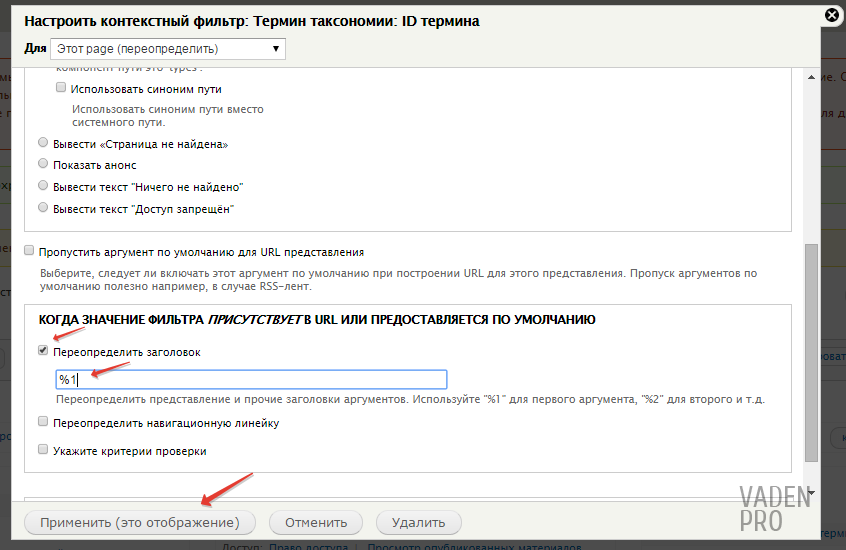
На этом настройки нашего фильтра не закончены. Далее мы должны опустить скрол в низ и найти секцию «Когда значение фильтра присутствует в URL …». В ней мы должны поставить галочку на разделе «Переопределить заголовок». После того как мы это сделаем, появится текстовое поле, а под ним небольшая подсказка- какие аргументы использовать. Нам нужен первый аргумент поэтому ставим «%1». Теперь можно сохранять настройки.
Сохранение и проверка
Так как остальные поля унаследовались от родительского отображения, больше ни каких настроек вносить не нужно, по этому сохраняем наше отображение.
Теперь, перейдя по ссылке термина, мы можем убедиться, что больше нет ошибки а есть страница, на которой только те книги, которые относятся к этому жанру, и количество совпадает с указанным в предствалении.
using views argument in the view tpl.php file
i am a newby to drupal. here is my problem: on my main page.tpl.php i have this code lines: «if ( $is_front == TRUE ) < print views_embed_view('all_product_by_type_thin', "default", "canon"); print views_embed_view('all_product_by_type_thin', "default", "Nikon"); >» as you can see, in case of the front page i print the «all_product_by_type_thin» view while sending parameter «cannon» and «nikon» the result of the all_product_by_type_thin view is altered inside the views-view-unformatted—all_product_by_type_thin.tpl.php file. in that file i am wrapping the view results in all kind of divs. what i need to do though, and cant figure out a way to do it, is get the argument i sent the view «canon» or «nikon» inside the php code of views-view-unformatted—all_product_by_type_thin.tpl.php any idea ?
1 Answer 1
Inside your Views theme file ie. views-view-unformatted—all_product_by_type_thin.tpl.php you should have access to the $view object.
One of the attributes of this object will contain the arguments passed to the view. You can do a print_r and find this attribute and hence, the arguments.
Related
Hot Network Questions
Subscribe to RSS
To subscribe to this RSS feed, copy and paste this URL into your RSS reader.
Site design / logo © 2023 Stack Exchange Inc; user contributions licensed under CC BY-SA . rev 2023.7.21.43541
By clicking “Accept all cookies”, you agree Stack Exchange can store cookies on your device and disclose information in accordance with our Cookie Policy.