- Drawing Rectangles Examples with Java Graphics2D
- 1. Drawing Rectangles in integer coordinates
- 2. Drawing Rectangles in double coordinates
- 3. Drawing Rectangles in float coordinates
- 4. Drawing Rectangles with Rounded-Corners
- 5. Drawing 3D Rectangles
- 6. Drawing Rectangles with Custom Strokes
- API References:
- About the Author:
- Add comment
- Comments
- Lesson: Getting Started with Graphics
- Drawing Arbitrary Shapes
Drawing Rectangles Examples with Java Graphics2D
In Java, to draw a rectangle (outlines) onto the current graphics context, we can use the following methods provided by the Graphics / Graphics2D class:
- drawRect(int x, int y, int width, int height)
- draw3DRect(int x, int y, int width, int height, boolean raised)
- draw(Rectangle2D)
- drawRoundRect(int x, int y, int width, int height, int arcWidth, int arcHeight)
- ( x , y ) is the upper left corner of the rectangle.
- width and height : specify dimension of the rectangle.
- raised : specifies whether the rectangle edges are raised or sunk when drawing a 3D rectangle.
- Rectangle2D is the base class of Rectangle (for integer coordinates) Rectangle2D.Double (for double coordinates) and Rectangle2D.Float (for float coordinates).
- arcWidth and arcHeight : specify the horizontal and vertical diameters of the arcs at the four corners when drawing a rectangle with rounded corners.
/** * This program demonstrates how to rectangles using Graphics2D object. * @author www.codejava.net * */ public class RectanglesDrawingExample extends JFrame < public RectanglesDrawingExample() < super("Rectangles Drawing Demo"); getContentPane().setBackground(Color.WHITE); setSize(480, 200); setDefaultCloseOperation(JFrame.EXIT_ON_CLOSE); setLocationRelativeTo(null); >void drawRectangles(Graphics g) < Graphics2D g2d = (Graphics2D) g; // code to draw rectangles goes here. >public void paint(Graphics g) < super.paint(g); drawRectangles(g); >public static void main(String[] args) throws Exception < SwingUtilities.invokeLater(new Runnable() < @Override public void run() < new RectanglesDrawingExample().setVisible(true); >>); > > The code examples will go into the drawRectangles() method which obtains graphics context of the JFrame window:
void drawRectangles(Graphics g) < Graphics2D g2d = (Graphics2D) g; // code to draw rectangles goes here. >
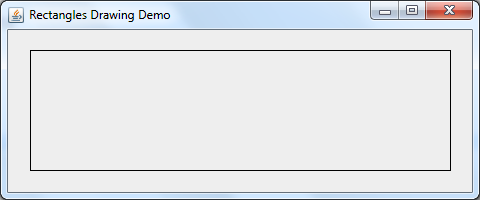
1. Drawing Rectangles in integer coordinates
g2d.draw(new Rectangle(30, 50, 420, 120));
2. Drawing Rectangles in double coordinates
To draw a rectangle in double coordinates, create a new instance of the Rectangle2D.Double class. For example:
double x = 29.5d; double y = 48.8d; double width = 413.2d; double height = 118.6d; Rectangle2D.Double rect = new Rectangle2D.Double(x, y, width, height); g2d.draw(rect);
g2d.draw(new Rectangle2D.Double(29.5d, 48.8d, 413.2d, 118.6d));
3. Drawing Rectangles in float coordinates
Similar to double coordinates, we use the Rectangle2D.Float class to draw rectangles in float coordinates. For example:
float x = 29.5f; float y = 48.8f; float width = 413.2f; float height = 118.6f; Rectangle2D.Float rect = new Rectangle2D.Float(x, y, width, height); g2d.draw(rect);
g2d.draw(new Rectangle2D.Float(29.5f, 48.8f, 413.2f, 118.6f));
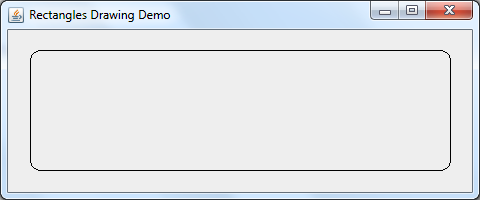
4. Drawing Rectangles with Rounded-Corners
To draw a rectangle with four rounded corners, use the drawRoundRect() method and pass values for the horizontal diameter ( arcWidth ) and vertical diameter ( arcHeight ) of the corners. Here’s an example:
int x = 30; int y = 50; int width = 420; int height = 120; int arcWidth = 20; int arcHeight = 20; g2d.drawRoundRect(x, y, width, height, arcWidth, arcHeight);
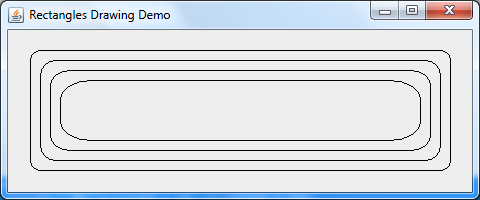
The following example plays around with various values for the arcWidth and arcHeight :
g2d.drawRoundRect(x, y, width, height, arcWidth, arcHeight); g2d.drawRoundRect(x + 10, y + 10, width - 20, height - 20, arcWidth + 10, arcHeight + 10); g2d.drawRoundRect(x + 20, y + 20, width - 40, height - 40, arcWidth + 20, arcHeight + 10); g2d.drawRoundRect(x + 30, y + 30, width - 60, height - 60, arcWidth + 40, arcHeight + 20);
5. Drawing 3D Rectangles
The draw3DRect() method draws a rectangle with edges appear to be raised or sunk, specified by the raised boolean flag. Here’s an example:
int x = 30; int y = 50; int width = 420; int height = 120; boolean raised = true; g2d.setColor(Color.LIGHT_GRAY); g2d.draw3DRect(x, y, width, height, raised);
The following example draws two rectangles — one with raised edges and one with sunk edges:
g2d.setColor(Color.LIGHT_GRAY); g2d.draw3DRect(30, 50, 200, 120, true); g2d.draw3DRect(250, 50, 200, 120, false);
NOTE: The draw3DRect() method uses only the current color and ignores the current paint, such as line strokes.
6. Drawing Rectangles with Custom Strokes
Rather than using the default style (thin and solid line, black color), we can make some attractive decorations for the outlines of the rectangles using Stroke s. For example:
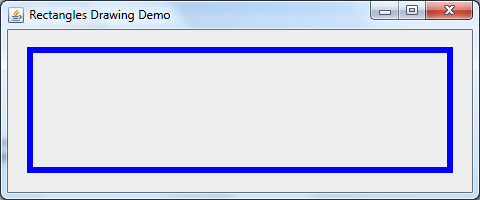
Stroke stroke1 = new BasicStroke(6f); g2d.setColor(Color.BLACK); g2d.setStroke(stroke1); g2d.drawRect(30, 50, 420, 120);
That draws a rectangle with outlines in blue color and thickness of 6 pixels width. Here’s the result:
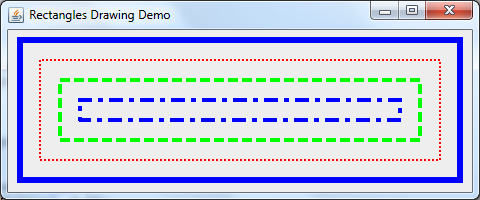
To understand more about using strokes, see the tutorial: Drawing lines examples with Graphics2D. The following code snippet plays around with various strokes:
int x = 20; int y = 40; int width = 440; int height = 140; Stroke stroke1 = new BasicStroke(6f); g2d.setColor(Color.BLUE); g2d.setStroke(stroke1); g2d.drawRect(x, y, width, height); float[] dashingPattern1 = ; Stroke stroke2 = new BasicStroke(2f, BasicStroke.CAP_BUTT, BasicStroke.JOIN_MITER, 1.0f, dashingPattern1, 2.0f); g2d.setColor(Color.RED); g2d.setStroke(stroke2); g2d.drawRect(x + 20, y + 20, width - 40, height - 40); float[] dashingPattern2 = ; Stroke stroke3 = new BasicStroke(4f, BasicStroke.CAP_BUTT, BasicStroke.JOIN_MITER, 1.0f, dashingPattern2, 0.0f); g2d.setColor(Color.GREEN); g2d.setStroke(stroke3); g2d.drawRect(x + 40, y + 40, width - 80, height - 80); float[] dashingPattern3 = ; Stroke stroke4 = new BasicStroke(4f, BasicStroke.CAP_SQUARE, BasicStroke.JOIN_MITER, 1.0f, dashingPattern3, 0.0f); g2d.setColor(Color.BLUE); g2d.setStroke(stroke4); g2d.drawRect(x + 60, y + 60, width - 120, height - 120);
API References:
Other Java Graphics Tutorials:
About the Author:

Nam Ha Minh is certified Java programmer (SCJP and SCWCD). He started programming with Java in the time of Java 1.4 and has been falling in love with Java since then. Make friend with him on Facebook and watch his Java videos you YouTube.
Add comment
Comments
Hi,
Need to draw an image in vertical 270 degrees using Rectangle2D.
I am rotating the object as below
originalAffinTransform = graphics2DArg.getTransform();
localTheta = Math.toRadians(localTheta);
graphics2DArg.rotate(localTheta, Rectangle2D.getCenterX(), Rectangle2D.getCenterY());
But unable to draw the image as user selected position. Little bit going left side.
Dear, Kindly Find my question and answer it.
I want to draw a shape over the imageview that is showing an image an save it in a folder with javafx how I can do it?
Lesson: Getting Started with Graphics
The Java 2D API is powerful and complex. However, the vast majority of uses for the Java 2D API utilize a small subset of its capabilities encapsulated in the java.awt.Graphics class. This lesson covers the most common needs of applications developers. Less common needs are described later in the Advanced topics in the Java 2D API.
Most methods of the Graphics class can be divided into two basic groups:
- Draw and fill methods, enabling you to render basic shapes, text, and images
- Attributes setting methods, which affect how that drawing and filling appears
Methods such as setFont and setColor define how draw and fill methods render.
This figure illustrates how these methods relate to graphic objects:
- drawString – For drawing text
g.drawImage(img, 0, 0, width, height, 0, 0, imageWidth, imageHeight, null);
g2.draw(new Line2D.Double(0, 0, 30, 40));
Depending on your current need, you can choose one of several methods in the Graphics class based on the following criteria:
- Whether you want to render the image at the specified location in its original size or scale it to fit inside the given rectangle
- Whether you prefer to fill the transparent areas of the image with color or keep them transparent
Fill methods apply to geometric shapes and include fillArc , fillRect , fillOval , fillPolygon .
Whether you draw a line of text or an image, remember that in 2D graphics every point is determined by its x and y coordinates. All of the draw and fill methods need this information which determines where the text or image should be rendered.
For example, to draw a line, an application calls the following:
java.awt.Graphics.drawLine(int x1, int y1, int x2, int y2)
In this code (x1, y1) is the start point of the line, and (x2, y2) is the end point of the line.
So the code to draw a horizontal line is as follows:
Graphics.drawLine(20, 100, 120, 100);
The demo below accumulates all mentioned techniques. Move the slider to display various weather types.
Note: If you don’t see the applet running, you need to install at least the Java SE Development Kit (JDK) 7 release.
The WeatherWizard demo uses the JSlider component as well as various graphics capabilities to generate and display a specified weather type. For more information about the JSlider class see the How to Use Sliders section of the Swing Tutorial.
The paint method of the WeatherPainter class implements graphics features. The following code draws an image determined by using the setupWeatherReport() method.
. origComposite = g2.getComposite(); if (alpha0 != null) g2.setComposite(alpha0); g2.drawImage(img0, 0, 0, size.width, size.height, 0, 0, img0.getWidth(null), img0.getHeight(null), null); if (img1 != null) < if (alpha1 != null) g2.setComposite(alpha1); g2.drawImage(img1, 0, 0, size.width, size.height, 0, 0, img1.getWidth(null), img1.getHeight(null), null); >.
The setFont and drawString methods render the temperature and the weather condition.
. // Freezing, Cold, Cool, Warm, Hot, // Blue, Green, Yellow, Orange, Red Font font = new Font("Serif", Font.PLAIN, 36); g.setFont(font); String tempString = feels + " " + temperature+"F"; FontRenderContext frc = ((Graphics2D)g).getFontRenderContext(); . g.setColor(textColor); int xTextTemp = rX-(int)boundsTemp.getX(); int yTextTemp = rY-(int)boundsTemp.getY(); g.drawString(tempString, xTextTemp, yTextTemp); int xTextCond = rX-(int)boundsCond.getX(); int yTextCond = rY-(int)boundsCond.getY() + (int)boundsTemp.getHeight(); g.drawString(condStr, xTextCond, yTextCond); The fillRect method allows you to draw a rectangle filled with the specified color.
. Rectangle2D boundsTemp = font.getStringBounds(tempString, frc); Rectangle2D boundsCond = font.getStringBounds(condStr, frc); int wText = Math.max((int)boundsTemp.getWidth(), (int)boundsCond.getWidth()); int hText = (int)boundsTemp.getHeight() + (int)boundsCond.getHeight(); int rX = (size.width-wText)/2; int rY = (size.height-hText)/2; g.setColor(Color.LIGHT_GRAY); g2.fillRect(rX, rY, wText, hText); .
Try to modify the WeatherWizard demo to alter the graphical content. For example, use the fillRoundRect method instead of fillRect or apply another font size in the setFont method. Find the complete code for this applet in the WeatherWizard.java file. The demo also requires the following images: weather-cloud.png , weather-rain.png , weather-snow.png , and weather-sun.png located in the images directory.
Drawing Arbitrary Shapes
You have already learned how to draw most of shapes represented in the java.awt.geom package. To create more complicated geometry, such as polygons, polylines, or stars you use another class from this package, GeneralPath .
This class implements the Shape interface and represents a geometric path constructed from lines, and quadratic and cubic curves. The three constructors in this class can create the GeneralPath object with the default winding rule ( WIND_NON_ZERO ), the given winding rule ( WIND_NON_ZERO or WIND_EVEN_ODD ), or the specified initial coordinate capacity. The winding rule specifies how the interior of a path is determined.
public void paint (Graphics g)
To create an empty GeneralPath instance call new GeneralPath() and then add segments to the shape by using the following methods:
- moveTo(float x, float y) – Moves the current point of the path to the given point
- lineTo(float x, float y) – Adds a line segment to the current path
- quadTo(float ctrlx, float ctrly, float x2, floaty2) – Adds a quadratic curve segment to the current path
- curveTo(float ctrlx1, float ctrly1, float ctrlx2, float ctrly2, float x3, floaty3) – Adds a cubic curve segment to the current path
- closePath() – Closes the current path
The following example illustrates how to draw a polyline by using GeneralPath :
// draw GeneralPath (polyline) int x2Points[] = ; int y2Points[] = ; GeneralPath polyline = new GeneralPath(GeneralPath.WIND_EVEN_ODD, x2Points.length); polyline.moveTo (x2Points[0], y2Points[0]); for (int index = 1; index < x2Points.length; index++) < polyline.lineTo(x2Points[index], y2Points[index]); >; g2.draw(polyline);
This example illustrates how to draw a polygon by using GeneralPath :
// draw GeneralPath (polygon) int x1Points[] = ; int y1Points[] = ; GeneralPath polygon = new GeneralPath(GeneralPath.WIND_EVEN_ODD, x1Points.length); polygon.moveTo(x1Points[0], y1Points[0]); for (int index = 1; index < x1Points.length; index++) < polygon.lineTo(x1Points[index], y1Points[index]); >; polygon.closePath(); g2.draw(polygon);
Note that the only difference between two last code examples is the closePath() method. This method makes a polygon from a polyline by drawing a straight line back to the coordinates of the last moveTo .
To add a specific path to the end of your GeneralPath object you use one of the append() methods. The ShapesDemo2D.java code example contains additional implementations of arbitrary shapes.