- Implementing HTML and CSS to Create a Content Division Line [duplicate]
- Create line to divide content with HTML and CSS [duplicate]
- Dividing line in horizontal menu
- How to divide the input into two in single line
- CSS or what? Forcing the text split into multiple lines
- HTML Line Dividers
- Conclusion
- How to create a divider in HTML using the hr tag
- Learn JavaScript for Beginners 🔥
- About
- Search
- Tags
- CSS Line Dividor
- CSS Line Dividor
Implementing HTML and CSS to Create a Content Division Line [duplicate]
Additional information on CSS grid can be found in the provided link. Consider the following solutions for adding vertical dividing lines between menu items in CSS style: Solution 3 involves including a specific line, which is my preferred method. Alternatively, Solution 4 suggests using flexbox and drawing the vertical line. The question pertains to adding vertical dividing lines between menu items, which can be effectively achieved using CSS grid for content layout.
Create line to divide content with HTML and CSS [duplicate]
I’m attempting to split the webpage’s content into two sections: one for the navbar on the left side and the other for the main content on the right side. I’m encountering difficulties while using the hr tag to create a line that separates the two parts.
beautypg.com
Any suggestion? Thanks for reading.
Solution 1:
Presenting a contemporary flexbox layout that utilizes the minimal layout technique.
.split-layout < display: flex; flex-direction: column; >@media screen and (min-width: 30em) < .split-layout < flex-direction: row; align-items: stretch; >>.split-layout__item < flex: 1; >@media screen and (min-width: 30em) < .split-layout__item < padding-left: 1em; >.split-layout__item:first-child < padding: 0; >>.split-layout__divider < display: flex; flex-direction: row; align-items: center; >@media screen and (min-width: 30em) < .split-layout__divider < flex-direction: column; >>.split-layout__label < padding: 1em; >.split-layout__rule < flex: 1; border-style: solid; border-color: rgba(255, 255, 255, 0.3); border-width: 1px 0 0 0; >@media screen and (min-width: 30em) < .split-layout__rule < border-width: 0 1px 0 0; >>/* =DEMO STYLES --------------------------------------------------------------------*/htmlNavigation
Lorem ipsum dolor sit amet, consectetur adipisicing elit. Id eos esse voluptates cupiditate expedita inventore, temporibus? In beatae hic tenetur molestiae facilis illo neque esse repellendus harum. A, consequatur, labore.
Content
Lorem ipsum dolor sit amet, consectetur adipisicing elit. Id eos esse voluptates cupiditate expedita inventore, temporibus?
CSS grid. CSS grid is highly beneficial for organizing content layout.
body < font-family: Tahoma, sans-serif; >.grid < display: grid; grid-template-areas: 'cell-navbar cell-content cell-content cell-content'; >.cell-navbar < grid-area: cell-navbar; border-right: thin solid #ccc; >.cell-content < grid-area: cell-content; >body, main, .cell-navbar, .cell-contentFor further information about CSS grid, click here.
Consider incorporating the following line into your CSS style.
#left_content, #right_contentmy preferred way of doing this,
Instead of using border-right and #left_content to draw the vertical line, utilize flexbox.
.container< display:flex >#left_content< border-right: solid 1px #333; padding-right:20px; >#right_contentHorizontal line and right way to code it in html, css, I need to draw a horizontal line after some block, and I have three ways to do it: 1) Define a class h_line and add css features to it, like #css .hline < width:100%; …
Dividing line in horizontal menu
Is there a method to insert vertical dividing lines amidst the items? Appreciate your assistance.
To position them, utilize the :after .
#menu > li:after < content: '|' /* or url('divider.png'); */ >#menu > li:last-child:afterIt is possible that this is what you are looking for. However, please be aware that the support for your browser may be somewhat limited to newer versions. The good news is that the degradation is handled gracefully and will not cause any issues on older browsers.
- "Demo: http://jsbin.com/awarih/edit#html,live" - "Demo featuring an image: http://jsbin.com/awarih/2/edit#html,live
What do you call this gray line thing in HTML, Add a comment. 6. this is called a horizontal rule and can be created using the following:
. However, the fact that the line is gray is online its …
How to divide the input into two in single line
The code below retrieves input fields values individually, however, I would like to display two input fields on a single line.
updated html
Replace display: block with display: inline-block and place each desired input field in separate div 's to group them together.
Html - divide the page in three parts using div tag, I am trying to get the below layout for more than 1.5 hours but still can't get the right solution. well if there are any duplicates then forgivve me for …
CSS or what? Forcing the text split into multiple lines
When the text reaches the maximum width of #div , it is necessary to split it into multiple lines.
Is there a way to achieve this? Whenever I attempt to display data containing 200 characters without any spaces, the result I obtain is as follows:
The outcome labeled as Result 1 is presented without any spacing.
aaaaaaaaaaaaaaaaaaaaaaaaaaaaaaaaaaaaaaaaaaaaaaaaaaaaaaaaaaaaaaaaaaaaaaaaaaaaaaaaa.The outcome of the second result is as follows, with a single space.
aaaaaaaaaaaaaaaaaaaaaaaaaaaaaaaaaaaaaaaaaaaaaaaaaaaaa (space) aaaaaaaaaaaaaaaaaaaaaaaaaaaaaaaaaaaaaaaaaaaaaaaaaaaaaaaaaaaaaaaaaaaaaaaaaaaaaaaaa.The anticipated outcome is:
aaaaaaaaaaaaaaaaaaaaaaaaaaaaaaaaaaaaaaaaaaaaaaaaaaaaaaaaaaaaaaaaaaaa aaaaaaaaaaaaaaaaaaaaaaaaaaaaaaaaaaaaaaaaaaaaaaaaaaaaaaaaaaaaaaaaaaaa aaaaaaaaaaaaaaaaaaaaaaaaaaaaaaaaaaaaaaaaaaaaaaaaaaaaaaaaaaaaaaaaaaaa aaaaaaaaaaaaaaaaaaaaaaaaaaaaaaaaaaa.Do I need to use the following?
By utilizing word-break: break-all; , the text will automatically wrap at the specified character whenever it surpasses the width of its parent element, eliminating the necessity for additional spacing or breakpoints.
As previously mentioned in the approved response, employ the following:
The W3 specification indicates that word-break: break-all is intended for enforcing a specific behavior with CJK (Chinese, Japanese, and Korean) text, while word-wrap: break-word is a more general behavior that is not CJK-aware.
Options for the Word-Break Property are available on W3Schools.
normal Default value. Break words according to their usual rules break-all Lines may break between any two letters keep-all Breaks are prohibited between pairs of letters initial Sets this property to its default value. Read about initial inherit Inherits this property from its parent element. Read aboutAn illustration of work in action:
Create a smaller div and apply CSS using the text-align: justify and word-break:break-all; .
In the CSS file, utilize the 'div' element to establish the width of a div.
And then in the html file add
Html - CSS or what? Forcing the text split into multiple, As already stated in the accepted answer use the following: word-break:break-all; The W3 specification that talks about these seem to suggest that …
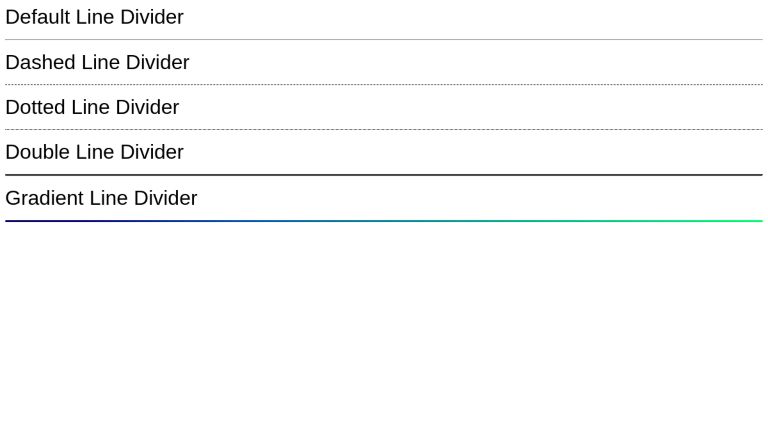
HTML Line Dividers
The content on a webpage, especially if academic in nature, can be composed of multiple topics and their subtopics. A decent way to indicate the transitions between topics is to use a visual separator element. The purpose of the separator element is to inform the user that the current topic/subtopic is concluding, and now a new topic will be discussed. For example - scenes of a play, scenarios in a novel, paras in an essay. You may be writing a blog on multiple concepts, and when one concept ends, you need a visual separator, etc.
The horizontal rule, by default, is a plain horizontal line with the following default styles.
You can see it in action here. This element is by definition, a full fledge HTML element like any other (p, div, etc) and supports Global Attributes and Global Events. Hence, you can style its appearance just like any other customizable element having a block display.
Let’s see some basic examples of dividers.
Using the hr tag plainly will render the default styled divider as seen above.
Default Line Divider
Dashed Line Divider
Dotted Line Divider
Double Line Dividerhr.dashed < border-top: 1px dashed; border-bottom: none; >hr.dotted < border-top: 1px dotted; border-bottom: none; >hr.doubleBy now you would have observed that divider is nothing but a plain HTML element with border(s) and no inner content. This is why we used the border-top property to apply different styles (which accordingly were different values of supported borders). And we applied border-bottom: none; style to remove repetition of the border which in this case increases the thickness of the border. This style is also the fix for a faint bottom line when the output is seen using Chrome.
So far, we have seen limited border styling options as we relied on the border value. What if you want a custom-themed divider that is visually better aligned with a vibrant theme of your site? The answer is making your own dividers. Let’s see how.
Divider is nothing but a partitioning element that has specific dimensions. You can create an empty div with the dimensions you need, and give it a background of your choice. Since now you’ll be leveraging the background property, you get all the amazing flexibility and power of this property. For instance, let’s build a divider with a gradient.
The style options with background property are infinite. You can develop all that goes with your theme. You can even use background images depending on your use case. Using an image might not be a great option, but it is nevertheless on the table of possibilities.
Default Line Divider
Dashed Line Divider
Dotted Line Divider
Double Line Divider
Gradient Line Divider
body < font-family: sans-serif; >hr.dashed < border-top: 1px dashed; border-bottom: none; >hr.dotted < border-top: 1px dotted; border-bottom: none; >hr.double < border-top: 3px double; border-bottom: none; >hr.gradientConclusion
Dividers improve the presentation of a website or webpage’s content by marking transitions, topic changes, etc. HTML offers an
tag out-of-the-box for this purpose. We can style
tag with different values of border property to get variations of fundamental types. For increasing the range of style options, we can use empty divs as custom dividers.
UnusedCSS helps website owners remove their unused CSS every day. See how much you could save on your website:
You Might Also Be Interested In
How to create a divider in HTML using the hr tag
Posted on Aug 12, 2021
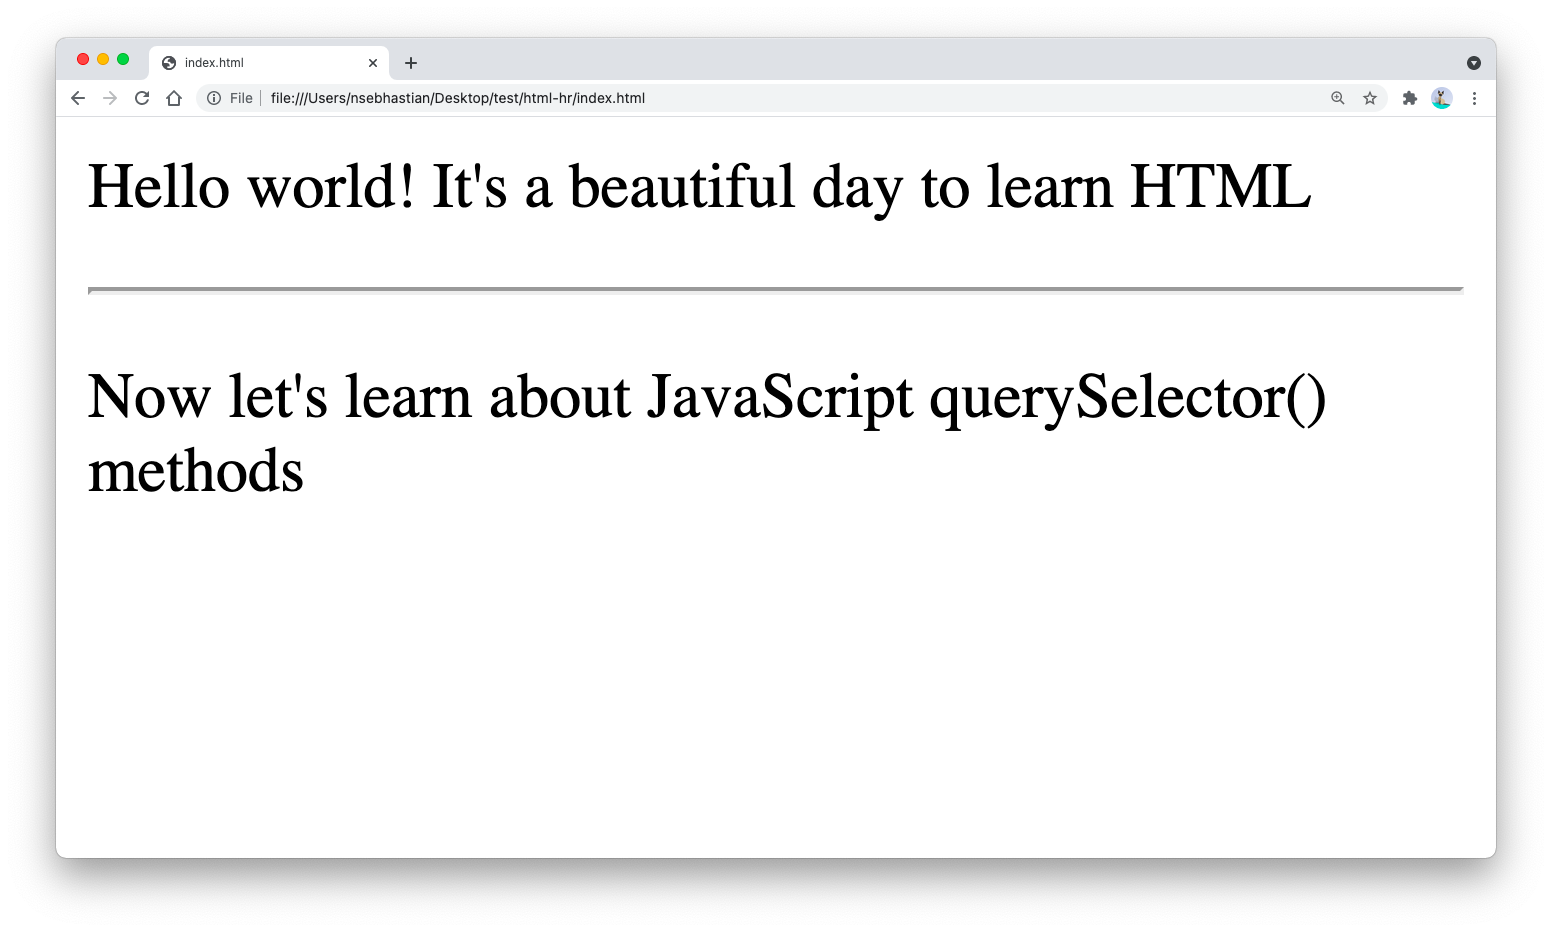
The HTML
tag is used to create a horizontal line with the purpose of dividing sections of a page.
The example below used the
tag to separate two paragraph elements :
Here’s the HTML output on Chrome Browser:
Web browsers tend to style the
tag a bit differently even though it always produces a horizontal line using the border property.
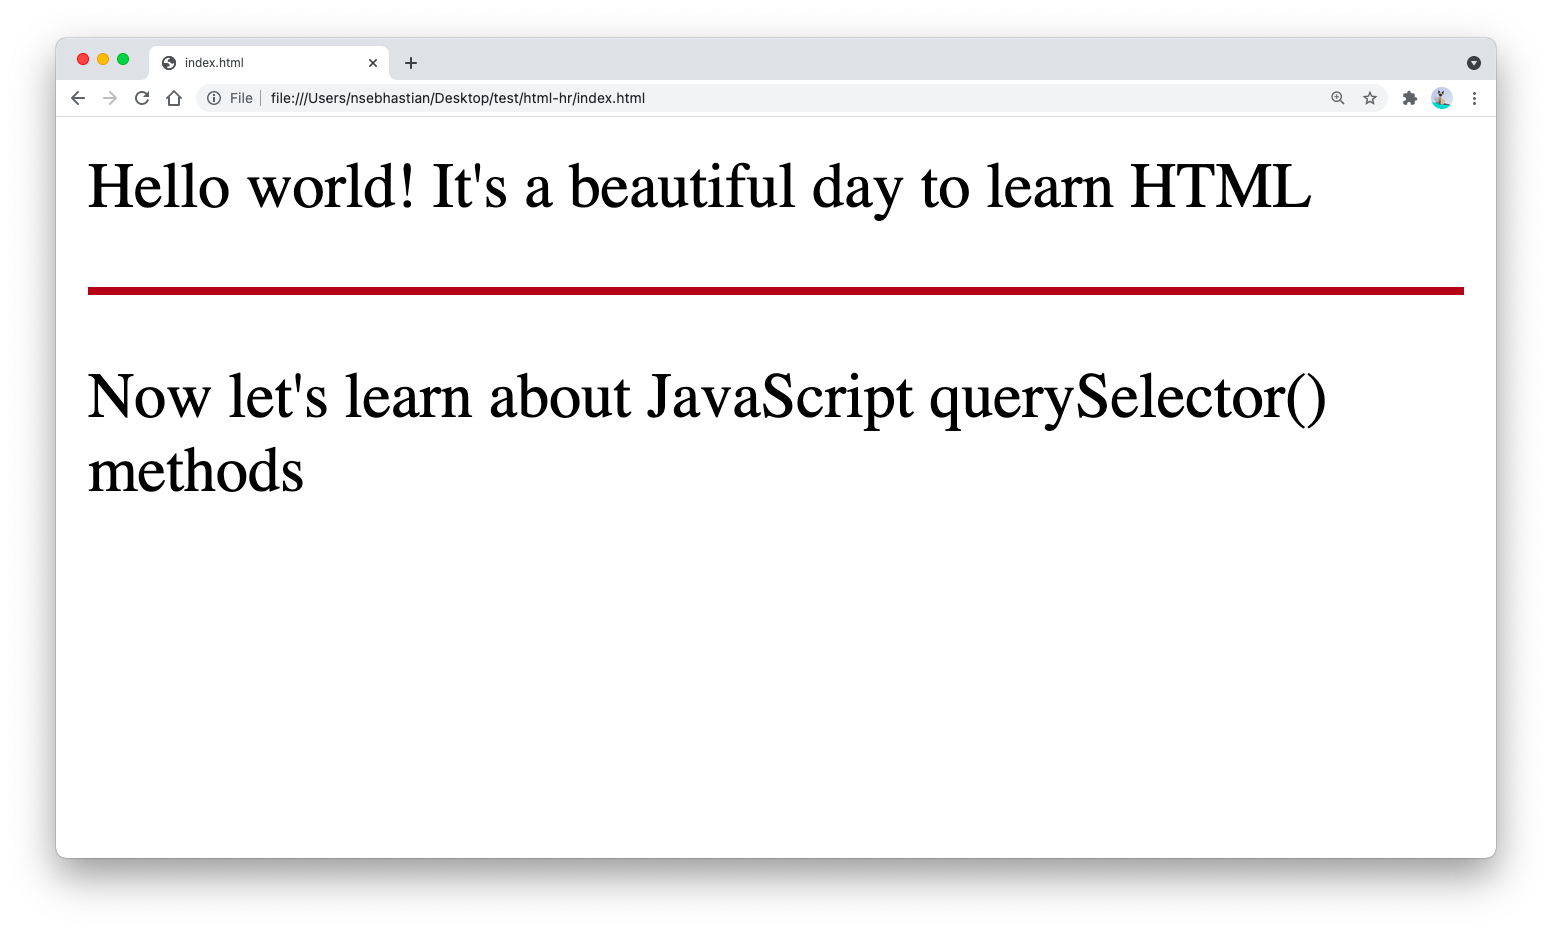
If you want to customize the look of your
tag, you need to normalize the style first by writing border:0 rule for the
tag.
For example, the following style attribute will create a brown-colored two pixels border:
The border is applied only to the top side using border-top property because using the border property would apply the 2px rule both to the top and bottom side. You will have a four pixels border instead of two pixels.Here’s how it looks on Chrome browser:
You can use any valid border-style attribute to style your
tag.
For example, you can create a dashed horizontal line using the following CSS:
You can apply different styles for the
tag by targeting different classes in your CSS rule:And that’s how you create a horizontal divider using HTML and CSS 😉Learn JavaScript for Beginners 🔥
Get the JS Basics Handbook, understand how JavaScript works and be a confident software developer.
A practical and fun way to learn JavaScript and build an application using Node.js.
About
Hello! This website is dedicated to help you learn tech and data science skills with its step-by-step, beginner-friendly tutorials.
Learn statistics, JavaScript and other programming languages using clear examples written for people.Search
Type the keyword below and hit enter
Tags
Click to see all tutorials tagged with:
CSS Line Dividor
In order to make the left side panel expand according to its content, a line or divider is drawn and grows accordingly. This can be achieved by rendering the structure as a layout, where the height of the columns is determined by the individual column with the maximum height.
CSS Line Dividor
I'm attempting to structure two sets of data in a specific manner and have provided a basic prototype for reference.
With the exception of the diving line, I have managed to get everything else working. Despite attempting to set up the entire thing as a table and defining the appropriate border styles, I was unsuccessful in my efforts.
At present, I possess all the required components, except for the central partition, to obtain the desired outcome.
Name: Category: ID:
Name: Category: ID:
Name: Category: ID:
Name: Category: ID: As of now, this code is merely for experimental purposes and hasn't undergone any cleanup. Therefore, kindly disregard any in-line styling present.
I have created an example quickly, and it may not be perfect. You can find the example at this link: https://jsfiddle.net/33pc23w0/2/.
Can you advise on how to create the line in code instead of relying on images? This way, I can ensure that the elements can be adjusted to various sizes without any constraints. Do you have any recommendations specifically for the middle lines?
A rapid fix was implemented by assigning the position of the primary container to relative and by introducing two absolute positions along with appropriately sized borders and dimensions to manage the dividers.
.main-container < width: 800px; position: relative; >.divider-top < position: absolute; width: 150px; height: 150px; left: 300px; border: 2px solid black; border-left: 0px; border-top: 0px; >.divider-bottom < position: absolute; width: 150px; height: 167px; top: 150px; left: 300px; border: 0px; border-left: 2px solid black; >.details_images < display: block; margin: auto; margin-top: 5px; margin-bottom: 5px; border-radius: 10px; >.btn4 < display: inline-block; padding: 6px 12px; margin-bottom: 0; font-size: 14px; font-weight: 400; line-height: 1.42857143; text-align: center; white-space: nowrap; vertical-align: middle; -ms-touch-action: manipulation; touch-action: manipulation; cursor: pointer; -webkit-user-select: none; -moz-user-select: none; -ms-user-select: none; user-select: none; background-image: none; border: 1px solid transparent; border-radius: 4px; width: 150px; height: 50px; >.btn4.focus, .btn4:focus, .btn4:hover < color: #333; text-decoration: none; >.btn4-confirm < color: #fff; background-color: #5cb85c; border-color: #4cae4c; >.btn4-confirm:active
Name: Blah Category: Blah ID: Blah
Name: Blah Category: Blah ID: Blah