- How to enable/disable an element using jQuery and JavaScript? Example
- How to enable/disable text field using JavaScript
- How to enable/disable text field using jQuery?
- How To Disable An Element By ID Using JavaScript?
- What is the HTML “disabled” attribute?
- Disable an element by ID using JavaScript
- Solution 1: Disable an element by ID directly
- Solution 2: Disable an element by ID using setAttribute() method
- Summary
- 5 Ways to Disable Elements In An HTML DIV
- QUICK SLIDES
- TABLE OF CONTENTS
- DOWNLOAD & NOTES
- QUICK NOTES
- EXAMPLE CODE DOWNLOAD
- HOW TO DISABLE
- METHOD 1) DISABLE FORM
- METHOD 2) HIDE IT
- METHOD 3) COVER ANOTHER DIV OVER IT
- METHOD 4) CSS POINTER EVENT
- METHOD 5) DISABLE TEXT HIGHLIGHT
- USEFUL BITS & LINKS
- LINKS & REFERENCES
- THE END
How to enable/disable an element using jQuery and JavaScript? Example
Sometimes we need to enable and disable input elements like text box, radio buttons, or checkboxes, but every time you make a change you need to reload the HTML? The question is, how can we do it dynamically without loading the page? Well, we can use JavaScript, particularly jQuery to do this. An element can be disabled in HTML by setting disable property to true and enabled again by setting disabled=false . By using jQuery, you can grab the element you want to enable or disable and change this property by using the prop() or attr() function, depending upon the version of jQuery you are using.
The prop() function was added in jQuery 1.6 and its the standard way to deal with properties but attr() function does the same job for jQuery 1.5 and lower version so you can use attr() for the same purpose in jQuery version lower than 1.6.
Btw, you can also enable or disable any HTML element e.g. input text field using plain old JavaScript.
All you need to do is get the element by id and set its disabled property to true or false. You can do that when a user clicks on some button by calling a JavaScript function by using the onclick attribute as shown in our first example.
As a Java web developer, I can say that JavaScript is jQuery is a very important skill. Even though the value of jQuery is gone down a little bit due to their frameworks like React, Angular, and Vue JS and recent enhancements on JavaScript itself like ES 6 features, but it is still a force, and valued in the job market.
How to enable/disable text field using JavaScript
In this example, we have an HTML form, text boxes, and a couple of buttons to enable and disable that text field. I am using plain JavaScript, no jQuery yet to accomplish the task.
1) Register enable() and disable() function with buttons to enable and disable text field
2) Use the getElementById() to grab the text field
3) Set the disabled field to true or false
Here is the sample HTML file with JavaScript solution:
html> head> title>How to enable or disable input using JavaScript/title> /head> body> h2>Enabling and Disabling text field using JavaScript/h2> form id="registration-form"> Enter your name: input type="text" id="name"> /form> button onclick="disable()">Disable the text field/button> button onclick="enable()">Enable the text field/button> script> function disable() < document.getElementById("name").disabled = true; > function enable() < document.getElementById("name").disabled = false; > /script> /body> /html> When you click the button «Disable the text field», the disable() function will be called and disabled property of text field will be set to true, which means you cannot enter text on this text field anymore, it’s disabled.
You can re-enable the text field by clicking on «Enable the text field» button, it will call the enable() function which will reset the disabled property to false.

How to enable/disable text field using jQuery?
Here is the jQuery code to do the same thing. In this example, we have used prop() function, if you are running on jQuery 1.5 or lower version, just replace the prop() with attr() and it should work fine.
Similar to the previous example, we have two buttons btn_enable and btn_disable to enable and disable the text field.
We attach the event handler using click() function at $(document).ready() which called after page is loaded. On event handler we grab the text field by using jQuery ID selector e.g. $(«#name») and then called prop(«disabled», false») to disable this text field.
When a user calls the enable button we just set the disabled property to true by calling prop(«disabled», true) . This enabled the text field again.
Remember, you cannot enter text into a disabled text field, again.
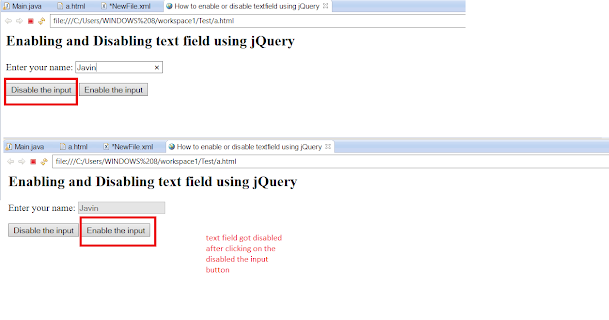
html> head> title>How to enable or disable textfield using jQuery/title> /head> body> h2>Enabling and Disabling text field using jQuery/h2> form id="registration-form"> Enter your name: input type="text" id="name"> /form> button id="btn_disable" >Disable the input/button> button id="btn_enable" >Enable the input/button> script src="http://code.jquery.com/jquery-1.6.2.min.js">/script> script> $(document).ready(function() < $("#btn_enable").click(function()< $("#name").prop("disabled", false); >); $("#btn_disable").click(function()< $("#name").prop("disabled", true); >); >); /script> /body> /html> You can test this by running in your browser. Just remember, not to call removeProp() function to enable the button again e.g. removeProp(«disabled») because it will remove the «disabled» attribute from the text field and it won’t be possible to disable it again in the future, instead just use prop(«disabled», false) method.
Anyway, here is the screenshot of how it will look like when you open the page in a browser like Edge or Chrome.
That’s all about how to enable and disable an element using JavaScript and jQuery. In this example, we have disabled the text field and re-enabled again but you can use this technique to enable/disable any HTML element. You can use JavaScript or jQuery based upon what is used in your project.
My suggestion is to be consistent. If you are already using JavaScript then use that, but if you are using jQuery then it’s better to do it as jQuery way.
- Top 5 jQuery Books Every Web Developer Should Read? (see here)
- How to get current URL Parameter using jQuery? (solution)
- How to use multiple jQuery Datepicker element in one HTML page? (answer)
- 10 Examples of jQuery selectors for Web Developers (tutorial)
- How to redirect web page using jQuery code? (answer)
- 3 Ways to parse HTML using JSoup in Java? (solution)
- How to reload/refresh a page using jQuery? (answer)
- How to prevent double submission of POST data using JavaScript? (solution)
- How to modify multiple elements in one go in jQuery? (example)
- How to check and uncheck checkboxes using jQuery? (tutorial)
How To Disable An Element By ID Using JavaScript?

In web programming, many situations require enabling/disabling buttons, inputs, checkboxes, etc. This article will show you one of several solutions to prevent users from using HTML elements by setting the “disabled” Attribute in JavaScript. That’s disable an element by ID using JavaScript.
What is the HTML “disabled” attribute?
When applied to an element, the “disabled” attribute renders the element unusable. “Disabled” attribute can be set to prevent the user from using the element until the required conditions are met (like pressing a button, selecting a checkbox, etc.).
JavaScript can then delete the “disabled” attribute and make the element usable by the user.
The following elements can apply to the “disabled” Attribute: Button, fieldset, input, optgroup, option, select, and textarea.

This example depicts a disabled button.
Disable an element by ID using JavaScript
This article will show two solutions to disable an element by ID using JavaScript.
Solution 1: Disable an element by ID directly
First, we use the getElementById() method to choose the element with the specified ID. After identifying the element that needs to be disabled, we’ll set the “disabled” attribute to true.
Solution 2: Disable an element by ID using setAttribute() method
To disable an element by ID using the setAttribute() method. First, we use the getElementById() method to choose the element with the specified ID. Then, we can set the “disabled” attribute on the selected element by using the setAttribute() method.
The setAttribute() method in JavaScript creates an attribute’s new value.
element.setAttribute(name, value)name: The name of the attribute to the set value: The new value of that attributeFirst, call the setAttribute() method on the element. Then we set the first parameter to “disabled” and the second parameter to an empty string (“”).
Because when the value of the “disabled” attribute is set to an empty string (“”), the “disabled” attribute will be true, and the selected element will be disabled.
Summary
This article has shown you how to disable an element by ID using JavaScript. I hope the information in this article is helpful to you. If you have any questions, please comment below. Thank you for your reading!
Maybe you are interested:

Hello, my name’s Bruce Warren. You can call me Bruce. I’m interested in programming languages, so I am here to share my knowledge of programming languages with you, especially knowledge of C, C++, Java, JS, PHP.
Name of the university: KMA
Major: ATTT
Programming Languages: C, C++, Java, JS, PHP
5 Ways to Disable Elements In An HTML DIV
Welcome to a tutorial on how to disable elements inside an HTML DIV.
- var all = document.querySelectorAll(«#container select, #container input, #container textarea, #container button»);
- for (let el of all)
Otherwise, when it comes to “disabling a DIV”, that could literally mean anything. From disabling a form placed inside it, to stopping videos, to preventing copy-paste, preventing text highlight, to removing on click events – There is no “universal way to disable everything”.
Just how do we “blanket disable” all of these then? Well, there are still a couple of tricks and alternatives – Let us walk through some examples in this guide, read on!
ⓘ I have included a zip file with all the example source code at the start of this tutorial, so you don’t have to copy-paste everything… Or if you just want to dive straight in.
QUICK SLIDES

TABLE OF CONTENTS
DOWNLOAD & NOTES
Firstly, here is the download link to the example code as promised.
QUICK NOTES
If you spot a bug, feel free to comment below. I try to answer short questions too, but it is one person versus the entire world… If you need answers urgently, please check out my list of websites to get help with programming.
EXAMPLE CODE DOWNLOAD
Click here to download the source code, I have released it under the MIT license, so feel free to build on top of it or use it in your own project.
HOW TO DISABLE
All right, let us now get into the various ways to disable an entire div in HTML.
METHOD 1) DISABLE FORM
Name: Email: Random Story: Cate or Doge: // (B1) GET ALL FORM ELEMENTS var all = document.querySelectorAll("#container select, #container input, #container textarea, #container button"); // (B2) DISABLE ALL for (let el of all) < el.disabled = true; >// (B3) TO ENABLE // for (let el of allform) - Grab all the form elements ( ) using document.querySelectorAll() .
- Then disable them accordingly with ELEMENT.disabled = true .
METHOD 2) HIDE IT
HELLO WORLD! My name na Uvuvwevwevwe Onyetenyevwe Ugwemubwem Ossas.
This is not really “disable”, but to “hide”. If we don’t have any good use for a particular section, then why add to the confusion by showing it? Just hide the and show it only when necessary.
METHOD 3) COVER ANOTHER DIV OVER IT
/* (A1) SET RELATIVE POSITION ON CONTAINER */ #container < position: relative; >/* (A2) OVERLAY OVER CONTAINER */ #overlay CONTENTS INSIDE
- We can cover an extra layer of over the container .
- This will block the bottom , effectively preventing all kinds of interactions with it – Forms, videos, clicks, highlights, etc…
- It is done using just some simple CSS.
- The container must be set to relative or absolute position first.
- To place the overlay over the container – position:absolute; top:0; width:100%; height:100%;
METHOD 4) CSS POINTER EVENT
#containerCONTENTS INSIDEYep, pointer-events: none is all it takes to disable all the button clicks inside a container. Take note this will not work on ancient browsers that do not support pointer-events though.
METHOD 5) DISABLE TEXT HIGHLIGHT
.nohighlight *::selection < background: none; >.nohighlightRANDOM CONTENTSLorem ipsum dolor sit amet, consectetur adipiscing elit. Aenean sit amet volutpat diam.
RANDOM CONTENTS
Lorem ipsum dolor sit amet, consectetur adipiscing elit. Aenean sit amet volutpat diam.
If you just want to disable the highlighting of text to prevent people from copying, simply use CSS user-select: none to do it. .nohighlight *::selection < background: none >is kind of an extra to not show highlight background colors.
USEFUL BITS & LINKS
That’s all for this guide, and here is a small section on some extras and links that may be useful to you.
LINKS & REFERENCES
THE END
Thank you for reading, and we have come to the end of this guide. I hope that it has helped you with your project, and if you want to share anything with this guide, please feel free to comment below. Good luck and happy coding!