- Интересные -webkit CSS свойства
- -webkit-text-security
- Syntax
- Formal definition
- Formal syntax
- Examples
- Obscuring a text input
- HTML
- CSS
- Result
- Specifications
- Browser compatibility
- See also
- Found a content problem with this page?
- MDN
- Support
- Our communities
- Developers
- Input Text [Everything You Should Know]
- Input [type=»text»]
- A Placeholder Text
- The Result:
- Focus State
- The Result:
- Autocomplete State
- The Result:
- Validation States
- The Result:
- Extra Tip
- Good Examples
- Closing Word
- Styling Form Controls Using Pseudo Classes
- variations
- element
- Autofill
- Date input type
- Form validation message
- WebKit r82179 or older
- Example
- WebKit r82180 or later
- Example
- Вложения (3)
Интересные -webkit CSS свойства
Если вы знаете о том, что WebKit умеет изменять вид тэга SPAN на кнопку, или на поле ввода, или если вы знаете каким свойством можно диктовать поведение элемента в момент тапа по нему, то вам не сюда.
И так, есть несколько очень интересных свойств, которые присущи движкам WebKit. Например, есть свойство
-webkit-touch-callout
Это свойство позволяет вам диктовать поведение браузера в момент тапа и удержания пальца на ссылке. По умолчанию в браузерах всплывает окно, содержащее информацию о ссылке. По умолчанию у этого свойства выставлено значение default, но установив значение none окошко с информацией всплывать не будет.
Это свойство полезно применять в тех случаях когда на ссылку повешен какой-либо JavaScript/AJAX.
-webkit-user-drag
Свойство указывает на то, что во время перетаскивания блока двигаться должен именно блок, а не содержимое внутри него.
/* ничего не перетаскивает */ .content p.noDrag < -webkit-user-drag: none; >/* перетаскивается весь элемент а не контент внутри */ .sidebar div.elDrag
-webkit-appearance
Задавая это свойство элементу вы можете определять то, как будет выглядеть элемент SPAN. Например, как radio button:
Всего таких значений около 50. Весь список можно посмотреть тут.
-webkit-text-security
Оказывается, маску при вводе пароля можно изменять. Например, вместо кружков можно отображать квадраты.
-webkit-user-select
Определяет что пользователь может выбирать внутри элемента.
На этом все. Это был вольный перевод данной статьи.
UPD. Уточнение по свойству -webkit-touch-callout.
-webkit-text-security
Non-standard: This feature is non-standard and is not on a standards track. Do not use it on production sites facing the Web: it will not work for every user. There may also be large incompatibilities between implementations and the behavior may change in the future.
Syntax
-webkit-text-security: circle; -webkit-text-security: disc; -webkit-text-security: square; -webkit-text-security: none; /* Global values */ -webkit-text-security: inherit; -webkit-text-security: initial; -webkit-text-security: revert; -webkit-text-security: revert-layer; -webkit-text-security: unset;
Formal definition
Formal syntax
Examples
Obscuring a text input
Try typing in the field below. If your browser supports this property, the characters should be visually replaced with squares.
HTML
label for="name">Name:label> input type="text" name="name" id="name" />
CSS
input -webkit-text-security: square; > Result
Specifications
Browser compatibility
BCD tables only load in the browser
See also
Found a content problem with this page?
This page was last modified on May 26, 2023 by MDN contributors.
Your blueprint for a better internet.
MDN
Support
Our communities
Developers
Visit Mozilla Corporation’s not-for-profit parent, the Mozilla Foundation.
Portions of this content are ©1998– 2023 by individual mozilla.org contributors. Content available under a Creative Commons license.
Input Text [Everything You Should Know]
Inputs are sooo important in the user experience design and it’s crucial that their style is perfectly transferred from the design to the page. It’s no secret that for a presentation on a web page you need CSS but the tricky part is how to make it as good as possible. Inputs have more variations, states and things about them than any other element in HTML so, let’s cover everything a one should know about the post input type text. Let’s bust the input!
Input [type=»text»]
Input text presents an empty square where the text is expected. It is a pretty common element and, in most cases, presents a white element surrounded by a color border.
It is a good practice to add a placeholder text inside of it and to have a label outside of it. 
Default input text 
Default input text in focus state 
Default placeholder text 
Default autofill state To add the desired style to the input there are a few standard options and a few special ones. If there is a label for the input, it is added in the label element next to the input, and its for attribute has the same value as the id attribute of the linked input element. The label element can be styled like the standard HTML text element. For input, it is standard to change dimensions, border , background-color , border-radius and font options. It is not standard to style a placeholder text, a focus, an autofill and a validation state. These non-standard options will be explained in the next article and after that, some examples of different options used will be presented.
A Placeholder Text
For styling a placeholder text set with placeholder attribute, ::placeholder pseudo-element is used. All text styling is supported (font, color, background, opacity, word-spacing, text-transform, line-height. ). In Firefox browser all placeholders have an opacity value applied so to reset that value it is necessary to define opacity.
::-webkit-input-placeholder < /* Chrome/Opera/Safari */ . >::-moz-placeholder < /* Firefox 19+ */ opacity:1; . >:-ms-input-placeholder < /* IE 10+ */ . >:-moz-placeholder < /* Firefox 18- */ . > The Result:

Focus State
The focus state is important for user experience and it exists on every input element. It is used for indication of the currently targeted element. This state is presented with a blue border around an element and in CSS it is selected with pseudo class :focus . The blue border around the focused element is added with the default line outline: auto 5px -webkit-focus-ring-color and that default color value is defined in a browser theme. In some cases, this presentation annoy designers of the element and some people choose to disable it by next code:
This is a very bad practice and it should be avoided. Instead of neutralizing style for the focus state, you can style it in your own way and it doesn’t need to include an outline. Example:
The Result:

It is a nice touch to add a transition in this case (and any other!).
Autocomplete State
Webkit browsers provide a setting that allows users to automatically fill in details for common form fields. You have seen this when completing a form that asks for things like name, address, and email. Autocomplete fields have default yellow background and that is something that can interfere with design, and also that is something that can easily be changed (in this mode you can also change text color).
:-webkit-autofill < -webkit-box-shadow: 0 0 0 1000px mintcream inset !important; >:-webkit-autofill
The Result:

Validation States
There are two relatively new pseudo-classes :valid and :invalid . These pseudo-classes are useful for highlighting success and fail for the user. It is common to see green when content is valid and red if it’s not, so now you can easily define that with CSS. Old versions of browsers do not support it, keep that in mind.
box-shadow option is used instead of the border-left because there is a visual problem in the case when borders of one element have different style or color
The Result:

Extra Tip
One more problem with input fields is one on the iOS which appears because default styling is added. There are some extra rounded corners and dropshadows. The best way I found to fix this is one from daretothink blog:
-webkit-appearance: none;
border-radius: 0;
Good Examples


Closing Word
Work on input field design is something that you can always do and something that your user will surely appreciate. Once again I urge you to use transition in styling. This article is originally published on Kolosek Blog.
Styling Form Controls Using Pseudo Classes
WebKit provides a way to give CSS styles to form controls. Some form controls can be styled through pseudo classes. This article will illustrate how we can customize their appearances using the pseudo classes.
Note: These pseudo classes are not standardized and we might change the behavior in the future.
By giving » -webkit-appearance: none; «, element creates two internal elements for its rendering. Since each internal element has a pseudo class, you can customize the appearance by changing the style of these pseudo classes.
┗ ::-webkit-progress-bar ┗ ::-webkit-progress-value
The default appearance is defined in http://trac.webkit.org/browser/trunk/Source/WebCore/css/html.css . Note that the width value of -webkit-progress-value is overwritten internally by WebKit based on the value atribute.
You can find an example of appearance customization in the WebKit test suite.

As , also creates internal elements for rendering when » -webkit-appearance: none; » is given. Internal elements hierarchy is almost same as
┗ ::-webkit-progress-bar ┗ ::-webkit-meter-optimum-value, ::-webkit-meter-suboptimum-value, ::-webkit-meter-even-less-good-value
Note that the pseudo class of the second element dynamically changes based on element’s value attribute. The width value of -webkit-progress-value is overwritten internally as .
An example is also available for customization in the test suite.

variations
On Mac OS X, WebKit provides multiple built-in appearances for .
- -webkit-appearance: continuous-capacity-level-indicator; (Default)
- -webkit-appearance: discrete-capacity-level-indicator;
- -webkit-appearance: relevancy-level-indicator;
- -webkit-appearance: rating-level-indicator;
You can find the rendering result in the test suite:


element
Removing spin buttons for
input::-webkit-inner-spin-button < -webkit-appearance: none; >input::-webkit-outer-spin-button
Autofill
The autofill color can be styled as of WebKit r113511 or later. The background and foreground colors can be overridden from their defaults.
Date input type
You can disable the native calendar picker by the following code:
::-webkit-calendar-picker-indicator >, false);
Note: This doesn’t work for iOS, Android, and Blackberry.
There are no ways to specify the date format in the text box. It always reflects OS setting.
Also, there are no ways to styling the native calendar picker.
Form validation message
WebKit r82179 or older
A validation message consists of four div elements with pseudo classes and some nodes for message text. You can customize the appearance by changing the style of these pseudo classes.
 ::-webkit-validation-bubble ┣ ::-webkit-validation-bubble-top-outer-arrow ┣ ::-webkit-validation-bubble-top-inner-arrow ┗ ::-webkit-validation-bubble-message ┣ ┃ ┗ Text node for the validation message ┗ Text nodes and
elements for the title attribute value
Example
Suppose that you want to modify colors of the validation messages bubble. Add the following CSS declarations:
::-webkit-validation-bubble-message < color: ; background: none; background-color: ; border-color: ; > ::-webkit-validation-bubble-top-outer-arrow < border-bottom-color: ; > ::-webkit-validation-bubble-top-inner-arrow < border-bottom-color: ; >
WebKit r82180 or later
A validation message consists of four div elements with pseudo classes and some nodes for message text. You can customize the appearance by changing the style of these pseudo classes.
 ::-webkit-validation-bubble ┣ ::-webkit-validation-bubble-arrow-clipper ┃ ┗ ::-webkit-validation-bubble-arrow ┗ ::-webkit-validation-bubble-message ┣ ┃ ┗ Text node for the validation message ┗ Text nodes and
elements for the title attribute value
Example
Suppose that you want to modify colors of the validation messages bubble. Add the following CSS declarations:
::-webkit-validation-bubble-message < color: ; background: ; border-color: ; -webkit-box-shadow: 0 0 0 0; > ::-webkit-validation-bubble-arrow < background: ; border-color: ; -webkit-box-shadow: 0 0 0 0; >
::-webkit-validation-bubble-message < color: #eee; background: #000; border-color: #444; -webkit-box-shadow: 4px 4px 4px rgba(100,100,100,0.5); >::-webkit-validation-bubble-message:before < content: ""; display: inline-block; width: 16px; height: 16px; margin-right: 4px; background: url(http://trac.webkit.org/export/90202/trunk/Source/WebCore/inspector/front-end/Images/errorMediumIcon.png) >::-webkit-validation-bubble-arrow
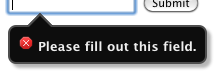
This shows the following bubble:
Вложения (3)
- custom-meter.png ( 8.0 KB ) — added by morrita@google.com 13 лет ago. A screenshot
- custom-progress.png ( 5.6 KB ) — added by morrita@google.com 13 лет ago. A screenshot
- validation-bubble-styled.png ( 5.7 KB ) — added by tkent@chromium.org 12 лет ago.
Download all attachments as: .zip