- CSS Forms
- Styling Input Fields
- Example
- Padded Inputs
- Example
- Bordered Inputs
- Example
- Example
- Colored Inputs
- Example
- Focused Inputs
- Example
- Example
- Input with icon/image
- Example
- Animated Search Input
- Example
- Styling Textareas
- Example
- Styling Select Menus
- Example
- Styling Input Buttons
- Example
- Responsive Form
- Aligned Form
- A Beginner’s Guide To Styling CSS Forms
- Prerequisites for styling CSS Forms
- Creating the HTML boilerplates
- Creating the necessary HTML tags
- How to style common form elements with CSS?
- Appling universal selector
CSS Forms
The look of an HTML form can be greatly improved with CSS:
Styling Input Fields
Use the width property to determine the width of the input field:
Example
The example above applies to all elements. If you only want to style a specific input type, you can use attribute selectors:
- input[type=text] — will only select text fields
- input[type=password] — will only select password fields
- input[type=number] — will only select number fields
- etc..
Padded Inputs
Use the padding property to add space inside the text field.
Tip: When you have many inputs after each other, you might also want to add some margin , to add more space outside of them:
Example
Note that we have set the box-sizing property to border-box . This makes sure that the padding and eventually borders are included in the total width and height of the elements.
Read more about the box-sizing property in our CSS Box Sizing chapter.
Bordered Inputs
Use the border property to change the border size and color, and use the border-radius property to add rounded corners:
Example
If you only want a bottom border, use the border-bottom property:
Example
Colored Inputs
Use the background-color property to add a background color to the input, and the color property to change the text color:
Example
Focused Inputs
By default, some browsers will add a blue outline around the input when it gets focus (clicked on). You can remove this behavior by adding outline: none; to the input.
Use the :focus selector to do something with the input field when it gets focus:
Example
Example
Input with icon/image
If you want an icon inside the input, use the background-image property and position it with the background-position property. Also notice that we add a large left padding to reserve the space of the icon:
Example
input[type=text] <
background-color: white;
background-image: url(‘searchicon.png’);
background-position: 10px 10px;
background-repeat: no-repeat;
padding-left: 40px;
>
Animated Search Input
In this example we use the CSS transition property to animate the width of the search input when it gets focus. You will learn more about the transition property later, in our CSS Transitions chapter.
Example
input[type=text] <
transition: width 0.4s ease-in-out;
>
input[type=text]:focus width: 100%;
>
Styling Textareas
Tip: Use the resize property to prevent textareas from being resized (disable the «grabber» in the bottom right corner):
Example
textarea <
width: 100%;
height: 150px;
padding: 12px 20px;
box-sizing: border-box;
border: 2px solid #ccc;
border-radius: 4px;
background-color: #f8f8f8;
resize: none;
>
Styling Select Menus
Example
select <
width: 100%;
padding: 16px 20px;
border: none;
border-radius: 4px;
background-color: #f1f1f1;
>
Styling Input Buttons
Example
input[type=button], input[type=submit], input[type=reset] <
background-color: #04AA6D;
border: none;
color: white;
padding: 16px 32px;
text-decoration: none;
margin: 4px 2px;
cursor: pointer;
>
/* Tip: use width: 100% for full-width buttons */
For more information about how to style buttons with CSS, read our CSS Buttons Tutorial.
Responsive Form
Resize the browser window to see the effect. When the screen is less than 600px wide, make the two columns stack on top of each other instead of next to each other.
Advanced: The following example uses media queries to create a responsive form. You will learn more about this in a later chapter.
Aligned Form
An example of how to style labels together with inputs to create a horizontal aligned form:
A Beginner’s Guide To Styling CSS Forms

To put in a simple term, an HTML or web forms are mostly referred to as web elements that are designed to enable users to put in their information, which may include their names, age, gender, or credit card number, etc., which is then sent to a server for processing.
Web forms are very useful and are now a very important aspect of web development. Imagine having to travel to a foreign country just to fill out a form because you want to apply for a course in their university.
Since every modern university has a website with a form, students can sit in the comfort of their homes and apply within their convenient time, saving them the time to visit the school in person. Then the school collects this information to decide if the candidate is qualified to study at their university.
Web forms are not limited to schools only, businesses such as Banks, E-Commerce, to mention a few, use web forms to collect information from their customers. This helps them decide how to serve the needs of their customers better.
This is exactly what web forms are designed to do – to collect information for processing.
In this tutorial on CSS Forms, we will take a closer look at how to style forms with CSS and much more.
TABLE OF CONTENTS
- Prerequisites for styling CSS Forms
- How to style common form elements with CSS?
- Appling universal selector
- Applying viewport width (vw) and viewport height (vh)
- Applying hero image
- Centering the form with Flexbox
- Styling the form element
- Styling form logo
- Styling site caption
- Styling the input tag
- Styling forget password
- Style the form button
- Styling the signup option
Prerequisites for styling CSS Forms
By the end of this tutorial on CSS Forms, you would be in a position to build a form in HTML that is styled using CSS. However, a basic knowledge of HTML and CSS is required to understand this blog on CSS Forms better.
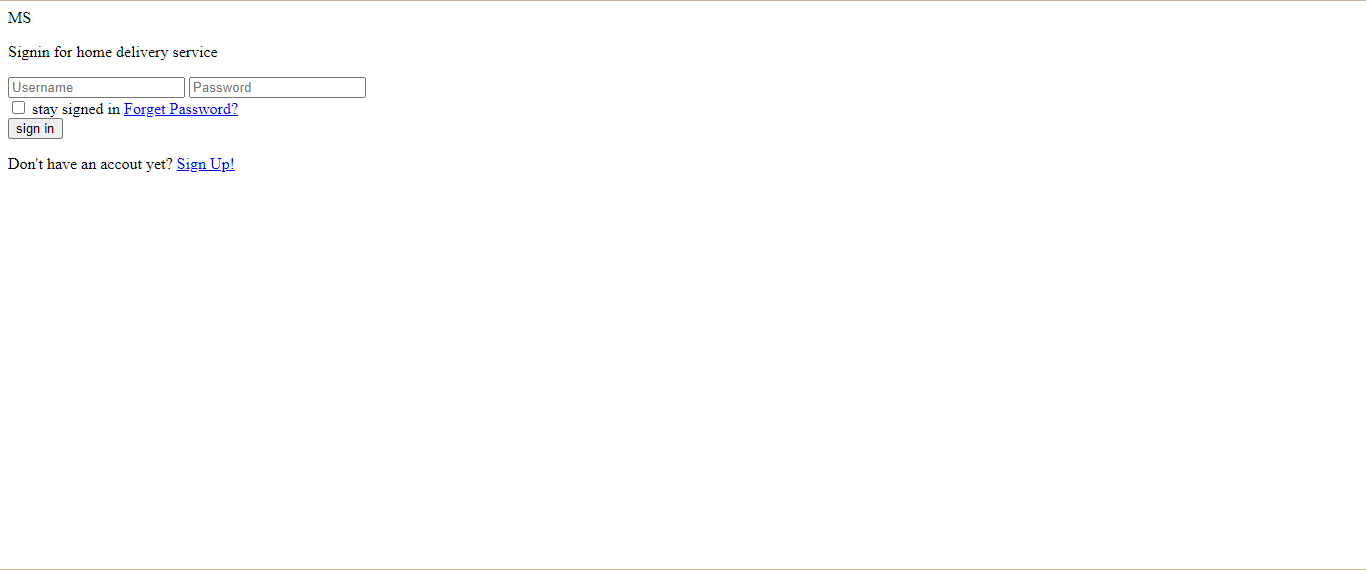
Here is a sample of the finished project of what we’ll be building.

Here is the link to CodePen for this styling CSS Form project’s source code.
Creating the HTML boilerplates
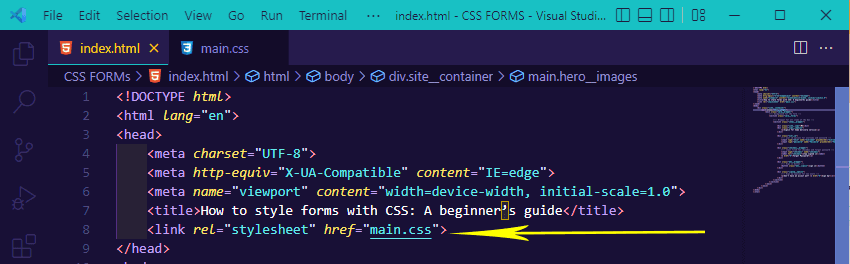
Let’s start by creating the website boilerplates (that is, the HTML code structure for the website). This contains the head and body tags, as seen below.
After creating our HTML boilerplate, now save it as an index.html file, am using VS Code but you can use any IDE of your choice.
Hey here’s a quick free tool called rem-to-px-converter & px-to-rem-converter that will help you convert CSS unit REM values & pixels.
Creating the necessary HTML tags
Now, let’s create the necessary HTML tags for our styling CSS Forms project.
From the code sample above, let’s look at what each tag is supposed to do based on the class names assigned to them.
- site__container: This class is assigned to a div tag that wraps around every other tag within our HTML tags.
- hero__images: This class is assigned to the main tag. This tag is where our hero image will be assigned using CSS.
- card__wrapper: This class is assigned to another main tag nested inside the hero__image tag. This tag wraps around all tags that make up our web form.
- card__forms: This class is assigned to the section tag, which is the main tag for our web form
- Items__wrapper: This tag wraps around the div, input, button, and link tags which are items within the web form.
- site__logo: This is the site logo.
- sign__caption: This tag helps to inform the user why they should sign up/sign in using the web form.
- user_id: This wraps around the input tag where the user has to enter their username and password.
- checkbox__wrapper: This wraps around the input, a (anchor), and labels tag. Here we ask the user if they would like their user id to be saved so that they don’t have to retype them later when they visit the site by clicking the checkbox. We also ask if they have a forgotten password that needs to be recovered.
- btn__wrapper: This wraps around the main button of the form. This is the button the user clicks on that helps them sign in to the site.
- signup__option: This tag wraps around the paragraph tag and a link tag. Here we provide an option for new users who don’t have an account to signup.
Now that we have the HTML boilerplate setup, save it and run it on your favorite browser. The code in this CSS Forms tutorial is run using Google Chrome.
Brower Output:

Your code should look like this. You will notice how plain and simple the website is from our browser output. This is because we have not added the CSS yet. In the next section of this tutorial on CSS Forms, we’ll talk about this.
How to style common form elements with CSS?
Form elements are some of the most common elements on a website. Every site must have these elements, from login forms to search boxes and buttons, to be functional. These elements are sometimes overlooked in design and styling, which may cause them to blend into each other, making your site’s UI look dull. A good way to avoid this is by using CSS to change the appearance of form elements such as text fields and buttons.
Here’s how you can style common CSS Form elements:
- In your Visual Studio Code, create a new file and name it main.css. This is going to be the CSS file. Notice from our HTML file that in the head tag, we have a link tag that points to main.css. This link tag helps us link together both the HTML and CSS files. Any changes to the HTML will affect the CSS file & vice versa.


Appling universal selector
Universal selector is a CSS concept that lets you define styles once and reuse them across the entire website. It means that you need to define only that “one thing” once, and then you can use it on other pages. This saves us a lot of time and makes the code more maintainable.
Type and run the code below for your CSS Forms project: