- How To Write Mobile-first CSS
- What are Mobile-first and Desktop-first approaches?
- Why Code Mobile-first?
- Using Max-width Queries With A Mobile-First Approach
- A Video!
- Conclusion
- Can I send you a few articles that will help you become amazing at CSS?
- Can I send you a few articles that will help you become amazing at CSS?
- Адаптивный и мобильный дизайн с CSS3 Media Queries
- Для начала посмотрим это в действии.
- Другие примеры
- Обзор
- HTML
- HTML5.js
- CSS
- Сбрасываем HTML5 элементы в block
- Описываем основную структуру в CSS
- Шаг 1
- CSS3 Media Queries
- Подключаем Media Queries Javascript
- Подключаем CSS media queries
- Размер экрана меньше 980px (резиновый макет)
- Размер экрана меньше 650px (одноколоночный макет)
- Размер экрана меньше 480px
- Эластичные изображения
- Эластичные встраиваемые видео
- Initial Scale Meta Tag (iPhone)
- Финальное Демо
How To Write Mobile-first CSS
Building responsive websites is a must-have skill for front-end developers today. When we speak about responsive websites, the term mobile-first pops into mind immediately.
We know the importance of designing from a mobile-first perspective. Unfortunately, much less was said about coding from a mobile-first approach.
Today, I’d like to share with you about the mobile-first approach to styling, why it is much better, and how to work its magic.
Note: This article will be immensely helpful if you are learning to build responsive layouts with Susy.
What are Mobile-first and Desktop-first approaches?
Let’s understand the differences between mobile-first and desktop-first before we dive into why the mobile-first approach is better.
A mobile-first approach to styling means that styles are applied first to mobile devices. Advanced styles and other overrides for larger screens are then added into the stylesheet via media queries.
This approach uses min-width media queries.
// This applies from 0px to 600px body background: red; > // This applies from 600px onwards @media (min-width: 600px) body background: green; > >In the example above, will have a red background below 600px. Its background changes to green at 600px and beyond.
On the flipside, a desktop-first approach to styling means that styles are applied first to desktop devices. Advanced styles and overrides for smaller screens are then added into the stylesheet via media queries.
This approach uses max-width media queries.
body background: green; > // This applies from 0px to 600px @media (max-width: 600px) body background: red; > >will have a background colour of green for all widths. If the screen goes below 600px, the background colour becomes red instead.
Why Code Mobile-first?
Code for larger screens is usually more complicated than the codes for smaller screens. This is why coding mobile first helps simplify your code.
Consider a situation where you have a content-sidebar layout for a website. .content takes up a 100% width on mobile, and 66% on the desktop.
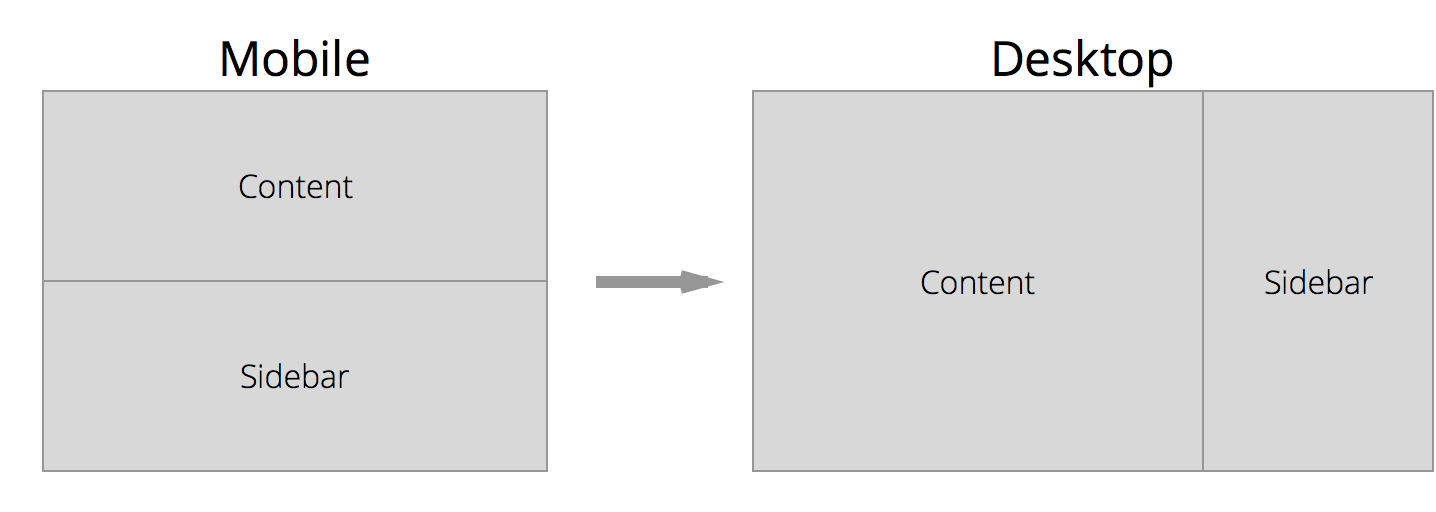
Most of the time, we can rely on default properties to style content for smaller screens. In this case, a has a width of 100% by default.
If we work with the mobile-first approach, the Sass code will be:
.content // Properties for smaller screens. // Nothing is required here because we can use the default styles // Properties for larger screens @media (min-width: 800px) float: left; width: 60%; > >If we go with the desktop-first approach instead, we will have to restore the default properties for smaller viewports most of the time. The Sass code for the same result is:
.content // Properties for larger screens. float: left; width: 60%; // Properties for smaller screens. // Note that we have to write two default properties to make the layout work @media (max-width: 800px) float: none; width: 100%; > >With this one example, we save two lines of code and a few seconds of mind-bending CSS. Imagine how much time and effort this will save you if you worked on a larger site.
Most of the time min-width queries would be enough to help you code a website. There are however instances where a combination of both min-width and max-width queries helps to reduce complications that pure min-width queries cannot hope to achieve.
Let’s explore some of these instances.
Using Max-width Queries With A Mobile-First Approach
Max-width queries come into play when you want styles to be constrained below a certain viewport size. A combination of both min-width and max-width media queries will help to constrain the styles between two different viewport sizes.
Consider a case of a gallery of thumbnails. This gallery has 3 thumbnails in a row on a smaller viewport and 4 items in a row on a larger viewport.
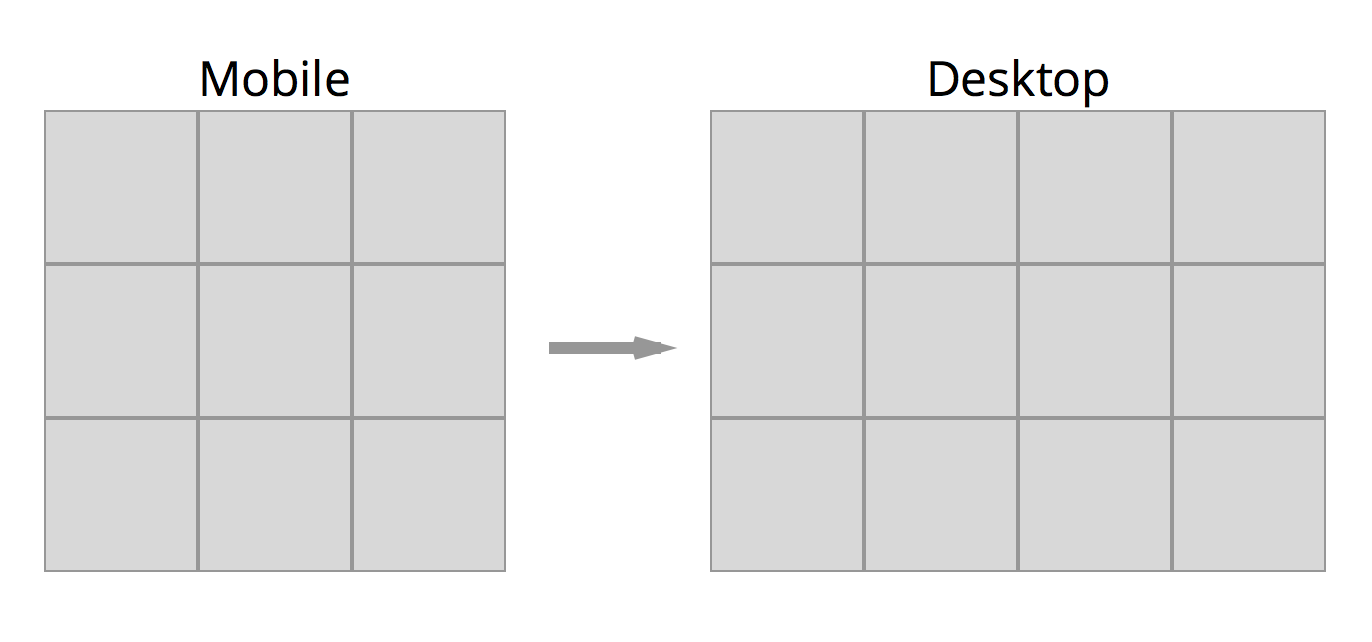
Since there are no spaces between each item, its simple:
.gallery__item float: left; width: 33.33%; @media (min-width: 800px) width: 25%; > >It gets slightly complicated if there are empty spaces within each item.
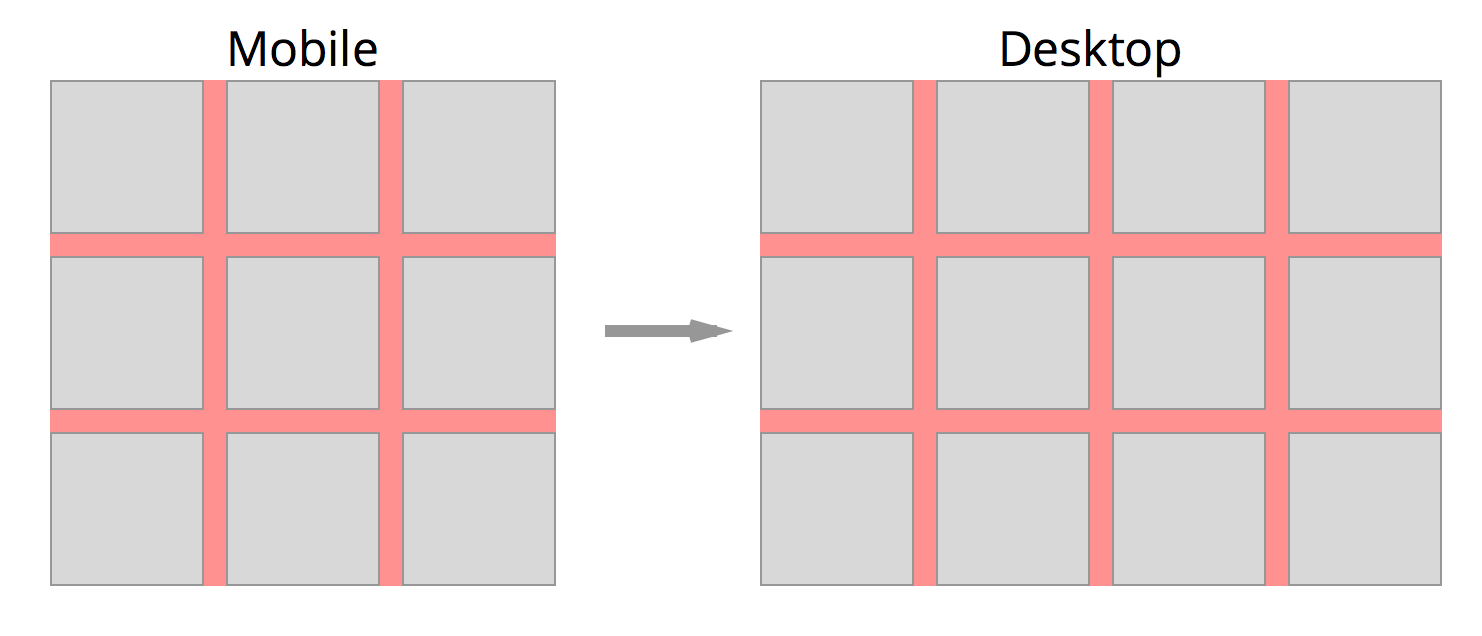
Say these spaces each take up 5% of the width:
.gallery__item float: left; width: 30%; margin-right: 5%; margin-bottom: 5%; >We will also have to give the final (3rd item) on the row a margin-right of 0 to make sure it doesn’t get pushed down into the next column.
.gallery__item float: left; width: 30%; margin-right: 5%; margin-bottom: 5%; &:nth-child(3n) margin-right: 0; > >This code must also work for the case where there are four items in the row. If we go according to the min-width query we had above…
.gallery__item float: left; width: 30%; margin-right: 5%; margin-bottom: 5%; &:nth-child(3n) margin-right: 0; > @media (min-width: 800px) width: 21.25%; // (100% - 15%) / 4 &:nth-child (4n) margin-right: 0; > > >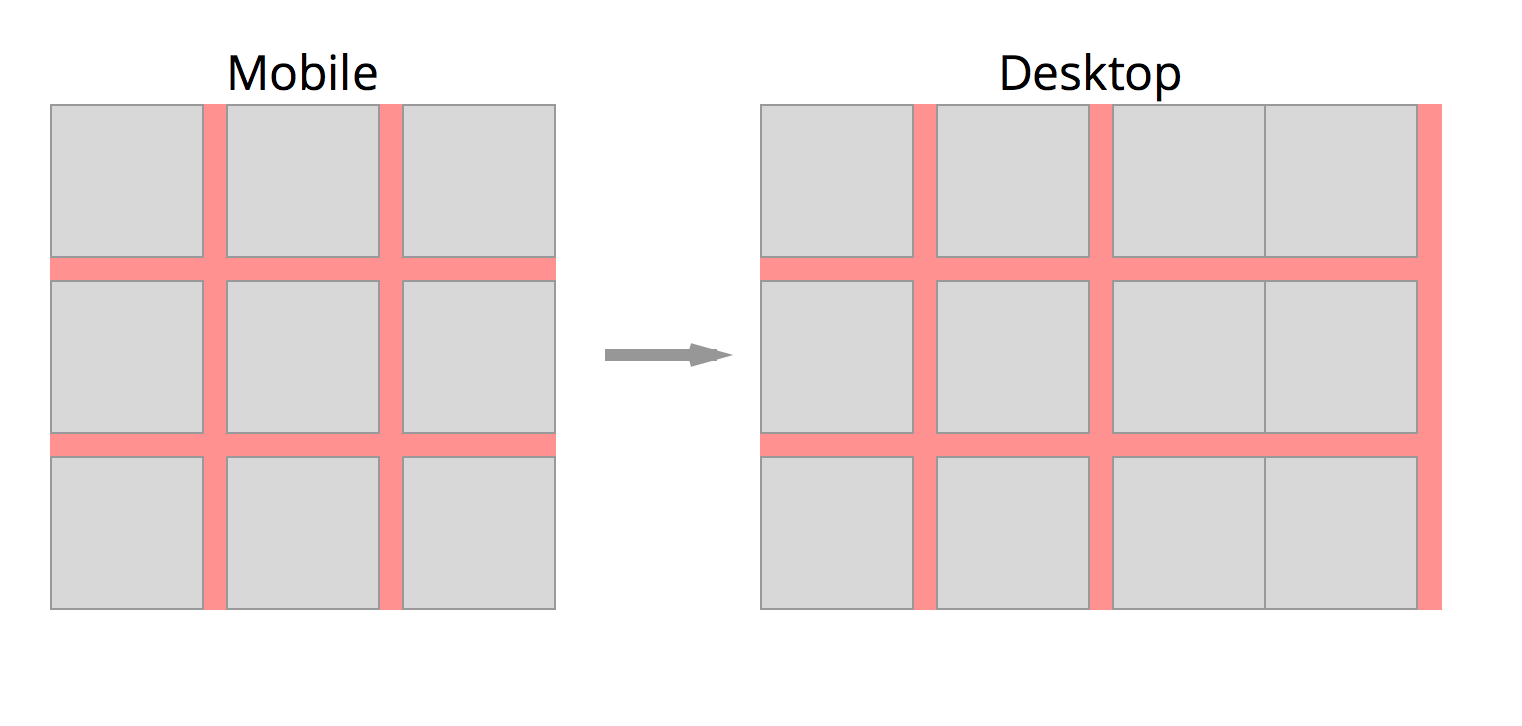
This doesn’t work properly because we specified that every 3rd item should have a margin-right of 0px. This property gets cascaded towards a larger viewport and breaks the pattern we wanted.
We can fix it by resetting the margin-right property of every 3rd item to 5%:
.gallery__item // . @media (min-width: 800px) // . &:nth-child (3n) margin-right: 5%; > &:nth-child(4n) margin-right: 0%; > > >This isn’t a very nice approach since we are going to repeat the 5% margin-right property if we have to change the number of items on a larger viewport.
We should keep the code as DRY as possible.
A better way is to constrain nth-child(3n) selector within its rightful viewport by using a max-width query.
.gallery__item float: left; margin-right: 5%; margin-bottom: 5%; @media (max-width: 800px) width: 30%; &:nth-child(3n) margin-right: 0; > > @media (min-width: 800px) width: 21.25%; // (100% - 15%) / 4 &:nth-child (4n) margin-right: 0; > > >
This works because the max-width property limits the selectors to below 800px and the styles given within will not affect styles for any other viewports.
Now imagine if you have a larger viewport and you wanted to show 5 items per row in the gallery. This is when a combination of min and max-width queries come together.
.gallery__item float: left; margin-right: 5%; margin-bottom: 5%; @media (max-width: 800px) width: 30%; &:nth-child(3n) margin-right: 0; > > // combining both min-width and max-width queries @media (min-width: 800px) and (max-width: 1200px) width: 21.25%; // (100% - 15%) / 4 &:nth-child (4n) margin-right: 0; > > @media (min-width: 1200px) width: 16%; // (100% - 20%) / 5 &:nth-child (5n) margin-right: 0; > > >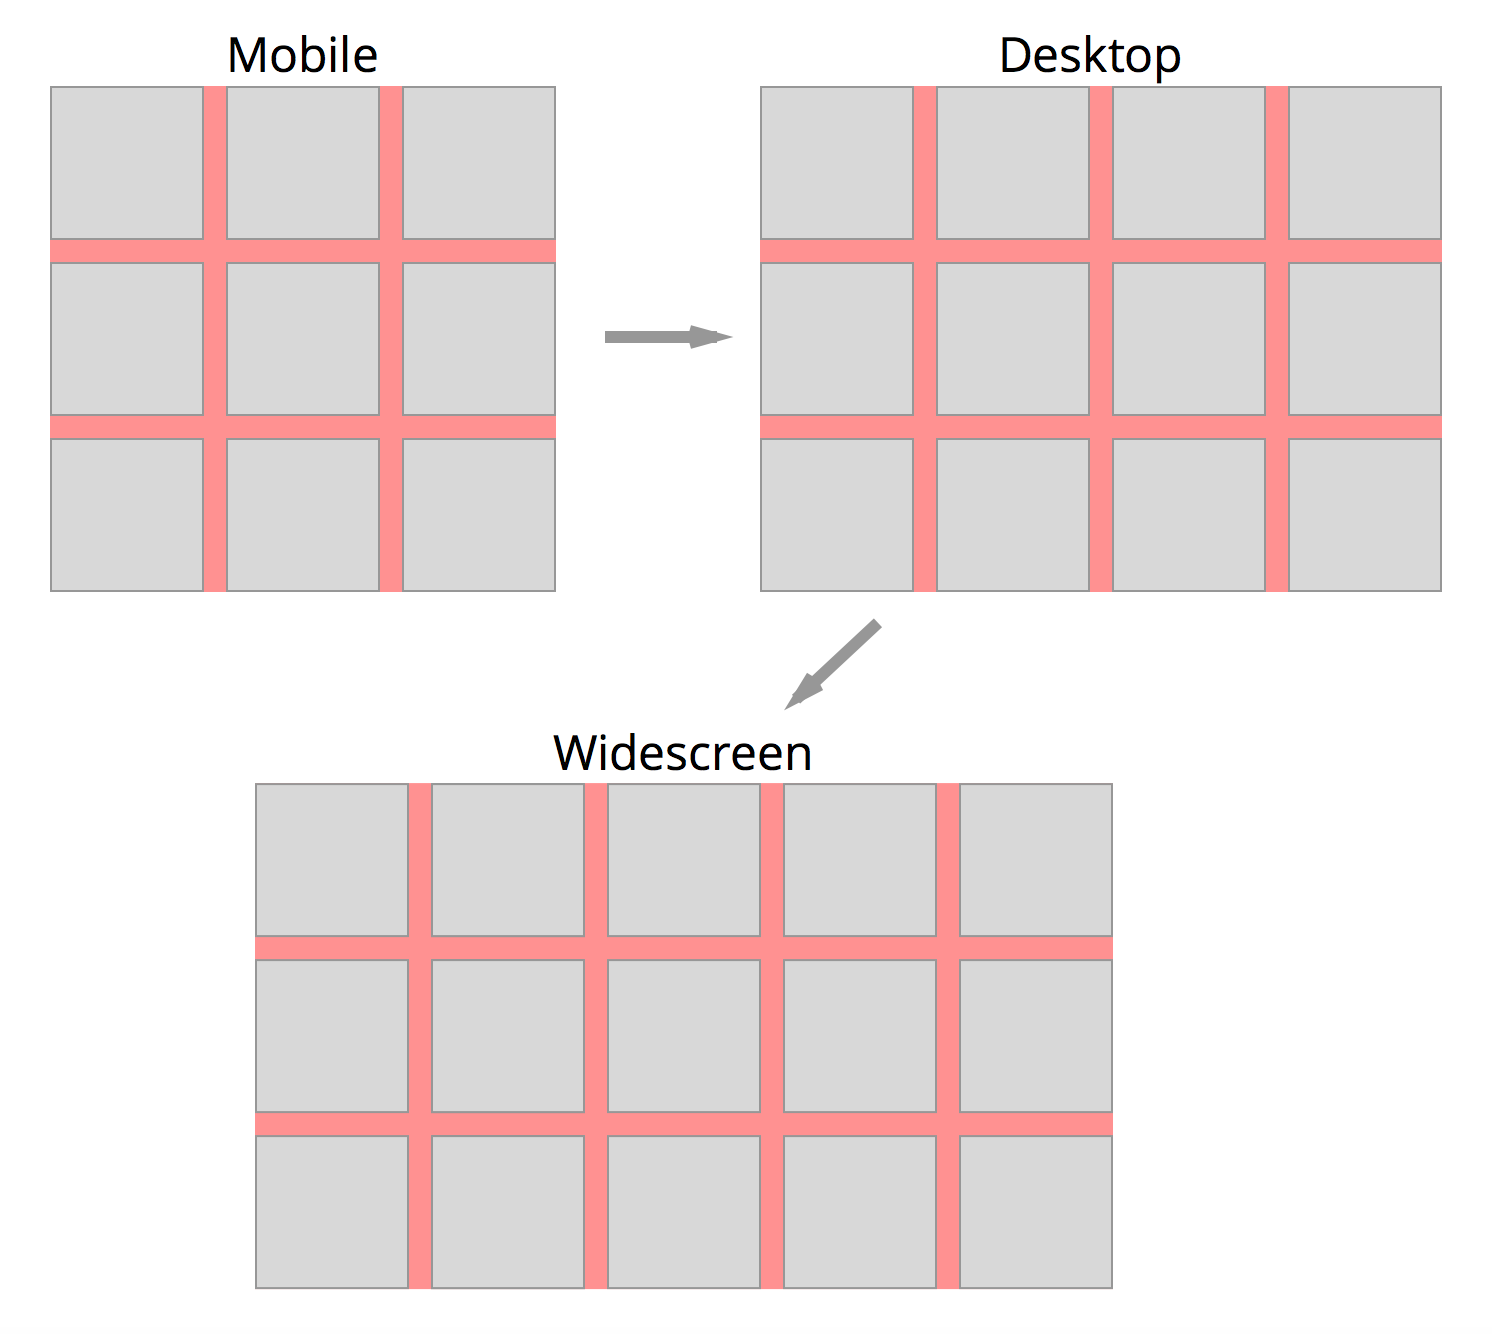
A Video!
The guys over at Webucator were extremely kind and volunteered to create a video to summarize this blog post. So if videos are your thing, do check this out.
Conclusion
Min-width media queries are extremely helpful when it comes to coding responsive websites because it reduces code complexity. Min-width queries are, however, not the solution to every problem as you can see from the examples above. It can sometimes be beneficial to add max-width queries into your stylesheet to help keep things DRYer.
I hope you found this useful. If you did, I hope you’ll share it with someone else. And feel free to reach out if you have any questions or comments.
Thanks for reading, all the best, and happy coding!
Can I send you a few articles that will help you become amazing at CSS?
Learn the fundamentals that will help you build as strong foundation so you never get confused.
Can I send you a few articles that will help you become amazing at CSS?
Learn the fundamentals that will help you build as strong foundation so you never get confused.
© 2013 — 2023 Zell Liew. All rights reserved · Terms
Адаптивный и мобильный дизайн с CSS3 Media Queries
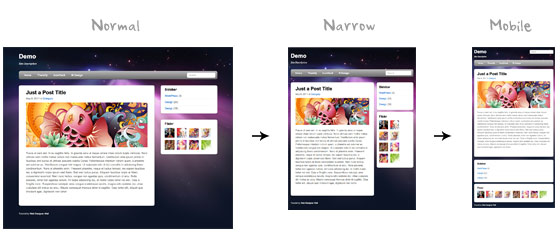
Разрешение экрана в наши дни колеблется от 320px (iPhone) до 2560px (большие мониторы) или даже выше. Пользователи больше не просматривают сайты только на настольных компьютерах. Теперь пользователи используют мобильные телефоны, небольшие ноутбуки, планшетные устройства, такие как iPad или Playbook для доступа в интернет. Поэтому, традиционный дизайн с фиксированной шириной больше не работает. Дизайн должен быть адаптивным. Структура должна автоматически изменяться с учетом всех разрешений дисплеев. Эта статья покажет вам как создавать кросс-браузерный адаптивный дизайн при помощи HTML5 и CSS3 media queries.
Для начала посмотрим это в действии.
Пред началом посмотрите на финальное демо, что бы увидеть, как хорошо это выглядит. Изменяйте размер браузера, что бы увидеть как структура автоматически изменяется основываясь на ширине окна.

Другие примеры
Если вы хотите увидеть больше примеров, посмотрите следующие темы для WordPress, которые я сделал используя media queries: iTheme2, Funki, Minblr и Wumblr.
Обзор
Контейнер страницы имеет ширину 980px для любого разрешения, больше 1024px. Для проверки ширины используются media queries, если ширина меньше чем 980px, в этом случае макет становится резиновым, вместо фиксированной ширины. Если ширина меньше 650px, то контейнеры с контентом и боковой панелью расширяются на полный экран и становятся в одну колонку.
HTML
Не будем останавливаться на подробном описании HTML. Ниже описана основная структура макета. У меня есть «pagewrap», который включает в себя «header», «content», «sidebar» и «footer».
HTML5.js
Обратите внимание, что в демо используется HTML5. Internet Explorer ниже 9-й версии не поддерживает новые элементы содержащиеся в HTML5, такие как , , , и прочие. Поэтому подключаем Javascript файл html5.js в HTML документ, который позволит IE понимать новые элементы.
CSS
Сбрасываем HTML5 элементы в block
article , aside , details , figcaption , figure , footer , header , hgroup , menu , nav , section <
display : block ;
>
Описываем основную структуру в CSS
Я снова не буду вдаваться в подробности. Основной контейнер «pagewrap» имеет ширину 980px. «Header» имеет фиксированную высоту 160px. Контейнер «content» шириной 600px и прижат влево. «Sidebar» шириной 280px и прижат вправо.
#pagewrap <
width : 980px ;
margin : 0 auto ;
>
#header <
height : 160px ;
>
#content <
width : 600px ;
float : left ;
>
#sidebar <
width : 280px ;
float : right ;
>
#footer <
clear : both ;
>
Шаг 1
На первом шаге в демо не реализованы media queries, поэтому при изменении размера окна браузера, макет будет оставаться фиксированной ширины.
CSS3 Media Queries
Теперь начинается самое интересное – media queries.
Подключаем Media Queries Javascript
Internet Explorer 8 и более ранних версий не поддерживает CSS3 media queries. Вы можете включить ее, добавив Javascript файл css3-mediaqueries.js.
Подключаем CSS media queries
Создаем новый CSS файл для media queries. Посмотрите мою прошлую статью, что бы увидеть как работают media queries.
Размер экрана меньше 980px (резиновый макет)
@media screen and (max-width: 980px) <
#pagewrap <
width : 95 % ;
>
#content <
width : 60 % ;
padding : 3 % 4 % ;
>
#sidebar <
width : 30 % ;
>
#sidebar .widget <
padding : 8 % 7 % ;
margin-bottom : 10px ;
>
>
Размер экрана меньше 650px (одноколоночный макет)
- header = сбрасываем высоту в auto;
- searchform = позиционируем — 5px сверху;
- main-nav = сбрасываем позиционирование в static;
- site-logo = сбрасываем позиционирование в static;
- site-description = сбрасываем позиционирование в static;
- content = устанавливаем ширину auto (это растянет контейнер на всю ширину)
- sidebar = устанавливаем ширину 100% и убираем float.
@media screen and (max-width: 650px) <
#header <
height : auto ;
>
#searchform <
position : absolute ;
top : 5px ;
right : 0 ;
>
#main-nav <
position : static ;
>
#site-logo <
margin : 15px 100px 5px 0 ;
position : static ;
>
#site-description <
margin : 0 0 15px ;
position : static ;
>
#content <
width : auto ;
float : none ;
margin : 20px 0 ;
>
#sidebar <
width : 100 % ;
float : none ;
margin : 0 ;
>
>
Размер экрана меньше 480px
- html = отключаем регулировку размера шрифта. По умолчанию iPhone увеличивает размер шрифта, для более комфортного чтения. Вы можете это отключить добавив -webkit-text-size-adjust: none;
- main-nav = сбрасываем размер шрифта до 90%.
@media screen and (max-width: 480px) <
html <
-webkit-text-size-adjust : none ;
>
#main-nav a <
font-size : 90 % ;
padding : 10px 8px ;
>
>
Эластичные изображения
Для того, чтобы сделать изображения эластичными, просто добавьте max-width:100% и height:auto . Изображения max-width:100% и height:auto работает в IE7, но не работает в IE8 (да, еще один странный баг). Для исправления нужно добавить width:auto\9 для IE8.
Эластичные встраиваемые видео
Для видео применяем те же правила, как для изображений. По непонятным причинам max-width:100% (для видео) не работает в Safari. Нужно использовать width: 100% .
Initial Scale Meta Tag (iPhone)
По умолчанию iPhone Safari сжимает станицы, что бы вместить в экран. Следующий мета-тег говорит iPhone Safari использовать ширину устройства как ширину окна и отключить.
Финальное Демо
Откроем финальное демо и поизменяем размер экрана, что бы увидеть media queries в действии. Не забудьте проверить в iPhone, iPad, Blackberry (последние версии) и Android телефонах, что бы увидеть мобильную версию.