- CSS Padding
- CSS Padding
- Padding — Individual Sides
- Example
- Padding — Shorthand Property
- Example
- Example
- Example
- Example
- Padding and Element Width
- Example
- Example
- More Examples
- All CSS Padding Properties
- CSS Forms
- Styling Input Fields
- Example
- Padded Inputs
- Example
- Bordered Inputs
- Example
- Example
- Colored Inputs
- Example
- Focused Inputs
- Example
- Example
- Input with icon/image
- Example
- Animated Search Input
- Example
- Styling Textareas
- Example
- Styling Select Menus
- Example
- Styling Input Buttons
- Example
- Responsive Form
- Aligned Form
- padding
- Синтаксис
- Значения
- Объектная модель
- Браузеры
CSS Padding
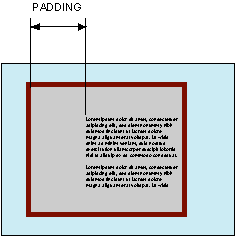
Padding is used to create space around an element’s content, inside of any defined borders.
CSS Padding
The CSS padding properties are used to generate space around an element’s content, inside of any defined borders.
With CSS, you have full control over the padding. There are properties for setting the padding for each side of an element (top, right, bottom, and left).
Padding — Individual Sides
CSS has properties for specifying the padding for each side of an element:
All the padding properties can have the following values:
- length — specifies a padding in px, pt, cm, etc.
- % — specifies a padding in % of the width of the containing element
- inherit — specifies that the padding should be inherited from the parent element
Note: Negative values are not allowed.
Example
Set different padding for all four sides of a element:
Padding — Shorthand Property
To shorten the code, it is possible to specify all the padding properties in one property.
The padding property is a shorthand property for the following individual padding properties:
If the padding property has four values:
- padding: 25px 50px 75px 100px;
- top padding is 25px
- right padding is 50px
- bottom padding is 75px
- left padding is 100px
Example
Use the padding shorthand property with four values:
If the padding property has three values:
- padding: 25px 50px 75px;
- top padding is 25px
- right and left paddings are 50px
- bottom padding is 75px
Example
Use the padding shorthand property with three values:
If the padding property has two values:
- padding: 25px 50px;
- top and bottom paddings are 25px
- right and left paddings are 50px
Example
Use the padding shorthand property with two values:
If the padding property has one value:
Example
Use the padding shorthand property with one value:
Padding and Element Width
The CSS width property specifies the width of the element’s content area. The content area is the portion inside the padding, border, and margin of an element (the box model).
So, if an element has a specified width, the padding added to that element will be added to the total width of the element. This is often an undesirable result.
Example
Here, the element is given a width of 300px. However, the actual width of the element will be 350px (300px + 25px of left padding + 25px of right padding):
To keep the width at 300px, no matter the amount of padding, you can use the box-sizing property. This causes the element to maintain its actual width; if you increase the padding, the available content space will decrease.
Example
Use the box-sizing property to keep the width at 300px, no matter the amount of padding:
More Examples
Set the left padding
This example demonstrates how to set the left padding of aelement.
Set the right padding
This example demonstrates how to set the right padding of aelement.
Set the top padding
This example demonstrates how to set the top padding of aelement.
Set the bottom padding
This example demonstrates how to set the bottom padding of aelement.
All CSS Padding Properties
Property Description padding A shorthand property for setting all the padding properties in one declaration padding-bottom Sets the bottom padding of an element padding-left Sets the left padding of an element padding-right Sets the right padding of an element padding-top Sets the top padding of an element CSS Forms
The look of an HTML form can be greatly improved with CSS:
Styling Input Fields
Use the width property to determine the width of the input field:
Example
The example above applies to all elements. If you only want to style a specific input type, you can use attribute selectors:
- input[type=text] — will only select text fields
- input[type=password] — will only select password fields
- input[type=number] — will only select number fields
- etc..
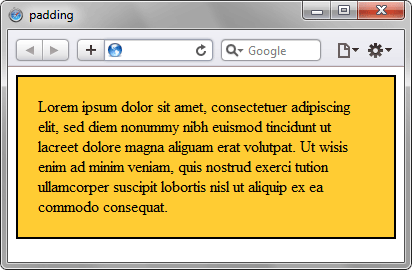
Padded Inputs
Use the padding property to add space inside the text field.
Tip: When you have many inputs after each other, you might also want to add some margin , to add more space outside of them:
Example
Note that we have set the box-sizing property to border-box . This makes sure that the padding and eventually borders are included in the total width and height of the elements.
Read more about the box-sizing property in our CSS Box Sizing chapter.Bordered Inputs
Use the border property to change the border size and color, and use the border-radius property to add rounded corners:
Example
If you only want a bottom border, use the border-bottom property:
Example
Colored Inputs
Use the background-color property to add a background color to the input, and the color property to change the text color:
Example
Focused Inputs
By default, some browsers will add a blue outline around the input when it gets focus (clicked on). You can remove this behavior by adding outline: none; to the input.
Use the :focus selector to do something with the input field when it gets focus:
Example
Example
Input with icon/image
If you want an icon inside the input, use the background-image property and position it with the background-position property. Also notice that we add a large left padding to reserve the space of the icon:
Example
input[type=text] <
background-color: white;
background-image: url(‘searchicon.png’);
background-position: 10px 10px;
background-repeat: no-repeat;
padding-left: 40px;
>Animated Search Input
In this example we use the CSS transition property to animate the width of the search input when it gets focus. You will learn more about the transition property later, in our CSS Transitions chapter.
Example
input[type=text] <
transition: width 0.4s ease-in-out;
>input[type=text]:focus width: 100%;
>Styling Textareas
Tip: Use the resize property to prevent textareas from being resized (disable the «grabber» in the bottom right corner):
Example
textarea <
width: 100%;
height: 150px;
padding: 12px 20px;
box-sizing: border-box;
border: 2px solid #ccc;
border-radius: 4px;
background-color: #f8f8f8;
resize: none;
>Styling Select Menus
Example
select <
width: 100%;
padding: 16px 20px;
border: none;
border-radius: 4px;
background-color: #f1f1f1;
>Styling Input Buttons
Example
input[type=button], input[type=submit], input[type=reset] <
background-color: #04AA6D;
border: none;
color: white;
padding: 16px 32px;
text-decoration: none;
margin: 4px 2px;
cursor: pointer;
>/* Tip: use width: 100% for full-width buttons */
For more information about how to style buttons with CSS, read our CSS Buttons Tutorial.
Responsive Form
Resize the browser window to see the effect. When the screen is less than 600px wide, make the two columns stack on top of each other instead of next to each other.
Advanced: The following example uses media queries to create a responsive form. You will learn more about this in a later chapter.
Aligned Form
An example of how to style labels together with inputs to create a horizontal aligned form:
padding
Устанавливает значение полей вокруг содержимого элемента. Полем называется расстояние от внутреннего края рамки элемента до воображаемого прямоугольника, ограничивающего его содержимое (рис. 1).

Рис. 1. Поле слева от текста
Свойство padding позволяет задать величину поля сразу для всех сторон элемента или определить ее только для указанных сторон.
Синтаксис
padding: [значение | проценты] | inherit
Значения
Разрешается использовать одно, два, три или четыре значения, разделяя их между собой пробелом. Эффект зависит от количества значений и приведен в табл. 1.
Табл. 1. Зависимость от числа значений
Число значений Результат 1 Поля будут установлены одновременно от каждого края элемента. 2 Первое значение устанавливает поля от верхнего и нижнего края, второе — от левого и правого. 3 Первое значение задает поле от верхнего края, второе — одновременно от левого и правого края, а третье — от нижнего края. 4 Поочередно устанавливается поля от верхнего, правого, нижнего и левого края. Величину полей можно указывать в пикселах (px), процентах (%) или других допустимых для CSS единицах. Значение inherit указывает, что оно наследуется у родителя. При указании поля в процентах, значение считается от ширины родителя элемента.
HTML5 CSS2.1 IE Cr Op Sa Fx
Результат данного примера показан на рис. 2.

Рис. 2. Применение свойства padding
Объектная модель
[window.]document.getElementById(» elementID «).style.paddingБраузеры
Internet Explorer до версии 7.0 включительно не поддерживает значение inherit .