- Css input type button and submit
- Value
- Setting the value attribute
- Omitting the value attribute
- Additional attributes
- formaction
- formenctype
- formmethod
- formnovalidate
- formtarget
- Using submit buttons
- A simple submit button
- Adding a keyboard shortcut to a submit button
- Disabling and enabling a submit button
- Validation
- Examples
- Technical Summary
- Specifications
- Browser compatibility
- See also
- Found a content problem with this page?
- MDN
- Support
- Our communities
- Developers
- How to Style Input and Submit Button With CSS
- How to Style Input Fields With CSS?
- How to Style Submit Button With CSS?
- Conclusion
- About the author
- Sharqa Hameed
Css input type button and submit
elements of type submit are rendered as buttons. When the click event occurs (typically because the user clicked the button), the user agent attempts to submit the form to the server.
Value
An element’s value attribute contains a string which is displayed as the button’s label. Buttons do not have a true value otherwise.
Setting the value attribute
input type="submit" value="Send Request" /> Omitting the value attribute
If you don’t specify a value , the button will have a default label, chosen by the user agent. This label is likely to be something along the lines of «Submit» or «Submit Query.» Here’s an example of a submit button with a default label in your browser:
Additional attributes
formaction
A string indicating the URL to which to submit the data. This takes precedence over the action attribute on the element that owns the .
This attribute is also available on and elements.
formenctype
A string that identifies the encoding method to use when submitting the form data to the server. There are three permitted values:
This, the default value, sends the form data as a string after URL encoding the text using an algorithm such as encodeURI() .
Uses the FormData API to manage the data, allowing for files to be submitted to the server. You must use this encoding type if your form includes any elements of type file ( ).
Plain text; mostly useful only for debugging, so you can easily see the data that’s to be submitted.
If specified, the value of the formenctype attribute overrides the owning form’s action attribute.
This attribute is also available on and elements.
formmethod
A string indicating the HTTP method to use when submitting the form’s data; this value overrides any method attribute given on the owning form. Permitted values are:
A URL is constructed by starting with the URL given by the formaction or action attribute, appending a question mark («?») character, then appending the form’s data, encoded as described by formenctype or the form’s enctype attribute. This URL is then sent to the server using an HTTP get request. This method works well for simple forms that contain only ASCII characters and have no side effects. This is the default value.
The form’s data is included in the body of the request that is sent to the URL given by the formaction or action attribute using an HTTP post method. This method supports complex data and file attachments.
This method is used to indicate that the button closes the dialog with which the input is associated, and does not transmit the form data at all.
This attribute is also available on and elements.
formnovalidate
A Boolean attribute which, if present, specifies that the form should not be validated before submission to the server. This overrides the value of the novalidate attribute on the element’s owning form.
This attribute is also available on and elements.
formtarget
A string which specifies a name or keyword that indicates where to display the response received after submitting the form. The string must be the name of a browsing context (that is, a tab, window, or ). A value specified here overrides any target given by the target attribute on the that owns this input.
In addition to the actual names of tabs, windows, or inline frames, there are a few special keywords that can be used:
Loads the response into the same browsing context as the one that contains the form. This will replace the current document with the received data. This is the default value used if none is specified.
Loads the response into a new, unnamed, browsing context. This is typically a new tab in the same window as the current document, but may differ depending on the configuration of the user agent.
Loads the response into the parent browsing context of the current one. If there is no parent context, this behaves the same as _self .
Loads the response into the top-level browsing context; this is the browsing context that is the topmost ancestor of the current context. If the current context is the topmost context, this behaves the same as _self .
This attribute is also available on and elements.
Using submit buttons
buttons are used to submit forms. If you want to create a custom button and then customize the behavior using JavaScript, you need to use , or better still, a element.
A simple submit button
We’ll begin by creating a form with a simple submit button:
form> div> label for="example">Let's submit some textlabel> input id="example" type="text" name="text" /> div> div> input type="submit" value="Send" /> div> form>
Try entering some text into the text field, and then submitting the form.
Upon submitting, the data name/value pair gets sent to the server. In this instance, the string will be text=usertext , where «usertext» is the text entered by the user, encoded to preserve special characters. Where and how the data is submitted depends on the configuration of the ; see Sending form data for more details.
Adding a keyboard shortcut to a submit button
Keyboard shortcuts, also known as access keys and keyboard equivalents, let the user trigger a button using a key or combination of keys on the keyboard. To add a keyboard shortcut to a submit button — just as you would with any for which it makes sense — you use the accesskey global attribute.
In this example, s is specified as the access key (you’ll need to press s plus the particular modifier keys for your browser/OS combination). In order to avoid conflicts with the user agent’s own keyboard shortcuts, different modifier keys are used for access keys than for other shortcuts on the host computer. See accesskey for further details.
Here’s the previous example with the s access key added:
form> div> label for="example">Let's submit some textlabel> input id="example" type="text" name="text" /> div> div> input type="submit" value="Send" accesskey="s" /> div> form>
For example, in Firefox for Mac, pressing Control — Option — S triggers the Send button, while Chrome on Windows uses Alt + S .
The problem with the above example is that the user will not know what the access key is! This is especially true since the modifiers are typically non-standard to avoid conflicts. When building a site, be sure to provide this information in a way that doesn’t interfere with the site design (for example by providing an easily accessible link that points to information on what the site access keys are). Adding a tooltip to the button (using the title attribute) can also help, although it’s not a complete solution for accessibility purposes.
Disabling and enabling a submit button
To disable a submit button, specify the disabled attribute on it, like so:
input type="submit" value="Send" disabled /> You can enable and disable buttons at run time by setting disabled to true or false ; in JavaScript this looks like btn.disabled = true or btn.disabled = false .
Validation
Submit buttons don’t participate in constraint validation; they have no real value to be constrained.
Examples
We’ve included simple examples above. There isn’t really anything more to say about submit buttons. There’s a reason this kind of control is sometimes called a «simple button.»
Technical Summary
Specifications
Browser compatibility
BCD tables only load in the browser
See also
Found a content problem with this page?
This page was last modified on Apr 12, 2023 by MDN contributors.
Your blueprint for a better internet.
MDN
Support
Our communities
Developers
Visit Mozilla Corporation’s not-for-profit parent, the Mozilla Foundation.
Portions of this content are ©1998– 2023 by individual mozilla.org contributors. Content available under a Creative Commons license.
How to Style Input and Submit Button With CSS
![]()
CSS is a language for creating style sheets that describe how a document is presented in a markup language, such as HTML or XML. Along with HTML and JavaScript, CSS is a key component of the World Wide Web. Using CSS, users can style all HTML elements, including tables, buttons, input fields, forms, and many more.
How to Style Input Fields With CSS?
To style the input field with CSS, try out the mentioned procedure.
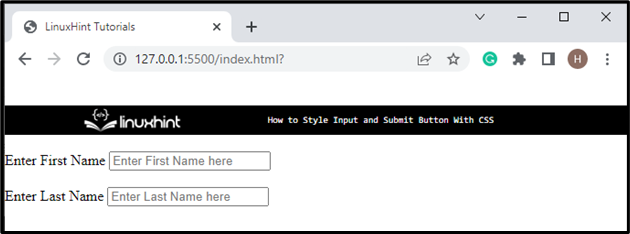
Step 1: Create Input Form
First of all, create a form in HTML. To do so, follow the instructions listed below:
- First, create a form with the help of the “ ” tag.
- Inside the form, the “ ” element is defined to specify captions for the “input” elements. The label’s “for” attribute is used to attach the label element with element through “id”.
- The “type” attribute determines the input type, such as text or number.
- The “class” attribute is assigned the “Input” name, “placeholder” attribute allocates the placeholder text in the input field:
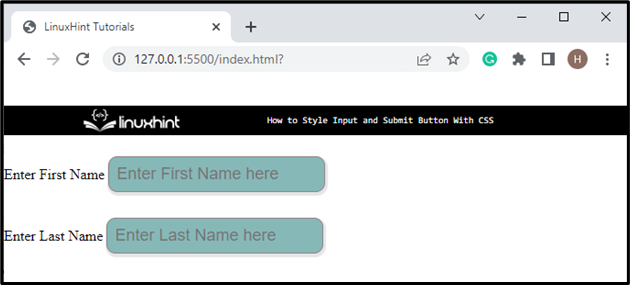
Step 2: Style Input Button in CSS
To style the input button in CSS, check out the given properties:
input {
padding: 8px;
border-radius: 10px;
margin: 5px auto;
border: 1px solid #918383;
background-color: #87b8b8;
box-shadow: 1px 2px 1px 2px rgb ( 230 , 229 , 229 ) ;
color: #c9c2c2;
outline: none;
font-size: 18px;
}
Access the “input” class and then apply below-mentioned properties:
- Set “padding” that specifies the space around the element’s content.
- “border-radius” property sets the element’s edges round.
- “margin” property with the value “5px auto” adds space “5px” on top and bottom, and “auto” is used to set equal space around the element on the left and right.
- “border” property specifies the border around the table.
- “background-color” property is utilized to specify the color of the background.
- “box-shadow” adds a shadow around the element. It is a shorthand property that specifies the x-offset, y-offset, blur effect, spread effect, and color for the shadow.
- “color” property refers to the element’s font color.
- “outline” adjusts the line around the elements to make it dominant.
- “font-size” property is utilized to set the element’s font size.
Next, access the “label” element for styling it:
After accessing the label element, apply the styling of your choice. For instance, we have applied “font-size”, “color”, and “margin” properties.
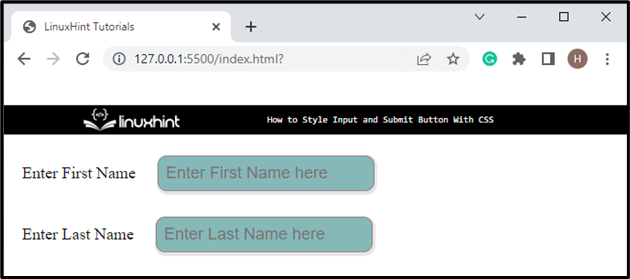
Let’s move toward the next section to style the submit button using CSS.
How to Style Submit Button With CSS?
To style the submit button with CSS, examine the example below, which demonstrates a step-wise guide on how to create and style the HTML button.
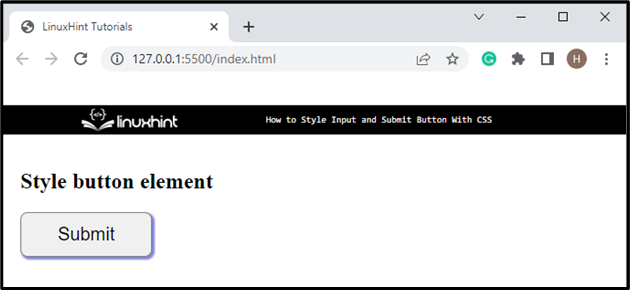
Step 1: Create Submit Button
Initially, add heading text inside the heading tag “ ”. Then, create a button by utilizing the “ ” element and set the button type as “submit”:

Step 2: Style “button” Element
To style the button in CSS, check out the properties described below:
button {
padding: 12px 40px;
border-radius: 8px;
box-shadow: 2px 2px 2px 1px rgb ( 131 , 131 , 219 ) ;
border: 1px solid gray;
font-size: 20px;
}
Access the button element by tag name and apply the properties on the button according to your preference. For instance, we have applied “padding”, “border-radius”, “box-shadow”, “border”, and “font-size” properties.
Let’s add the hover effect on the button element:
The “button:hover” selector is utilized to apply the effect of hover on the button. With the help of the “hover” selector, users can generate the CSS effect in real-time. For instance, we have set the “background-color” and “color” properties as described above:
We have discussed to style the input field and submit button with CSS.
Conclusion
To style the input element and submit button with CSS, different properties of CSS are used, including “padding”, “border-radius”, “box-shadow”, “margin”, “border”, “background-color”, “font-size” and many more. Users can apply the specified properties by accessing the elements through the tag name. This post has demonstrated the method for styling the input text fields and submit buttons with CSS.
About the author
Sharqa Hameed
I am a Linux enthusiast, I love to read Every Linux blog on the internet. I hold masters degree in computer science and am passionate about learning and teaching.