- CSS Layout — Overflow
- CSS Overflow
- overflow: visible
- Example
- overflow: hidden
- Example
- overflow: scroll
- Example
- overflow: auto
- Example
- overflow-x and overflow-y
- Example
- All CSS Overflow Properties
- Two(2) ways to prevent padding from causing an overflow in CSS
- Introduction
- 1. Using CSS Box-sizing property
- 2. Using the CSS calc() function
- Conclusion
- overflow hidden only hides elements going over the padding-box
- Related Topics
- Related Articles
- overflow-x
- Try it
- Syntax
- Values
- Formal definition
- Formal syntax
- Examples
- HTML
- CSS
- Result
- Specifications
- Browser compatibility
- See also
- Found a content problem with this page?
- MDN
- Support
- Our communities
- Developers
CSS Layout — Overflow
The CSS overflow property controls what happens to content that is too big to fit into an area.
This text is really long and the height of its container is only 100 pixels. Therefore, a scrollbar is added to help the reader to scroll the content. Lorem ipsum dolor sit amet, consectetuer adipiscing elit, sed diam nonummy nibh euismod tincidunt ut laoreet dolore magna aliquam erat volutpat. Ut wisi enim ad minim veniam, quis nostrud exerci tation ullamcorper suscipit lobortis nisl ut aliquip ex ea commodo consequat. Duis autem vel eum iriure dolor in hendrerit in vulputate velit esse molestie consequat, vel illum dolore eu feugiat nulla facilisis at vero eros et accumsan et iusto odio dignissim qui blandit praesent luptatum zzril delenit augue duis dolore te feugait nulla facilisi. Nam liber tempor cum soluta nobis eleifend option congue nihil imperdiet doming id quod mazim placerat facer possim assum. Typi non habent claritatem insitam; est usus legentis in iis qui facit eorum claritatem.
CSS Overflow
The overflow property specifies whether to clip the content or to add scrollbars when the content of an element is too big to fit in the specified area.
The overflow property has the following values:
- visible — Default. The overflow is not clipped. The content renders outside the element’s box
- hidden — The overflow is clipped, and the rest of the content will be invisible
- scroll — The overflow is clipped, and a scrollbar is added to see the rest of the content
- auto — Similar to scroll , but it adds scrollbars only when necessary
Note: The overflow property only works for block elements with a specified height.
Note: In OS X Lion (on Mac), scrollbars are hidden by default and only shown when being used (even though «overflow:scroll» is set).
overflow: visible
By default, the overflow is visible , meaning that it is not clipped and it renders outside the element’s box:
You can use the overflow property when you want to have better control of the layout. The overflow property specifies what happens if content overflows an element’s box.
Example
overflow: hidden
With the hidden value, the overflow is clipped, and the rest of the content is hidden:
You can use the overflow property when you want to have better control of the layout. The overflow property specifies what happens if content overflows an element’s box.
Example
overflow: scroll
Setting the value to scroll , the overflow is clipped and a scrollbar is added to scroll inside the box. Note that this will add a scrollbar both horizontally and vertically (even if you do not need it):
You can use the overflow property when you want to have better control of the layout. The overflow property specifies what happens if content overflows an element’s box.
Example
overflow: auto
The auto value is similar to scroll , but it adds scrollbars only when necessary:
You can use the overflow property when you want to have better control of the layout. The overflow property specifies what happens if content overflows an element’s box.
Example
overflow-x and overflow-y
The overflow-x and overflow-y properties specifies whether to change the overflow of content just horizontally or vertically (or both):
overflow-x specifies what to do with the left/right edges of the content.
overflow-y specifies what to do with the top/bottom edges of the content.
You can use the overflow property when you want to have better control of the layout. The overflow property specifies what happens if content overflows an element’s box.
Example
div <
overflow-x: hidden; /* Hide horizontal scrollbar */
overflow-y: scroll; /* Add vertical scrollbar */
>
All CSS Overflow Properties
| Property | Description |
|---|---|
| overflow | Specifies what happens if content overflows an element’s box |
| overflow-wrap | Specifies whether or not the browser can break lines with long words, if they overflow its container |
| overflow-x | Specifies what to do with the left/right edges of the content if it overflows the element’s content area |
| overflow-y | Specifies what to do with the top/bottom edges of the content if it overflows the element’s content area |
Two(2) ways to prevent padding from causing an overflow in CSS
When padding is added to an element with a width or a height of 100% it causes that element to overflow. It’s no surprise since padding creates extra space within an element. To fix this issue caused by padding, in this tutorial I am going to introduce two(2) ways of tackling this.
Introduction
1. Using CSS Box-sizing property
Using box-sizing is the best way of tackling the issue of an overflow caused by padding.
The box-sizing property will allow us to define how the width and height of an element are calculated. The default value of the box-sizing property is content-box , but when we set it to border-box this will make the element’s padding and border to also be included in its width and height.
Meaning if we set the element as a width/height of 10px and add padding or a border of 2px , the element’s actual width/height will still be 10px except the padding + border is greater than 10px
.div width: 10px; height: 10px padding: 2px; border: 2px; > Element’s actual width = width + padding + border
Element’s actual width = 10px + 4px + 4px = 18px
This is the same for the height.
Element’s actual height = 10px + 4px + 4px = 18px
We used 4px instead of 2px for the border and padding because in our code we are adding 2px to both the left and right sides of the element.
But with the box-sizing property:
.div width: 10px; padding-right: 5px; border-right: 5px; box-sizing: border-box; > Element’s actual width = 10px + 5px + 5px = 10px
Element’s actual height = 10px + 4px + 4px = 10px
2. Using the CSS calc() function
The calc() function allows us to perform calculations when we want to specify a property value. The cool thing about the calc() function is that even when the values are in a different unit, it can still be used to calculate the adding(+), subtraction(-), multiplication(*) and division of the values.
For example, we can use the calc() function to do something like this:
For the overflow issue of adding padding to a 100% width/height element Using the calc() function is not the most efficient way of going about it but it will still suffice.
Here is how we go about using the calc() function to handle the overflow issue:
.div width: calc(100% - 20px - 20px ) height: calc(100% - 20px - 20px ) padding: 10px border: 10px > Conclusion
In this article, we have learned how to use the box-sizing property and calc() function in CSS to prevent padding from causing an overflow. If you know of any other ways of doing this, feel free to drop it in the commend section below.
overflow hidden only hides elements going over the padding-box
I love smart CSS tricks! Today, I read «Restricting a (pseudo) element to its parent’s border-box» written by Ana Tudor. And while this article includes all the CSS magic, you may know Ana for it, also brought up a tiny CSS detail I wasn’t aware of.
Before going into it, let’s look into the CSS box-model for a minute. The CSS box-model defines several element areas and how they’re laid out. There are the content-box , padding-box , and border-box and you can look at them in your developer tools of choice.
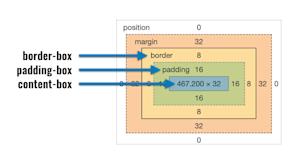
It’s essential to know about the box-model when you want to lay out a website. But it’s critical to understand when you want to create advanced CSS backgrounds like Ana describes in her article.
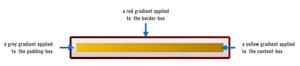
Thanks to the three box-model areas, you can apply three different CSS backgrounds to the same element without adding additional markup.
.someManyGradients // more stuff background: linear-gradient(90deg, #F2BC1B, #B27C00) content-box, linear-gradient(#f1f1f1, #ccc) padding-box, linear-gradient(-90deg, #8C142A, #5C0000) border-box; > . lets you style single elements with several gradients. 🎉
If you want to learn more about this technique, you can also have a look at this article in which I explain a specific element on CSSTricks this in detail.
But what happens when you have elements that overflow (let’s say with absolute positioning) and you want to make them fit right into the pretty gradient-element?
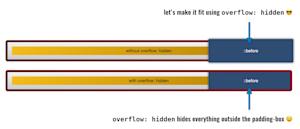
It turns out that the flowing element can not going over the red border. The CSS Overflow spec defines this behavior:
This value indicates that the box’s content is clipped to its padding box [. ]
This is very surprising because I expected that the inner element would cover the red border-box, too.
If you want to learn how to come around this behavior, have a look at Ana’s article or if you want to play around with the included example element you can find it on CodePen.
Was this TIL post helpful?
Yes? Cool! You might want to check out Web Weekly for more quick learnings. The last edition went out 28 days ago.
Related Topics
Related Articles
overflow-x
The overflow-x CSS property sets what shows when content overflows a block-level element’s left and right edges. This may be nothing, a scroll bar, or the overflow content. This property may also be set by using the overflow shorthand property.
Try it
Syntax
/* Keyword values */ overflow-x: visible; overflow-x: hidden; overflow-x: clip; overflow-x: scroll; overflow-x: auto; /* Global values */ overflow-x: inherit; overflow-x: initial; overflow-x: revert; overflow-x: revert-layer; overflow-x: unset;
The overflow-x property is specified as a single keyword value.
If overflow-y is hidden , scroll , or auto , and the overflow-x property is visible (default), the value will be implicitly computed as auto .
Values
Overflow content is not clipped and may be visible outside the element’s padding box on left and right edges. The element box is not a scroll container.
Overflow content is clipped if necessary to fit horizontally in the elements’ padding box. No scroll bars are provided.
Overflow content is clipped if necessary to fit horizontally inside the element’s padding box. Browsers display scroll bars in the horizontal direction whether or not any content is actually clipped. (This prevents scroll bars from appearing or disappearing when the content changes.) Printers may still print overflowing content.
Overflow content is clipped at the element’s padding box, and overflow content can be scrolled into view. Unlike scroll , user agents display scroll bars only if the content is overflowing and hide scroll bars by default. If content fits inside the element’s padding box, it looks the same as with visible , but still establishes a new block-formatting context. Desktop browsers provide scroll bars if content overflows.
Note: The keyword value overlay is a legacy value alias for auto . With overlay , the scroll bars are drawn on top of the content instead of taking up space.
Formal definition
| Initial value | visible |
|---|---|
| Applies to | Block-containers, flex containers, and grid containers |
| Inherited | no |
| Computed value | as specified, except with visible / clip computing to auto / hidden respectively if one of overflow-x or overflow-y is neither visible nor clip |
| Animation type | discrete |
Formal syntax
overflow-x =
visible |
hidden |
clip |
scroll |
auto
Examples
HTML
ul> li> code>overflow-x:hiddencode> — hides the text outside the box div id="div1">ABCDEFGHIJKLMOPQRSTUVWXYZABCDEFGHIJKLMOPQRSTUVWXYZdiv> li> li> code>overflow-x:scrollcode> — always adds a scrollbar div id="div2">ABCDEFGHIJKLMOPQRSTUVWXYZABCDEFGHIJKLMOPQRSTUVWXYZdiv> li> li> code>overflow-x:visiblecode> — displays the text outside the box if needed div id="div3">ABCDEFGHIJKLMOPQRSTUVWXYZABCDEFGHIJKLMOPQRSTUVWXYZdiv> li> li> code>overflow-x:autocode> — on most browsers, equivalent to code>scrollcode> div id="div4">ABCDEFGHIJKLMOPQRSTUVWXYZABCDEFGHIJKLMOPQRSTUVWXYZdiv> li> ul>
CSS
#div1, #div2, #div3, #div4 border: 1px solid black; width: 250px; margin-bottom: 12px; > #div1 overflow-x: hidden; > #div2 overflow-x: scroll; > #div3 overflow-x: visible; > #div4 overflow-x: auto; > Result
Specifications
Browser compatibility
BCD tables only load in the browser
See also
Found a content problem with this page?
This page was last modified on Jul 18, 2023 by MDN contributors.
Your blueprint for a better internet.
MDN
Support
Our communities
Developers
Visit Mozilla Corporation’s not-for-profit parent, the Mozilla Foundation.
Portions of this content are ©1998– 2023 by individual mozilla.org contributors. Content available under a Creative Commons license.