- Css checkbox select all
- Value
- Additional attributes
- Using checkbox inputs
- Handling multiple checkboxes
- Checking boxes by default
- Providing a bigger hit area for your checkboxes
- Indeterminate state checkboxes
- Validation
- Examples
- HTML
- CSS
- JavaScript
- Technical summary
- Specifications
- Browser compatibility
- See also
- Found a content problem with this page?
- MDN
- Support
- Our communities
- Developers
- Creating a Select All and Deselect All Checkbox using CSS and JavaScript Tutorial
- What is the Select All and Deselect All Checkbox?
- How to create a Select All and Deselect All Checkbox?
- Sample Web Page
- Page Interface
- Stylesheet
- JavaScript
- Result
- Select All Checkboxes
- Deselect All Checkboxes
- Partially Select Checkboxes
Css checkbox select all
Note: Radio buttons are similar to checkboxes, but with an important distinction — same-named radio buttons are grouped into a set in which only one radio button can be selected at a time, whereas checkboxes allow you to turn single values on and off. Where multiple same-named controls exist, radio buttons allow one to be selected out of them all, whereas checkboxes allow multiple values to be selected.
Value
A string representing the value of the checkbox. This is not displayed on the client-side, but on the server this is the value given to the data submitted with the checkbox’s name . Take the following example:
form> div> input type="checkbox" id="subscribeNews" name="subscribe" value="newsletter" /> label for="subscribeNews">Subscribe to newsletter?label> div> div> button type="submit">Subscribebutton> div> form>
In this example, we’ve got a name of subscribe , and a value of newsletter . When the form is submitted, the data name/value pair will be subscribe=newsletter .
If the value attribute was omitted, the default value for the checkbox is on , so the submitted data in that case would be subscribe=on .
Note: If a checkbox is unchecked when its form is submitted, neither the name nor the value is submitted to the server. There is no HTML-only method of representing a checkbox’s unchecked state (e.g. value=unchecked ). If you wanted to submit a default value for the checkbox when it is unchecked, you could include JavaScript to create a within the form with a value indicating an unchecked state.
Additional attributes
A boolean attribute indicating whether this checkbox is checked by default (when the page loads). It does not indicate whether this checkbox is currently checked: if the checkbox’s state is changed, this content attribute does not reflect the change. (Only the HTMLInputElement ‘s checked IDL attribute is updated.)
Note: Unlike other input controls, a checkbox’s value is only included in the submitted data if the checkbox is currently checked . If it is, then the value of the checkbox’s value attribute is reported as the input’s value, or on if no value is set. Unlike other browsers, Firefox by default persists the dynamic checked state of an across page loads. Use the autocomplete attribute to control this feature.
Using checkbox inputs
We already covered the most basic use of checkboxes above. Let’s now look at the other common checkbox-related features and techniques you’ll need.
Handling multiple checkboxes
The example we saw above only contained one checkbox; in real-world situations you’ll be likely to encounter multiple checkboxes. If they are completely unrelated, then you can just deal with them all separately, as shown above. However, if they’re all related, things are not quite so simple.
For example, in the following demo we include multiple checkboxes to allow the user to select their interests (see the full version in the Examples section).
fieldset> legend>Choose your interestslegend> div> input type="checkbox" id="coding" name="interest" value="coding" /> label for="coding">Codinglabel> div> div> input type="checkbox" id="music" name="interest" value="music" /> label for="music">Musiclabel> div> fieldset>
In this example you will see that we’ve given each checkbox the same name . If both checkboxes are checked and then the form is submitted, you’ll get a string of name/value pairs submitted like this: interest=coding&interest=music . When this string reaches the server, you need to parse it other than as an associative array, so all values, not only the last value, of interest are captured. For one technique used with Python, see Handle Multiple Checkboxes with a Single Serverside Variable, for example.
Checking boxes by default
To make a checkbox checked by default, you give it the checked attribute. See the below example:
fieldset> legend>Choose your interestslegend> div> input type="checkbox" id="coding" name="interest" value="coding" checked /> label for="coding">Codinglabel> div> div> input type="checkbox" id="music" name="interest" value="music" /> label for="music">Musiclabel> div> fieldset>
Providing a bigger hit area for your checkboxes
Beyond accessibility, this is another good reason to properly set up elements on your forms.
Indeterminate state checkboxes
In addition to the checked and unchecked states, there is a third state a checkbox can be in: indeterminate. This is a state in which it’s impossible to say whether the item is toggled on or off. This is set using the HTMLInputElement object’s indeterminate property via JavaScript (it cannot be set using an HTML attribute):
A checkbox in the indeterminate state has a horizontal line in the box (it looks somewhat like a hyphen or minus sign) instead of a check/tick in most browsers.
There are not many use cases for this property. The most common is when a checkbox is available that «owns» a number of sub-options (which are also checkboxes). If all of the sub-options are checked, the owning checkbox is also checked, and if they’re all unchecked, the owning checkbox is unchecked. If any one or more of the sub-options have a different state than the others, the owning checkbox is in the indeterminate state.
This can be seen in the below example (thanks to CSS Tricks for the inspiration). In this example we keep track of the ingredients we are collecting for a recipe. When you check or uncheck an ingredient’s checkbox, a JavaScript function checks the total number of checked ingredients:
- If none are checked, the recipe name’s checkbox is set to unchecked.
- If one or two are checked, the recipe name’s checkbox is set to indeterminate .
- If all three are checked, the recipe name’s checkbox is set to checked .
So in this case the indeterminate state is used to state that collecting the ingredients has started, but the recipe is not yet complete.
const overall = document.querySelector("#enchantment"); const ingredients = document.querySelectorAll("ul input"); overall.addEventListener("click", (e) => e.preventDefault(); >); for (const ingredient of ingredients) ingredient.addEventListener("click", updateDisplay); > function updateDisplay() let checkedCount = 0; for (const ingredient of ingredients) if (ingredient.checked) checkedCount++; > > if (checkedCount === 0) overall.checked = false; overall.indeterminate = false; > else if (checkedCount === ingredients.length) overall.checked = true; overall.indeterminate = false; > else overall.checked = false; overall.indeterminate = true; > >
Note: If you submit a form with an indeterminate checkbox, the same thing happens as if the checkbox were unchecked — no data is submitted to represent the checkbox.
Validation
Checkboxes do support validation (offered to all s). However, most of the ValidityState s will always be false . If the checkbox has the required attribute, but is not checked, then ValidityState.valueMissing will be true .
Examples
The following example is an extended version of the «multiple checkboxes» example we saw above — it has more standard options, plus an «other» checkbox that when checked causes a text field to appear to enter a value for the «other» option. This is achieved with a simple block of JavaScript. The example includes implicit labels, with the directly inside the . The text input, without a visible label, includes the aria-label attribute which provides its accessible name. This example also includes some CSS to improve the styling.
HTML
form> fieldset> legend>Choose your interestslegend> div> label> input type="checkbox" id="coding" name="interest" value="coding" /> Coding label> div> div> label> input type="checkbox" id="music" name="interest" value="music" /> Music label> div> div> label> input type="checkbox" id="art" name="interest" value="art" /> Art label> div> div> label> input type="checkbox" id="sports" name="interest" value="sports" /> Sports label> div> div> label> input type="checkbox" id="cooking" name="interest" value="cooking" /> Cooking label> div> div> label> input type="checkbox" id="other" name="interest" value="other" /> Other label> input type="text" id="otherValue" name="other" aria-label="Other interest" /> div> div> button type="submit">Submit formbutton> div> fieldset> form>
CSS
html font-family: sans-serif; > form width: 600px; margin: 0 auto; > div margin-bottom: 10px; > fieldset background: cyan; border: 5px solid blue; > legend padding: 10px; background: blue; color: cyan; > JavaScript
const otherCheckbox = document.querySelector("#other"); const otherText = document.querySelector("#otherValue"); otherText.style.visibility = "hidden"; otherCheckbox.addEventListener("change", () => if (otherCheckbox.checked) otherText.style.visibility = "visible"; otherText.value = ""; > else otherText.style.visibility = "hidden"; > >);
Technical summary
Specifications
Browser compatibility
BCD tables only load in the browser
See also
- :checked , :indeterminate : CSS selectors that let you style checkboxes based on their current state
- HTMLInputElement : HTML DOM API that implements the element
- CSS property compatibility table for form controls
Found a content problem with this page?
This page was last modified on Jun 13, 2023 by MDN contributors.
Your blueprint for a better internet.
MDN
Support
Our communities
Developers
Visit Mozilla Corporation’s not-for-profit parent, the Mozilla Foundation.
Portions of this content are ©1998– 2023 by individual mozilla.org contributors. Content available under a Creative Commons license.
Creating a Select All and Deselect All Checkbox using CSS and JavaScript Tutorial
In this tutorial, you can learn how to create a Select All and Deselect All Checkbox functionality using CSS and JavaScript. This tutorial aims to provide students and beginners with a reference for learning some useful techniques and components for building creative web application features. Here, I will be providing a simple web page script that demonstrates the creation of the Select All and Deselect All Checkbox functionality.
What is the Select All and Deselect All Checkbox?
Select All and Deselect All Checkbox is a software feature that allows users to easily select and deselect multiple data or checkboxes. This component is usually or commonly implement with the website or feature for bulk actions such as bulk deletion of data.
How to create a Select All and Deselect All Checkbox?
Creating a Select All and Deselect All Checkbox can be achieved easily using JavaScript. JavaScript comes with built-in methods and APIs that are useful to achieve this. We can create this functionality by Identifying the current state of a checkbox every time the user updates the checkbox value. Check out the web page scripts that I have provided below to understand this more.
Sample Web Page
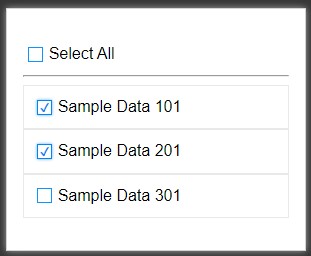
The script below results in a simple web application page that contains a static list with checkboxes. It has the capability to check and uncheck all the checkboxes at once. In addition, the main checkbox is automatically updated to checked or unchecked if the child checkboxes are manually managed.
Page Interface
Here’s the HTML file script of the page that contains the page layout and static content elements.
Stylesheet
Here’s the CSS script that I created for the design of the page and custom checkbox.
JavaScript
Lastly, here is the JavaScript file script that contains the code that makes the select/deselect all functionality possible.
Result
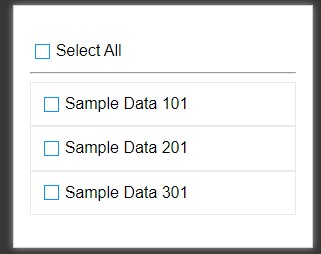
Here are the snapshots of the overall result of the script I have provided above:
Select All Checkboxes
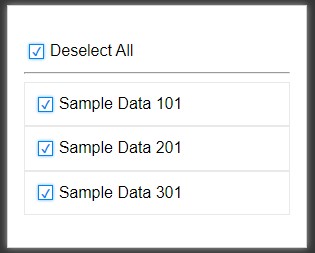
Deselect All Checkboxes
Partially Select Checkboxes
There you go! I have also provided the complete source code zip file that I created for this tutorial on this website and it is free to download. Feel free to download and modify it to make some experiments to enhance your knowledge and skills. The download button is located below this tutorial’s content.
That’s it! I hope this Creating a Select All and Deselect All Checkbox using CSS and JavaScript Tutorial will help you with what you are looking for and will be useful for your current and future web application projects.
Explore more on this website for more Tutorials and Free Source Codes.