- How To Change Mouse Cursor On Hover In WordPress
- 1. Changing the cursor for an existing CSS class
- Before
- After
- 2. Changing the cursor with inline CSS
- HTML with inline CSS
- Live preview
- CSS Cursor Cheat Sheet With Live Preview
- That’s all for today!
- 881 346 customers have already unleashed the true potential of WordPress. Download Divi and start building beautiful websites today.
- Related posts
- How To Create Custom Divi Column Structures In Mobile Devices
- Display Two (Or More) Buttons Side By Side In Divi
- How To Disable Divi Static CSS Cache On Single Pages & Posts
- 0 Comments
- Submit a Comment Cancel reply
- About DiviMundo
- Divi Resources
- Offers
- More from us
- Stay Tuned!
- Affiliate Disclaimer
- Privacy Overview
- How to Change Cursor to Image on Hover Using CSS
- What is “cursor” CSS Property?
- How to Change Cursor to Image on Hover Using CSS?
- Conclusion
- About the author
- Sharqa Hameed
How To Change Mouse Cursor On Hover In WordPress
The three most common cursors are the default arrow , the pointer and the text cursor. Just hover the bold words for a live preview. See the complete Cursor Cheat Sheet below for the complete list.
You can customize the cursor to improve the user experience. Some form plugins, for example, use old grey submit buttons with the default arrow cursor on hover. Why not style the button and swap to a pointer hand instead? And you could of course highlight an element with a crosshair or a question mark just because it’s fun.
1. Changing the cursor for an existing CSS class
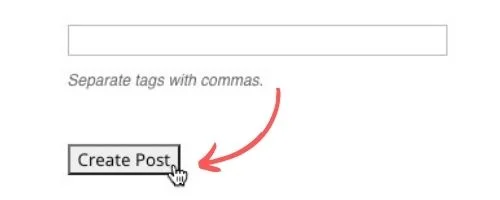
In this example I’m going to change the mouse cursor from the the default arrow to the more adequate hand pointer when hovering a WPUF Post Form submission button.
Before

After
- Go to Appearance » Customizer from your WordPress dashboard
- Expand the Additional CSS tab
- Find the class that you want to target by using for example the Chrome Inspector (watch the video for a step by step tutorial)
- In this example, the button class is .wpuf-submit-button so I’ll add the CSS snippet below to apply a hand pointer on hover:
Troubleshooting: In some cases you might need to add !important to override the existing CSS. Only use this sledge hammer if the original snippet doesn’t work. Example:
2. Changing the cursor with inline CSS
You can also change the cursor by adding inline CSS in your pagebuilder, for example Divi Builder, Gutenberg, Classic Editor or Elementor. Make sure that you edit the HTML code by using the Text tab and not the Visual tab.
HTML with inline CSS
Live preview
Hover this link to see a help cursor.
- This list item will display a grab cursor
- This list item will display a progress spinner
CSS Cursor Cheat Sheet With Live Preview
Hover the boxes below for a live preview of the different cursors. I’ve highlighted the most common once.
That’s all for today!
I hope that you enjoyed this post. Subscribe to DiviMundo on YouTube and join our Facebook group for more crisp content on WordPress and web design.
881 346 customers have already unleashed the true potential of WordPress. Download Divi and start building beautiful websites today.
Try today and get your money back within 30 days if you are not satisified. 100% Risk-Free.
Related posts
How To Create Custom Divi Column Structures In Mobile Devices
Let’s unlock a wide array of flexible Divi column layouts for mobile devices using grid CSS.

Display Two (Or More) Buttons Side By Side In Divi
Here are a few CSS snippets that lets you display and style as many Divi buttons you like side by side.

How To Disable Divi Static CSS Cache On Single Pages & Posts
Sometimes, the Divi Static CSS Cache doesn’t play well with all pages on your website. Now you can simply disable it on these single pages and posts.
0 Comments
Submit a Comment Cancel reply
This site uses Akismet to reduce spam. Learn how your comment data is processed.
About DiviMundo
We are dedicated to sharing knowledge about WordPress and Divi. Some of the links in this post are affiliate links. This means if you click on the link and purchase the item, I will receive an affiliate commission, but it will never cost more for you. Divi is a registered trademark of Elegant Themes, Inc. This website is not affiliated with nor endorsed by Elegant Themes.
Divi Resources
Offers
More from us
Stay Tuned!
Get the latest tutorials, layouts and news from DiviMundo. You can unsubscribe at any time.
Affiliate Disclaimer
All content on DiviMundo is funded by you – our beloved readers. Some of the links are affiliate links. This means that if you click on the link and purchase something, I will receive an affiliate commission. But it will never cost more for you. Thanks for your support!
Victor Duse, founder of DiviMundo
We use cookies on our website to give you the most relevant experience. By clicking “Accept All”, you consent to the use of ALL the cookies. Visit «Cookie Settings» to provide a controlled consent. Read More
Privacy Overview
This website uses cookies to improve your experience while you navigate through the website. Out of these, the cookies that are categorized as necessary are stored on your browser as they are essential for the working of basic functionalities of the website. We also use third-party cookies that help us analyze and understand how you use this website. These cookies will be stored in your browser only with your consent. You also have the option to opt-out of these cookies. But opting out of some of these cookies may affect your browsing experience.
Necessary cookies are absolutely essential for the website to function properly. These cookies ensure basic functionalities and security features of the website, anonymously.
| Cookie | Duration | Description |
|---|---|---|
| _GRECAPTCHA | 5 months 27 days | This cookie is set by the Google recaptcha service to identify bots to protect the website against malicious spam attacks. |
| cookielawinfo-checkbox-advertisement | 1 year | Set by the GDPR Cookie Consent plugin, this cookie is used to record the user consent for the cookies in the «Advertisement» category . |
| cookielawinfo-checkbox-analytics | 11 months | This cookie is set by GDPR Cookie Consent plugin. The cookie is used to store the user consent for the cookies in the category «Analytics». |
| cookielawinfo-checkbox-functional | 11 months | The cookie is set by GDPR cookie consent to record the user consent for the cookies in the category «Functional». |
| cookielawinfo-checkbox-necessary | 11 months | This cookie is set by GDPR Cookie Consent plugin. The cookies is used to store the user consent for the cookies in the category «Necessary». |
| cookielawinfo-checkbox-others | 11 months | This cookie is set by GDPR Cookie Consent plugin. The cookie is used to store the user consent for the cookies in the category «Other. |
| cookielawinfo-checkbox-performance | 11 months | This cookie is set by GDPR Cookie Consent plugin. The cookie is used to store the user consent for the cookies in the category «Performance». |
| viewed_cookie_policy | 11 months | The cookie is set by the GDPR Cookie Consent plugin and is used to store whether or not user has consented to the use of cookies. It does not store any personal data. |
Functional cookies help to perform certain functionalities like sharing the content of the website on social media platforms, collect feedbacks, and other third-party features.
Performance cookies are used to understand and analyze the key performance indexes of the website which helps in delivering a better user experience for the visitors.
Analytical cookies are used to understand how visitors interact with the website. These cookies help provide information on metrics the number of visitors, bounce rate, traffic source, etc.
| Cookie | Duration | Description |
|---|---|---|
| _ga | 2 years | The _ga cookie, installed by Google Analytics, calculates visitor, session and campaign data and also keeps track of site usage for the site’s analytics report. The cookie stores information anonymously and assigns a randomly generated number to recognize unique visitors. |
| _gat_gtag_UA_112395721_1 | 1 minute | Set by Google to distinguish users. |
| _gid | 1 day | Installed by Google Analytics, _gid cookie stores information on how visitors use a website, while also creating an analytics report of the website’s performance. Some of the data that are collected include the number of visitors, their source, and the pages they visit anonymously. |
| CONSENT | 16 years 2 months 25 days 12 hours | YouTube sets this cookie via embedded youtube-videos and registers anonymous statistical data. |
Advertisement cookies are used to provide visitors with relevant ads and marketing campaigns. These cookies track visitors across websites and collect information to provide customized ads.
| Cookie | Duration | Description |
|---|---|---|
| IDE | 1 year 24 days | Google DoubleClick IDE cookies are used to store information about how the user uses the website to present them with relevant ads and according to the user profile. |
| test_cookie | 15 minutes | The test_cookie is set by doubleclick.net and is used to determine if the user’s browser supports cookies. |
| VISITOR_INFO1_LIVE | 5 months 27 days | A cookie set by YouTube to measure bandwidth that determines whether the user gets the new or old player interface. |
| YSC | session | YSC cookie is set by Youtube and is used to track the views of embedded videos on Youtube pages. |
| yt-remote-connected-devices | never | YouTube sets this cookie to store the video preferences of the user using embedded YouTube video. |
| yt-remote-device-id | never | YouTube sets this cookie to store the video preferences of the user using embedded YouTube video. |
| yt.innertube::nextId | never | This cookie, set by YouTube, registers a unique ID to store data on what videos from YouTube the user has seen. |
| yt.innertube::requests | never | This cookie, set by YouTube, registers a unique ID to store data on what videos from YouTube the user has seen. |
Other uncategorized cookies are those that are being analyzed and have not been classified into a category as yet.
| Cookie | Duration | Description |
|---|---|---|
| et_bloom_optin_optin_5_mailchimp_f3bc4861cc_imp | 1 year | This cookie logs if you have signed up the email newsletter. |
| et_bloom_optin_optin_7_mailchimp_f3bc4861cc_imp | 1 year | This cookie logs if you have signed up the email newsletter. |
| wp-wpml_current_language | 1 day | This cookie tracks which language version (English or Spanish) you are using on this website. |
How to Change Cursor to Image on Hover Using CSS
![]()
In CSS, various types of cursors are used for different HTML elements, and to change the type of cursor, the “cursor” property is used. It permits you to change the cursor type and set the value of the cursor you want to display on the screen. As an additional feature, it also lets you set your own cursor image.
In this guide, you will learn:
- What is cursor CSS property
- How to change cursor to image on Hover using CSS
What is “cursor” CSS Property?
To control the appearance of the mouse over an HTML element, the “cursor” property of CSS can be used. It allows changing the regular cursor into different types such as copy cursor, hand pointer, grab, and many more. You can also set your own custom cursor by setting the url of the image in the cursor property.
The syntax of the cursor property is given as:
In the above-given syntax, assign the path of the image in the “url()” that you want to display on the screen.
We will now move to the example to change the regular cursor into an image on hover.
How to Change Cursor to Image on Hover Using CSS?
To change the cursor to an image on hover, first, add an element in HTML.
Example 1: Changing Cursor to an Image on Hover using cursor Property
We will create a heading and button class name “btn”.
Currently, hovering on the button will show the default cursor:
Now move to the CSS and change the cursor to the image.
Then, set the path of the image in the “url()”. For instance, we have specified “icon.svg” as our selected image. Then, set the value of the cursor property as “auto”.
Save the above code and execute the HTML file to see the following outcome:
The given output indicates that the cursor is successfully changed into an image on hover.
Note: “auto” is used as an alternative option in the cursor property; when the image does not load, or the file path or file itself is missing, the default icon is displayed on the screen because of the auto value.
Example 2: Setting Default Cursor on Hover
For instance, we will give the url of the image and only set the value of the cursor property as “auto”:
As a result, the cursor will not change when hovered over the button:
Example 3: Setting Image Alternative on Hover
In the place of auto, you can set different values of the cursor you want to display as an alternative to the image. For example, we will change the value of the cursor property from “auto” to “pointer”:
As you can see in the below output, the cursor is changed into a hand pointer when it hovers over the button:
We have provided the easiest method for changing the cursor image on hover using CSS.
Conclusion
In CSS, you can change the cursor to the image on hover using the “cursor” property. It allows changing a regular cursor to an image by assigning the “url” of the image to the cursor property. You can apply any type of cursor you want to display when it has hovered on an element. This article demonstrated the method of changing the cursor to a hand pointer.
About the author
Sharqa Hameed
I am a Linux enthusiast, I love to read Every Linux blog on the internet. I hold masters degree in computer science and am passionate about learning and teaching.