- Рамки блоков с градиентом
- Белый фон блока
- Результат:
- Пример:
- Еще один пример:
- Прозрачный фон блока
- Результат:
- Анимированный градиент
- Результат:
- Комментарии
- Другие публикации
- Border with gradient and radius
- Explanation
- That’s it!
- Create a gradient border in CSS
- Pseudo element
- Positioning trick
- Masking trick
- Background clip
- Demo
- Как сделать круглый border с градиентом?
- border с градиентом и скругленными углами css
Рамки блоков с градиентом
Примеры, как сделать рамку блока с градиентом и анимировать её.
Белый фон блока
.block < position: relative; >.block:before < content: ""; position: absolute; top: 3px; left: 3px; bottom: 3px; right: 3px; background-color: #fff; z-index: 1; border-radius: 4px; >.block:after < content: ''; position: absolute; top: 0; left: 0; height: 100%; width: 100%; background: linear-gradient(45deg, #F17C58, #E94584, #24AADB, #27DBB1, #FFDC18, #FF3706); z-index: -1; border-radius: 4px; >.block-content
Результат:
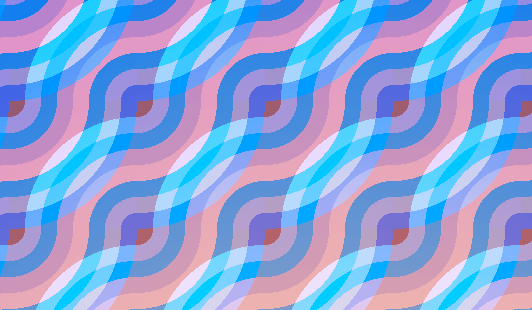
Используя различные градиенты можно добиться следующих узоров:
.block < position: relative; >.block:before < content: ""; position: absolute; top: 10px; left: 10px; bottom: 10px; right: 10px; background-color: #fff; z-index: 1; >.block:after < content: ''; position: absolute; top: 0; left: 0; height: 100%; width: 100%; background: repeating-linear-gradient(45deg, yellow 0, yellow 10px, #000 10px, #000 20px); z-index: -1; >.block-content
Пример:
Еще один пример:
.block < position: relative; margin: 0 auto; width: 500px; >.block:before < content: ""; position: absolute; top: 10px; left: 10px; bottom: 10px; right: 10px; background-color: #fff; z-index: 1; >.block:after < content: ''; position: absolute; top: 0; left: 0; height: 100%; width: 100%; background: repeating-linear-gradient(45deg, #fff, #fff 10px, #3C7AB8 0, #3C7AB8 20px, #fff 0, #fff 30px, #CB2C4B 0, #CB2C4B 40px); z-index: -1; >.block-content
Прозрачный фон блока
Для прозрачного фона потребуется CSS-свойство clip-path , которое задаст прозрачную область блока.
Результат:
Анимированный градиент
Анимировать градиент можно с помощью animation keyframes изменяя значения background-position .
.block < color: #ffffff; padding: 10px 30px; font-size: 16px; border-radius: 4px; position: relative; >.block:after < content: ''; position: absolute; top: 0; left: 0; right: 0; bottom: 0; border-radius: 4px; background: linear-gradient(60deg, #f79533, #f37055, #ef4e7b, #a166ab, #5073b8, #1098ad, #07b39b, #6fba82); z-index: -1; animation: blockanimate 3s ease alternate infinite; background-size: 300% 300%; clip-path: polygon(0% 100%, 3px 100%, 3px 3px, calc(100% - 3px) 3px, calc(100% - 3px) calc(100% - 3px), 3px calc(100% - 3px), 3px 100%, 100% 100%, 100% 0%, 0% 0%); >@keyframes blockanimate < 0% < background-position: 0% 50%; >50% < background-position: 100% 50%; >100% < background-position: 0% 50%; >>Результат:
Комментарии
Другие публикации
Еще один способ сделать эффект смешивания градиента и изображения, основан на свойстве background-blend-mode. Минус.

Имеем несколько колонок с разным по длине текстом, нужно сделать их одинаковой высоты и скрыть лишнее.

В CSS3 появилась возможность указать в свойстве background несколько изображений (Multiple Backgrounds), при этом они.
Border with gradient and radius

Unfortunately, border-radius isn’t supported with border-image and it’s painful to find tricks to obtain rounded borders having a gradient. Here is a trick that will produce such a result. No complex code, No SVG, or multiple elements are required! only two lines of CSS code using the mask property.
.box border-radius: 50px; /*1*/ border: 10px solid transparent; /*2*/ background: linear-gradient(45deg,red,blue) border-box; /*3*/ -webkit-mask: /*4*/ linear-gradient(#fff 0 0) padding-box, linear-gradient(#fff 0 0); -webkit-mask-composite: xor; /*5'*/ mask-composite: exclude; /*5*/ > 
Explanation
(1)(2): Those lines are trivial.
(3): We apply a gradient as background and we make its origin the border box (by default it’s the padding box).
(4): Using the mask property, we apply two opaque layers. The bottom one will cover the whole element and the top one will cover only the padding box (so it will not cover the border area)
(5): We exclude the top layer from the bottom one so that only the border area will be shown!
(5′): Some browsers still don’t support mask-composite so we use the prefixed version.
That’s it!
Now you can adjust the border, gradient, and radius as you want. The only drawback is that this will mask the content so we can move the code to a pseudo-element instead
.box position: relative; > .box::before content: ""; position: absolute; inset: 0; border-radius: 50px; padding: 10px; background:linear-gradient(45deg,red,blue); -webkit-mask: linear-gradient(#fff 0 0) content-box, linear-gradient(#fff 0 0); -webkit-mask-composite: xor; mask-composite: exclude; > 
I replaced the border with padding to make the code shorter but the logic remains the same: we exclude the content area from the padding area so only padding will remain visible
Create a gradient border in CSS
To show gradients for a border with CSS you can use the border-image property. It allows setting gradient values in the same way as the background-image property.
Besides the border-image property, you should specify additional properties to actually show border gradient.
We can combine these properties into a shorthand syntax border-width with border-style into border and border-image-source with border-image-slice into border-image .
.gradient-border border: 5px solid; border-image: linear-gradient(45deg, purple, orange) 1; > Now you have a nice looking gradient border. And you can use all types of gradients: linear-gradient , radial-gradient and conic-gradient .
However, there’s a drawback to this approach. You cannot use border-radius property, as it is not supported with the border-image property. But there are a few workarounds.
Pseudo element
Positioning trick
For this approach, we need to add a gradient as a background-image for the pseudo-element. Additionally, we need to set its position to absolute and set a negative margin, that will represent the border width. Give it a negative z-index to make it below the main element. And finally, make it inherit border-radius from the main element.
For the initial element, we need to set the required border-radius . Set background color, to match the body background. Optionally we give it a margin to make it within the boundaries of the container because pseudo-element has a negative margin.
.gradient-border-pseudo position: relative; padding: 10px 20px; background: #fff; margin: 5px; border-radius: 5px; > .gradient-border-pseudo::after content: ""; position: absolute; top: 0; right: 0; bottom: 0; left: 0; z-index: -1; margin: -5px; border-radius: inherit; background-image: linear-gradient(45deg, purple, orange); > Masking trick
For this solution, we’ll also use the pseudo-element, but instead of positioning it with z-index , we will use the mask property to clip the background.
The mask CSS shorthand property hides an element (partially or fully) by masking or clipping the image at specific points.
— MDN
While the mask property may lack full support, you can use this approach for the gradient border.
We’ll set the element’s background as a gradient. And then using mask property we’ll specify two more gradient backgrounds (same color as body ). The first one will mask (cover) the area within the padding boundaries, and the second one will mask (cover) the area all the way up to the border.
Additionally, we need to set the mask-composite property to exclude the top layer from the bottom in order to see the border.
.gradient-border-mask position: relative; padding: 15px 20px; > .gradient-border-mask::before content: ""; position: absolute; top: 0; left: 0; right: 0; bottom: 0; border-radius: 50px; border: 5px solid transparent; background: linear-gradient(45deg,purple,orange) border-box; -webkit-mask: linear-gradient(#fff 0 0) padding-box, linear-gradient(#fff 0 0); -webkit-mask-composite: destination-out; mask-composite: exclude; > Background clip
To avoid additional styles for pseudo-element you can use the background-image property in combination with background-clip property.
The background-clip CSS property sets whether an element’s background extends underneath its border box, padding box, or content box.
— MDN
Essentially we’re going to clip the background in the similar way we did with the mask property.
First, we’ll need to pass two gradients values for the background-image . One will represent the background of the element with the according color, and the second one will represent the border with gradient.
For each of the gradients, we’ll specify the background-clip property.
For the first one, the value will be padding-box , so the background will extend up until the border.
For the second one, the value will be border-box , which means that the background will extend to the outside edge of the border.
Finally we need to specify a transparent border color and border-radius , and it’s done.
.gradient-border-bg background: linear-gradient(#fff, #fff) padding-box, linear-gradient(45deg, slateblue, coral) border-box; border: 5px solid transparent; border-radius: 50px; > 💡 NOTE: To control the inner border-radius while maintaining the gradient you should use a slightly different approach. Check out my article on inner border-radius.
Demo
Complete examples with code available on CodePen:
See the Pen Untitled by Tippingpoint Dev (@tippingpointdev) on CodePen.
Как сделать круглый border с градиентом?
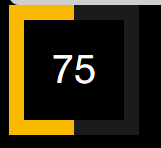
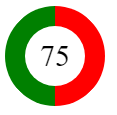
Сейчас пытаюсь так, но нагуглил что border-image и border-radius не работают вместе. Нужно то же самое что на скрине (это то, что в данный момент у меня), только чтобы border был круглый

Я не очень верно пример привёл, процент заполнения круга цветом $orange должен быть равен числу, т.е. там может быть
border-image: linear-gradient(to right, $orange 66%, $darkGrey 34%) ;Я так понимаю в той реализации, которую предложили вы — это сделать не получится
Ne7Le4Der, ну а вообще простейший вариант — это два блока
на заднем градиент и паддинг, на внутреннем фон
Делал следующим образом: блоку, который надо обернуть, прописал стиль position: relative. И создал внутри этого блока div, с стилями:
position: absolute;
top: -2px;
left: -2px;
bottom: -2px;
right: -2px;//толщина бордера
border-radius: который нам нужен
background: градиент, который нам нужен.
border с градиентом и скругленными углами css
Понадобилось мне тут, по воле дизайнера, верстать округлые кнопки с градиентной обводкой.
Да, в CSS3 конечно существует «border-image», при помощи которого можно делать градиенты для рамок. Но проблема в том, что данное CSS свойство, не работает в паре со свойством border-radius, отвечающим за скругление углов.
Есть еще варианты с имитацией бордера через псевдо-элементы или дополнительные теги. Но c псевдо элементами возникают нюансы с бэкграундами. А засорять код дополнительными тегами не хотелось.
Впав в легкое отчаяние и занимаясь уже соседним не менее заковыристым элементом. Я вдруг придумала! Как можно воплотить border с градиентом и скругленными углами, стандартными свойствами css и всего одним тегом.
a.button border: 3px solid transparent; /*Обводка нужной толщины, но прозрачная*/ background: linear-gradient(0deg, #5E17EB 0.08%, #E5097F 155.74%); /*Нужный градиент в качестве фона*/ box-shadow: inset 0px 0px 0px 100vw #fff; /*Тень направленная внутрь контейнера, перекрывает ненужный фон и оставляет только рамку*/ border-radius: 60px; /*Скругляет углы*/ /*дальше несущественно - выравнивания и отступы какие вам нужны*/ padding: 20px; margin: 5px 0; display: inline-block; >Важно - "box-shadow" должен быть достаточного размера чтобы перекрыть фон в блоке с обводкой.
У данного решения есть 2 странности, которые я пока не нашла как побороть:
- Градиент под border получается зеркально отраженным. Поэтому на фон нужно ставить не конечный градиент, а его перевернутую версию.
- Вытекает из первой. В уголках получаются вставки другого цвета.
З.Ы. Во всех браузерах не тестировала, но по идее должно работать. Если оттестировали, пишите результаты 🙂