- HTML Class Attribute
- Syntax
- Example of the HTML class attribute used with CSS:
- Example of the HTML class attribute with multiple class names:
- Example of the HTML class attribute with the and elements:
- Unique Page Styling with Custom CSS Body Classes
- Opening Your Browser’s Developer Tool and Locating the Body Tag
- Using a Page Body Class to Prefix a CSS Rule
- Common WordPress Body Class Names
- Do More with Siteorigin Premium
- HTML class Attribute
- Using class
- Задание класса для Body
- 5 ответов на этот вопрос
- Рекомендованные сообщения
- Присоединяйтесь к обсуждению
- Обсуждения
HTML Class Attribute
The HTML class attribute is used to specify one or more class names for an element. Commonly, the class attribute points to a class in a style sheet. The class name is case sensitive.
This attribute can also be used by JavaScript via the HTML DOM to make certain changes to HTML elements with a specified class name.
In HTML5, you can use the class attribute for any HTML element.
In HTML 4.01, the class attribute cannot be used with the following elements: , , , , , , , , and .
Although there aren’t specific requirements for the name of classes, it’s better to use names describing the semantic purpose of the element, and not its presentation. The name should begin with a letter a-z or A-Z, and it can be followed by letters, digits (0-9), underscores («_»), and hyphens («-«).
Syntax
html> html> head> title>Title of the document title> style> .red < color: red; > .orange < color: orange; > style> head> body> h1>Example of the HTML class attribute h1> p class="red">It is a some red paragraph. p> p>This is a some text. p> p class="orange">It is a some yellow paragraph. p> body> html>In CSS, if you want to select elements with a specific class, use a period (.) character followed by the class name.
Example of the HTML class attribute used with CSS:
html> html> head> title>Title of the document title> style> .title < background-color: #1c87c9; color: #ffffff; padding: 20px; > style> head> body> h1>Example of the class attribute h1> h2 class="title">Heading h2> p>Lorem ipsum, or lipsum as it is sometimes known, is dummy text used in laying out print, graphic or web designs. The passage is attributed to an unknown typesetter in the 15th century who is thought to have scrambled parts of Cicero's De Finibus Bonorum et Malorum for use in a type specimen book. p> h2 class="title">Heading h2> p>Lorem ipsum, or lipsum as it is sometimes known, is dummy text used in laying out print, graphic or web designs. The passage is attributed to an unknown typesetter in the 15th century who is thought to have scrambled parts of Cicero's De Finibus Bonorum et Malorum for use in a type specimen book.Lorem ipsum, or lipsum as it is sometimes known, is dummy text used in laying out print, graphic or web designs. The passage is attributed to an unknown typesetter in the 15th century who is thought to have scrambled parts of Cicero's De Finibus Bonorum et Malorum for use in a type specimen book. p> body> html>HTML elements can also have more than one class name. Each of them must be separated by a space.
Example of the HTML class attribute with multiple class names:
html> html> head> title>Title of the document title> style> .title < background-color: #202131; color: #dddddd; padding: 15px 25px; > .text-right < text-align: right; > style> body> h1>Example of multiple classes h1> p> Lorem ipsum, or lipsum as it is sometimes known, is dummy text used in laying out print, graphic or web designs. The passage is attributed to an unknown typesetter in the 15th century who is thought to have scrambled parts of Cicero's De Finibus Bonorum et Malorum for use in a type specimen book. p> h2 class="title">London h2> p> Lorem ipsum, or lipsum as it is sometimes known, is dummy text used in laying out print, graphic or web designs. The passage is attributed to an unknown typesetter in the 15th century who is thought to have scrambled parts of Cicero's De Finibus Bonorum et Malorum for use in a type specimen book. p> h2 class="title text-right">Paris h2> p> Lorem ipsum, or lipsum as it is sometimes known, is dummy text used in laying out print, graphic or web designs. The passage is attributed to an unknown typesetter in the 15th century who is thought to have scrambled parts of Cicero's De Finibus Bonorum et Malorum for use in a type specimen book. p> h2 class="title">Tokyo h2> body> html>Example of the HTML class attribute with the and
elements:
html> html> head> title>Title of the document title> style> .grey-text < color: #808080; > style> body> h1>Example of the class attribute h1> h2 class="grey-text">Heading h2> p class="grey-text"> Lorem ipsum, or lipsum as it is sometimes known, is dummy text used in laying out print, graphic or web designs. The passage is attributed to an unknown typesetter in the 15th century who is thought to have scrambled parts of Cicero's De Finibus Bonorum et Malorum for use in a type specimen book. p> body> html>Unique Page Styling with Custom CSS Body Classes
Cascading Style Sheets (CSS) is the programming language used to style your WordPress pages and posts. If you’d like to make small style changes that aren’t available via theme or plugin settings, Custom CSS is a great way to do that. Our SiteOrigin CSS plugin offers a visual editor interface as well as a standard Custom CSS field for you to enter your CSS rules. If you aren’t familiar with CSS basics, our visual editor is a great way to get started.
We chat with many users that are comfortable adding Custom CSS rules but aren’t quite sure how to apply a particular rule to a page or group of pages. The ability to make a rule specific to a post, page or group of posts is really useful and much easier than you might think. WordPress outputs class names into the body tag of each post or page, we can use those class names to prefix our CSS rules and thereby make them specific to the post, page or group of posts we’d like to target. In this introductory tutorial, we’ll cover using your browser’s developer tool to locate body classes and how to apply them to your Custom CSS rules.
Opening Your Browser’s Developer Tool and Locating the Body Tag
To get started, browse to the page on your website that you’d like to customize. Next, open your browser’s developer tool either by right-clicking anywhere and selecting Inspect (Inspect Element for Firefox and Safari) or via the keyboard shortcut Control + Shift + I on Windows/Linux or Command + Option + I on Mac. In Chrome and Safari, ensure you’re viewing the Elements tab, in Firefox ensure you’re viewing the Inspector tab. Next, locate the body tag, you’ll find it close to the top of the page’s source code, just below the closing head tag.
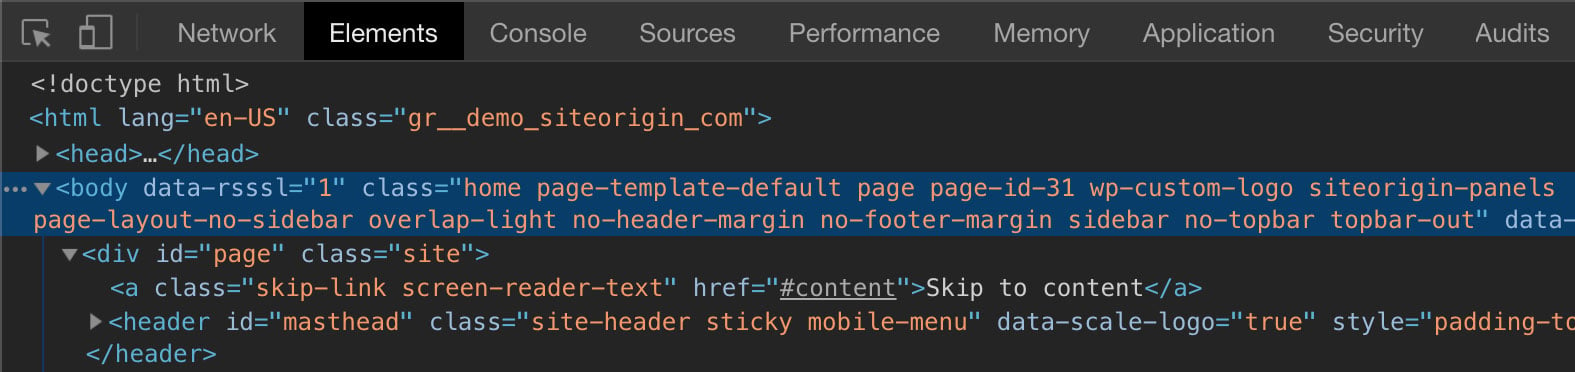
Locate the body tag, just below the closing head tag.
In this example we’re viewing the Corp demo home page. There are two body classes we could use to target this particular page, either home or page-id-31 .
Using a Page Body Class to Prefix a CSS Rule
Let’s say for example that we’d like to change the background color of the Corp demo home page footer. The footer background color is defined by the following CSS rule:
If we add the above rule to our Custom CSS and change the background value, the rule will be applied to the entire site. However, if we prefix the rule with one of the body classes specific to the home page, it’ll ensure the rule is only applied to the home page. The two body classes we can choose from are home or page-id-31 , either can be used.
The above rule will change the background color of the site footer from #363a43 to #2f333b and will do so only on the home page. Note the period before the home class name. Class names are prefixed with a period when writing CSS.
Common WordPress Body Class Names
Below you’ll find a list of some of the class names used within WordPress. This list is to give you an idea of some of the common class names used but is by no means complete.
Home: home
Targets the static home page assigned at Settings Reading .
Blog: blog
Targets the blog (posts) page assigned at Settings Reading .
Pages: page to target all pages or page-id-x to target a single page.
Replace x with the ID of the page, you can locate the ID by editing the page and checking the URL, the page ID number will be the only number listed in the URL.
Posts: single-post to target all posts or postid-x to target a single post.
Replace x with the ID of the post, you can locate the ID by editing the post and checking the URL, the post ID number will be the only number listed in the URL.
Archive: archive
Applies to all archive pages such as category, tag and author archives.
Category: category to target all category pages. category-slug or category-x can be used to target a single category. Replace slug with the category slug or x with the ID number of the category you’re targetting. Either can be used.
Tag: tag to target all tag pages. tag-slug or tag-x can be used to target a single tag. Replace slug with the tag slug or x with the ID number of the tag you’re targetting. Either can be used.
Author: author to target all author pages. author-username or author-x can be used to target a single author. Replace username with the author’s username or x with the ID number of the author you’re targetting. Either can be used.
404: error404
Search Results: search-results
Do More with Siteorigin Premium
SiteOrigin Premium offers a huge array of additional functionality for Page Builder, the Widgets Bundle and all of our themes. Enhance SiteOrigin CSS with Web Font Selector addon which allows you to easily choose from hundreds of beautiful web fonts right in the visual editor. SiteOrigin Premium also includes access to our next-level email support service, perfect for those times when you need fast and effective technical support.
HTML class Attribute

Militia Company of District II under the Command of Captain Frans Banninck Cocq, also known as The Shooting Company of Frans Banning Cocq and Willem van Ruytenburch, but commonly referred to as The Night Watch (Dutch: De Nachtwacht), is a 1642 painting by Rembrandt van Rijn. It is in the collection of the Amsterdam Museum but is prominently displayed in the Rijksmuseum as the best-known painting in its collection. The Night Watch is one of the most famous Dutch Golden Age paintings. The painting is famous for three things: its colossal size, the dramatic use of light and shadow (tenebrism), and the perception of motion in what would have traditionally been a static military group portrait. The painting was completed in 1642, at the peak of the Dutch Golden Age.
.body-style The Night Watch Militia Company of District II under the Command of Captain Frans Banninck Cocq, also known as The Shooting Company of Frans Banning Cocq and Willem van Ruytenburch, but commonly referred to as The Night Watch (Dutch: De Nachtwacht), is a 1642 painting by Rembrandt van Rijn. It is in the collection of the Amsterdam Museum but is prominently displayed in the Rijksmuseum as the best-known painting in its collection. The Night Watch is one of the most famous Dutch Golden Age paintings.
The painting is famous for three things: its colossal size, the dramatic use of light and shadow (tenebrism), and the perception of motion in what would have traditionally been a static military group portrait. The painting was completed in 1642, at the peak of the Dutch Golden Age.

Using class
Classes (i.e. classnames) are used for styling the body element. Multiple classnames are separated by a space. JavaScript uses classes to access elements by classname.
Задание класса для Body
Задача реализовать различное графическое оформление для различных страниц сайта.
Скажем, определение фона и шрифт для стандартного шаблона идет через класс «.body1», а для определенного диапазона страниц — через «.body2».
Либо это делается как-то иначе?
Ссылка на комментарий
Поделиться на других сайтах
5 ответов на этот вопрос
Рекомендованные сообщения
Присоединяйтесь к обсуждению
Вы можете опубликовать сообщение сейчас, а зарегистрироваться позже. Если у вас есть аккаунт, войдите в него для написания от своего имени.
Примечание: вашему сообщению потребуется утверждение модератора, прежде чем оно станет доступным.
Обсуждения

http://htmlbook.ru/html/area на одной картинке можно организовать несколько областей ссылок ведущих на разные страницы
margin внутри таблицы не работает, кста еще можно вот так реализовать так заливка ячеек будет корректно работать, если она нужна будет
| row 1 cell 1 | row 1 cell 2 | row 1 cell 3 must contain several lines |
| row 2 cell 1 | row 2 cell 2 | |
| row 3 cell 1 | row 3 cell 2 | |
| row 4 cell 1 | row 4 cell 2 | |
| row 5 cell 1 | row 5 cell 2 | row 5 cell 3 |
| row 6 cell 1 | row 6 cell 2 | row 5 cell 3 |
если не критично еще можно использовать обертку внутри ячеек, и с ней много чего можно дополнительного реализовать в таблицах
Switch74 Спасибо, второй вариант как раз то, что хотелось. Не понятно только, почему margin-top не работает, пробовал задавать и для клеточек, и для всей строки. А про padding как-то не подумал.
тогда как выше предложили пустую строку
| row 1 cell 1 | row 1 cell 2 | row 1 cell 3 must contain several lines |
| row 2 cell 1 | row 2 cell 2 | |
| row 3 cell 1 | row 3 cell 2 | |
| row 4 cell 1 | row 4 cell 2 | |
| row 5 cell 1 | row 5 cell 2 | row 5 cell 3 |
| row 6 cell 1 | row 6 cell 2 | row 5 cell 3 |
или если подсветка ячеек не обязательна, то можно так
| row 1 cell 1 | row 1 cell 2 | row 1 cell 3 must contain several lines |
| row 2 cell 1 | row 2 cell 2 | |
| row 3 cell 1 | row 3 cell 2 | |
| row 4 cell 1 | row 4 cell 2 | |
| row 5 cell 1 | row 5 cell 2 | row 5 cell 3 |
| row 6 cell 1 | row 6 cell 2 | row 5 cell 3 |