- Тег body
- Атрибут Background
- Атрибут Bgcolor
- Атрибут Text
- Атрибут Link
- Атрибут Alink
- Атрибут Vlink
- Атрибут Topmargin, Bottommargin, Leftmargin и Rightmargin
- Создание ссылок в HTML
- Css body alink vlink
- link, vlink and alink
- clear
- size
- noshade
- Part 3
- How to Change the HTML Link Color?
- Different Types of Hyperlinks in HTML
- How to Change Link Color in HTML ?
- Example 1: Using HTML Style Attribute
- Example 2: Using HTML Body Tag
- Example 3: Using CSS
- See Also
- Conclusion
Тег body
Тег — (тело документа) предназначен для хранения содержимого страницы.
Все, что Вы видите в окне браузера — располагается в теле документа: текст, таблицы, изображения, фотографии, формы для заполнения и т.д.
Атрибут Background
Атрибут background тега body — задает фоновый рисунок страницы.
В качестве фонового рисунка желательно использовать изображение, размер которого совпадает (или больше) с размером окна браузера, так как иначе картинка будет повторяться. В отличии от обычных изображений, размещаемых на странице — для фонового изображения нельзя задать ширину и высоту (оно всегда отображается в натуральную величину).
Атрибут Bgcolor
Атрибут bgcolor тега body — задает фоновый цвет страницы.
Атрибут Text
Атрибут text тега body — задает цвет текста на странице.
Цвет текста можно изменить в любом месте страницы, используя тег .
Атрибут Link
Атрибут link тега body — задает цвет ссылок на странице.
Атрибут Alink
Атрибут alink тега body — (active link) — задает цвет активных ссылок (ссылка является активной при нажатии на нее кнопкой мыши).
Атрибут Vlink
Атрибут vlink тега body — (visited link) – задает цвет уже посещенных ссылок.
Атрибут Topmargin, Bottommargin, Leftmargin и Rightmargin
Атрибут topmargin, bottommargin, leftmargin и rightmargin тега body — эти атрибуты задают отступ от, соответственно, верхней, нижней, левой и правой частей окна браузера до содержимого страницы.
Атрибуты отступа поддерживаются не всеми браузерами
Создание ссылок в HTML
Проверив в браузере нашу страницу, мы увидим эту ссылку, но она не действует. А не действует потому-что мы не указали никаких атрибутов (куда же она должна ссылаться).
Самый основной атрибут ссылки — это атрибут href . Именно он отвечает за то куда ссылка должна ссылаться. В значении этого атрибута мы должны указать ту страницу, на которую наша ссылка должна нас перебросить (прописать полный путь на эту страницу).
Следующий атрибут, применяемый у ссылок — это атрибут target , отвечающий за открытие ссылки (а именно в каком окне (вкладке) откроется страница, на которую ведет ссылка). Можно открыть в том же окне, а можно и в новом окне (вкладке).
Для открытия ссылки в новом окне используем значение «_blank» (со знаком подчеркивания).
Еще один атрибут у ссылок — это атрибут title . Этот атрибут не обязательный, а применяем его для указания темы той страницы на которую ссылаемся. При наведении курсора на ссылку будет всплывать подсказка (то что мы пропишем в значении атрибута title ).
Это мы сделали ссылки ведущие на страницы нашего же сайта. Теперь давайте создадим ссылку ведущую на страницу другого сайта. Для этого в значении атрибута href нам надо прописать полный адрес сайта, на который мы ссылаемся.
Вот таким способом создаются ссылки на другие интернет-ресурсы.
Теперь рассмотрим следующий тип ссылок — это ссылки на скачивание файлов. В якоре такой ссылки пропишем — скачать файл , а в значении атрибута href необходимо указать полный адрес расположения файла для скачивания.
При клике по ссылке открывается окно загрузки файла где нам предлагается скачать файл. Вот так создаются ссылки на скачивание файлов.
Теперь давайте создадим ссылку на ваш email-адрес , при клике по которой у пользователя загружается почтовая программа где он может написать вам письмо. В значении атрибута прописываем следующее: «mailto: адрес вашей электронной почты, на который будут приходить письма » .
Далее поговорим о ссылке на определенную часть страницы, так как ссылаться можно не только с одной страницы на другую, но и с одного места страницы на другое место этой же страницы.
Для начала нам необходимо создать метку в том месте страницы, куда мы будем переходить по ссылке. Для этого в html-коде, в выбранном нами месте пишем следующую строку:
Как видим у нас появился новый атрибут — name , а в значении этого атрибута пишем имя метки (любое).
Дальше создаем саму ссылку в том месте, откуда мы будем делать переход. В значении атрибута href пишем имя метки через символ решетки — # .
Таким же образом можно ссылаться на определенную часть другой страницы, создав на этой странице метку. А при создании ссылки на эту метку, в значении атрибута после адреса страницы указать имя метки.
В окончании рассмотрим цвета ссылок на странице. Не посещенная ссылка имеет один цвет, а после клика по этой ссылке она меняет цвет на другой. Если этот цвет не подходит под дизайн страницы, это можно легко исправить.
Исправляется это в теге нашего html-документа. У тега тоже есть свои атрибуты и некоторые из них отвечают за цвет ссылок.
Атрибут link — отвечает за цвет не посещенных ссылок.
Атрибут vlink — отвечает за цвет уже посещенных ссылок.
Атрибут alink — отвечает за цвет ссылки при клике по ней.
В значениях атрибутов прописываем цвет, который нам необходим.
Еще один важный момент — это подчеркивание ссылок и его влияние на поведенческие факторы — endseo.ru
Вот все о создании ссылок.
Css body alink vlink
In Part 1 of CSS for Deprecated HTML Attributes, I described how to replace HTML’s deprecated attributes with CSS, which is more flexible and inline with web standards in use today. If you want to convert an existing site that is using out of date practices or want to understand how to bring your own development up to scratch, then these articles are for you.
Let’s get straight into it with link, alink and vlink. I’ll also cover clear, size and noshade.
link, vlink and alink
Link, alink (active link) and vlink (visited link) were all attributes for the element. Link sets the colour of the text of unvisited hyperlinks, alink the colour when selected by the user (when the link is being clicked) and vlink the colour of visited hyperlinks.
Deprecated example of the link attributes in the body element
To put this into a stylesheet you need to use the “:link”, “:visited” and “:active” pseudo-classes on the “a” type selector.
The flexibility here is that any extra styling can be added to the hyperlink, that wasn’t possible through HTML alone. You can add borders, background images or colour, change font family and size and most usually to amend whether the default underline shows or not. CSS allows for 2 other states that were not possible previously. “:hover” and “:focus”. :hover sets the style of the link when the mouse pointer passes over it and :focus is what is seen when the link is tabbed on to using the keyboard.
The pseudo-classes have differing specificities which means there is a set order in which these must be written; link, visited, focus, hover then active. The standard mnemonic that people use is “LoVe, HAte” with focus added in the middle, if you’re using it.
clear
The clear attribute was deprecated for use in the
element. It specified where the next line should appear after the line break caused by this element, to control the text flow around floating objects. As with border, this conversion should be used anywhere you would like to clear floats.
The next line will begin.
// . normally (default)
// . on the nearest line below any floating objects on the left-hand margin
// . on the nearest line below any floating objects on the right-hand margin
// .. on the nearest line below any floating objects on both margins
Deprecated examples of the clear attribute in the br element
One common use for clear in today’s coding is to ensure a footer starts below any floating 2 or 3 column layout. For this you would want to position it underneath anything on the left and right margins, so that it is the very last item presented; in otherwords to clear all items. In CSS that is translated to “clear:both”:
#footer < clear: both; >// same as clear="all" br < clear:left; >// an example to replace the deprecated use of clear in
Clear left, right and none use the same value in the declaration as their name, i.e. clear:left, clear:right and clear:none – very easy.
size
Size was in use on the
(horizontal rule) element to set it’s height in pixels or percentage. Years ago I would always set size to 1 to give a thin solid black line, which would get rid of the default two-tone shading effect – more on the shading of
later.
Before I show how to replicate this using CSS, I should point out that there are continual wranglings about whether or not this whole tag should still be in use. The two sides to the argument are; on the one hand it is a purely presentational element and should be removed in favour of using a border declaration in CSS; and on the other hand it has its semantic place to divide sections of text. I will leave the decision to you – a huge discussion on
’s semantics took place on the Web Standards Group list last week.
To replicate in CSS is simple and uses the “height” declaration:
By moving this to CSS we again open up the possibilities of how a horizontal rule can be styled – adding colour, relative heights and background images (note: the rendering of background images and colour is not consistent across the browsers).
noshade
The
element had another attribute deprecated; noshade was a boolean attribute used to remove the two-tone shading effect and set the line in a solid colour, usually grey.
As a small aside, boolean attributes in XHTML are no longer used in their shortened form. For example, the “checked” attribute that is still in use on elements should be written in long-hand:
Similarly for “selected” in elements:
Removing the shade in CSS isn’t as straight-forward as the attributes we’ve seen so far. In IE you’ll need to use the “color” declaration; and in Mozilla and Opera you need to use both the “border” and “background-color” declarations to get a similar effect to the original attributes. The following should be safe across different browers.
The same styling rules apply as for the “size” attribute above.
Part 3
I’ll finish this series off by looking at bgcolor, align, width and height.
How to Change the HTML Link Color?

HTML Links are connections that help to switch between two resources over the web. HTML links or hyperlinks allow users to navigate from one location to another. Besides, links bookmark a portion of the page, navigate to internal parts of the website, download files, etc.
The HTML links have default colors assigned that can be altered using HTML and CSS. However, in this case, it is advised to prefer CSS over HTML, as the primary purpose of CSS is styling the webpage.
Different Types of Hyperlinks in HTML
The different types of HTML links are :
The links have different HTML link colors assigned to them that indicate their state of interactiveness. A hyperlink is underlined by default.
The different hyperlink states are as follows :
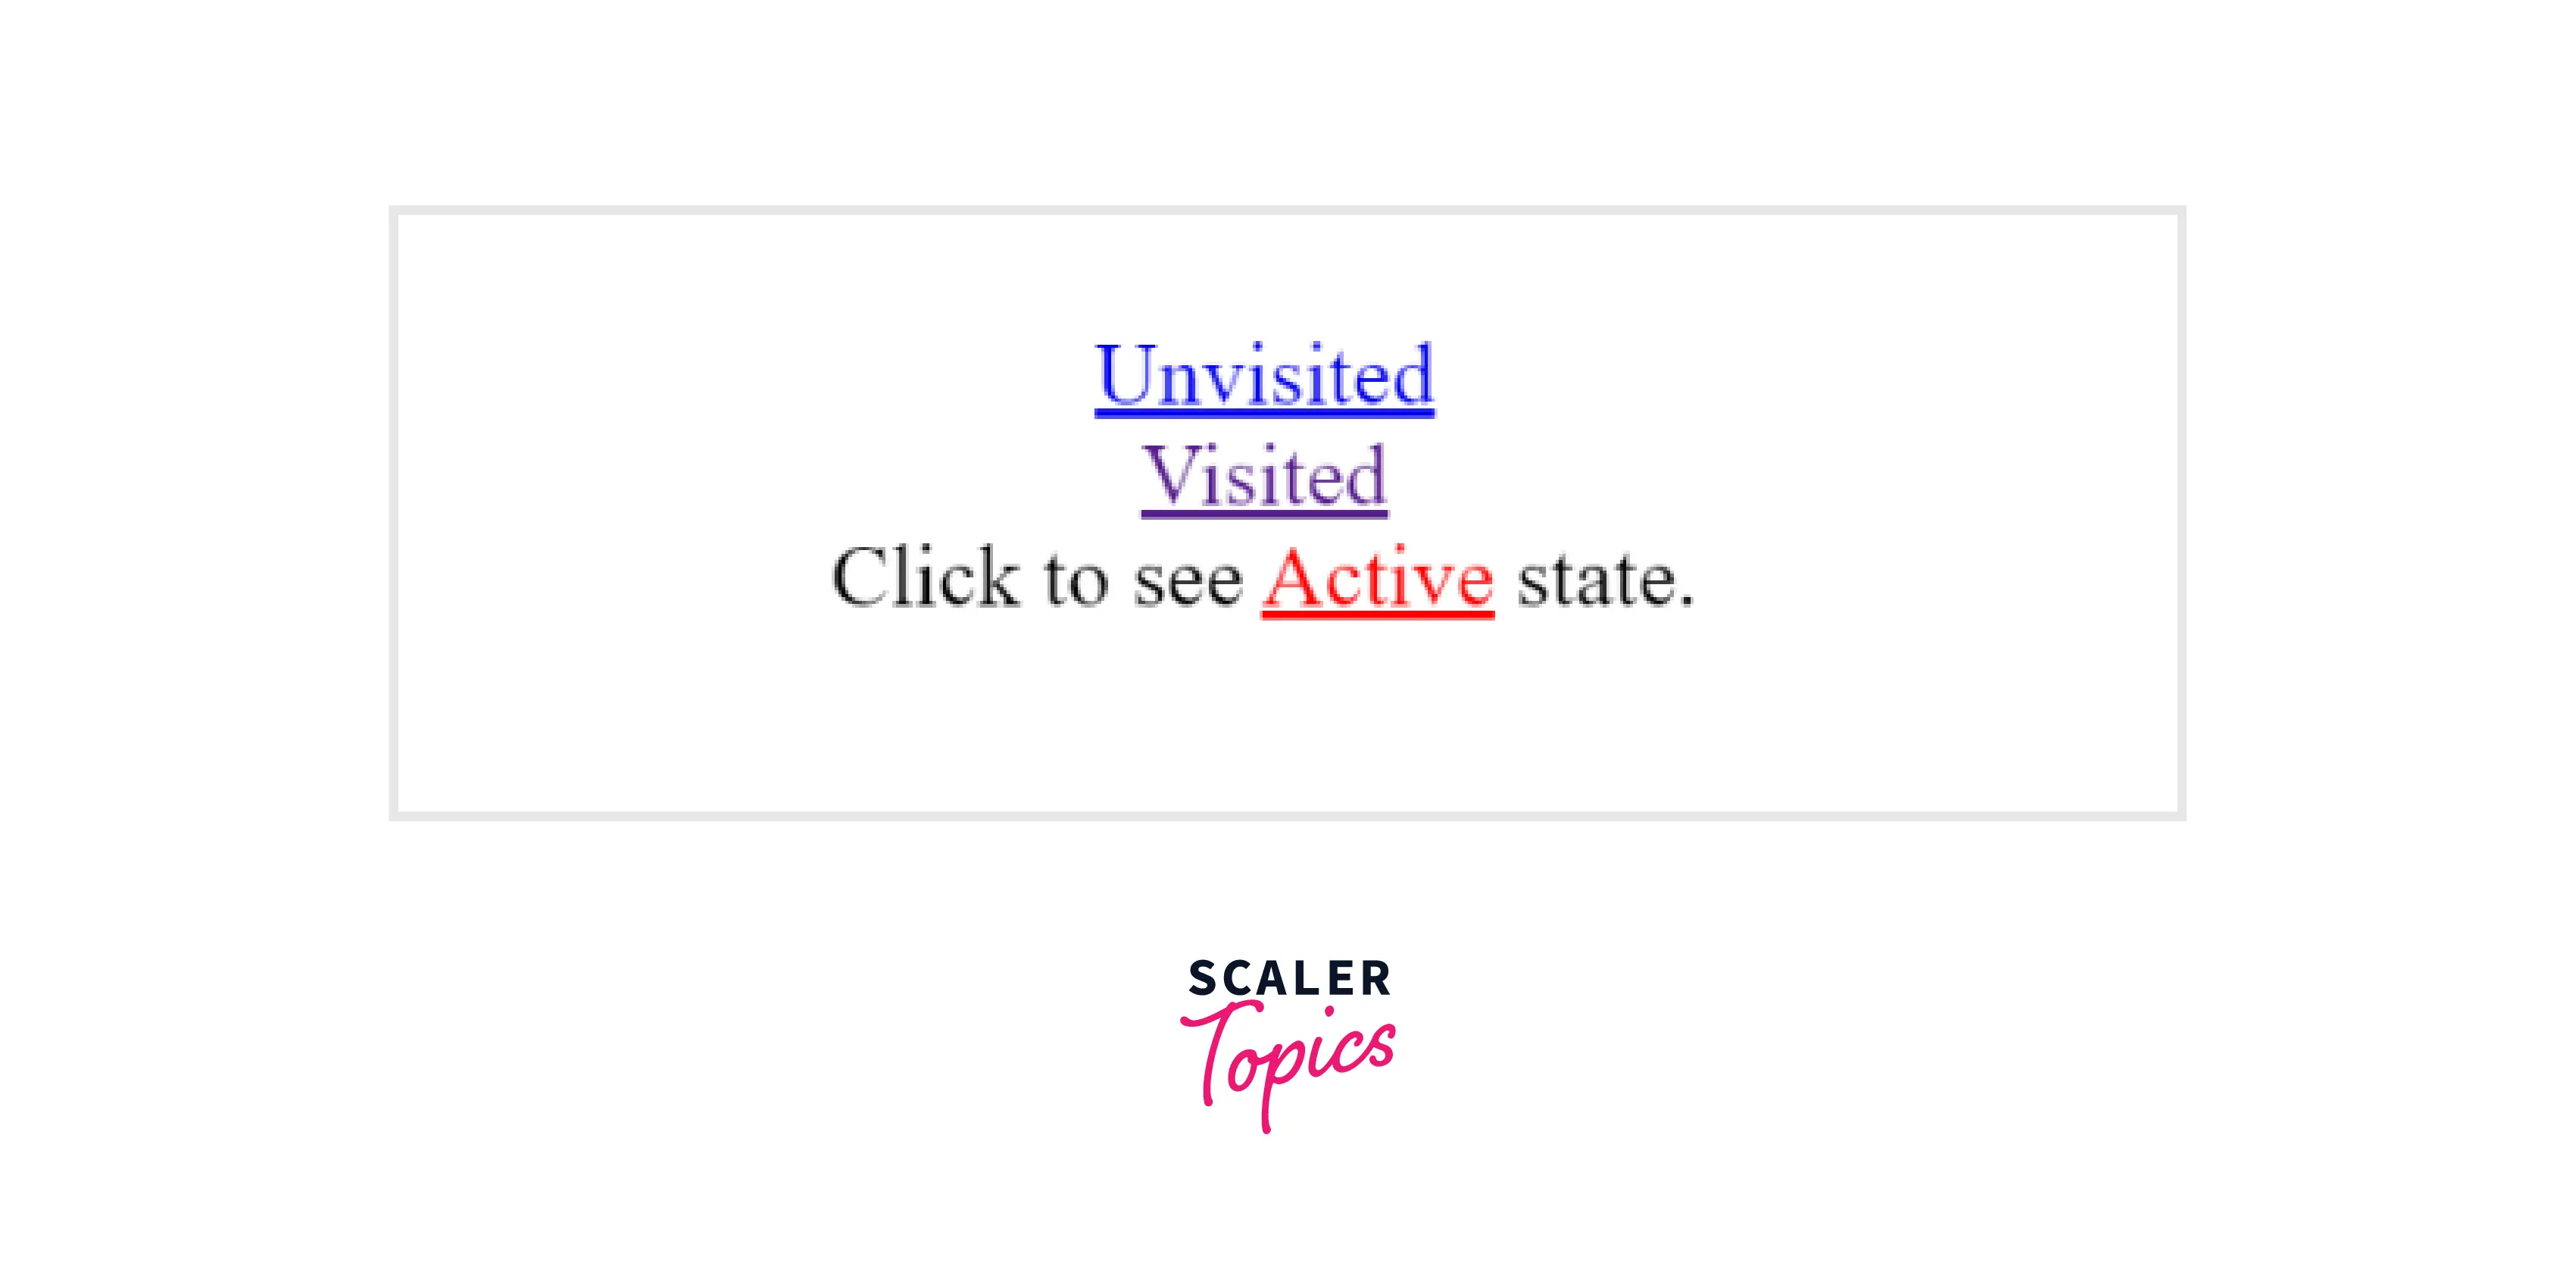
- Unvisited link :
A blue hyperlink implies that the linked destination, has not been viewed by the user. - Visited link :
A purple hyperlink indicates that the user has already seen the linked page. - Active Link :
In this state color of the link turns red on being clicked. This indicates that releasing the mouse button will lead the user to the linked location. - Hover link :
The state when the mouse pointer is hovering over a link has the same color as in the Active and Visited links.
Note :
Though the link states have default HTML link colors, the users can change the colors as per requirements.
How to Change Link Color in HTML ?
Example 1: Using HTML Style Attribute
The following steps will guide you to modify the color for a link using HTML.
Note :
The default color for a link state can be changed using HTML tags and attributes. The style attribute can override any style set using HTML tag or an external style sheet.
Note :
The following CSS code is used only for styling purposes.

Output
Example 2: Using HTML Body Tag
The following attributes of the HTML tags help in defining the link colors according to their state.
- LINK sets the default color of an unvisited link.
- VLINK sets the color for a visited link.
- ALINK sets the color that should appear when a link is in an active state (when the link is clicked).
Note :
HTML5 does not support the link attribute in the body tag.
The following steps will guide you to set the color to the hyperlink states using HTML tag.
- Step — 1
In the initial step, set the HTML values for the link, alink, and vlink attributes in the body tag. - Step — 2
Next, add an anchor tag with the destination link. - Step — 3
Rerun the file to see if changes take place.
Example 3: Using CSS
The following example sets new colors to the hyperlink states using CSS.
- Step — 1
In the initial step, set the HTML link color for the anchor tag, which implies all the states have the mentioned color. - Step — 2
Next, set the desired HTML link color values for the active, visited, and hover states. - Step — 3
Rerun the file to see if changes take place.
Note: Since no additional change is made to the unvisited state, the color remains at the initially set value.
See Also
Conclusion
- HTML links connect two resources over the web.
- The default appearance of the different types of links are :
- Unvisited link — Blue
- Visited link — Purple
- Active link — Red