- 4 Quick Steps To Make An Image Map In HTML (With Code Example)
- Should You Use Image Maps?
- Image Maps Explained
- HTML Elements Used to Create Image Maps
- Creating a Simple Image Map
- Step 1: Determine the size of our image
- Step 2: Create a map to overlay the image
- Step 3: Define the coordinates for the map shapes
- Step 4: Put it all together
- Learn More About Image Maps
- Server-Side Image Maps
- Creating the Map File
- HTML Image Maps
- Image Maps
- Example
- How Does it Work?
- The Image
- Create Image Map
- The Areas
- Shape
- Shape=»rect»
- Example
- Shape=»circle»
- Example
- Shape=»poly»
- Example
- Image Map and JavaScript
- Example
- Chapter Summary
- HTML Image Tags
- HTML Tag
- Browser Support
- Attributes
- Global Attributes
- Event Attributes
- More Examples
- Example
- Related Pages
- Default CSS Settings
- COLOR PICKER
- Report Error
- Thank You For Helping Us!
4 Quick Steps To Make An Image Map In HTML (With Code Example)
Image maps aren’t as popular today as they once were. In the past, they were very common, and used to create navigation menus on lots of popular websites. While they are rarely used for this purpose any longer, image maps are still a valuable way to display complex sets of links. Take for instance this clickable map of state budget information.
Should You Use Image Maps?
Image maps can still be useful for the right application, as you can see in the example linked to above. However, in today’s mobile-first environment you should do two things to make sure your website is accessible to mobile device users:
- Create a fallback for your image map. This can be as simple as creating a table or list of the links contained in the image map, and placing them directly below the image map. Take another look at the clickable state map we linked to above. Notice the table of links below the map. This table creates a fallback for users who can’t see or use the map.
- Make the image map responsive so that it changes size based on the size of the device being used to view the map.
Thankfully, there is an easy-to-use jQuery plugin, created by Matt Stow, which makes image maps responsive. Or if your website is powered by WordPress, there’s a free WordPress plugin you can use which is based on Matt’s jQuery plugin.
Image Maps Explained
The basic idea behind an image map is that you combine two different components:
The map is overlaid on the image, and the clickable areas coincide with portions of the image. In HTML the image and the clickable areas are coded separately. However, from the visitor’s perspective, it appears that portions of the image itself are linked to different destination.
HTML Elements Used to Create Image Maps
There are three HTML elements used to create image maps:
- img : specifies the location of the image to be included in the map.
- map : is used to create the map of clickable areas.
- area : is used within the map element to define the clickable areas.
It’s easiest to understand how all of this works by looking at an example.
Creating a Simple Image Map

Here’s our image: What we’re going to do is link the screen of the phone to Facebook and the Scrabble letters to the Wikipedia article on social media.
Step 1: Determine the size of our image
Our image is 1000 pixels wide by 664 pixels tall. However, in this example, we’re going to use HTML to cause the image to display half that size: 500 by 332 pixels. When you create an image map it’s important to remember that if you change the size of the image you will also have to change the area coordinates. This is because the area coordinates are tied to the original size and scale of the image. In order to render our image in the size we’ve selected we’ll use this code:

Step 2: Create a map to overlay the image
The map code is quite simple. It looks like this:
What’s missing at this point are the clickable areas. Those will need to be defined between the opening and closing map tags. It’s important to assign a name to the map. In this case we’ve used name=»map_example» as the name of the map. This name is what is used to overlay the map on the image. Take another look up at the image code in Step 1. Notice the usemap attributed followed by the name of the map. This is how the map is tied to the image.
Step 3: Define the coordinates for the map shapes
We need to create two shapes to overlay over the image: a polygon shape over the screen of the phone, and a second polygon that approximately covers the Scrabble letters. The clickable shapes we’re going to define will look something like this.
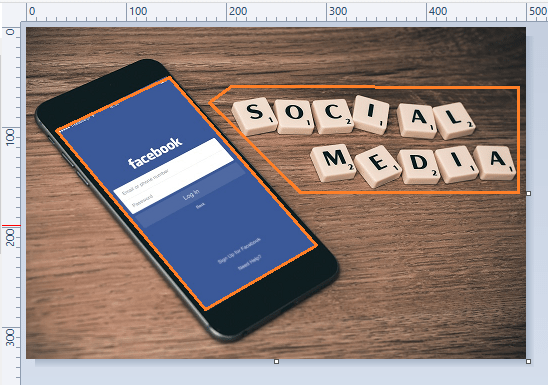
Using an application like Microsoft Paint with the rulers visible, we can see that the four corners of the phone screen fall at the following pixel coordinates:
- Top left: 30 by 100 pixels
- Top right: 140 by 50 pixels
- Bottom right: 290 by 220 pixels
- Bottom left: 180 by 280 pixels
We can create that shape, or area , in an HTML map by using the following code:
Using the same process described above, we can also create the shape over the letters by using the following code:
Notice that since the shape over the Scrabble images has five corners there are five sets of dimensions in the code.
Step 4: Put it all together
We can combine the image, map, and shapes into a single block of code that looks like this:
And here’s how that code actually renders:
Learn More About Image Maps
This tutorial covers enough to get you started with image maps. However, there’s a lot more to learn. For example, in addition to poly , you can also use rect and circle to define shapes. Learn more about using image maps by visiting the map documentation page.
Server-Side Image Maps
The method for creating images maps that we’ve covered in this tutorial is a pure HTML solution. However, image maps can also be created with some server-side activity. Here’s how this all works:
- An image map file is created and stored on the web server. The map file can be either in map format (.map), CGI, or PHP.
- The mapped image is displayed in a browser and linked to the map file.
- When a visitor clicks on a portion of the image, the clicked coordinates are sent to the server.
- The server processes the coordinates based on the instructions contained within the map file, identifies the appropriate hyperlink, and sends the visitor to the linked destination.
The ismap image attribute is used to identify an image as part of a server-side image map, and the img tag is wrapped in an anchor element which points toward the map file. Here’s what the HTML portion of the code for a server-side image map looks like:
The ismap method was common in the past, but if you’re going to create image maps today, it is recommended that you use the usemap attribute and the method described in detail in this tutorial.
Creating the Map File
The map file itself can be in one of three formats: map, PHP, or CGI. The simplest format is the map format. If we were to use a map file to store the coordinates we used in our previous example we would type the following code into a text file:
poly https://facebook.com 30,100,140,50,290,220,180,280 poly https://en.wikipedia.org/wiki/Social_media 190,75,200,60,495,60,495,165,275,165, That file would be saved as ismap.map and uploaded to the server.
Jon is a freelance writer, travel enthusiast, husband and father. He writes about web technologies such as WordPress, HTML, and CSS.
HTML Image Maps
With HTML image maps, you can create clickable areas on an image.
Image Maps
The HTML tag defines an image map. An image map is an image with clickable areas. The areas are defined with one or more tags.
Try to click on the computer, phone, or the cup of coffee in the image below:

Example
Here is the HTML source code for the image map above:
How Does it Work?
The idea behind an image map is that you should be able to perform different actions depending on where in the image you click.
To create an image map you need an image, and some HTML code that describes the clickable areas.
The Image
The image is inserted using the tag. The only difference from other images is that you must add a usemap attribute:
The usemap value starts with a hash tag # followed by the name of the image map, and is used to create a relationship between the image and the image map.
Tip: You can use any image as an image map!
Create Image Map
The element is used to create an image map, and is linked to the image by using the required name attribute:
The name attribute must have the same value as the ‘s usemap attribute .
The Areas
Then, add the clickable areas.
A clickable area is defined using an element.
Shape
You must define the shape of the clickable area, and you can choose one of these values:
- rect — defines a rectangular region
- circle — defines a circular region
- poly — defines a polygonal region
- default — defines the entire region
You must also define some coordinates to be able to place the clickable area onto the image.
Shape=»rect»
The coordinates for shape=»rect» come in pairs, one for the x-axis and one for the y-axis.
So, the coordinates 34,44 is located 34 pixels from the left margin and 44 pixels from the top:
The coordinates 270,350 is located 270 pixels from the left margin and 350 pixels from the top:
Now we have enough data to create a clickable rectangular area:
Example
This is the area that becomes clickable and will send the user to the page «computer.htm»:
Shape=»circle»
To add a circle area, first locate the coordinates of the center of the circle:
Then specify the radius of the circle:
Now you have enough data to create a clickable circular area:
Example
This is the area that becomes clickable and will send the user to the page «coffee.htm»:
Shape=»poly»
The shape=»poly» contains several coordinate points, which creates a shape formed with straight lines (a polygon).
This can be used to create any shape.
Like maybe a croissant shape!
How can we make the croissant in the image below become a clickable link?

We have to find the x and y coordinates for all edges of the croissant:
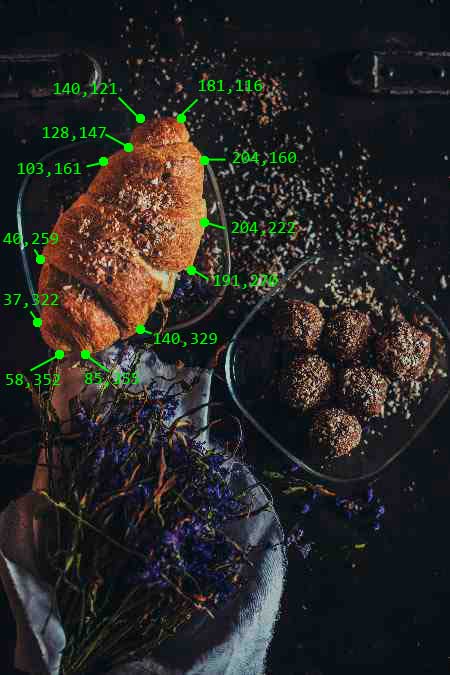
The coordinates come in pairs, one for the x-axis and one for the y-axis:
Example
This is the area that becomes clickable and will send the user to the page «croissant.htm»:

Image Map and JavaScript
A clickable area can also trigger a JavaScript function.
Add a click event to the element to execute a JavaScript function:
Example
Here, we use the onclick attribute to execute a JavaScript function when the area is clicked:
Chapter Summary
- Use the HTML element to define an image map
- Use the HTML element to define the clickable areas in the image map
- Use the HTML usemap attribute of the
element to point to an image map
HTML Image Tags
| Tag | Description |
|---|---|
| Defines an image | |
| Defines an image map | |
| Defines a clickable area inside an image map | |
| Defines a container for multiple image resources |
For a complete list of all available HTML tags, visit our HTML Tag Reference.
HTML Tag
The tag is used to define an image map. An image map is an image with clickable areas.
Browser Support
Attributes
Global Attributes
Event Attributes
More Examples
Example
Another image map, with clickable areas:
usemap=»#planetmap»>
Related Pages
Default CSS Settings
Most browsers will display the element with the following default values:

COLOR PICKER


Report Error
If you want to report an error, or if you want to make a suggestion, do not hesitate to send us an e-mail:
Thank You For Helping Us!
Your message has been sent to W3Schools.
Top Tutorials
Top References
Top Examples
Get Certified
W3Schools is optimized for learning and training. Examples might be simplified to improve reading and learning. Tutorials, references, and examples are constantly reviewed to avoid errors, but we cannot warrant full correctness of all content. While using W3Schools, you agree to have read and accepted our terms of use, cookie and privacy policy.