How to create a GUI in Java [closed]
Closed. This question is seeking recommendations for books, tools, software libraries, and more. It does not meet Stack Overflow guidelines. It is not currently accepting answers.
We don’t allow questions seeking recommendations for books, tools, software libraries, and more. You can edit the question so it can be answered with facts and citations.
I have used Java for some time, but I have never created a GUI — always CLI. How does one create a GUI in Java? Can you suggest a good tutorial/reference? I’m looking to create a simple GUI that has two long text areas and some buttons.
@Flynn1179 what google considers as popular websites for GUI does not give me the professional opinion I am looking for in SO.
7 Answers 7
import java.awt.BorderLayout; import java.awt.event.ActionEvent; import java.awt.event.ActionListener; import javax.swing.JButton; import javax.swing.JFrame; import javax.swing.JTextArea; public class Foo < public static void main(String[] args) < JFrame f = new JFrame("A JFrame"); f.setSize(250, 250); f.setLocation(300,200); final JTextArea textArea = new JTextArea(10, 40); f.getContentPane().add(BorderLayout.CENTER, textArea); final JButton button = new JButton("Click Me"); f.getContentPane().add(BorderLayout.SOUTH, button); button.addActionListener(new ActionListener() < @Override public void actionPerformed(ActionEvent e) < textArea.append("Button was clicked\n"); >>); f.setVisible(true); > > event can be replaced with a lambda expression: button.addActionListener((ActionEvent e) -> < textArea.append("Button was clicked\n"); >); — this example is worth a thousand words.
I just started learning java and swing, why you didn’t manipulate the GUI in the Event Dispatch Thread using invokeLater() method here ? They say this is a must because Swing is not thread-safe ?
Read about Swing on Oracle Tutorial’s pages.
Well what you have to do is create your text/code thin (Note Pad++ or Notepad) and remember the name.
import java.awt.*; import javax.swing.*; This basically tells java to get java.awt and javax.swing from its various code libraries that came with java when you downloaded it (Understandable as this is language made to help developers).
You then need to make your function that will have everything from the size, text inside it, color ect. REMEBER, we are not coding the gui here as that was already done when we imported import java.awt.*; and javax.swing.* ;.
When I put public class work ,Work in the name of my file (if it was called code it would be public class code .
Remember you have not called the function anywhere, its basically waiting there until it is called.
public static void main(String[] args) This tells the computer that what ever comes next, you do when i run the program.
So inside that you need to put
As this is what you called your function above and it is calling the function, you do not need to call this function as it does it when you run the program.
Java Swing Tutorial: How to Create a GUI Application in Java
Swing in Java is a Graphical User Interface (GUI) toolkit that includes the GUI components. Swing provides a rich set of widgets and packages to make sophisticated GUI components for Java applications. Swing is a part of Java Foundation Classes(JFC), which is an API for Java GUI programing that provide GUI.
The Java Swing library is built on top of the Java Abstract Widget Toolkit (AWT), an older, platform dependent GUI toolkit. You can use the Java simple GUI programming components like button, textbox, etc., from the library and do not have to create the components from scratch.
In this Java Swing tutorial, you will learn Java GUI basics like-
Java Swing class Hierarchy Diagram
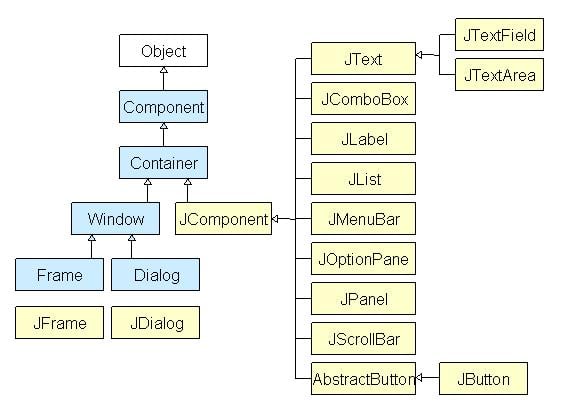
All components in Java Swing are JComponent which can be added to container classes.
What is a Container Class?
Container classes are classes that can have other components on it. So for creating a Java Swing GUI, we need at least one container object. There are 3 types of Java Swing containers.
- Panel: It is a pure container and is not a window in itself. The sole purpose of a Panel is to organize the components on to a window.
- Frame: It is a fully functioning window with its title and icons.
- Dialog: It can be thought of like a pop-up window that pops out when a message has to be displayed. It is not a fully functioning window like the Frame.
What is GUI in Java?
GUI (Graphical User Interface) in Java is an easy-to-use visual experience builder for Java applications. It is mainly made of graphical components like buttons, labels, windows, etc. through which the user can interact with an application. GUI plays an important role to build easy interfaces for Java applications.
How to Make a GUI in Java with Example
Now in this Java GUI Tutorial, let’s understand how to create a GUI in Java with Swings in Java examples.
Step 1) Copy code into an editor
In first step Copy the following code into an editor.
import javax.swing.*; class gui < public static void main(String args[])< JFrame frame = new JFrame("My First GUI"); frame.setDefaultCloseOperation(JFrame.EXIT_ON_CLOSE); frame.setSize(300,300); JButton button = new JButton("Press"); frame.getContentPane().add(button); // Adds Button to content pane of frame frame.setVisible(true); >> Step 2) Run the code
Next step, Save, Compile, and Run the code
Step 3) Copy following code into an editor
Now let’s Add a Button to our frame. Copy following code into an editor from given Java UI Example
import javax.swing.*; class gui < public static void main(String args[])< JFrame frame = new JFrame("My First GUI"); frame.setDefaultCloseOperation(JFrame.EXIT_ON_CLOSE); frame.setSize(300,300); JButton button1 = new JButton("Press"); frame.getContentPane().add(button1); frame.setVisible(true); >> 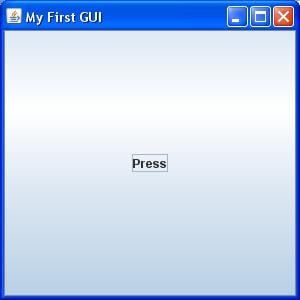
Step 5) Add two buttons
How about adding two buttons? Copy the following code into an editor.
import javax.swing.*; class gui < public static void main(String args[])< JFrame frame = new JFrame("My First GUI"); frame.setDefaultCloseOperation(JFrame.EXIT_ON_CLOSE); frame.setSize(300,300); JButton button1 = new JButton("Button 1"); JButton button2 = new JButton("Button 2"); frame.getContentPane().add(button1); frame.getContentPane().add(button2); frame.setVisible(true); >> Step 6) Save & Run the program
Next, Save, Compile, and Run the program.
Step 7) Check output
Unexpected output =? Buttons are getting overlapped.
Java Layout Manager
The Layout manager is used to layout (or arrange) the GUI Java components inside a container. There are many layout managers, but the most frequently used are-
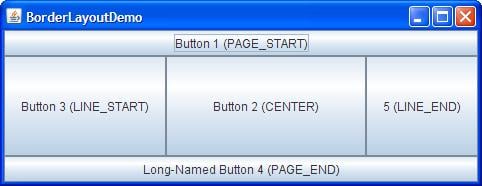
Java BorderLayout
A BorderLayout places components in up to five areas: top, bottom, left, right, and center. It is the default layout manager for every java JFrame
Java FlowLayout
FlowLayout is the default layout manager for every JPanel . It simply lays out components in a single row one after the other.

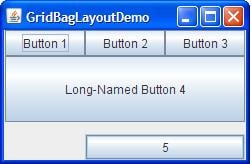
Java GridBagLayout
It is the more sophisticated of all layouts. It aligns components by placing them within a grid of cells, allowing components to span more than one cell.
Step 8) Create chat frame
How about creating a chat frame like below?

Try to code yourself before looking at the program below.
//Usually you will require both swing and awt packages // even if you are working with just swings. import javax.swing.*; import java.awt.*; class gui < public static void main(String args[]) < //Creating the Frame JFrame frame = new JFrame("Chat Frame"); frame.setDefaultCloseOperation(JFrame.EXIT_ON_CLOSE); frame.setSize(400, 400); //Creating the MenuBar and adding components JMenuBar mb = new JMenuBar(); JMenu m1 = new JMenu("FILE"); JMenu m2 = new JMenu("Help"); mb.add(m1); mb.add(m2); JMenuItem m11 = new JMenuItem("Open"); JMenuItem m22 = new JMenuItem("Save as"); m1.add(m11); m1.add(m22); //Creating the panel at bottom and adding components JPanel panel = new JPanel(); // the panel is not visible in output JLabel label = new JLabel("Enter Text"); JTextField tf = new JTextField(10); // accepts upto 10 characters JButton send = new JButton("Send"); JButton reset = new JButton("Reset"); panel.add(label); // Components Added using Flow Layout panel.add(tf); panel.add(send); panel.add(reset); // Text Area at the Center JTextArea ta = new JTextArea(); //Adding Components to the frame. frame.getContentPane().add(BorderLayout.SOUTH, panel); frame.getContentPane().add(BorderLayout.NORTH, mb); frame.getContentPane().add(BorderLayout.CENTER, ta); frame.setVisible(true); >> Как начать пользоваться Swing GUI-визардом IntelliJ IDEA. Подробная инструкция
Давно не писал настольных приложений на Java вообще и с использовании Swing в частности. Однако, возникла необходимость немного по GUIть. В качестве инструмента выбрал IntelliJ IDEA Community edition, 2016.1 версии.
Взялся ваять и, естественно, первое, на что налетел — хотя со времён Borland Java Builder 2006 воды утекло немало, экранные интерфейсы создавать проще не стало, скорее наоборот. А одной из причин выбора IDEA было как раз наличие Swing дизайнера «из коробки», однако как им пользоваться с ходу решительно непонятно — форма генерится, класс создаётся, создаются переменные контролов из дизайнера… но и только: при создании нашего класса форма на экране не появляется
Пошарил интернет, информации приблизительно ноль. Народ говорит, мол, «создавай и — вперёд!». Хм…
По результатам небольших мытарств на эту тему решил опубликовать инструкцию, так как мне с учётом былого опыта было искать намного легче, чем новичку, который вообще в первый раз ваяет форму на Swing.
Создание Swing GUI форм средствами JetBrains IntelliJ IDEA 2016.1
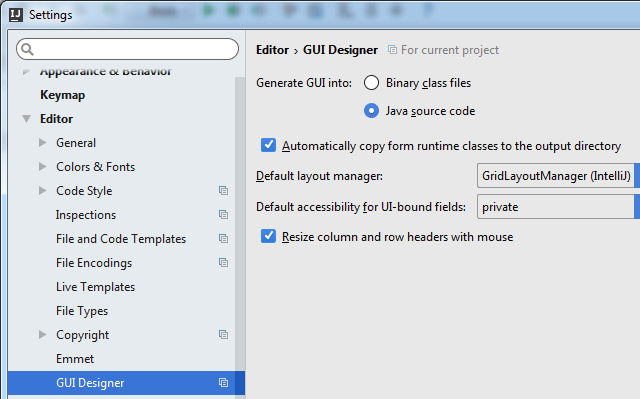
Во-первых, для понимания процесса лучше начать с того. что зайти в меню IDEA «File -> Settings» — там «Editor -> GUI Designer» и установить флажок Generate GUI Into: в Java source code. (это немного поможет пониманию процесса на первом этапе — потом можно будет убрать обратно).
Далее открываем дерево исходного кода своего проекта и кликаем правой кнопкой мыши на любую папку или файл исходного кода java и выбираем «New -> Dialog» — вводим имя класса для формы.

В итоге нам действительно сгенерили класс-наследник JDialog (который можно создать и использовать) и форма к нему.
Запускаем наш проект на выполнение и… о ужасчудо! при компиляции IDEA добавляет в конец нашего файла некоторый дополнительный код.
< // GUI initializer generated by IntelliJ IDEA GUI Designer // >>> IMPORTANT!! /** * Method generated by IntelliJ IDEA GUI Designer * >>> IMPORTANT!! /** * @noinspection ALL */ public JComponent $$$getRootComponent$$$()
Несложно догадаться, что вся наша Swing-овая форма конфигурируется в автогенерируемом методе $$$setupUI$$$.
Вспомните настройку, которую мы установили в самом начале — «GUI Into: -> Java source code». Если её не ставить, то этот метод просто будет появляться напрямую в _class_ файле, минуя java-файл (декомпилируйте его, если сомневаетесь — я это сделал). Соответственно, можете вернуть настройку «GUI Into:» к первоначальному виду, чтобы этот код (который всё равно редактировать настоятельно не рекомендуют) не мозолил глаза.
Теперь, когда мы поняли, как оно работает, перейдём к созданию прочих форм — необязательно диалогов.
Опять правой кнопкой мыши кликаем на папку или файл исходного кода, выбираем «New -> GUI Form» — вводим имя класса для формы.
Генерится класс и форма к нему. Накидываем на форму несколько контролов. В GUI дизайнере смотрим имя корневого элемента (обычно panel1, если IDEA не задала имя, а такое бывает, задайте принудительно — я для наглядности назвал rootPanel).

Переходим к исходному коду нашего класса.
Итак:
1. Добавляем для нашего класса наследование «extends JFrame»;
2. Добавляем конструктор класса со строками:
setContentPane(panel1); setVisible(true); public class GUIFrame extends JFrame < private JButton button1; private JPanel rootPanel; public GUIFrame() < setContentPane(rootPanel); setVisible(true); setDefaultCloseOperation(WindowConstants.EXIT_ON_CLOSE); >public static void main(String[] args) < new GUIFrame(); >> Всё. Форма готова к употреблению. Остальное смотрите в многочисленных инструкциях по Swing.
P.S. Как вариант, можно не наследовать наш класс от JFrame, а создать конструктор вида:
JFrame frame = new JFrame(); frame.setContentPane(panel1); frame.setVisible(true);