- How to make a Python script Pip-installable
- Steps involved#
- Create a python script, or application#
- Add and configure a setup file#
- How to build your new Pip Package Locally#
- Upload them both to the PyPi#
- Install your new package using Pip#
- Shortcuts#
- Top Related Articles
- Создание python-пакетов (aka setup scripts)
- Создаем структуру проекта
- Редактируем мета-информацию (setup.py)
- Виртуальное окружение
- Создание команд
- Работа с версиями
- Управление зависимостями
- Управление файлами проекта (MANIFEST.in)
- Создание и запуск тестов
- Публикация пакета на pypi.python.org
How to make a Python script Pip-installable
As Python developers, we’ve all used pip to install applications, but speaking to other Python developers, it’s not always clear how to make your own application/script pip-installable .
If you want to automatically publish your Python to PyPi, check out makepip
automation tip
Steps involved#
- Create a python script, or application
- Add and configure a setup file
- Build your new Pip Package Locally
- Upload them both to the Python Package Index (PyPi)
So let’s run through these 4 steps to get you going.
Create a python script, or application#
Python scripts can be big or small, simple or complex, but either way, we will end up with a python file. So let’s create one and just print out some text for a super simple demonstration.
You can really name this file anything, so we will call our script helloworld.py .
Add and configure a setup file#
Within a pip-installable package exists a setup.py file. This is the central piece of creating, distributing and installing a module. These modules will be installed using the Distutils internal package.
So let’s create a simple setup.py file for our helloworld script.
from setuptools import setup setup( name="my-very-own-helloworld-app", version="1.0.0", scripts=["helloworld"] ) name is the name of your newly created PyPi package that will be installed.
version is how you will version your package each time someone installs or upgrades it.
scripts is the name of your script. Note that this is also the command people will using when calling your module.
How to build your new Pip Package Locally#
At this stage we will package our script using the configurations given in our setup.py file. This can be done by running:
This command will create a dist directory in the same parent directory, and will contain all the needed files for the pip distribution.
If you want to install it locally once this directory is created, you can test it by running:
Not comes the time to make it available to the world!
Upload them both to the PyPi#
At this stage, we will be using https://pypi.org/, so if you don’t already have an account (free), then go register one.
You used to be able to do it from the command-line by typing python setup.py register , but I think those days are over.
In fact, if you do this step now you will get the following error:
Server response (410): Project pre-registration is no longer required or supported, upload your files instead.
Once this is ready, you can login. Note that your login username is stored in a local file called ~/.pypirc .
This file will look something like this:
[distutils] index-servers=pypi [pypi] repository = https://upload.pypi.org/legacy/ username = aogl Remember to change your username to reflect your own one. The one in the example above is my own.
At this stage you can distribute your application with the following command:
python setup.py sdist upload
You can combine the commands above as follows:
python setup.py register sdist upload
Install your new package using Pip#
Congratulations, your new package is now on PyPi and available for the world to consume!
Type pip install my-very-own-helloworld-app to install your new application.
Shortcuts#
Top Related Articles
- When to use Pip3 instead of Pip in Python
- [Solved] Pip: There was a problem confirming the ssl certificate
- How to send emails using Python and AWS SES SMTP
- Read the top n lines of a file in Python
- How Fast is your Website?
- Learn Golang as a Python Developer
- Get the Amount of Days Between Two Dates in Python
- How to Always run Python 3 from Bash
- How to tell if a year is a Leap Year in Python
- How to Reverse a Linked List in Python
Создание python-пакетов (aka setup scripts)
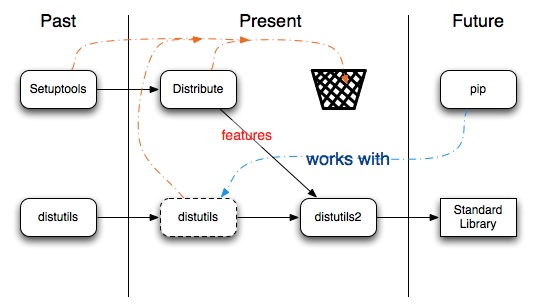
Одна из действительно полезных вещей в python — это система скриптов установки. Любой, серьезно увлекающийся python-программированием разработчик рано или поздно сталкивается с ней. Но из-за гибкости инструментария скриптов установки, их документация весьма раздута. На текущий момент имеется набор утилит (setuptools, distutils, distribute) выполняющих одинаковые задачи.
В данной статье я на конкретных примерах покажу как создать и настроить простой python-пакет.
Наш проект будет иметь следующую функциональность:
- Метод возвращающий строку: «Hello World!»;
- Команда helloworld печатающая эту строку в стандартный вывод.
Создаем структуру проекта
Для начала создадим директорию для пакета. Ее минимальный набор файлов состоит из: файла дистрибьюции ( setup.py ) описывающего метаданные и python кода проекта (в нашем случае модуля helloworld).
Также, xорошим тоном считается создание в корне директории файла с описанием проекта: README.txt .
Получаем следующую структуру:
helloworld-project ├── helloworld │ ├── __init__.py │ └── core.py ├── setup.py └── README.txt
Наша корневая директория helloworld-project будет содержать мета-данные пакета и вспомогательные файлы (тесты, лицензию, документацию и т.д.), а поддиректория helloworld непосредственно сам модуль helloworld .
Теперь отредактируем файл: helloworld/core.py и добавим логику нашего приложения (получение и вывод строки «Hello World!»):
def get_message(): return "Hello World!" def print_message(): print get_message()
Редактируем мета-информацию (setup.py)
Заполним файл описания README.rst :
Description =========== An example Hello World project.
Теперь отредактируем файл setup.py :
from setuptools import setup, find_packages from os.path import join, dirname setup( name='helloworld', version='1.0', packages=find_packages(), long_description=open(join(dirname(__file__), 'README.txt')).read(), )
Убедитесь, что в вашей системе доступны setuptools, в противном случае установите python-пакет distribute
Этих операций достаточно, чтобы собрать пакет дистрибьюции. Выполните команду сборки:
В случае успеха вы получите файл: dist/helloworld-1.0.tar.gz . Это полноценный, архивированный python-пакет и вы можете распространять его среди прочих разработчиков.
Виртуальное окружение
Virtualenv — пакет применяемый для создания изолированного python-окружения. Используем его для тестирования нашего проекта.
Команда создаст директорию env внутри нашего проекта и установит туда python, pip и distribute. Произведем в него установку нашего проекта.
$ ./env/bin/python setup.py install running install running bdist_egg running egg_info [. ] Processing dependencies for helloworld==1.0 Finished processing dependencies for helloworld==1.0
И протестируем его работоспособность:
$ ./env/bin/python >>> import helloworld.core as hw >>> hw.get_message() 'Hello World!' >>> hw.print_message() Hello World!
Все работает. Осталось добавить поддержку команды helloworld в консоли.
Создание команд
Для создания команды helloworld изменим файл setup.py :
setup( . entry_points= 'console_scripts': ['helloworld = helloworld.core:print_message'] > )
В параметре entry_points мы задаем словарь с «точками вызова» нашего приложения. Ключ console_scripts задает список создаваемых исполняемых скриптов (в Windows это будут exe-файлы). В данном случае мы указали создание исполняемого скрипта helloworld при вызове которого будет запускаться метод print_message из модуля helloworld.core.
Переустановим модуль в наше окружение и проверим работу созданного скрипта (для этого прийдется активировать наше окружение):
$ ./env/bin/python setup.py install $ source ./env/bin/activate (env) $ helloworld Hello World! (env)
Работа с версиями
Номер версии важная часть любого проекта. От него зависит обновление пакетов и разрешение зависимостей. В примере выше мы указали номер версии 1.0 в файле setup.py . Более правильное решение перенести его в файл helloworld/__init__.py чтобы сделать доступным в python-коде. По существующим соглашения для хранения номера версии в модуле, используется переменная __version__.
Изменим файл setup.py , чтобы нам не приходилось редактировать номер версии в двух местах:
. import helloworld setup( name='helloworld', version=helloworld.__version__, .
Существует множество систем наименования версий в python обычно рекомендуется использовать PEP386. Можно представить, что обозначение версии состоит из номера мажорного, минорного релизов (номера багфикса при необходимости), разделенных точками. В последней части версии разрешается использовать буквы латинского алфавита. Примеры из официальной документации:
0.4 0.4.0 (these two are equivalent) 0.4.1 0.5a1 0.5b3 0.5 0.9.6 1.0 1.0.4a3 1.0.4b1 1.0.4
Управление зависимостями
Добавим функциональности нашему проекту. Создадим команду serve которая будет запускать вебсервер отдающий страницу со строкой «Hello world!» генерируемой нашим модулем. Для этого воспользуемся пакетом Flask.
Добавляем файл helloworld/web.py :
from flask import Flask, render_template from helloworld.core import get_message app = Flask(__name__) @app.route("/") def hello(): return render_template('index.html', message=get_message()) def run_server(): app.run()
И файл helloworld/templates/index.html :
И опишем команду serve в файле setup.py :
. entry_points= 'console_scripts': [ 'helloworld = helloworld.core:print_message', 'serve = helloworld.web:run_server', ] >, .
Теперь в нашем проекте появилась зависимость от пакета Flask. Без его установки наше приложение не будет правильно работать. За описание зависимостей в файле setup.py отвечает параметр install_requires:
Проверим установку зависимостей обновив наш пакет и работу команды serve:
$ ./env/bin/python setup.py develop . Processing dependencies for helloworld==0.1 Searching for Flask==0.8 . $ serve * Running on http://127.0.0.1:5000/
Открыв браузер по адресу http://127.0.0.1:5000 вы должны увидеть нашу страницу.
Управление файлами проекта (MANIFEST.in)
На текущий момент при сборке нашего пакета distutils включает в него только python-файлы. Необходимо включить в него файл helloworld/templates/index.html без которого проект работать не будет.
Чтобы сделать это мы должны сообщить distutils какие еще файлы надо включать в наш проект. Один из способов — это создание файла MANIFEST.in :
recursive-include helloworld/templates *.html
Данная команда указывает distutils на включение в проект всех html файлов в директории helloworld/templates .
Также придется обновить setup.py :
. setup( . include_package_data=True, . )
Теперь шаблоны будут включены в наш проект.
Создание и запуск тестов
Хорошей практикой считается создание тестов для вашего проекта. Добавим простейшую реализацию, файл tests.py :
from unittest import TestCase from helloworld.core import get_message class HelloworldTestCase(TestCase): def test_helloworld(self): self.assertEqual(get_message(), 'Hello World!')
Теперь мы можем произвести предварительное тестирование нашего проекта:
$ python setup.py test running test running egg_info writing requirements to helloworld.egg-info/requires.txt writing helloworld.egg-info/PKG-INFO writing top-level names to helloworld.egg-info/top_level.txt writing dependency_links to helloworld.egg-info/dependency_links.txt writing entry points to helloworld.egg-info/entry_points.txt reading manifest file 'helloworld.egg-info/SOURCES.txt' reading manifest template 'MANIFEST.in' writing manifest file 'helloworld.egg-info/SOURCES.txt' running build_ext test_helloworld (tests.HelloworldTestCase) . ok ---------------------------------------------------------------------- Ran 1 test in 0.000s OK
Обратите внимание, что для запуска тестов даже не нужно создание виртуального окружения. Необходимые зависимости будут скачаны в директорию проекта в виде egg пакетов.
Публикация пакета на pypi.python.org
Прежде чем вы сможете опубликовать свой проект вам необходимо зарегистрироваться на PyPi. Запишите ваши реквизиты в файле ~/.pypirc :
[distutils] index-servers = pypi [pypi] username: password:
Все ваш проект готов к публикации. Достаточно ввести соответствующую команду:
$ python setup.py register sdist upload
Вы не сможете опубликовать пакет helloworld , тк данное имя проекта уже занято.