- How to add a button dynamically using jquery
- Button
- Examples
- Interactions
- Widgets
- Effects
- Utilities
- Books
- Button Widget
- Theming
- Dependencies
- Additional Notes:
- How to Create a Button with jQuery?
- Introduction:
- Method 1: Using HTML and jQuery (Normal Method)
- Output:
- Method 2: Dynamically Creating Buttons
- Output:
- Conclusion:
- Related Post
How to add a button dynamically using jquery
Note: This one can be done with either .appendTo or with .append .
you should use your .append() function INSIDE of your test() function, because you want the new input to be appent to your body each time your click the button, it means each time your run your function, that’s why you should put your line $(«body»).append(r); in your function instead of putting it after.
To add dynamic button on the fly;
the $(«body»).append(r) statement should be within the test function, also there was misplaced » in the test method
function test() < var r=$('').attr(< type: "button", id: "field", value: 'new' >); $("body").append(r); > Update
In that case try a more jQuery-ish solution
I want to be the first to thank you for making that code readable. It was really badly formatted
@user2236221 check updated answer if input with id field is not exist than it append it to body other wise not..
how we can pass id, value etc through function like this_app.CreateButton (id, text, primaryIcon, secondaryIcon, className);
To add the new input just once, use the following code:
$(document).ready(function() < $("#insertAfterBtn").one("click", function(e) < var r = $('', < type: "button", id: "field", value: "I'm a button" >); $("body").append(r); >); >); To make it work in w3 editor, copy/paste the code below into ‘source code’ section inside w3 editor and then hit ‘Submit Code’:
Button
Enhances standard form elements like buttons, inputs and anchors to themeable buttons with appropriate hover and active styles.
Examples
Examples of the markup that can be used for buttons: A button element, an input of type submit and an anchor.
Buttons can be styled via the button widget or by adding the classes yourself. This avoids the JavaScript overhead if you don’t need any of the methods provided by the button widget.
html>html lang="en">head>meta charset="utf-8">meta name="viewport" content="width=device-width, initial-scale=1">title>jQuery UI Button - Default functionality title>link rel="stylesheet" href="//code.jquery.com/ui/1.13.2/themes/base/jquery-ui.css">link rel="stylesheet" href="/resources/demos/style.css">script src="https://code.jquery.com/jquery-3.6.0.js"> script>script src="https://code.jquery.com/ui/1.13.2/jquery-ui.js"> script>script>$( function( )$( ".widget input[type=submit], .widget a, .widget button" ).button();$( "button, input, a" ).on( "click", function( event )event.preventDefault();> );> );script>head>body>div class="widget">h1>Widget Buttons h1>button>A button element button>input type="submit" value="A submit button">a href="#">An anchor a>div>h1>CSS Buttons h1>button class="ui-button ui-widget ui-corner-all">A button element button>input class="ui-button ui-widget ui-corner-all" type="submit" value="A submit button">a class="ui-button ui-widget ui-corner-all" href="#">An anchor a>body>html>
Want to learn more about the button widget? Check out the API documentation.
Interactions
Widgets
Effects
Utilities
Books
Copyright 2023 OpenJS Foundation and jQuery contributors. All rights reserved. See jQuery License for more information. The OpenJS Foundation has registered trademarks and uses trademarks. For a list of trademarks of the OpenJS Foundation, please see our Trademark Policy and Trademark List. Trademarks and logos not indicated on the list of OpenJS Foundation trademarks are trademarks™ or registered® trademarks of their respective holders. Use of them does not imply any affiliation with or endorsement by them. OpenJS Foundation Terms of Use, Privacy, and Cookie Policies also apply. Web hosting by Digital Ocean | CDN by StackPath
Button Widget
Button enhances standard form elements like buttons, inputs and anchors to themeable buttons with appropriate hover and active styles.
When using an input of type button, submit or reset, support is limited to plain text labels with no icons.
Note: The button widget was rewritten in 1.12. Some options changed, you can find documentation for the old options in the 1.11 button docs. This widget used to bundle support for inputs of type radio and checkbox, this is now deprecated, use the checkboxradio widget instead. It also used to bundle the buttonset widget, this is also deprecated, use the controlgroup widget instead.
Theming
The button widget uses the jQuery UI CSS framework to style its look and feel. If button specific styling is needed, the following CSS class names can be used for overrides or as keys for the classes option:
- ui-button : The DOM element that represents the button. This element will additionally have the ui-button-icon-only class, depending on the showLabel and icon options.
- ui-button-icon : The element used to display the button icon. This will only be present if an icon is provided in the icon option.
- ui-button-icon-space : A separator element between icon and text content of the button. This will only be present if an icon is provided in the icon option and the iconPosition option is set to "beginning" or "end" .
Dependencies
Additional Notes:
- This widget requires some functional CSS, otherwise it won't work. If you build a custom theme, use the widget's specific CSS file as a starting point.
How to Create a Button with jQuery?
In this blog, we will learn the various methods to create buttons using jQuery and discover how to make your buttons visually stunning and engaging. Explore HTML and jQuery integration, dynamic button generation, advanced effects, and more, to enhance user experience and interaction on your web applications.
Introduction:
In web development, buttons play a crucial role in enhancing user experience and interaction. While there are various ways to create buttons, jQuery offers a simple and efficient approach to achieve this. In this blog, we will explore multiple methods to create buttons using jQuery, discussing their implementation, benefits, and potential use cases. By the end, you will have a solid understanding of how to create buttons that are both visually appealing and functional.
Method 1: Using HTML and jQuery (Normal Method)
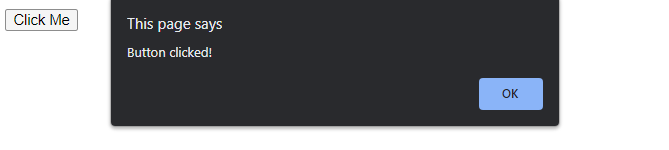
The most basic approach to creating a button with jQuery is by utilizing HTML and jQuery together. We can define a button element in HTML and then use jQuery to add interactivity to it. Let's consider an example where we want to create a button that triggers an alert when clicked:
In this example, we include the jQuery library and create a script block that waits for the document to be ready. Within the script, we attach a click event listener to the button with the ID "myButton." When the button is clicked, an alert with the message "Button clicked!" will be displayed.
Output:

Method 2: Dynamically Creating Buttons
Another useful technique is dynamically creating buttons using jQuery. This approach allows us to generate buttons on the fly, which can be beneficial when dealing with dynamic content or data-driven applications. Let's illustrate this with an example where we create multiple buttons based on an array of options:
In this example, we define an array of options. Within the script, we iterate over each option and dynamically create a button element using jQuery's $('') syntax. We set the button's text to the current option and then append it to the container div with the ID "buttonContainer." This results in the creation of three buttons with the respective option texts.
Output:
Conclusion:
In this blog, we explored several methods for creating buttons using jQuery. We started with the simplest approach, combining HTML and jQuery to add interactivity to a button. We then delved into dynamically generating buttons, which can be particularly useful for dynamic content. Finally, we touched upon the advanced features jQuery offers to further enhance button effects. By understanding and implementing these techniques, you can create visually appealing and highly functional buttons that elevate your web applications.
Related Post