- Как хранить массивы в базе данных
- 5 последних уроков рубрики «PHP»
- Фильтрация данных с помощью zend-filter
- Контекстное экранирование с помощью zend-escaper
- Подключение Zend модулей к Expressive
- Совет: отправка информации в Google Analytics через API
- Подборка PHP песочниц
- How to Store Array in MySQL with PHP
- Contents
- 1. Table structure
- 2. Configuration
- 3. With serialize() and unserialize()
- 4. With implode() and explode()
- 5. With Loop
- 6. Conclusion
- How to Store Array in Database Laravel?
Как хранить массивы в базе данных
При работе с базой данных MySQL иногда нужно сохранить массив в одном поле. К сожалению, нет способа непосредственно передать массив как параметр. В результате, хранение таких структур данных становиться более сложным процессом, но, тем не менее, возможным.
Чтобы конвертировать любой массив (или объект) в строку в PHP, нужно вызвать функцию serialize :
$array = array( 1, 2, 3 ); $string = serialize( $array ); echo $string;
$string содержит строчную версию массива. Выше приведенный пример выведет следующее:
Чтобы конвертировать такую строку обратно в массив, надо использовать unserialize :
// $array будет содержать( 1, 2, 3 ) $array = unserialize( $string );
Теперь проведём конвертацию массива из 200 случайно генерированных целых чисел в диапазоне от 1 до 1000:
Пример выведет подобную строку:
Данная строка может быть сохранена в базе данных и конвертирована в массив по мере надобности. Очень часто функция base64_encode используется в сочетании с функцией serialize для хранения массивов:
$string = base64_encode( serialize( $array ) );
Зашифрованная строка может быть восстановлена в массив с помощью функции base64_decode :
$array = unserialize( base64_decode( $string ) );
К сожалению, такие строки могут иметь очень большой размер. В таком случае можно использовать функцию gzcompress для сжатия строки (размер сжатой строки существенно меньше):
$smallString = gzcompress( $string );
Перед использованием, такую строку надо вернуть к обычному виду с помощью функции gzuncompress .
Вот и все, что может пригодиться при решении вопроса хранения массива в базе данных.
Данный урок подготовлен для вас командой сайта ruseller.com
Источник урока: www.lateralcode.com/store-array-database/
Перевел: Сергей Фастунов
Урок создан: 3 Сентября 2010
Просмотров: 97388
Правила перепечатки
5 последних уроков рубрики «PHP»

Фильтрация данных с помощью zend-filter
Когда речь идёт о безопасности веб-сайта, то фраза «фильтруйте всё, экранируйте всё» всегда будет актуальна. Сегодня поговорим о фильтрации данных.

Контекстное экранирование с помощью zend-escaper
Обеспечение безопасности веб-сайта — это не только защита от SQL инъекций, но и протекция от межсайтового скриптинга (XSS), межсайтовой подделки запросов (CSRF) и от других видов атак. В частности, вам нужно очень осторожно подходить к формированию HTML, CSS и JavaScript кода.

Подключение Zend модулей к Expressive
Expressive 2 поддерживает возможность подключения других ZF компонент по специальной схеме. Не всем нравится данное решение. В этой статье мы расскажем как улучшили процесс подключение нескольких модулей.

Совет: отправка информации в Google Analytics через API
Предположим, что вам необходимо отправить какую-то информацию в Google Analytics из серверного скрипта. Как это сделать. Ответ в этой заметке.

Подборка PHP песочниц
Подборка из нескольких видов PHP песочниц. На некоторых вы в режиме online сможете потестить свой код, но есть так же решения, которые можно внедрить на свой сайт.
How to Store Array in MySQL with PHP
An array is a special variable that allows storing one or more values in a single variable e.g. – holding usernames or details in an Array.
They are easier to access and manipulate.
Sometimes, require to store Array in the MySQL database and retrieve it.
In this tutorial, I show how you can store an Array in the MySQL database and read it with PHP.
Contents
1. Table structure
Create contents_arr table.
The ‘arr_serialize1’ and ‘arr_serialize2’ is used to store serialized value.
CREATE TABLE `contents_arr` ( `id` int(11) NOT NULL PRIMARY KEY AUTO_INCREMENT, `username` varchar(80) NOT NULL, `name` varchar(80) NOT NULL, `arr_serialize1` varchar(255) NOT NULL, `arr_serialize2` varchar(255) NOT NULL ) ENGINE=InnoDB DEFAULT CHARSET=utf8;
2. Configuration
Create a config.php for the database connection.
Completed Code
3. With serialize() and unserialize()
Define two arrays – $names_arr , and $users_arr .
$names_arr Array is Indexed type Array and $users_arr is an Associative Array.
Serialize Syntax –
Pass the array in the serialize() method and pass the serialized values in the INSERT query.
Unserialize Syntax –
unserialize([Serialized value]);
Fetch records and pass the serialized value in the unserialize() method to convert it to Array format.
Completed Code
"yssyogesh","name"=>"Yogesh singh"); $users_arr[] = array("username"=>"bsonarika","name"=>"Sonarika Bhadoria"); $users_arr[] = array("username"=>"vijay","name"=>"Vijay Maurya"); // Serialize the Array $names_str = serialize($names_arr); $users_str = serialize($users_arr); // Insert record $sql = "INSERT INTO contents_arr(arr_serialize1,arr_serialize2) VALUES('".$names_str."','".$users_str."')"; mysqli_query($con,$sql); // Read record $sql = mysqli_query($con,"SELECT * FROM contents_arr"); while($row = mysqli_fetch_assoc($sql))< // Unserialize $arr_unserialize1 = unserialize($row['arr_serialize1']); $arr_unserialize2 = unserialize($row['arr_serialize2']); // Display echo ""; print_r($arr_unserialize1); print_r($arr_unserialize2); echo "
«; >
Array ( [0] => Yogesh singh [1] => Sonarika Bhadoria [2] => Vijay Maurya ) Array ( [0] => Array ( [username] => yssyogesh [name] => Yogesh singh ) [1] => Array ( [username] => bsonarika [name] => Sonarika Bhadoria ) [2] => Array ( [username] => vijay [name] => Vijay Maurya ) )
4. With implode() and explode()
Use implode() to separate the $names_arr by separator (” , “) and get a string. Pass the value in the INSERT query.
Fetch records and use explode() to convert a comma-separated string in an Array format.
In the example, I am displaying the value in a string and Array format.
Completed Code
"; echo ""; print_r($name_explode); echo "
"; >
name : Yogesh singh , Sonarika Bhadoria , Vijay Maurya Array ( [0] => Yogesh singh [1] => Sonarika Bhadoria [2] => Vijay Maurya )
5. With Loop
Loop on the $users_arr Array.
Read and pass the value in the INSERT query. New record is inserted until data is available.
Completed Code
"yssyogesh","name"=>"Yogesh singh"); $users_arr[] = array("username"=>"bsonarika","name"=>"Sonarika Bhadoria"); $users_arr[] = array("username"=>"vijay","name"=>"Vijay Maurya"); // Insert record foreach($users_arr as $userid=>$user) < $username = $user['username']; $name = $user['name']; $sql = "INSERT INTO contents_arr(username,name) VALUES('".$username."','".$name."')"; mysqli_query($con,$sql); >// Read record $sql = mysqli_query($con,"SELECT * FROM contents_arr"); while($row = mysqli_fetch_assoc($sql))< $username = $row['username']; $name = $row['name']; echo "username : ".$username.", name : ".$name."
"; > username : yssyogesh, name : Yogesh singh username : bsonarika, name : Sonarika Bhadoria username : vijay, name : Vijay Maurya
6. Conclusion
It is better to use serialize() method which converts an Array to string format and stores it in a single column. You need to use the unserialize() method to convert the serialized value and get it back in the Array format.
If you found this tutorial helpful then don’t forget to share.
How to Store Array in Database Laravel?
In this tutorial, you will learn how to store array in database laravel. I explained simply step by step laravel store array in database. Here you will learn how to store array data in database in laravel. I explained simply about how to store array in database laravel.
You can use this example with laravel 6, laravel 7, laravel 8, laravel 9 and laravel 10 version.
Sometimes, if we have large data or unfixed columns then we can not create too many fields in a database table with the nullable field. so we have to use JSON data type to store values, that way we can store large data or unstructured data. if you want to store a JSON array in a database in laravel then I will give you a simple example of how to store a JSON array store and access it from the database in laravel.
In this example, first, we will create migration with a JSON column. Then we will create a model with a getter and setter. when you create records then you can pass them as an array and when you get records then you will find an array. so let’s see a simple example and learn it.
Step 1: Install Laravel
This is optional; however, if you have not created the laravel app, then you may go ahead and execute the below command:
composer create-project laravel/laravel example-app
Step 2: Create Migration
Here, we need create database migration for «items» table with title and data(JSON Column) columns and also we will create model for items table.
php artisan make:migration create_items_table
use Illuminate\Database\Migrations\Migration;
use Illuminate\Database\Schema\Blueprint;
use Illuminate\Support\Facades\Schema;
return new class extends Migration
/**
* Run the migrations.
*
* @return void
*/
public function up()
Schema::create(‘items’, function (Blueprint $table) $table->id();
$table->string(‘title’);
$table->json(‘data’)->nullable();
$table->timestamps();
>);
>
/**
* Reverse the migrations.
*
* @return void
*/
public function down()
Schema::dropIfExists(‘items’);
>
>;
Then run migration command to create items table.
Step 3: Create Model
In this step, we will create Item.php model with getter setter. let’s create model and update following code:
php artisan make:model Item
namespace App\Models;
use Illuminate\Database\Eloquent\Factories\HasFactory;
use Illuminate\Database\Eloquent\Model;
use Illuminate\Database\Eloquent\Casts\Attribute;
class Item extends Model
use HasFactory;
/**
* Write code on Method
*
* @return response()
*/
protected $fillable = [
‘title’, ‘data’
];
/**
* Get the user’s first name.
*
* @return \Illuminate\Database\Eloquent\Casts\Attribute
*/
protected function data(): Attribute
return Attribute::make(
get: fn ($value) => json_decode($value, true),
set: fn ($value) => json_encode($value),
);
>
>
Step 4: Create Route
In third step, we will create one route for testing. so create one route here.
use Illuminate\Support\Facades\Route;
use App\Http\Controllers\ItemController;
/*
|—————————————————————————
| Web Routes
|—————————————————————————
|
| Here is where you can register web routes for your application. These
| routes are loaded by the RouteServiceProvider within a group which
| contains the «web» middleware group. Now create something great!
|
*/
Route::get(‘item’, [ItemController::class, ‘index’]);
Step 5: Create Controller
In this step, we will create ItemController file and write index() method to create item records with array and access as array.
namespace App\Http\Controllers;
use Illuminate\Http\Request;
use App\Models\Item;
class ItemController extends Controller
/**
* Write code on Method
*
* @return response()
*/
public function index()
$input = [
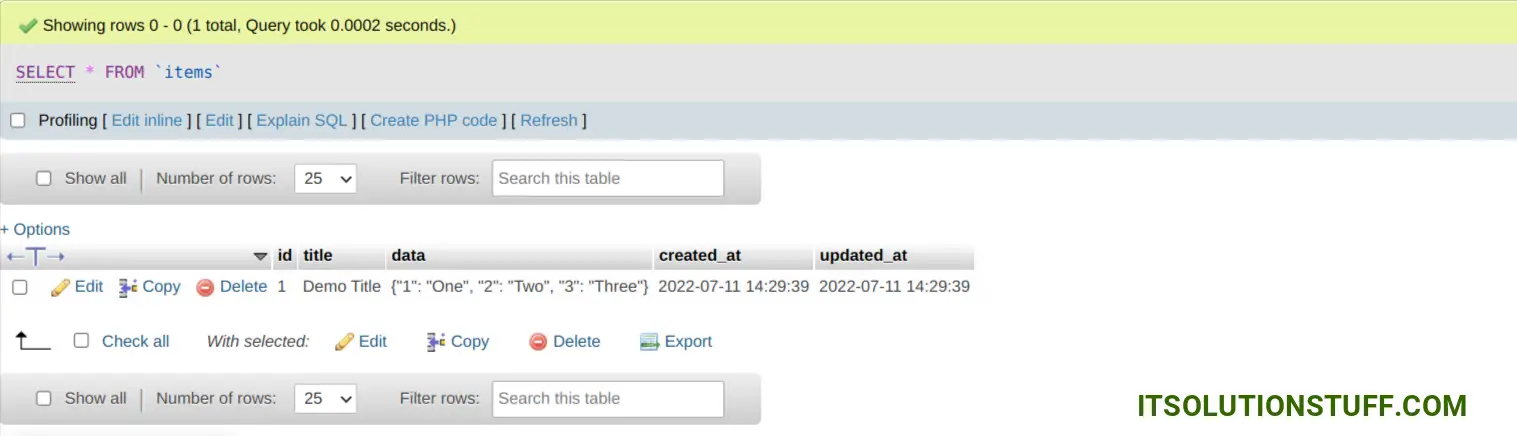
‘title’ => ‘Demo Title’,
‘data’ => [
‘1’ => ‘One’,
‘2’ => ‘Two’,
‘3’ => ‘Three’
]
];
$item = Item::create($input);
dd($item->data);
>
>
Run Laravel App:
All the required steps have been done, now you have to type the given below command and hit enter to run the Laravel app:
Now, Go to your web browser, type the given URL and view the app output:
You can see database output and print variable output:

array:3 [
1 => «One»
2 => «Two»
3 => «Three»
]