- HTML JavaScript
- Example
- My First JavaScript
- The HTML Tag
- Example
- A Taste of JavaScript
- Example
- Example
- Example
- The HTML Tag
- Example
- HTML Exercises
- HTML Script Tags
- # Creating HTML with JavaScript
- # Using Template Literals
- # Creating a Template
- # Creating a Template with Placeholders
- # Inserting Templates with innerHTML
- # Using a Loop with innerHTML
- # Inserting Templates with insertAdjacentHTML()
- # Using createElement()
- # Creating HTML Element
- # Inserting HTML Element
- # The appendChild() method
- # The insertBefore() method
- How To Add JavaScript to HTML
- Adding JavaScript into an HTML Document
- Working with a Separate JavaScript File
- Conclusion
- Tutorial Series: How To Code in JavaScript
HTML JavaScript
JavaScript makes HTML pages more dynamic and interactive.
Example
My First JavaScript
The HTML Tag
The HTML tag is used to define a client-side script (JavaScript).
The element either contains script statements, or it points to an external script file through the src attribute.
Common uses for JavaScript are image manipulation, form validation, and dynamic changes of content.
To select an HTML element, JavaScript most often uses the document.getElementById() method.
This JavaScript example writes «Hello JavaScript!» into an HTML element with >
Example
Tip: You can learn much more about JavaScript in our JavaScript Tutorial.
A Taste of JavaScript
Here are some examples of what JavaScript can do:
Example
JavaScript can change content:
Example
JavaScript can change styles:
document.getElementById(«demo»).style.fontSize = «25px»;
document.getElementById(«demo»).style.color = «red»;
document.getElementById(«demo»).style.backgroundColor = «yellow»;
Example
JavaScript can change attributes:
The HTML Tag
The HTML tag defines an alternate content to be displayed to users that have disabled scripts in their browser or have a browser that doesn’t support scripts:
Example
HTML Exercises
HTML Script Tags
| Tag | Description |
|---|---|
| Defines a client-side script | |
| Defines an alternate content for users that do not support client-side scripts |
For a complete list of all available HTML tags, visit our HTML Tag Reference.
# Creating HTML with JavaScript
One of the most common uses for JavaScript is to create HTML. Creating HTML with JavaScript can involve create a single tag or the entire page. There are common ways to create HTML. One is to use the createElement() function. The other is to use HTML template with innerHTML property or the insertAdjacentHTML() method.
# Using Template Literals
, creating HTML has become much easier for novice developers, because Template Literals allow the developer to create HTML in JavaScript that looks and feels like writing in an HTML file.
# Creating a Template
Using template literals, it is possible to create an HTML template, complete with white space, tabs and carriage returns.
For example, if we wanted to create an HTML unordered list of animals with a title, we do so with a template literal.
# Creating a Template with Placeholders
We can take this a step further by using placeholder in place of the text. Then using variables to recreate the HTML.
# Inserting Templates with innerHTML
There are two common techniques to insert a template into the HTML. The first is to use the innerHTML property and the second is to use the insertAdjacentHTML() method.
Both these techniques require a string and therefore will NOT work with the createElement() method discussed in the next section.
The innerHTML property of any HTML element will contain all of the HTML that within the element.
Like any other property, it is possible to change an element’s innerHTML by using an equals sign = and followed by the string HTML.
Change an element’s innerHTML will remove any existing HTML inside the element. To keep the existing HTML, you must include the element’s innerHTML after the equals sign.
# Using a Loop with innerHTML
While the above example works to create and insert new HTML, it would not be easy to maintain if additional animals are added to the list. This is where loops come in.
By using a loop to iterate over the array, it is possible to create the list item HTML without the need for additional HTML for each new animal.
In the example below, we are using the for. of loop
to iterate over the array, and storing each list item to a new array, items . This new items array is then inserted into our template literal using the join()
method to convert array to a string.
# Inserting Templates with insertAdjacentHTML()
Unlike the innerHTML property, which replaces the all the HTML of an element, the insertAdjacentHTML() method inserts a HTML string into an at a specified position.
The method takes two parameters. The first is the position, which will consist of one of the four predefined positions (see below). The second is a string of HTML.
The four predefined positions are:
- beforebegin : Before the element
- afterbegin : Inside the element, before its first child
- beforeend : Inside the element, after its last child
- afterend : After the element
div id="element"> p class="child">p> p class="child">p> div> # Using createElement()
The proper way to create HTML with JavaScript is to use the createElement() function. While best practice states that this is the preferred technique, due to it significantly better performance, it is also much more complex and difficult to use for novice developers. Furthermore, the real life benefits is marginal.
# Creating HTML Element
The createElement() method creates an HTML element with a specified tag name. The new element will have all of the properties and methods of elements retrieved from the DOM. However, the new element will only exist in JavaScript, as it has yet to be inserted into the HTML.
const $about = document.createElement('a') $about.href = 'about.html' $about.textContent = 'About' # Inserting HTML Element
The techniques of inserting HTML elements will NOT with template literals discussed in the previous section.
When using the createElement() , there are two common methods for inserting elements into HTML: appendChild() and insertBefore() .
# The appendChild() method
The appendChild() method adds a node to the end of a specified parent. With appendChild() the parent element calls the method, and the new element is passed as a function parameter.
# The insertBefore() method
The insertBefore() method will insert an element before a specified child of a specified parent. With insertBefore() the parent element calls the method, and the new element is passed as the first function parameter and the child element to insert before will be the second element.
How To Add JavaScript to HTML
JavaScript, also abbreviated to JS, is a programming language used in web development. As one of the core technologies of the web alongside HTML and CSS, JavaScript is used to make webpages interactive and to build web apps. Modern web browsers, which adhere to common display standards, support JavaScript through built-in engines without the need for additional plugins.
When working with files for the web, JavaScript needs to be loaded and run alongside HTML markup. This can be done either inline within an HTML document or in a separate file that the browser will download alongside the HTML document.
This tutorial will go over how to incorporate JavaScript into your web files, both inline into an HTML document and as a separate file.
Adding JavaScript into an HTML Document
You can add JavaScript code in an HTML document by employing the dedicated HTML tag that wraps around JavaScript code.
The tag can be placed in the section of your HTML or in the section, depending on when you want the JavaScript to load.
Generally, JavaScript code can go inside of the document section in order to keep them contained and out of the main content of your HTML document.
However, if your script needs to run at a certain point within a page’s layout — like when using document.write to generate content — you should put it at the point where it should be called, usually within the section.
Let’s consider the following blank HTML document with a browser title of Today’s Date :
DOCTYPE html> html lang="en-US"> head> meta charset="UTF-8"> meta name="viewport" content="width=device-width, initial-scale=1"> title>Today's Datetitle> head> body> body> html> Right now, this file only contains HTML markup. Let’s say we would like to add the following JavaScript code to the document:
let d = new Date(); alert("Today's date is " + d); This will enable the webpage to display an alert with the current date regardless of when the user loads the site.
In order to achieve this, we will add a tag along with some JavaScript code into the HTML file.
To begin with, we’ll add the JavaScript code between the tags, signalling the browser to run the JavaScript script before loading in the rest of the page. We can add the JavaScript below the tags, for instance, as shown below:
DOCTYPE html> html lang="en-US"> head> meta charset="UTF-8"> meta name="viewport" content="width=device-width, initial-scale=1"> title>Today's Datetitle> script> let d = new Date(); alert("Today's date is " + d); script> head> body> body> html> Once you load the page, you will receive an alert similar to this:

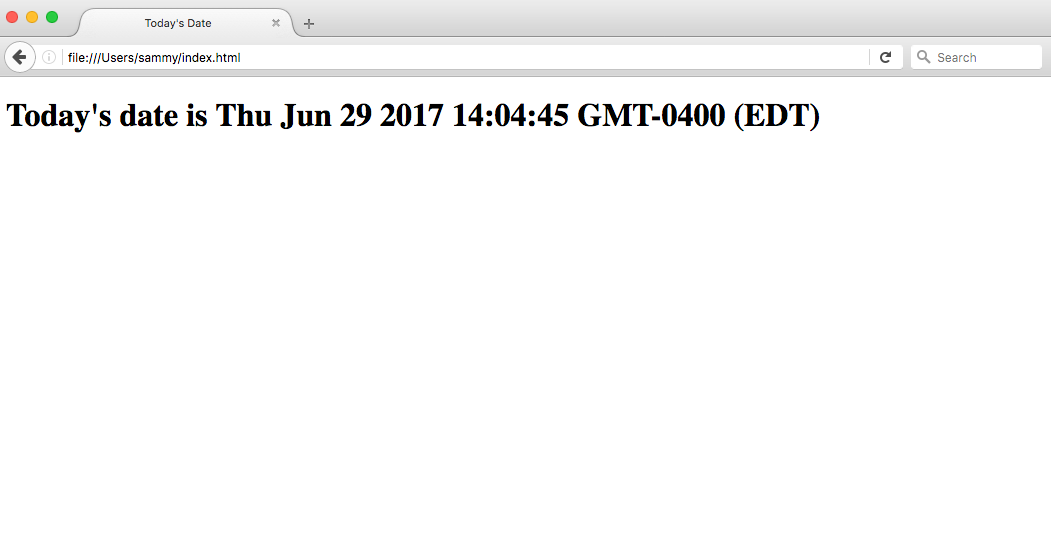
If we were modifying what is shown in the body of the HTML, we would need to implement that after the section so that it displays on the page, as in the example below:
DOCTYPE html> html lang="en-US"> head> meta charset="UTF-8"> meta name="viewport" content="width=device-width, initial-scale=1"> title>Today's Datetitle> head> body> script> let d = new Date(); document.body.innerHTML = "Today's date is " + d + ">" script> body> html> The output for the above HTML document loaded through a web browser would look similar to the following:
Scripts that are small or that run only on one page can work fine within an HTML file, but for larger scripts or scripts that will be used on many pages, it is not a very effective solution because including it can become unwieldy or difficult to read and understand. In the next section, we’ll go over how to handle a separate JavaScript file in your HTML document.
Working with a Separate JavaScript File
In order to accommodate larger scripts or scripts that will be used across several pages, JavaScript code generally lives in one or more js files that are referenced within HTML documents, similarly to how external assets like CSS are referenced.
The benefits of using a separate JavaScript file include:
- Separating the HTML markup and JavaScript code to make both more straightforward
- Separate files makes maintenance easier
- When JavaScript files are cached, pages load more quickly
To demonstrate how to connect a JavaScript document to an HTML document, let’s create a small web project. It will consist of script.js in the js/ directory, style.css in the css/ directory, and a main index.html in the root of the project.
project/ ├── css/ | └── style.css ├── js/ | └── script.js └── index.html We can start with our previous HTML template from the section above:
DOCTYPE html> html lang="en-US"> head> meta charset="UTF-8"> meta name="viewport" content="width=device-width, initial-scale=1"> title>Today's Datetitle> head> body> body> html> Now, let’s move our JavaScript code that will show the date as an header to the script.js file:
let d = new Date(); document.body.innerHTML = "Today's date is "
+ d + "" We can add a reference to this script to the section, with the following line of code:
script src="js/script.js">/script> The tag is pointing to the script.js file in the js/ directory of our web project.
Let’s consider this line in the context of our HTML file, in this case, within the section:
DOCTYPE html> html lang="en-US"> head> meta charset="UTF-8"> meta name="viewport" content="width=device-width, initial-scale=1"> title>Today's Datetitle> head> body> script src="js/script.js">script> body> html> Finally, let’s also edit the style.css file by adding a background color and style to the header:
body background-color: #0080ff; > h1 color: #fff; font-family: Arial, Helvetica, sans-serif; > We can reference that CSS file within the section of our HTML document:
DOCTYPE html> html lang="en-US"> head> meta charset="UTF-8"> meta name="viewport" content="width=device-width, initial-scale=1"> title>Today's Datetitle> link rel="stylesheet" href="css/style.css"> head> body> script src="js/script.js">script> body> html> Now, with the JavaScript and CSS in place we can load the index.html page into the web browser of our choice. We should see a page that looks similar to the following:

Now that we’ve placed the JavaScript in a file, we can call it in the same way from additional web pages and update them all in a single location
Conclusion
This tutorial went over how to incorporate JavaScript into your web files, both inline into an HTML document and as a separate .js file.
Want to deploy your application quickly? Try Cloudways, the #1 managed hosting provider for small-to-medium businesses, agencies, and developers — for free! DigitalOcean and Cloudways together will give you a reliable, scalable, and hassle-free managed hosting experience with anytime support that makes all your hosting worries a thing of the past. Start with $100 in free credits!
Tutorial Series: How To Code in JavaScript
JavaScript is a high-level, object-based, dynamic scripting language popular as a tool for making webpages interactive.