- Connection pooling in spring jdbc
- Connection pooling in spring jdbc
- How connection pooling works with RedisTemplate using spring boot application
- How to use connection pool with Spring Boot + Mybatis
- Connection Pooling with Spring & Hibernate
- Configuring Connection Pooling with Spring R2DBC
- Playing Around with R2DBC Pooling Performance
- Load Testing with K6
- Without Connection Pooling
- Implementing Connection Pooling in Spring Boot R2DBC
- With Connection Pooling
- Connection Pool Sizing
- Conclusion
- Connection Pooling
- Playing Around with R2DBC Pooling Performance
- Load Testing with K6
- Without Connection Pooling
- Implementing Connection Pooling in Spring Boot R2DBC
- With Connection Pooling
Connection pooling in spring jdbc
Solution 1: You can use DBCP component Solution 2: In Hibernate, you can configure CP30 Connection Pooling in Hibernate. further extends which has default values as below.
Connection pooling in spring jdbc
You can use own custom datasource, like this:
//Dao class configuration in spring Here or here described pretty simple.
Java — Creating custom connection pool in Spring Boot, We have nothing to do if we want to use Hikari in an application based on Spring Boot 2.x. You can set different properties of connection pool thru application.yml / application.properties. Below is an example of application.yml: spring: datasource hikari: maximumPoolSize: 4 # Specify maximum pool size minimumIdle: 1 # Specify minimum pool size Code sampleHikariConfig config = new HikariConfig();config.setDriverClassName(«com.snowflake.client.jdbc.SnowflakeDriver»);config.setDataSourceProperties(properties);config.setJdbcUrl(connectStr);HikariDataSource ds = new HikariDataSource(config);Feedback
How connection pooling works with RedisTemplate using spring boot application
When you create JedisClientConfiguration using the builder
JedisClientConfigurationBuilder builder = JedisClientConfiguration .builder() this will internally call default constructor on JedisClientConfiguration which looks like something like this.
private DefaultJedisClientConfigurationBuilder() < this.poolConfig = new JedisPoolConfig(); // other configs >JedisPoolConfig further extends GenericObjectPoolConfig which has default values as below. (which would be default values if not overridden manually)
maxTotal = 8; maxIdle = 8; minIdle = 0; In your case, as you have overridden config with GenericObjectPoolConfig , it will pick values from there.
GenericObjectPoolConfig.setMaxTotal(maxConnection); GenericObjectPoolConfig.setMaxIdle(maxConnectionIdle); GenericObjectPoolConfig.setMinIdle(minConnectionIdle); As you are specifying usePooling() and poolConfig(genericObjectPoolConfig) , your app will use these config for connection pooling.
Spring boot — HTTP Connection pooling Java, java spring-boot soap connection-pooling http-1.1. Share. Improve this question. Follow edited Apr 22, 2021 at 11:01. Jissay. 550 10 10 silver badges 28 28 bronze badges. asked Apr 22, 2021 at 10:29. Kagliostro Kagliostro. 21 2 2 bronze badges. 1. This answer has some info on how the http client pool works, …
How to use connection pool with Spring Boot + Mybatis
If you are using mybatis-spring-boot-started you don’t need to use mybatis.xml to specify datasource parameters. It is not used for database accesses initiated from spring.
In order to add connection pooling you need to add a dependency to any of the connection pool supported by spring-boot. The easiest way it do add a dependency to org.springframework.boot:spring-boot-starter-jdbc . If you have it the connections are already pooled.
Java — How to enable connection pooling with spring, Answering my own question. TLDR. Having org.springframework.boot:spring-boot-starter-data-r2dbc:2.3.5.RELEASE is enough to have connection pooling enabled by default; No need to add io.r2dbc:r2dbc-postgresql explicitly; No need to put :pool: in the URL in this case; Some detailed …
Connection Pooling with Spring & Hibernate
You can use DBCP component
com.project.domain.Domain1 com.project.domain.Domain1
$ $ $ In Hibernate, you can configure CP30 Connection Pooling in Hibernate. View a tutorial here. IBM has a good tutorial on how to integrate Hibernate with Spring.
If you want to use Best among all Java Connection Pool providers try HikariCP. Configure a datasource bean using HikariCP in servlet-context as:
jdbc:mysql://localhost:3306/exampledb root 250 2048 true true Then use this datasource to create EntityManagerFactory bean.
Java — Spring Boot with default connection-pool, Hikari is the default DataSource implementation with Spring Boot 2. This means we need not add explicit dependency in the pom.xml. The spring-boot-starter-jdbc and spring-boot-starter-data-jpa resolve it by default. To sum up, you require no other steps with Spring Boot 2. Link for Documentation : Spring …
Configuring Connection Pooling with Spring R2DBC
After successfully configuring your Spring Boot with Spring Data R2DBC, you probably want to launch it to production without any performance hiccup. Unfortunately, it’s not as straightforward as you would like. You will need to use connection pooling. Connection pooling is a way to store and reuse a connection to be reused again later, avoiding the expensive cost of creating a connection for each use. Before we implement connection pooling, let’s try to do some basic benchmarks to see whether or not it improves our application performance.
Playing Around with R2DBC Pooling Performance
There are multiple ways to load test our application, you can even use Apache Benchmark directly from your terminal with the ab command. But this time, I’d like to explore a tool called K6.
Load Testing with K6
We’re testing an API that will insert a hundred record into our database. This is going to be a write-heavy operation to stress the database.
Without Connection Pooling
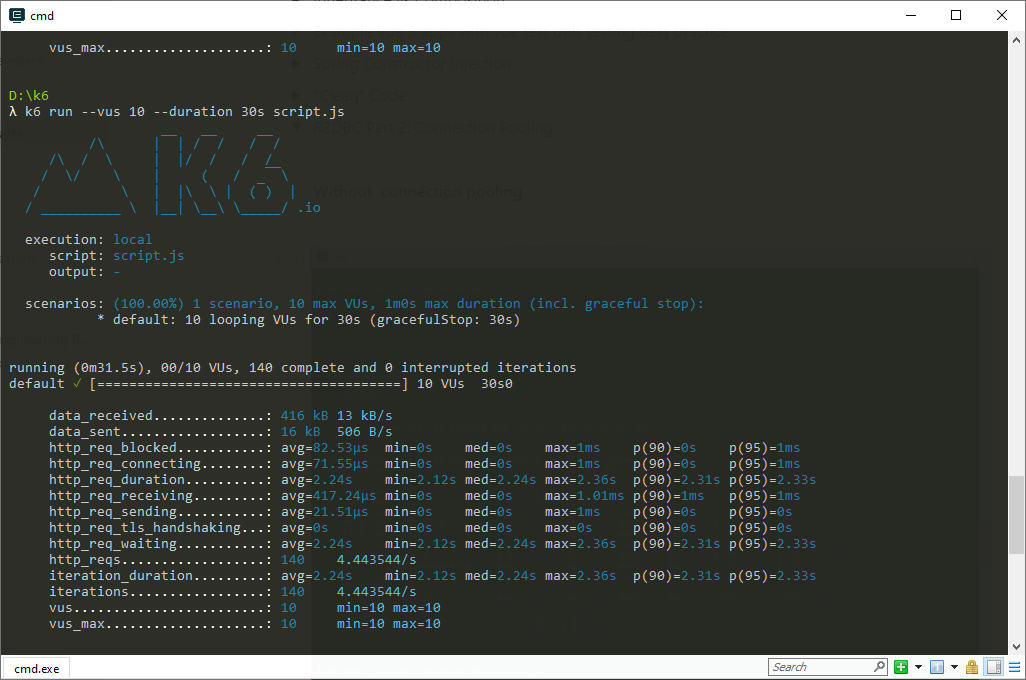 Without connection pooling, we only get 140 requests completed, with the 95th percentile of 2.33s. I also noticed that the docker instance responsible for running the database CPU usage spiked dramatically.
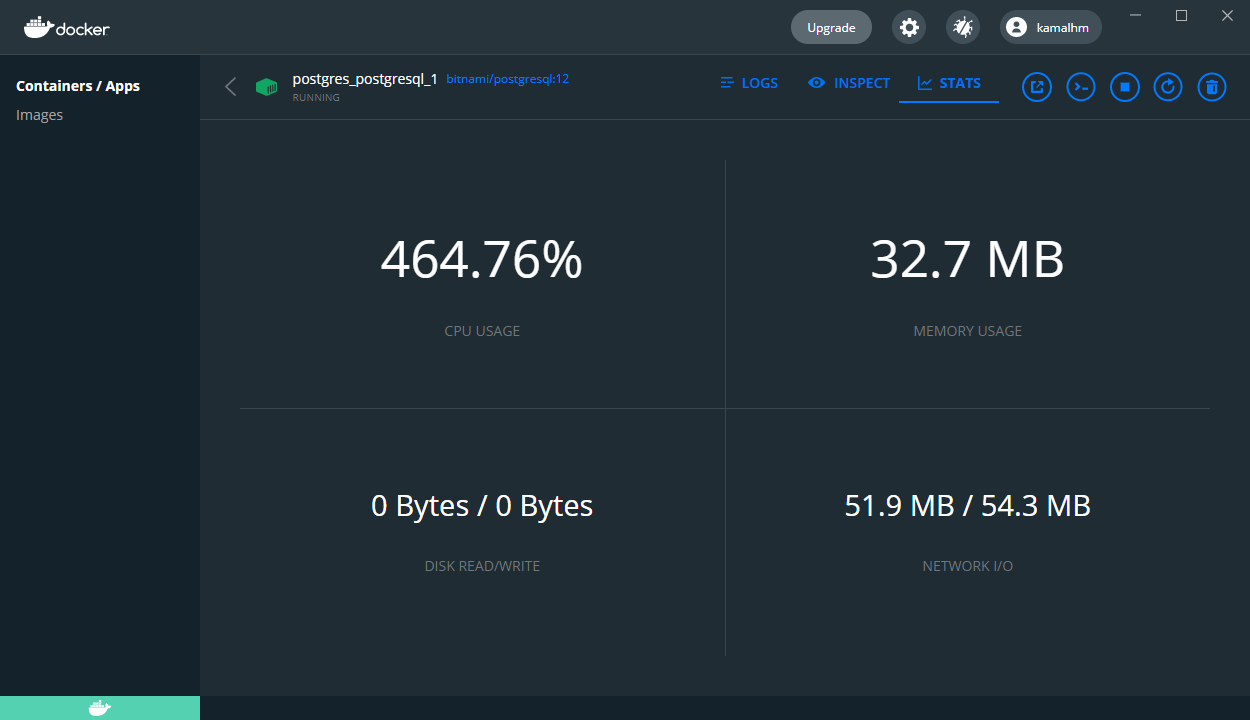
Implementing Connection Pooling in Spring Boot R2DBC
In Spring Boot application that use blocking connection to DB such as JDBC connection pooling is usually handled by a popular library called HikariCP. Luckily, Spring Data R2DBC already includes connection pooling option that we can use just by enabling it from our properties . To enable it, you can add below properties to your application.properties file and R2DBC will be able to pool the connections to our database! Easy right?
spring.r2dbc.pool.enabled=true spring.r2dbc.pool.initial-size=50 spring.r2dbc.pool.max-size=100 As you can probably guess, these properties will initiate the pool with 50 connections ready to use, and when needed it can scale up to maximum of 100 connections. Now then, let’s try our benchmark again.
With Connection Pooling
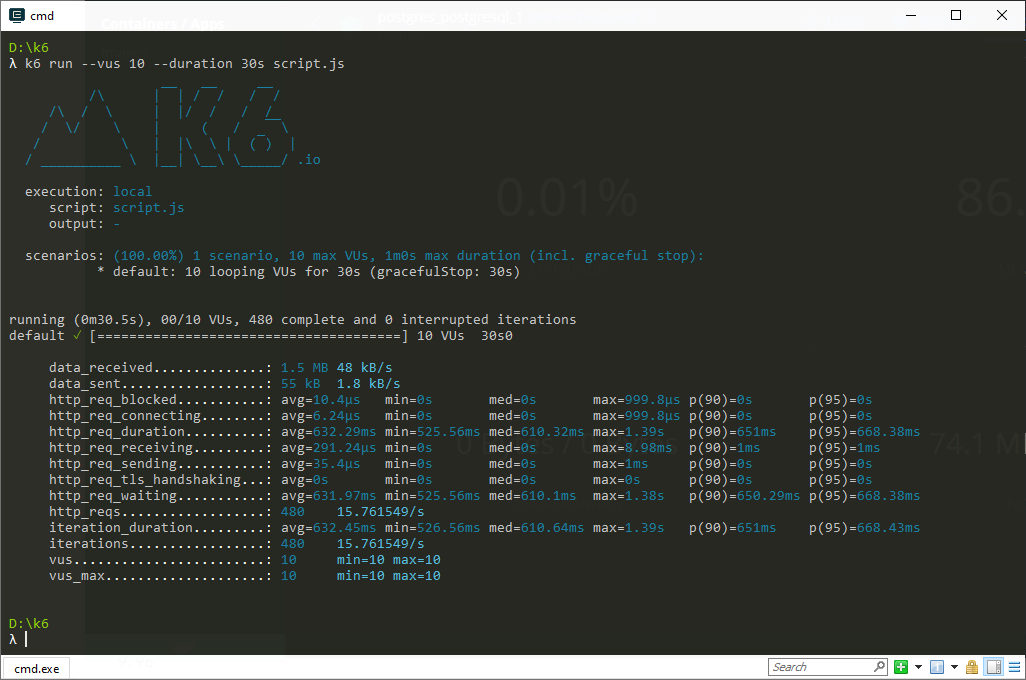
 The result is striking. With connection pooling, we completed 480 iterations of the requests, increasing throughput by almost 3.5x and reducing our 95th percentile latency to 668ms, that’s an almost 4x latency improvement! When we take a look at the docker instance, the CPU usage also stays comfy at around 76% usage. Enabling connection pooling improves the performance by almost 4x and reduced our database load significantly.
Connection Pool Sizing
After seeing an awesome performance improvement above, you might be tempted to try and increase the connection pool even further. After all, if we can get 4x improvement with 100 connection pool, then we should get even better performance with 200 connection pool, right? Sorry to burst the bubble but the short answer is no. If you’d like to learn further about connection pool sizing, please refer to this awesome article on pool sizing by the author of HikariCP himself: https://github.com/brettwooldridge/HikariCP/wiki/About-Pool-Sizing
Conclusion
We have learned how easy it is to enable connection pooling on an R2DBC project and its impact on your application performance. So don’t forget to set it up whenever you’re configuring your application! As usual, you can see the source code for the project at: https://github.com/kamalhm/spring-boot-r2dbc This article is the second part of my first article related to Spring Boot R2DBC. If you haven’t checked it out, please check out: Reactive Spring Boot Application with R2DBC and PostgreSQL
Connection Pooling
After successfully configuring your Spring Boot with Spring Data R2DBC, you probably want to launch it to production without any performance hiccup. Unfortunately, it’s not as straightforward as you would like. You will need to use connection pooling. Connection pooling is a way to store and reuse a connection to be reused again later, avoiding the expensive cost of creating a connection for each use. Before we implement connection pooling, let’s try to do some basic benchmarks to see whether or not it improves our application performance.
Playing Around with R2DBC Pooling Performance
There are multiple ways to load test our application, you can even use Apache Benchmark directly from your terminal with the ab command. But this time, I’d like to explore a tool called K6.
Load Testing with K6
We’re testing an API that will insert a hundred record into our database. This is going to be a write-heavy operation to stress the database.
Without Connection Pooling
Without connection pooling, we only get 140 requests completed, with the 95th percentile of 2.33s. I also noticed that the docker instance responsible for running the database CPU usage spiked dramatically.
Implementing Connection Pooling in Spring Boot R2DBC
In Spring Boot application that use blocking connection to DB such as JDBC connection pooling is usually handled by a popular library called HikariCP. Luckily, Spring Data R2DBC already includes connection pooling option that we can use just by enabling it from our properties . To enable it, you can add below properties to your application.properties file and R2DBC will be able to pool the connections to our database! Easy right?
spring.r2dbc.pool.enabled=true spring.r2dbc.pool.initial-size=50 spring.r2dbc.pool.max-size=100 As you can probably guess, these properties will initiate the pool with 50 connections ready to use, and when needed it can scale up to maximum of 100 connections. Now then, let’s try our benchmark again.
With Connection Pooling
The result is striking. With connection pooling, we completed 480 iterations of the requests, increasing throughput by almost 3.5x and reducing our 95th percentile latency to 668ms, that’s an almost 4x latency improvement! When we take a look at the docker instance, the CPU usage also stays comfy at around 76% usage. Enabling connection pooling improves the performance by almost 4x and reduced our database load significantly.