- Can we build a website from python?
- Why should we create a website with Python?
- Roadmap to Create a website using Python step-by-step
- Step 1 − Learn about HTML and CSS.
- Step 2 − Master the fundamentals of JavaScript.
- Step 3 − Understand the document object model(DOM)
- Step 4 − Backend development with Python
- Step 5 − Select your framework and database
- Build a Website with Python
- Step #1: Minimal Web Application
- Step #2: Adding HTML
- Step #3: Adding CSS
- Step #4: Adding an Image
- Step #5: Adding JavaScript
Can we build a website from python?
Yes, you can build a website with Python — pretty easily, in fact. Although Python is a general-purpose programming language, it easily adapts itself to web development.
Python web development is feasible due to «frameworks,» which are pre-built packages of Python code that serve as the foundation, or structure, for your website.
Why should we create a website with Python?
Generally, web development falls under the domain of Python. Python frameworks have enabled web developers to create magnificently complicated websites and web apps.
But, what makes Python so appealing for web development? The following are some of the benefits of building a website with Python.
- Easy to learn
- A large library collection
- Fast development time
- Outstanding data visualization abilities
- Low cost
- Secure and scalable
Below are some brief points about it −
- Python is simple to learn, and its code is typically shorter than that of other languages.
- Python provides a lot of frameworks for web development that make the effort of development easier.
- The faster speed of Python is a significant advantage when constructing a website.
- Python’s ability to express data in the form of innovative visualizations is one of its primary features.
- Python is completely open-source, meaning the language and its corresponding frameworks are available to anybody. This means that the majority of Python website-building tools are free. This ensures that your web development process is kept as low-cost as possible.
- Python is an inherently secure and scalable programming language. Because of this quality, the language may be used to create web apps that can be readily scaled up as your business expands.
Roadmap to Create a website using Python step-by-step
So far, we’ve covered the various components of Python web development. Now, we will connect everything together and build a guide that will provide you with all of the information you need to succeed as a Python web developer.
Step 1 − Learn about HTML and CSS.
HTML and CSS are essential skills for any web developer worth their salt. These two languages serve as the foundation of the web development process. A developer cannot design the front-end, or the component of the website that is viewable in the browser, without HTML and CSS.
Step 2 − Master the fundamentals of JavaScript.
Following that, you must understand the basics of JavaScript, the important client-side scripting language that no website can operate without. Developers can use JavaScript to create powerful elements such as form validations, client-side animations, and many more.
Step 3 − Understand the document object model(DOM)
Once you’ve mastered the above, it’s time to study the Document Object Model (DOM), with which you can create complex, dynamic web pages. In this context, learning jQuery, a JavaScript library that facilitates dealing with DOM is beneficial.
Step 4 − Backend development with Python
After you’ve completed the preceding steps, you’re ready to begin back-end development. Now comes the exciting part − we must utilize Python to create the backend or the portion of the website code that runs on the server.
Begin by studying Python syntax before moving on to a framework such as Django or Flask. Python will be a piece of cake once you’ve mastered the fundamentals of JavaScript.
Step 5 − Select your framework and database
Finally, you must choose the best framework for your requirements, as well as the backend database that will be used to build your Python website. It is here that you must create the business-specific logic as well as your website’s data manipulation functions.
The following are some of the best Frameworks of python −
Django is a free and open-source Python framework, that allows developers to fastly create complex code and apps. The Django framework aids in the development of high-quality web applications. It is one of the greatest Python frameworks for the rapid creation of APIs and web applications.
The Django framework has been used to create over 12,000 well-known projects. Furthermore, it is one of the more experienced Python web development frameworks.
This high-level framework simplifies web application development by providing a variety of powerful features. It features a massive library collection and emphasizes effectiveness, less coding, and component reusability.
Web2py is a Python-based platform for creating dynamic web content. The technology has included a code editor, debugger, and deployment tools from its initial release in 2007. Web2py is a Python library that allows you to create dynamic web content.
Flask is a Python framework inspired by the Sinatra Ruby framework that is accessible under the BSD license. Flask is dependent on the Werkzeug WSGI toolbox and the Jinja2 template. The main goal is to assist in the development of a robust web application base.
The Python backend framework can be developed in any way that developers require; however, it was built for open-ended applications. Flask has been employed by large corporations such as LinkedIn and Pinterest. Flask, in comparison to Django, is best suited for tiny and simple projects. As a result, you may predict web server development, Google App Engine support, and built-in unit testing.
The bottle is a WSGI microweb framework, which means it is a single file with no dependencies other than a distributed module in the Python Standard Library. All of this is included in the framework, as well as request dispatching through URL, key/value databases and templates, and built-in HTTP server support.
AIOHTTP is an asynchronous framework with both server and client-side functions, making it ideal for a wide range of websites.
Not only these we have many more like NumPy, Pandas, Matplotlib, CherryPy, etc.
In this article, we learned how to write a website in Python, as well as a road map for how to code a website in Python.
Build a Website with Python
![]()
Flask is a web development framework. With Python, there are two modules one can use for web development: Django and Flask. However, Flask is more lightweight and easier to learn. In this tutorial, we’ll be building a very simple website using Python’s Flask module.
To begin with, install flask:
Step #1: Minimal Web Application
The minimal application can be found at https://flask.palletsprojects.com/en/2.0.x/quickstart/#a-minimal-application. This is a web page that displays “Hello World”. The first thing we did was create an instance of Flask() with “__name__” as the argument. The route decorator is used to inform Flask the URL that will activate the function we wrote.
def index ( ) :
return «Hello World»
if «__name__» == «__main__» :
app. run ( debug = True )
Next, in the terminal of PyCharm, type the following (where the name of my Python file is main.py; in your case, replace main.py with your Python’s filename):
Once you run “flask run”, the terminal will chuck out a URL with a port. This URL:PORT is where the web page is loaded. You can always press Control + c to quit. In my case, it says “Running on http://127.0.0.1:5000/ (Press CTRL+C to quit)”. So, open up your web browser, and copy and paste the URL given. In my case, I copied and pasted “http://127.0.0.1:5000/”. Please also note that the previous lines must be run every time you restart PyCharm for it to work:

Step #2: Adding HTML
The first thing you’ll need to do is open the folder where the Python script is located and create a folder called “templates”. When I first ran this, I tried putting the name “template” as the folder name, and the whole program crashed and didn’t work. So, it’s imperative that you call the folder “templates”. Within this “templates” folder, create an index.html file with your HTML code. Then, use render_template() and pass “index.html” as the argument. Now, if you run “flask run” in the terminal, your HTML code should be rendered:
My html code (index.html) for the moment is as follows:
And, my Python file code (main.py) is as follows:
from flask import Flask , render_template
def index ( ) :
return render_template ( «index.html» )
if «__name__» == «__main__» :
app. run ( debug = True )
The latter will render a simple HTML page.
Step #3: Adding CSS
Now, I want to add CSS to my HTML. To do this, create a folder called “static” and create a file called “main.css”. Here, the name of the actual CSS file can be anything. I’ve decided to call mine “main.css”. However, the name of the folder must be “static”! In fact, in the “static” folder, one can place anything that is static, such as CSS, JavaScript, and images. So, if you’re going to put images, JavaScript, and CSS, you may wish to create sub-folders.
First, let’s write out the CSS (main.css) I want:
body {
margin : 0 ;
color : #333
font-family : verdana ;
font-size : 20px ;
background-color : rgb ( 201 , 76 , 76 ) ;
}
.styled {
background-color : #92a8d1 ;
font-family : verdana ;
font-size : 20px ;
}
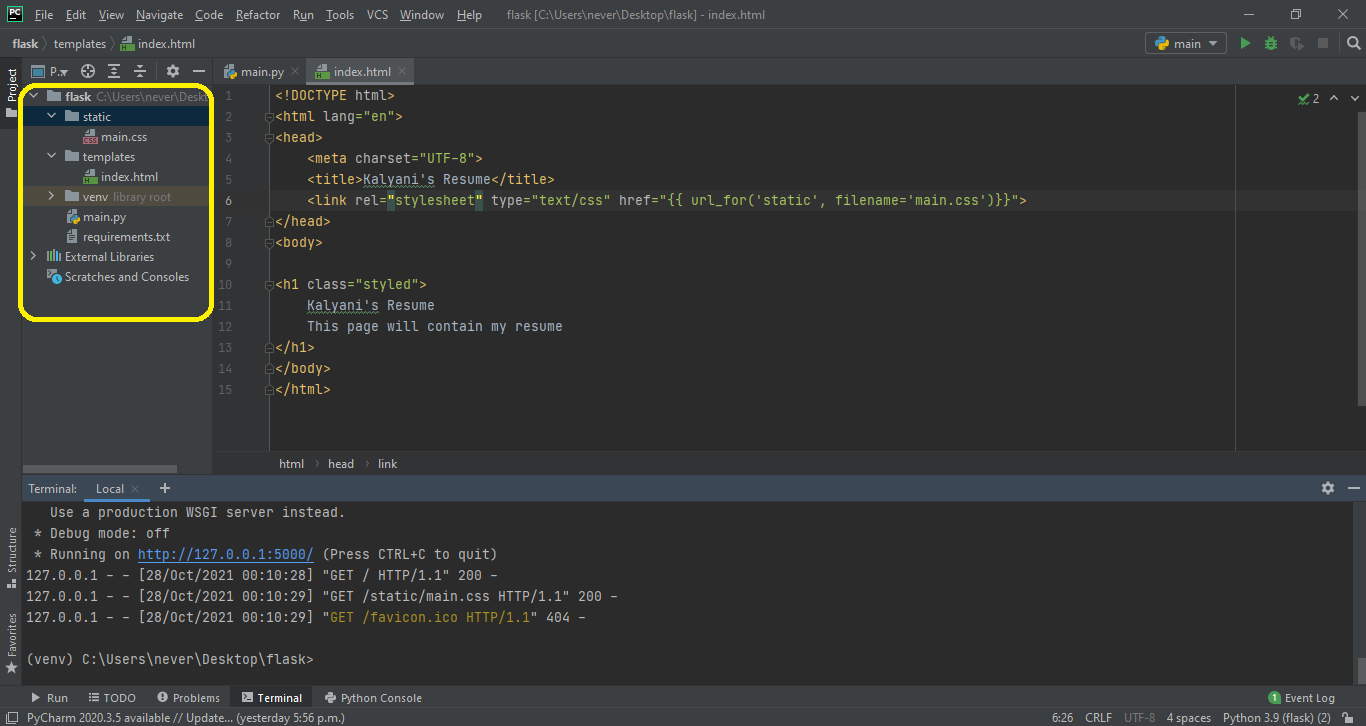
Here, in the index.html, we need to write <link rel=”stylesheet” type=”text/css” href=”>”> in the head of the HTML file. Here, the filename is the name of the CSS file (mine is main.css). If for instance the “main.css” is located with a sub-folder called “css”, then you’d write the following:
After that, you can use the CSS you have created. For instance, I created one called “styled”, and used it in the h1 class.
My index.html file would be as follows:
Kalyani’ s Resume
This page will contain my resume
< / h1 >
< / body >
< / html >
The main Python file – main.py – stays the same.
from flask import Flask , render_template
def index ( ) :
return render_template ( «index.html» )
if «__name__» == «__main__» :
app. run ( debug = True )
Step #4: Adding an Image

Now, let’s add an image to the HTML page we created! For this, we use the “static” folder we created. Within the “static” folder, I created another folder called “images”. Within the images folder, I placed an image. Now, let’s add the image to the HTML code as follows: . In this case, I set the height of the image to 200, but you can change it to whatever you want and add CSS if you want.
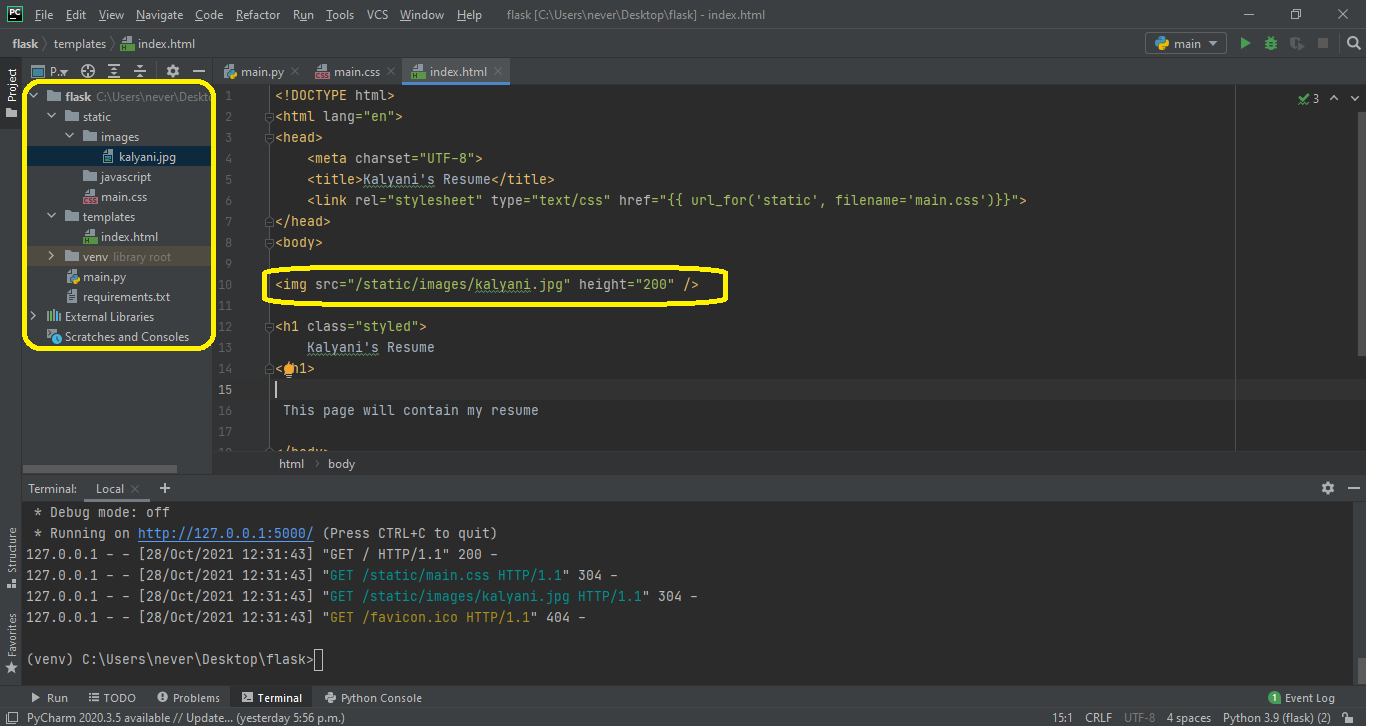
The HTML code would look as follows:
Alternatively, one can also use the following:
In this case, the HTML code would look like this:
[ cc lang = «html» width = «100%» height = «100%» escaped = «true» theme = «blackboard» nowrap = «0» ]
>»>
%3E%3E)
Kalyani’ s Resume
< / h1 >
This page will contain my resume
< / body >
< / html >
Step #5: Adding JavaScript
There are two ways you can add JavaScript. In this first demo, I will create a button. When the button is pressed, it would activate a function called myFunction() which will be JavaScript (found in the tag). For this, set up the button. Then, set up a script tag in the head of the HTML code and within it, define a function. In my case, I’ve defined a function that will add the “whole resume” to a p element upon button click.
You can add it to the index.html file as follows:
function myFunction() document.getElementById(«para»).innerHTML = «WHOLE RESUME»;
>

Kalyani’ s Resume
< / h1 >
This page will contain my resume
< / p >
Click to see Resume < / button >
< / body >
< / html >
However, in most cases, JavaScript files tend to be documents themselves, and not one liners. In such cases, we’d have a .js file that we have to link. In my case, I’d write: . So, much like the image file, we link the js file as follows:
>»>
Kalyani’ s Resume
< / h1 >
This page will contain my resume
< / p >
Click to see Resume < / button >
< / body >
< / html >
Alternatively, you can also use this: . The latter would generate this HTML code:
Kalyani’ s Resume
< / h1 >
This page will contain my resume
< / p >
Click to see Resume < / button >
< / body >
< / html >