- Using Chart JS with PHP and MySQL
- Making a bar chart
- Making resource friendly
- Line Chart using data from MySQL table by PHP
- DEMO of BSE Sensex historic data
- 1 : Collecting data from MySQL database
- 2 : Data array in PHP
- 3 : Transferring data from PHP to JavaScript to create the chart
- 4 : Adding data to Chart
- 5. HTML part
- Using CSV file as data source
- Adding animation to chart
- Pie Chart using data from MySQL table by PHP
- 2 : Data array in PHP
- 3 : Transferring data from PHP to JavaScript to crate the chart
- 4 : Adding data to Chart
- 5. HTML part
- Changing Height Width and Title
- 3-D Pie chart
- Using CSV file as data source
- Chart.js, MySQL & PHP for Beginners
Using Chart JS with PHP and MySQL
Chart JS is a very comprehensive framework for creating and customizing many charts and graphs. The ease of use and ability to configure the charts makes Chart JS a good choice for HTML5 charts.
Getting Chart JS to work with PHP and MySQL isn’t hard nor extensive. Here is how it is done:
Making a bar chart
Assume I have a database table that has an int column (value) and a datetime column (date_time). I am going to create a bar chart to show these values along with the date in a bar chart.
prepare("SELECT `value`, `date_time` FROM `data` ORDER BY `date_time`;"); $select->execute(); $data = array(); while ($row = $select->fetch(PDO::FETCH_ASSOC)) < $data[] = $row; >print json_encode($data); This will jsut print out the data as an array. This is what Chart JS uses to plot the points.
$(document).ready(function () < $.ajax(< url: "create_data.php", type: "GET", success: function (data) < var date_time = []; var value = []; for (var i in data) < date_time.push("" + data[i].date_time); value.push(data[i].value); >var chartdata = < labels: date_time, datasets: [ < label: "value", fill: false, lineTension: 0.3, backgroundColor: chartColors.green, borderColor: chartColors.green, pointHoverBackgroundColor: chartColors.green, pointHoverBorderColor: chartColors.green, hoverBackgroundColor: chartColors.gold, data: value, yAxisID: "y-axis-1" >] >; var ctx = $("#value-data"); var LineGraph = new Chart(ctx, < type: 'bar', data: chartdata, options: < title: < display: true, text: '', maintainAspectRatio: false, fontColor: chartColors.green >, responsive: true, scales: < xAxes: [< display: true, scaleLabel: < display: true, labelString: '' >>], yAxes: [ < type: "linear", display: true, position: "left", id: "y-axis-1", scaleLabel: < display: false, labelString: 'value' >>] > > >); >, error: function (data) < >>); >); window.chartColors = < red: 'rgb(255, 99, 132)', orange: 'rgb(255, 159, 64)', yellow: 'rgb(255, 205, 86)', green: 'rgb(75, 192, 192)', blue: 'rgb(54, 162, 235)', purple: 'rgb(153, 102, 255)', gold: 'rgb(248,193,28)', grey: 'rgb(201, 203, 207)' >; Looks confusing right? Most of the above is just options and configuration as per the docs. You can see that i am after the value and date_time columns, these obviously are also the points on the axis.
The colors are defined at the end, this was to save repeating a hex code and to create readability. Here is an example
 Making resource friendly

One issue with this current code is its lack of sustainability in resource usage. Every time someone goes to your chart page the database gets queried. You may not be getting 100 views per minute to your graph page but that doesn’t mean you can write code that has poor practice.
This becomes even more dependent when you start filtering, fetching more data per row (multiple bars) and formating the returned date time.
Avoiding this is simple, instead of create_data.php returning the array you get it to create a JSON file with the data in it.
prepare("SELECT `value`, `date_time` FROM `data` ORDER BY `date_time`;"); $select->execute(); $data = array(); while ($row = $select->fetch(PDO::FETCH_ASSOC)) < $data[] = $row; >$fp = fopen('value_data.json', 'w'); fwrite($fp, json_encode($data)); fclose($fp); Just point a cron job to call create_data.php thus updating the JSON file (value_chart.json).
Now when your chart page is viewed instead of the database being queried every single time, the JSON file gets loaded. Just remember to cron create_data.php every 2 or 5 minutes etc.
Line Chart using data from MySQL table by PHP
Without using PHP or MySQL, you can try this simple HTML and JavaScript code to display the above Line chart. Copy this code and save ( open ) as HTML file. Google Chart library is also included inside the code.
Download Zip file at end of this tutorial.
DEMO of BSE Sensex historic data
Using this tutorial one more example is developed showing the historic moment of stock market data. User can see the graph showing full range of movement of stock index or can select a particular year to check the movement of that year.
1 : Collecting data from MySQL database
After connecting to database through config.php file, we will run the SQL to collect the data from MySQL table. You can read more on MySQLi and how to collect data from table.
if($stmt = $connection->query("SELECT month,sale,profit,expanses, exp_fixed,exp_variable FROM chart_data_line"))< echo "No of records : ".$stmt->num_rows."
"; $php_data_array = Array(); // create PHP array echo " Month Sale Profit Exp Fxd Exp Vrv $row[0] $row[1] $row[2] $row[3] $row[4]
"; >else< echo $connection->error; >Using PDO : PHP Data Object we can connect to MySQL and retrive the data to create the array $php_data_array.
Any one method either MySQLi ( Above code ) or PDO ( Below code ) is to be used to collect data and create the JavaScript array.
Both scripts are avaialble inside zip file at the end of this page.
require "config-pdo.php";// Database connection $query="SELECT month,sale,profit, exp_fixed,exp_variable FROM chart_data_line"; $step = $dbo->prepare($query); if($step->execute())< $php_data_array = $step->fetchAll(); // echo " "; >2 : Data array in PHP
Before displaying records in a table we have created an array in PHP ( $php_data_array ). While displaying the records in a table we store each record inside the PHP array.
$php_data_array[] = $row; // Adding to arrayAfter displaying all the records in a table we have the $php_data_array with all the data collected from MySQL table. We can display the Json string like this.
echo json_encode($php_data_array);3 : Transferring data from PHP to JavaScript to create the chart
By using json_encode we will create an json string which can be used to create the JavaScript two dimensional array.
echo " ";4 : Adding data to Chart
Our JavaScript array my_2d stores all the data required for creating the chart. We need to display them in the format required by our Chart library.
5. HTML part
The chart drawn above can be displayed with live internet connection as the library is to be loaded from gstatic.com
Data is collected from MySQL database table so data can be edited by using script and the same will be reflected by the Chart. We have not included this part in the present script and there are many tutorials available here one handling data using PHP and MySQL.
You can read tutorials on other types of charts displayed by using data from database.
Using CSV file as data source
Once the php aray $php_data_array is created the rest of the code remain same. Here we are reading the chart_data_line.csv file to create the $php_data_array . Once the array is created same code can be used. Zip file below contains the chart_data_line.csv file as data source and the index-csv.php file to display the chart.
We used fgetcsv() to read csv file
$f_pointer=fopen("chart_data_line.csv","r"); // file pointer $php_data_array = Array(); // create PHP array while(! feof($f_pointer)) < $ar=fgetcsv($f_pointer); //echo print_r($ar); // print the array $php_data_array[] = $ar; // Adding to array >//print_r($php_data_array); echo " ";Adding animation to chart
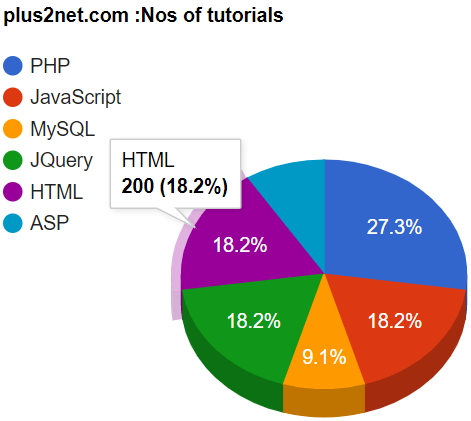
Pie Chart using data from MySQL table by PHP
After connecting to database through config.php file, we will run the SQL to collect the data from MySQL table. You can read more on MySQLi and how to collect data from table.
if($stmt = $connection->query("SELECT language, nos FROM chart_data"))< echo "No of records : ".$stmt->num_rows."
"; $php_data_array = Array(); // create PHP array echo " Language Nos $row[0] $row[1]
"; >else< echo $connection->error; >Using PDO : PHP Data Object we can connect to MySQL and retrive the data to create the array $php_data_arra.
Any one method either MySQLi ( Above code ) or PDO ( Below code ) is to be used to collect data and create the JavaScript array.
Both scripts are avaialble inside zip file at the end of this page.
prepare($query); if($step->execute())< $php_data_array = $step->fetchAll(); //echo json_encode($php_data_array); //Transfor PHP array to JavaScript two dimensional array echo " "; >else< echo $connection->error; > ?>2 : Data array in PHP
Before displaying records in a table we have created an array in PHP ( $php_data_array ). While displaying the records in a table we store each record inside the PHP array.
$php_data_array[] = $row; // Adding to arrayAfter displaying all the records in a table we have the $php_data_array with all the data collected from MySQL table. We can display the Json string like this.
echo json_encode($php_data_array);3 : Transferring data from PHP to JavaScript to crate the chart
By using json_encode we will create an json string which can be used to create the JavaScript two dimensional array.
echo " ";4 : Adding data to Chart
Our JavaScript array my_2d stores all the data required for creating the chart. We need to display them in the format required by our Chart library.
5. HTML part
The chart drawn above can be displayed with live internet connection as the library is to be loaded from gstatic.com
Data is collected from MySQL database table so data can be edited by using script and the same will be reflected by the Chart. We have not included this part in the present script and there are many tutorials available here one handling data using PHP and MySQL.
You can read tutorials on other types of charts displayed by using data from database.
Changing Height Width and Title
3-D Pie chart
Using CSV file as data source
Once the php aray $php_data_array is created the rest of the code remain same. Here we are reading the chart_data.csv file to create the $php_data_array . Once the array is created same code can be used. Zip file below contains the chart_data.csv file as data source and the index-csv.php file to display the chart.
We used fgetcsv() to read csv file
$f_pointer=fopen("chart_data.csv","r"); // file pointer $php_data_array = Array(); // create PHP array while(! feof($f_pointer)) < $ar=fgetcsv($f_pointer); //echo print_r($ar); // print the array $php_data_array[] = $ar; // Adding to array >//print_r($php_data_array); echo " ";
plus2net.com
Chart.js, MySQL & PHP for Beginners
If you are new to webdev and want to learn how to incorporate charts and graphs in your webpages this article is for you. The Northwind database is used in this article. You can find the sql file in this repository. Setup the config folder with the following files and code in it. The code below will allow you to connect to MySQL. config/config.php

After setting up the config directory you can now work on the webpage where you want to display your chart. Chart No. 1: Pie Chart Add the Chartjs script inside head tag.
0) < // array for data $Count_Orders = array(); // array for labels (x-axis) $label_piechart = array(); while ($row = mysqli_fetch_array($result01))< $Count_Orders[] = $row['Count_Orders']; $label_piechart[] = $row['CompanyName']; >// Free result mysqli_free_result($result01); // Close the connection mysqli_close($conn); >else < echo "No records matching your query were found."; >?> Create a script tag below the PHP code. There will be three blocks inside the script, setup, config, and render block.

Chart No. 2 Line Chart Prepare canvas tag.
// Free result mysqli_free_result($result_top3); $Top1_Count = array_fill(0,12,0); $Top2_Count = array_fill(0,12,0); $Top3_Count = array_fill(0,12,0); for ($counter=0; $counter 0) < while ($row = mysqli_fetch_array($result02))< if ($counter==0)< $Top1_Count[$row['Month_1997']] = $row['num_order']; >elseif ($counter==1) < $Top2_Count[$row['Month_1997']] = $row['num_order']; >else < $Top3_Count[$row['Month_1997']] = $row['num_order']; >> > > ?> 
Chart No. 3 Bar Graph (with 2 datasets) Prepare canvas for the chart.
PHP code that fetches the number of orders per month of Products under Meat/Poultry and Seafood categories.
0)< $Sales_Meat = array(); $Sales_Seafood = array(); while ($row = mysqli_fetch_array($result03))< if($row['CategoryName']=='Seafood')< $Sales_Seafood[] = $row['sales']; >else < $Sales_Meat[] = $row['sales']; >> // print_r($Sales_Seafood); // print_r($Sales_Meat); // Free result mysqli_free_result($result03); // Close the connection mysqli_close($conn); >else < echo "No records matching your query were found."; >?> 
Chart No. 4 Bar Chart (one dataset) Prepare canvas.
0) < $order_count = array(); $label_barchart = array(); while ($row = mysqli_fetch_array($result04))< $order_count[] = $row['order_count']; $label_barchart[] = $row['ProductName']; >// print_r($label_barchart); // Free result mysqli_free_result($result04); // Close the connection mysqli_close($conn); >else < echo "No records matching your query were found."; >?>