- How to Install Mod Fcgid on cPanel’s EasyApache 4 with CloudLinux
- Expectations: Downtime & Performance
- Installation of mod_fcgid
- Step 1: Liquid Web Servers Only – Disable Mod_Zeus & Other EA3 Modules
- Step 2: Disable Litespeed
- Step 3: Install mod_fcgid
- Step 4: CloudLinux Only – Configure CageFS Map for FCGI
- Step 5: [OPTIONAL] Remove Unnecessary Writable Permission
- Step 5a: Create & Attach to a Screen Session
- Step 5b: Run the One-Liner
- Step 6: [OPTIONAL] Disable mod_php Directives in .htaccess Files
- Step 6a: Create & Attach to a Screen Session
- Step 6b: Run the One-Liner
- Step 7: Rebuild the Apache Config (Troubleshoot Any Errors)
- Step 8: CloudLinux ONLY – Setup PHP Selector
- Step 8a: Force All Sites to Use Inherited Version of PHP in MultiPHP Selector
- Step 10: Perform a Full Stop & Restart of Apache
- Related Articles:
- About the Author: Jason Potter
- How to Setup Apache with PHP/FastCGI on CentOS/RHEL 7/6
- Step 1 – Prerequsitis
- Step 2 – Install Apache2
- Step 3 – Install PHP and FastCGI
- Step 4 – Disable Default PHP Handler
- Step 5 – Setup FastCGI Handler
- Step 6 – Setup VirtualHost with FastCGI
- Step 7 – Restart Apache and Test Setup
How to Install Mod Fcgid on cPanel’s EasyApache 4 with CloudLinux
When it comes to PHP execution, mod_fcgid (also called FCGI) is one of the heavyweight contenders. There are a few rival handlers, like PHP-FPM or mod_lsapi, which come close to matching its execution speed, but they generally leave something to be desired when it comes to fine-tuning and resource consumption. FCGI is built for speed and includes a myriad of Apache directives that can be leveraged for resource regulation.
This article will cover installing mod_fcgid followed by basic configuration in a separate article. The article applies to any cPanel servers running the following operating systems:
The article will not cover EasyApache 3 (EA3). Due to the End-of-Fife (EOL) status of EA3, it is imperative that any systems running EA3 upgrade to EA4 as soon as possible. To avoid conflicts, upgrading to EA4 should be handled as an entirely separate procedure from installing mod_fcgid. If you need assistance with upgrading from EA3 to EA4, please feel free to contact our support team. If you’re running a Liquid Web Fully Managed cPanel VPS server, our team will perform the entire upgrade procedure for you.
Expectations: Downtime & Performance
Downtime – Please plan ahead as this operation may cause downtime. While installing an Apache module and enabling a baseline configuration should only require an Apache restart, there may be unforeseen circumstances that require troubleshooting. This can lead to sites becoming unresponsive and/or slow.
Always plan for more downtime than expected and always have a reversion plan. Allot extra time for troubleshooting, testing, and reverting all changes if necessary.
Performance – While FCGI provides superior PHP execution time, it is not a blanket fix for performance. For server optimization, there will be an adjustment period for configuration tweaking. This period can take hours to weeks as it must account for the unique warnings with the specific server hardware, software, traffic habits, and many other unpredictable variables.
Optimization is an ongoing, perceptual process. There is no one-size-fits-all optimized configuration. Traffic & resource usages continually change over time on all servers. Periodic evaluation and configuration adjustment are necessary to stay ahead of the curve.
Installation of mod_fcgid
The following steps should be followed as close to the examples as possible. Things will vary slightly depending on CentOS/CloudLinux versions, and a few other factors. The article will denote the differences where they are expected.
Step 1: Liquid Web Servers Only – Disable Mod_Zeus & Other EA3 Modules
Older Liquid Web cPanel servers with EasyApache 3 who upgraded to EA4 may find residual configs on the system that can cause conflicts in the Apache configuration. This step will help make sure these older configs are disabled. The following sed one-liner will take care of disabling the inclusion line for these modules. These modules are stored in the /usr/local/lp/configs/httpd/conf.d/ directory. This directory is typically mentioned in the /etc/apache2/conf.d/includes/post_virtualhost_global.conf config file. The sed code looks for and comments out the specific include statement for this file.
sed -i -e ‘s/[^#]+\(Include [/]usr[/]local[/]lp[/]configs[/]httpd[/]\)/#\1/g‘ /etc/apache2/conf.d/includes/post_virtualhost_global.conf
To confirm the change, print the contents of the post_virtualhost_global.conf file using cat:
The output should be blank or have a commented out inclusion line like below:
Step 2: Disable Litespeed
FCGI is not compatible with Litespeed, which uses its mod_lsapi module to process PHP using lsphp. Disabling Litespeed in this way does not remove it from the server; it merely enables Apache as the default web server.
Step 3: Install mod_fcgid
The following yum command will install the necessary module:
yum install ea-apache24-mod_fcgid -y
Once completed, confirm Apache has the fcgid_module loaded:
httpd -M | grep ‘expires\|version\|fcgid’
Step 4: CloudLinux Only – Configure CageFS Map for FCGI
The following snippet will create the necessary directories needed by mod_fcgid to execute correctly. It will then add those directory entries into the /etc/cagefs/cagefs.mp file, allowing user-level access to said directories from within their caged environment. Finally, it forces cagefs to remount all user directories for access to the new directory on all sites.
mkdir -p /var/run/mod_fcgid /usr/share/cagefs-skeleton/var/run/mod_fcgid /run/mod_fcgid
cp -p /etc/cagefs/cagefs.mp<,.lwbak.$(date +%F_%H%M%S)>
cat >/etc/cagefs/cagefs.mp
/var/run/mod_fcgid
/run/mod_fcgid
/usr/local/cpanel/cgi-sys/
EOF
cagefsctl -M
Step 5: [OPTIONAL] Remove Unnecessary Writable Permission
Due to security restrictions, any website files or directories with group-writable or other-writable permissions will be denied and a 500 Internal Server Error will be displayed. The following awk one-liner uses the find command to search all DocumentRoot directories configured on the server. It is advised to run this process in a screen session as it may take an hour or more depending on the size of the file system in question. The code takes care to use nice and ionice commands to run the process as a low priority so there will be minimal impact on server load or disk I/O. All changed files and their previous permissions are recorded in the /var/log/fixperms.log file.
Step 5a: Create & Attach to a Screen Session
screen -dmS fixperms; screen -x fixperms
Step 5b: Run the One-Liner
Step 6: [OPTIONAL] Disable mod_php Directives in .htaccess Files
Another common precaution to take when switching to FCGI is that any existing mod_php related directives inside any .htaccess file are not compatible with mod_fcgid and will cause the site to throw a 500 Internal Server Error. So, these entries need to be located and disabled or removed. The following awk one-liner checks all configured DocumentRoot directories for .htaccess files, and if they contain a php_value or php_admin_value entry, it will disable by commenting the line out. First, an in-place backup is created of the original file. The backup is named .htaccess.bak.YYYY-MM-DD_HHMMSS. All changed files and their previous permissions are logged in the /var/log/fixhtaccess.log file.
Step 6a: Create & Attach to a Screen Session
screen -dmS fixhtaccess; screen -x fixhtaccess
Step 6b: Run the One-Liner
Step 7: Rebuild the Apache Config (Troubleshoot Any Errors)
The following command checks the system httpd.conf file for syntax error and if none are found, runs the cPanel httpd.conf rebuild script. Fix any syntax errors, until a clean rebuild is completed without error.
httpd -t && /scripts/rebuildhttpdconf
Step 8: CloudLinux ONLY – Setup PHP Selector
The PHP Selector feature of CloudLinux is only compatible with the inherit PHP versions in the cPanel MultiPHP Manager interface. All sites should be using the inherited version of PHP or PHP Selector will not function for that site. This only applies to CloudLinux servers.
Step 8a: Force All Sites to Use Inherited Version of PHP in MultiPHP Selector
The following command uses cPanel’s whmapi1 system to force all sites onto the inherited version of PHP in MultiPHP Manager.
To confirm the changes, run:
DEFAULT PHP: ea-php71
ea-php54 SAPI: fcgi
ea-php55 SAPI: fcgi
ea-php56 SAPI: fcgi
ea-php70 SAPI: fcgi
ea-php71 SAPI: fcgi
ea-php72 SAPI: fcgi
Step 10: Perform a Full Stop & Restart of Apache
The following script will stop Apache (gracefully if possible), and kill any unresponsive Apache & PHP processes before starting the Apache service again. It will also verify the Apache configuration syntax and will only perform the restart procedure if the syntax returns ok. This technique is handy as it is common for Apache processes to get stuck from time to time on busy servers. This snippet deals with those scenarios after performing the humane stop request first.
httpd -t && (/scripts/restartsrv_apache stop; sleep 3; killall httpd php lsphp php-cgi; sleep 3; killall -9 httpd php lsphp php-cgi; /scripts/restartsrv_apache start) || echo Fix Apache Config and try again.
Toss this snippet into an alias called apache_rescue which you can add to your ~/.bashrc for easy access to this code. Below is a one-liner that will create this alias for you and load the modified profile in your current session. Once this alias is installed, it will always be available on that server by typing apache_rescue.
cat >~/.bashrc && source ~/.bashrc alias apache_rescue=’httpd -t && (/scripts/restartsrv_apache stop; sleep 3; killall httpd php lsphp php-cgi; sleep 3; killall -9 httpd php lsphp php-cgi; /scripts/restartsrv_apache start) || echo Fix Apache Config and try again.’ EOF
This concludes our process for installing mod_fcgid onto your cPanel system. It’s recommended to adjust FCGI settings from their default settings. Tune into our next tutorial where we’ll be advising on how to optimize FCGI for various environments.
Related Articles:
About the Author: Jason Potter
A veteran of the IT Support field, I have more than a decade of experience in systems administration, web hosting, and cPanel servers. I enjoy writing and providing complicated technical concepts in layman terms. On my free time, I enjoy playing several types video games, automation scripting and just living life with my wife and two kids.

Join our mailing list to receive news, tips, strategies, and inspiration you need to grow your business
How to Setup Apache with PHP/FastCGI on CentOS/RHEL 7/6
FastCGI functionality is very similar to working of CGI. FastCGI makes differences at few places than CGI like FastCGI processes are persistent and they can handle more than one request per process. FastCGI allows running programs on remote machines by multiplexes the environment information, standard input, output and error over a single full-duplex connection. Read more about FastCGI.
This tutorial will help you to set up Apache webserver with PHP and FastCGI on RedHat based systems.
Step 1 – Prerequsitis
Fast of all, enable REMI and EPEL yum repositories on your system. These repositories provide the lastest packages for RedHat based systems.
Step 2 – Install Apache2
Apache2 packages are available with the name HTTPD for Redhat based systems. You can use the following commands to install the latest available Apache2 (HTTPD) packages in configured repositories on your system.
Step 3 – Install PHP and FastCGI
After installing the Apache web server, let’s install PHP and FastCGI Apache module on your system. You can install any version of the required PHP or simply use the following command to install available PHP packages. This tutorial doesn’t include installing PHP modules, So you can also install required PHP modules.
yum install php php-cli mod_fcgid
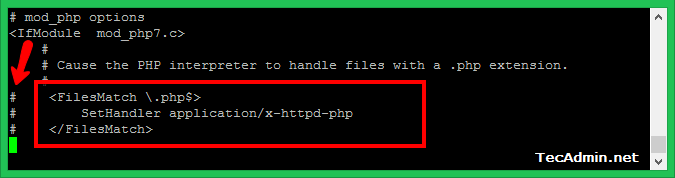
Step 4 – Disable Default PHP Handler
Before using PHP/FastCGI handler, you have to disable the default PHP handler on your system. Edit PHP configuration file for Apache (/etc/httpd/conf.d/php.conf) in your favorite text editor and comment following lines showing in below screenshot by adding the hash (#) sign at the start of the lines.
Step 5 – Setup FastCGI Handler
At this point we have successfully installed Apache FastCGI Module. Now nagigate to /var/www/cgi-bin directory, If not exists create directory. Then create a php.fastcgi file and add the following content to this file. Also make sure the php.ini file and php-cgi exist on your system.
vim /var/www/cgi-bin/php.fastcgi
#!/bin/bash PHPRC="/etc/php.ini" PHP_FCGI_CHILDREN=4 PHP_FCGI_MAX_REQUESTS=1000 export PHPRC export PHP_FCGI_CHILDREN export PHP_FCGI_MAX_REQUESTS exec /usr/bin/php-cgi
Change permissions of php.fastcgi script to make it executable by Apache server.
chown apache:apache /var/www/cgi-bin/php.fastcgi chmod +x /var/www/cgi-bin/php.fastcgi
Step 6 – Setup VirtualHost with FastCGI
Finally, create a VirtualHost in our Apache configuration file with FastCGI support. VirtualHosts are used to configure multiple sites with a single IP. Below configuration will allow siting svr1.tecadmin.net with any system IP on port 80.
ServerName svr1.tecadmin.net ServerAdmin [email protected] DocumentRoot /var/www/html ScriptAlias /cgi-bin/ "/var/www/cgi-bin/" Options +Indexes +FollowSymLinks +ExecCGI AddHandler php-fastcgi .php Action php-fastcgi /cgi-bin/php.fastcgi AllowOverride All Order allow,deny Allow from All
Step 7 – Restart Apache and Test Setup
At this point, you have completed the Apache configuration with FastCGI support. Let’s restart the Apache server using the following command.
Now create a file in your document root /var/www/html/info.php and add following content to check detailed php information.