- Урок 13. Основы JAVA. Методы обратного вызова (callback)
- Java Callback Function
- How Does Java Callback Function Work?
- Examples to Implement Java Callback Function
- Example #1
- Example #2
- Example #3
- Example #4
- Recommended Articles
- Callback methods in java
- Learn Latest Tutorials
- Preparation
- Trending Technologies
- B.Tech / MCA
- Javatpoint Services
- Training For College Campus
Урок 13. Основы JAVA. Методы обратного вызова (callback)
Механизм обратного вызова(callbacks) широко распространен в программировании. При обратном вызове программист задает действия, которые должны выполняться всякий раз, когда происходит некоторое событие. И неважно, будете разрабатывать только java-программы или android-приложения – колбеки будут встречаться вам повсюду.
Для создания методов обратного вызова (callback) в java используются уже знакомые нам из прошлого урока интерфейсы.
import javax.swing.*; public class SomeClass < // создаем колбек и его метод interface Callback< void callingBack(); >Callback callback; public void registerCallBack(Callback callback) < this.callback = callback; >void doSomething() < JOptionPane.showMessageDialog(null, "Выполняется работа"); // вызываем метод обратного вызова callback.callingBack(); >>
У интерфейса мы определили один метод callingBack(). Далее в классе мы создали объект интерфейса и инициализировали его в методе registerCallBack. В классе также был создан метод doSomething(), в котором может содержаться какой-то сложный код. Мы здесь создаем диалоговое окно, используя компонент JOptionPane библиотеки Swing. Кто не в курсе, Swing — библиотека для создания графического интерфейса программ на языке Java.
В конце работы метода doSomething() вызывается метод интерфейса callingBack() . В данном случае мы сами создали метод и знаем его код. Но во многих случаях, вы будете использовать готовый метод какого-то класса и можете даже не знать, что именно содержится в этом методе. Вам надо только знать, что такой метод существует и выполняет конкретную задачу.
Теперь нам нужен класс, реализующий интерфейс-callback. Создаем класс MyClass и подключаем интерфейс-колбек через ключевое слово implements. Среда разработки заставит нас реализовать шаблон метода интерфейса.
public class MyClass implements SomeClass.Callback < @Override public void callingBack() < System.out.println("Вызов метода обратного вызова"); >> Теперь мы можем использовать метод обратного вызова callingBack () для решения своих задач. Будем здесь выводить текст в консоль. Создадим класс Main, в котором будет реализован метод main – точка входа в программу.
Здесь создаем экземпляры классов, инициализируем колбек, передавая методу registerCallBack экземпляр MyClass, реализующий интерфейс-callback. И вызываем метод doSomething();
При старте программы будет выполняться код метода doSomething(); из класса SomeClass. На экране появилось диалоговое окно.

Когда мы нажмем кнопку, или закроем диалоговое окно, сработает метод обратного вызова callingBack(), который выведет сообщение в консоль.
package callback; import javax.swing.*; public class SomeClass < String replyTo; interface Callback< void callingBack(String s); >private Callback callback; public void registerCallBack(Callback callback) < this.callback = callback; >void doSomething() < int reply = JOptionPane.showConfirmDialog(null, "Вы программист?", "Опрос", JOptionPane.YES_NO_OPTION); if (reply == JOptionPane.NO_OPTION)< replyTo = "Нет"; >if (reply == JOptionPane.YES_OPTION) < replyTo = "Да"; >callback.callingBack(replyTo); > >
Изменим диалоговое окно – присвоим его новой целочисленной переменной reply, и изменим на showConfirmDialog, который имеет заголовок окна и больше одной кнопки ответа. В зависимости от нажатой кнопки переменной reply будет присвоено значение. Сравниваем ее значение с константой и присваиваем значение “Да” или “Нет” переменной replyTo.
package callback; public class MyClass implements SomeClass.Callback < @Override public void callingBack(String s) < if (s != null) < System.out.println("Ваш ответ: " + s); >else < System.out.println("Вы не ответили на вопрос!"); >> > Добавим аргумент в метод. И добавим условие проверки, что строка не пустая – это возможно, если вместо ответа просто закрыть диалоговое окно.
package callback; public class Main < public static void main(String[] args) < SomeClass someClass = new SomeClass(); MyClass myClass = new MyClass(); someClass.registerCallBack(myClass); someClass.doSomething(); >>
Запускаем программу. Теперь текст сообщения в консоли меняется в зависимости от того, выберем мы да, нет или просто закроем окно.

Я надеюсь, вы поняли принцип методов обратного вызова. Ниже есть ссылка на дополнительную информацию по колбекам, а также более сложные и познавательные примеры. Вопросы можно задавать в комментариях.
Java Callback Function
A callback is a mechanism when a reference that is passed to a function gets called when a particular event occurs in Event-driven programming. In cases of programming languages such as C, C++, the callback is attained by passing the function1 pointer to function2. As Java does not support pointers, the callback cannot be implemented like this. For that, interfaces are created and passed where the location of a function is referred. In this article, more details on the callback function will be discussed.
Web development, programming languages, Software testing & others
Below is the syntax of the callback function where an interface with a callback function is present. This method will be used later inside the class.
public interface interfaceA
How Does Java Callback Function Work?
Let us see how the callback function works in a simple manner.
- Create an interface With just one method callA().
- Create a method func1with A as a method parameter.
- Call callA()inside func1.
- Pass a new instance of A and override the method callA() for calling the func1.
- Use arrow notation as an alternative to the keyword news so that code looks cleaner.
Examples to Implement Java Callback Function
The following are some sample programs on java callback functions.
Example #1
Java program that prints text when the button is clicked.
//Create an interface clickeventhandlrinterfce for the callback method interface clickeventhandlrinterfce < //call method clickhndlr public void clickhndlr(); >//Create a callback handler ClickHandler that implements the clickeventhandlrinterfce interface class ClickHandler implements clickeventhandlrinterfce < //call method clickhndlr public void clickhndlr() < System.out.println("Hey. . . You have Clicked"); >> //Create class for event generator class Button < public void onClick(clickeventhandlrinterfce chndlr) < chndlr.clickhndlr(); >> public class CallBackFuncExample < public static void main(String[] args) < //create an object for btn2 Button btn1 = new Button(); //create an object for ClickHandler ClickHandler chndlr = new ClickHandler(); //pass the object of ClickHandler for performing the default operation btn1.onClick(chndlr); //create an object for button2 Button btn2 = new Button(); //For implementing own operation, pass the interface btn2.onClick(new clickeventhandlrinterfce() < @Override //method clickhndlr that displays output on clicking public void clickhndlr() < System.out.println("Hey. . . You have clicked a button"); >>); > >
Explanations: Firstly, create an object for button1, ClickHandler, and button2. Then pass the object of Click Handler for performing the default operation. After that, for implementing its own operation, pass the interface with a method clickhndlr that displays output on clicking. Once all these are done, create an interface clickeventhandlrinterfce for the callback method. Then, create a callback handler ClickHandler that implements the clickeventhandlrinterfce interface and, at last, creates a class for the event generator. On executing the code, two lines will be printed, as shown above in the sample output.
Example #2
Simple java program that implements callback function.
//class starts here public class CallBackFuncExample < //main method public static void main(String args[]) < //Function that passes interface name as parameter func1(new interfaceA() < //method callA public String callA() < return "HI, I AM FIRST CALL "; >> ) ; // function that passes interface name as parameter func1(new interfaceA() < //method callA public String callA() < return "HI, I AM SECOND CALL"; >> ) ; func1(() -> < return "HI, I AM THIRD CALL"; >); > public static void func1(interfaceA intr) < System.out.println("Method called here: " + intr.callA()); >public interface interfaceA < public String callA(); >>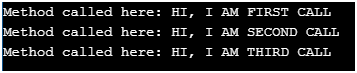
Explanations: In this program, an interface is created with just one method callA(). Then, another method, func1, is created with interfaceA as a method parameter. After that, call interfaceA.callA() inside func1. Once these steps are completed, pass a new instance of interfaceA and override the method callA() for calling the func1. Here an arrow notation is used as an alternative to the keywordnew so that code looks cleaner. On executing the code, it can be seen that three methods are called, and the results are returned, as shown in the figure above.
Example #3
Java program that implements callback function and prints a string.
//create an interface interface textprint < void samplefunc(String txt); >//create a class that implements the interface class classA implements textprint < //create a method samplefunc that takes a text as a parameter public void samplefunc(String txt) < System.out.println("The text is : " + txt); >> //main class public class CallBackFuncExample < // Reference to the textprint Interface textprint txtrcvr; CallBackFuncExample(textprint r) < txtrcvr = r ; >public void samplefunc2(String s) < txtrcvr.samplefunc(s); >//main method public static void main(String[] args) < // Create a object of the classA that implements the interface classA objA = new classA(); CallBackFuncExample obj2 = new CallBackFuncExample(objA); obj2.samplefunc2("Program runs successfully"); >>![]()
Explanations: In this program, create an interface and create a class that implements the interface. Inside that class, create a method samplefunc that takes a text as a parameter. Using the created class object, the method is called, and the string gets printed on executing the code.
Example #4
Java program that adds two numbers based on the class.
import java.util.Scanner; //create an interface interface interfaceA < double func1(); >// class A that implements the interface class A implements interfaceA < public double func1() < return 2500.0; >> //class B that implements the interface class B implements interfaceA < public double func1() < return 1500.0; >> class CallBackFuncExample < //MAIN METHOD public static void main(String[] args) throws ClassNotFoundException, IllegalAccessException, InstantiationException < //scanner object Scanner sc = new Scanner(System.in); System.out.println("Enter the class name"); String classnm = sc.next(); // object is then stored in cl Class cl = Class.forName(classnm); interfaceA intr = (interfaceA)cl.newInstance(); func2(intr); >static void func2(interfaceA intrfce) < double a = 2000.0; double b = intrfce.func1(); double sum = b + a; System.out.println("Total amount is :" + sum); >>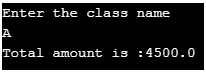
Explanations: In this program, the interface is created, and the class methods are called. Here, a sum of two amounts is found using the callback function based on the user input.
Recommended Articles
This is a guide to Java Callback Function. Here we discuss Java Callback Function’s concept through definition and their methods along with programming examples and their outputs. You can also go through our other suggested articles to learn more –
89+ Hours of HD Videos
13 Courses
3 Mock Tests & Quizzes
Verifiable Certificate of Completion
Lifetime Access
4.5
97+ Hours of HD Videos
15 Courses
12 Mock Tests & Quizzes
Verifiable Certificate of Completion
Lifetime Access
4.5
JAVA Course Bundle — 78 Courses in 1 | 15 Mock Tests
416+ Hours of HD Videos
78 Courses
15 Mock Tests & Quizzes
Verifiable Certificate of Completion
Lifetime Access
4.8
Callback methods in java
Learn Latest Tutorials


Preparation


Trending Technologies


B.Tech / MCA


Javatpoint Services
JavaTpoint offers too many high quality services. Mail us on h[email protected], to get more information about given services.
- Website Designing
- Website Development
- Java Development
- PHP Development
- WordPress
- Graphic Designing
- Logo
- Digital Marketing
- On Page and Off Page SEO
- PPC
- Content Development
- Corporate Training
- Classroom and Online Training
- Data Entry
Training For College Campus
JavaTpoint offers college campus training on Core Java, Advance Java, .Net, Android, Hadoop, PHP, Web Technology and Python. Please mail your requirement at [email protected].
Duration: 1 week to 2 week
Like/Subscribe us for latest updates or newsletter 


